Have fun with a few Summertime Crafting Projects!
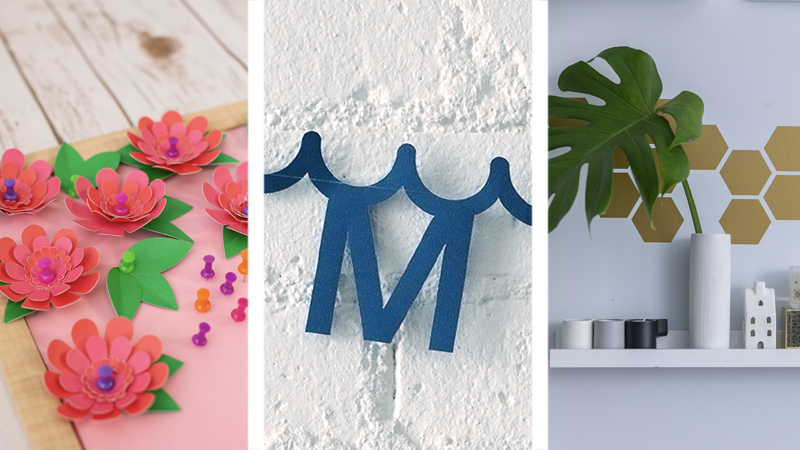
This month, we offer up some fun summertime projects like Honeycomb Wall Decals, Floral Bulletin Board, Summer Letter Garland. Try these projects today!
You will need:
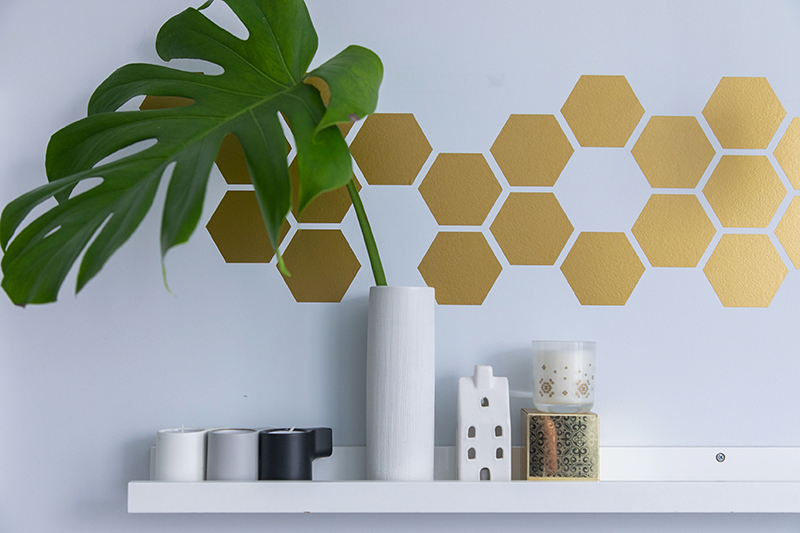
Honeycomb Wall Decals
ScanNCut, roll feeder, Brother vinyl (gold), transfer sheets
Floral Bulletin Board
ScanNCut, Colorful cardstock (variety of colors), tacks, bulletin board, glue
Summer Letter Garland
ScanNCut, Colorful cardstock (yellow + two contrasting colors), fishing line, needle
Steps for each project:
Honeycomb Wall Decals
- Set up your machine with the roll feeder + vinyl.
- Download the file “Honeycomb Wall Decals.fcm” to your machine.
- Cut out the pattern using the machine (cut settings should be automatically set to half cut).
- Weed out all extra vinyl from the cut-out designs.
- Roll out a length of transfer paper that matches the length of vinyl. Begin to separate the backing from the transfer paper and starting at one end, smooth the transfer paper over the top of the vinyl designs.
- Carefully peel back the paper vinyl backing from the sheet, so that the adhesive side is exposed.
- Align the transfer sheet with where you want to place the vinyl. Make sure that the wall is clean and smooth.
- Place the transfer sheet and use a straightedge to smooth it down over the surface of the wall.
- Peel off the transfer sheet, leaving the vinyl design adhered to the wall.
- Repeat steps 1-9 to create a repeating design if desired - the design can be layered on top of itself to repeat.
Floral Bulletin Board

- Download “BulletinBoard_Flowers.fcm” to your machine.
- Select the colors you’ll use for the flowers. This cut file contains pieces to make three flowers with alternating colors; you’ll want to align one of the colors on the top of the mat and one of the colors along the bottom.
- Cut out the flower pieces and set aside.
- Repeat steps 2-3 with two more cardstock colors.
- Download “BulletinBoard_Leaves.fcm” to your machine.
- Choose a green paper color and affix to the mat. Cut out the leaf shapes.
- Begin popping out the flower pieces into their more 3-D shapes; do this by layering the flaps of the petal shapes slightly on top of each other to make a slight conical shape. Glue the pieces in place.
- Use a pencil to add a curve to the petals.
- Layer the small, medium, and large pieces together to create the flower!
- Fold the leaf shapes slightly in the center to make them look more 3-D.
- Use tacks in the center of the flowers and on the corners of the leaves to add them decoratively to your bulletin board!
Summer Letter Garland

- Download “Summerbanner_Letters.fcm” to your machine.
- Select the color you’ll use for the letters. Affix a 12” x 12” sheet to the mat.
- Cut out the letters and set aside.
- Download “Summerbanner_Sun.fcm” to your machine.
- Use a yellow color of cardstock this time. Cut out the sun shape and set aside.
- Use a needle to pierce both ends of the wave portion on each letter, as well as two sides of the sun circle shape.
- Take a length of clear fishing line and thread it front-to-back of the left side of the first letter (“S”), around the backside of the cutout, and then back-to-front on the other side of the cutout.
- Repeat this process for the first three letters, then with the sun shape, and then for the last three letters.
- Tie off the fishing line in two knots at the beginning and end of the garland to secure the paper pieces.
- Hang up your garland wherever you desire!
Related Projects
Stay Connected
Follow Us
Brother Support
Corporate Information
Partnership Opportunities
About This Website
