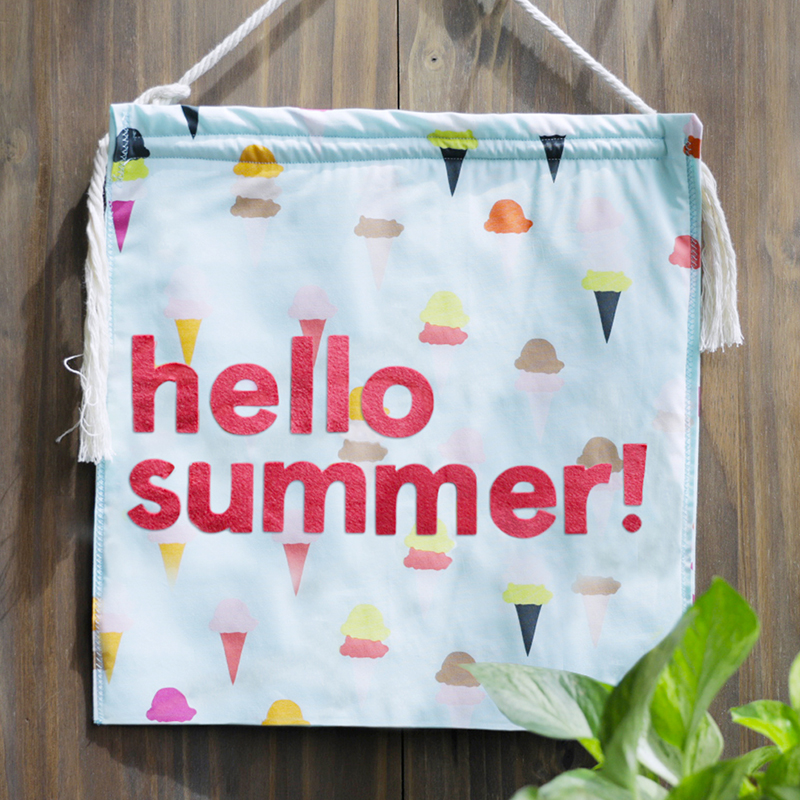
Welcome Summer with a Hello Summer! Banner
 Sunshine, blue skies and hot temps - give summer a big welcome with a warm and inviting Hello Summer banner! Make one today!
You will need: ScanNCut DX machine, Brother sewing machine, around 1 yard of colorful fabric, stiff felt, Brother iron-on appliqué sheets, thread, quilt batting, small 0.25” wooden dowel, yarn or rope, iron.
Steps:
- Measure and cut out a sheet of 13” w x 28” h fabric (to allow for a 1” seam allowance on 3 sides).
- Measure and cut out 12” x 12” of quilt batting.
- Using an iron, crease down 1” of fabric along the 2 long sides and one short side of the fabric, and at the 12” halfway mark on the long side, making a 12” x 12” final size. Make sure that the right side is facing out. Iron the rest of the fabric to make sure there are no wrinkles.
- Place the quilt batting on the inside of the fabric pocket, with the seam folds folding down around the quilt batting.
- Select a decorative stitch on your sewing machine and begin to sew on the two vertical sides of the 12” x 12” square (where the creases fold in on the inside and touch each other). We used the standard 0.25” setting. Make sure to backstitch at the beginning and end of each line of stitches.
- Using the leftover fabric, cut out a piece of 12” w x 1.5”h fabric. Fold all edges inwards by 0.25”, and iron down. Then fold and crease the fabric in half longways, securing with the iron again. The folded piece of fabric should measure about 11.5” w x 1” h.
- Place the fabric along the top edge of the banner (the 2 lines of stitches being perpendicular to it), as shown in the picture. Use a sewing machine to stitch two lines of stitches around 0.125” from the top and bottom edges. Make sure there is at least 0.5” of space between the 2 lines (this is where the dowel will go).
- Push the dowel through the pocket. Make sure its length aligns with the edges of the banner; if not, trim to fit.
- Tie yarn or rope to the two ends of the dowel. This will be how you hang the banner!
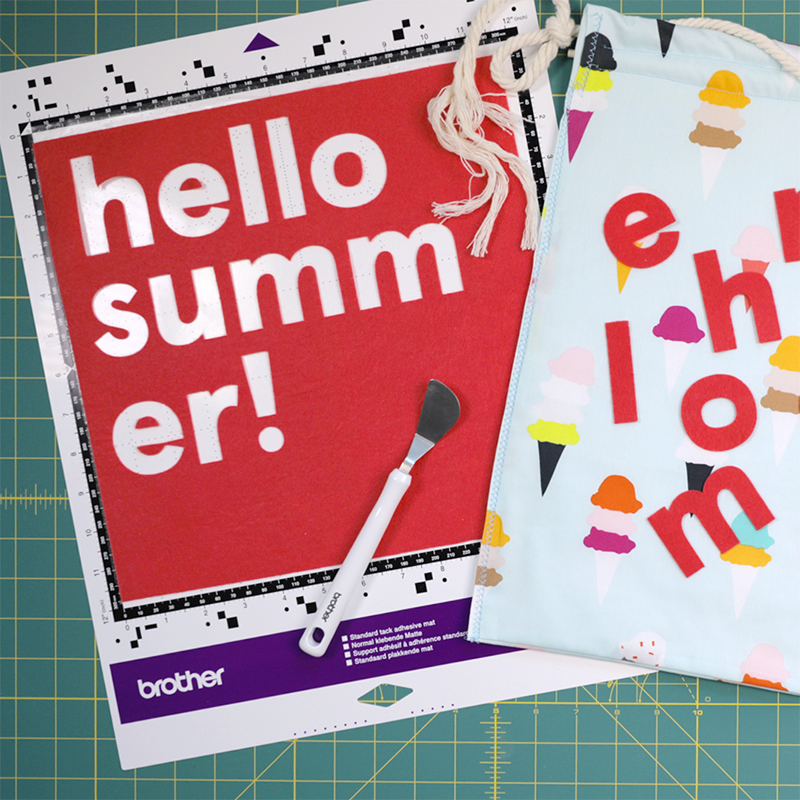
- Now it’s time to cut out the letters for the appliqué portion of the banner. Download “SummerBanner.fcm” to your machine.
- Get the iron-on appliqué sheets and affix the appropriate side to your stiff felt using a mat. This will be the iron-on adhesive backing. Follow the directions that come with the iron-on appliqué sheets.
- Stick the felt, adhesive-side down, onto the standard mat. Cut out the “hello, summer!” letter pattern.
- Remove all excess felt from the designs. Carefully peel up each letter, making sure that the adhesive remains on the back of the letter and doesn’t stick to the mat.
- Align each letter on the banner where you want them. Make sure everything is straight and where you want it.
- Use a scrap piece of fabric and lay it over the letters. Use an iron on a low setting to press the letters onto the fabric so that they bond to the fabric.
- You’re done! Display your creation and Welcome Summer!
Related Projects
Stay Connected
Follow Us
Brother Support
Corporate Information
Partnership Opportunities
About This Website
