How To Create an Art Journal That Shimmers
Brother Crafts Blogger
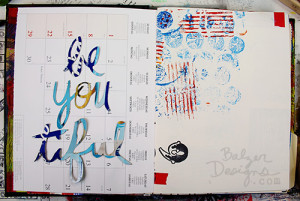
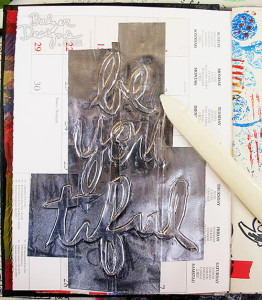
I love to use my ScanNCut when I art journal. I recently created this page in my art journal:
 The silver foil stars were cut with my ScanNCut, but not in the way you might think!
 Here's the easy peasey technique:
STEP ONE: Cut shapes from paper. For this tutorial I've used my ScanNCut to cut out some cuts of my handwriting. For the how-to on cutting your own handwriting with the ScanNCut, watch this tutorial:
I used my deep cut blade to cut up an old Equal box because I wanted my cuts to be thicker than paper.
Here's the easy peasey technique:
STEP ONE: Cut shapes from paper. For this tutorial I've used my ScanNCut to cut out some cuts of my handwriting. For the how-to on cutting your own handwriting with the ScanNCut, watch this tutorial:
I used my deep cut blade to cut up an old Equal box because I wanted my cuts to be thicker than paper.

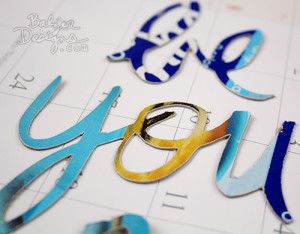 I used a "7" on my deep cut blade. Your machine may be different. Be sure to do a test cut first!
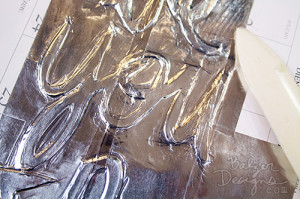
STEP TWO: Place foil tape over your shapes, slightly overlapping strips of tape.
I used a "7" on my deep cut blade. Your machine may be different. Be sure to do a test cut first!
STEP TWO: Place foil tape over your shapes, slightly overlapping strips of tape.

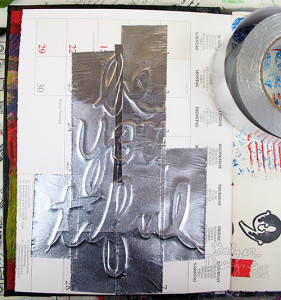 Foil tape (or duct tape) is something you can buy at the hardware store. I believe it's used for repairing duct work. You can also buy large sheets of adhesive backed foil from your craft store if you don't want seams.
STEP THREE: Rub well, especially down into the crevices of the paper underneath. Be careful not to pierce the tape.
Foil tape (or duct tape) is something you can buy at the hardware store. I believe it's used for repairing duct work. You can also buy large sheets of adhesive backed foil from your craft store if you don't want seams.
STEP THREE: Rub well, especially down into the crevices of the paper underneath. Be careful not to pierce the tape.
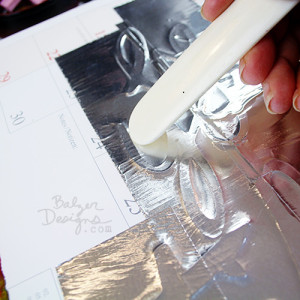 Usually I start with my finger and then move onto a tool like a bone folder.
 STEP FOUR: Paint over the top of the foil and allow the paint to dry. I used black gesso, but you could use any acrylic paint.
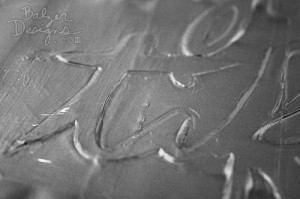 STEP FIVE: Once the paint is dry, sand it. Where the chipboard is underneath, the foil is raised and you will remove the paint when you sand it.
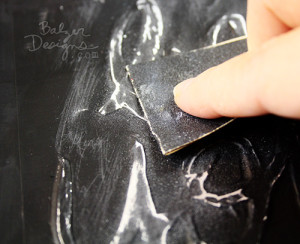 You can sand a lot or a little depending on the look you want.
 Note: If there are wrinkles in your foil tape, they will also catch the sandpaper. This is why it's important to spend some time smoothing everything down in step #3.
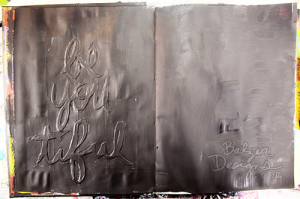
Here's the final result:
Note: If there are wrinkles in your foil tape, they will also catch the sandpaper. This is why it's important to spend some time smoothing everything down in step #3.
Here's the final result:
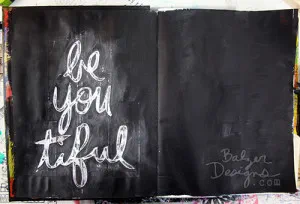 Pretty darn cool, right? In person, it really glows and shines!
See you next week!
Pretty darn cool, right? In person, it really glows and shines!
See you next week!
Related Projects
Stay Connected
* Required fields