Fun and Whimsical Antler Project
Opinion by Paid Consultant
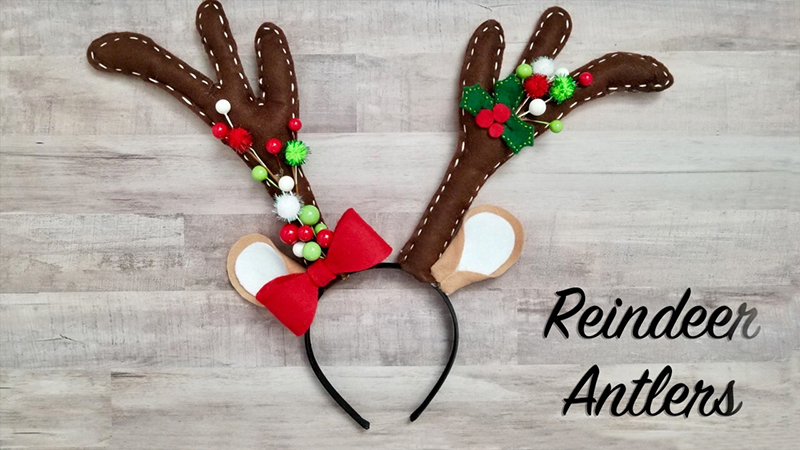
Tis the season for fun and whimsy! These antlers are fun to make since you can dress them up and embellish them any way you want. I can just picture someone making personalized ones for their whole family and then taking family photos for holiday cards…too cute!
Supplies:
- ScanNCutDX machine and accessories
- ScanNCut Brayer
- Craft Felt: 4 dark brown, 1 light brown, 1 white, 1 red, 1 green
- Hot Glue Gun and Glue
- Embroidery thread
- Embellishments
- FREE Cut File
Instructions:
- On your tablet in a drawing app, create a design and save it as a .jpg file.

- Open ScanNCut CanvasWorkspace, click on the main menu and select “project.”

Then click on the “image tracing” icon.

Select “normal tracing.”


Choose the .jpg file you created and click “ok”
Make any adjustments if needed.
To save it or transfer it to your ScanNCut machine, click the main menu button, select “download” and then choose “ScanNCut Transfer,” then “close.”


- On a Standard Cutting Mat, adhere your felt using the brayer. Place the mat between the guides and on your ScanNCut click the “load” button.

- Click on “retrieve data” then choose the Wi-Fi icon.

- Make any adjustments, such as deleting the patterns you are not cutting at this time.
You will need to cut the 4 antlers out using the dark brown felt, the large ear pieces on the light brown felt, the smaller ear pieces on white felt, the bow and holly berries on red felt and the holly leaves on green felt.
To delete patterns: click on “edit” and select the pattern you want to delete. Next click on the trash icon to delete it.

- To make sure your patterns are arranged properly to cut on the felt, click the “scan mat” icon, then “start.”


and then click on “edit” then “Object edit” to make any necessary changes.

To resize: click the “resize” icon and then click the + or – buttons.
To rotate: click the “rotate” icon and then choose how you want to rotate it.

When finished editing, click “ok” in all the screens and then select “cut.” Make sure the auto-blade is inserted into the blade holder.

- When finished cutting, unload the mat and remove the felt pieces.

- To get the pattern for the bow, in CanvasWorkspace, click on the “filter” icon, type in “bow” and select “all categories.” Click on the bow project and then click on the “edit in CanvasWorkspace” icon.


- Select the butterfly type pattern and delete it.

Select the bow, left click and choose “ungroup” and then click on the bow and drag it to a new location on the mat. The perforation marks should be left behind. Select all of them and delete them.


Send the bow pattern to the ScanNCut using ScanNCut Transfer.

- Cut out the bow.

- To get the pattern for the holly berries: go into “patterns” on the ScanNCut machine.

Choose the layered patterns icon, then choose the holiday icon.


Next choose the holly berries,

change the size if desired,

then select the “d” pattern and click “set” to add it to the mat. Next select “add” and select “e” and click “set to add it to the mat.

Send the patterns to the ScanNCut using ScanNCut Transfer.
Apply red felt to the cutting mat, insert it into the machine and cut the berries out.

- To get the pattern for the leaves: delete the berries and then choose “add” and select each of the leaves, “set” them on the mat, and then cut them out.

To assemble the antler headband:
- For the antlers… Add embroidery stitches to desired pieces of felt.

Using hot glue, glue the edges of each of the front and back antlers together leaving a large area open.

Stuff the inside of each antler and then continue to glue all the edges closed except for the bottom edge
Apply hot glue to the inside bottom edge and then adhere it to the headband. Repeat for the other antler.
- For the ears…
Apply a small amount of hot glue to the backside of the white ear and adhere it to the center of the light brown ear.
Apply hot glue to the left bottom corner of the ear and fold it to the bottom middle of the ear.
Apply hot glue to the right bottom corner of the ear and fold it to the bottom middle of the ear.
Apply hot glue to the bottom edge of the ear, fold it backwards and adhere it to the headband,
repeat steps for the other ear.

- For the bow…
Apply hot glue to each of the side tabs and then fold them in so the tabs adhere in the center. Wrap the long tab around the center of the bow and use hot glue to adhere it in place. Adhere it to the headband.

- For the leaves…

- Use hot glue to add any other embellishments to the headband.


Video Link
Related Projects
Stay Connected
* Required fields