Gift Wrapping with a Personal Touch
 Take your gift wrapping to the next level with your ScanNCut this holiday season!
You will need:
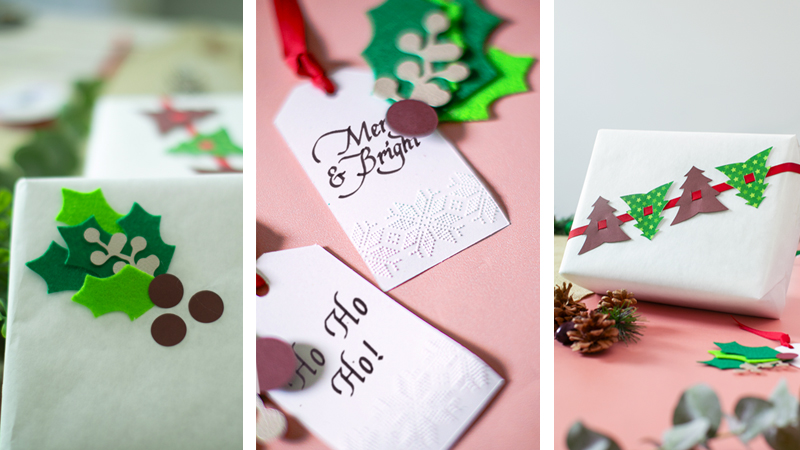
Textured Holly Sprigs • Stiff craft felt (green), metallic faux leather, deep red paper, hot glue, ScanNCut, Standard mat, High-Tack Fabric Support Sheet, Low-Tack mat • Holly Gift Embellishments.fcm • Red Holly.fcm • Green Holly.fcm Festive Tree Ribbon Embellishments • Cardstock in assorted colors, 0.5” ribbon, ScanNCut, Low-Tack mat • Tree Embellishments.fcm Paper Pierced Gift Tags • White cardstock, Paper Piercing Kit, ScanNCut, ribbon (for embellishment), Low-tack mat • Paper Pierced Tags.fcm Let's get Crafting! Steps for Textured Holly Sprigs 1. Download “Green Holly.fcm” to your machine. 2. Using the Standard mat and the High-Tack Fabric Support Sheet, apply a sheet of green craft felt to the mat. 3. Cut out the pattern and set aside. 4. Download “Holly Gift Embellishments.fcm” to your machine. 5. Using the Standard mat and the High-Tack Fabric Support Sheet, apply a sheet of metallic faux leather to the mat. 6. Cut out the pattern and set aside. 7. Download “Red Holly.fcm” to your machine. 8. Apply the red cardstock paper to the Low-Tack mat. 9. Cut out the pattern and set aside. 10. Next, gather all of the pieces and use hot glue to begin to assemble the holly sprigs together. Layer the felt, leather and paper on top of each other to create a dimensional look. 11. Use tape or hot glue to secure the finished holly sprigs to your gifts!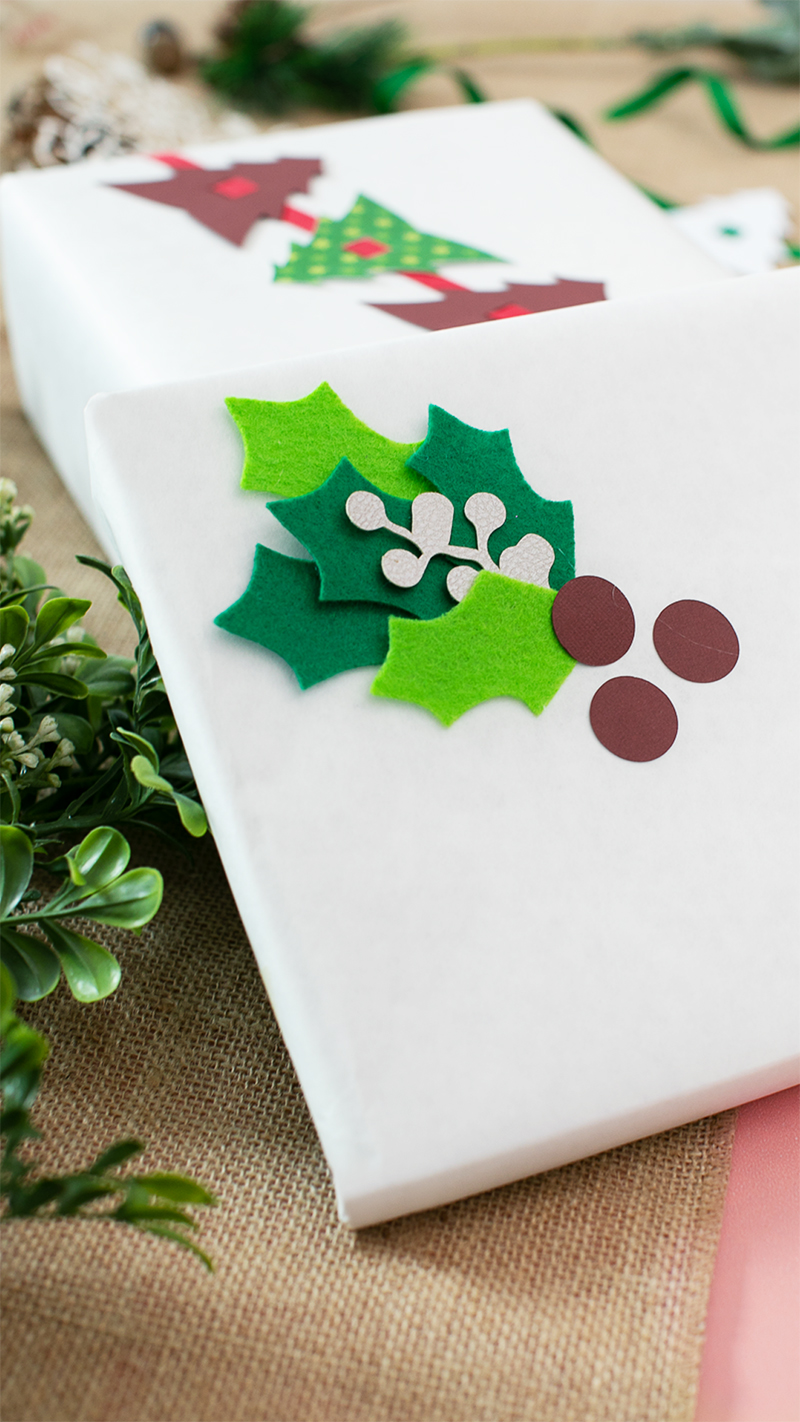 Steps for Festive Tree Ribbon Embellishments
1. Download “Tree Embellishments.fcm” to your machine.
2. Apply your cardstock paper to the Low-Tack mat.
3. Cut out the pattern.
4. Repeat steps 1-3 as desired with varied cardstock colors as desired to get a variety of colors.
5. Next, use ribbon to put the cutouts together. Thread the ribbon through the tab in the middle of each tree shape, making sure that each tree is spaced evenly from one another.
6. Repeat as desired to create the patterns and looks of your choice.
7. Done!
Steps for Festive Tree Ribbon Embellishments
1. Download “Tree Embellishments.fcm” to your machine.
2. Apply your cardstock paper to the Low-Tack mat.
3. Cut out the pattern.
4. Repeat steps 1-3 as desired with varied cardstock colors as desired to get a variety of colors.
5. Next, use ribbon to put the cutouts together. Thread the ribbon through the tab in the middle of each tree shape, making sure that each tree is spaced evenly from one another.
6. Repeat as desired to create the patterns and looks of your choice.
7. Done!
 Steps for Paper Pierced Gift Tags
1. Set up your Paper Piercing Kit with your machine, following all instructions.
2. Download “Paper Pierced Tags.fcm” to your machine.
3. Apply a sheet of white paper to the Paper Piercing mat.
4. Follow the instructions that come with the Paper Piercing Kit—using the Auto Blade, cut out the design first.
5. Then, switch out the Auto Blade for the 0.8mm Paper Piercing tool. Pierce the design. (This will likely take some time!)
6. Carefully remove the pierced design from the mat once finished.
7. Repeat steps 2-6 to create more tags if desired.
8. Loop a ribbon through the top hole of the tag and tie a knot neatly to secure.
9. You’re done! Use the custom tags to decorate your gifts.
Steps for Paper Pierced Gift Tags
1. Set up your Paper Piercing Kit with your machine, following all instructions.
2. Download “Paper Pierced Tags.fcm” to your machine.
3. Apply a sheet of white paper to the Paper Piercing mat.
4. Follow the instructions that come with the Paper Piercing Kit—using the Auto Blade, cut out the design first.
5. Then, switch out the Auto Blade for the 0.8mm Paper Piercing tool. Pierce the design. (This will likely take some time!)
6. Carefully remove the pierced design from the mat once finished.
7. Repeat steps 2-6 to create more tags if desired.
8. Loop a ribbon through the top hole of the tag and tie a knot neatly to secure.
9. You’re done! Use the custom tags to decorate your gifts.

Related Projects
Stay Connected
* Required fields