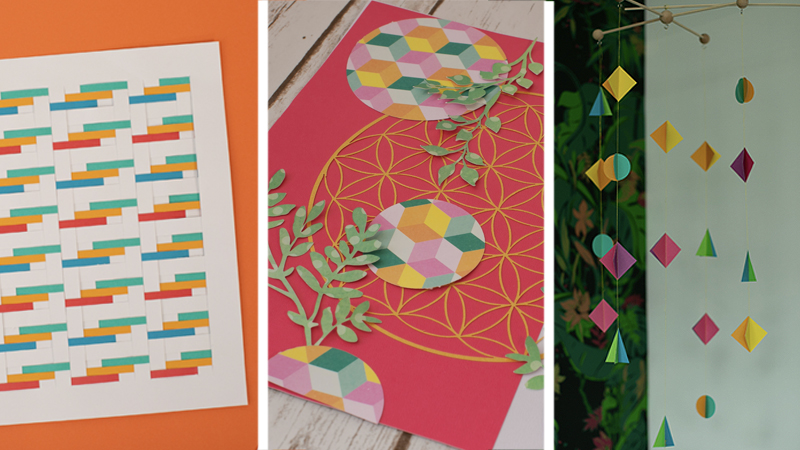
Long Weekend Crafting: 3D Paper Mobile, Paper Weaving, Modern Collage
Got a long weekend ahead of you? Why not get out your ScanNCut and try these fun crafting projects.
You will need:
3D Paper Mobile
Colorful cardstock (4 sets of 2 contrasting colors)
Wooden mobile frame (can also use thin wooden dowels tied together for a DIY version)
ScanNCutDX
Sewing Machine
Brightly colored thread
Needle
Paper Weaving
White cardstock, 12” x 12”
4 pieces of differently-colored cardstock or paper, 12” w x 6”h (at least)
ScanNCut
Modern Collage
Various colors of cardstock
Decorative patterned papers
Adhesive (non-toxic glue works well)
Steps:
3D Paper Mobile

- Open up the built-in patterns function on your machine. Create 10 copies of each of these shapes: circle, triangle; and 20 copies of a diamond shape. Make sure each shape is no more than 1.5” -- 2” in height.
- Cut out the shapes using 2 cardstock colors per shape. For example, you should have 5 circles in color 1 and 5 circles in color 2, and so on. Use 4 paper colors for the diamond shape. Set aside each shape.
- Pair up each cutout with a matching shape in a contrasting color. You should now have 20 pairs of shapes set aside. For each shape pair, stack one shape on top of the other.
- Use a sewing machine to begin sewing the shapes together down their centers, making sure to backstitch at the beginning to set the stitches.
- Once you finish sewing one shape, don’t cut the thread. Let the machine continue sewing for about 4 inches, creating a stitched thread. Make sure to keep light tension on the thread by pulling on it from the back.
- After there is a 4 -inch string created, feed the next pair of shapes into the machine and stitch them together down the middle.
- Repeat steps 4-6 until you have created a chain of 4 different shapes. Backstitch on the last shape pair and cut the thread, removing from the machine.
- Repeat steps 4-7 four more times to create a total of 5 shape chains.
- Use a needle and thread of the same color you sewed with to pierce the top of the first shape and pull the thread through. Tie off the thread and use it to hang the shape strand from the mobile.
- Repeat step 9 with the remaining shape strands.
- Hang up your beautiful mobile!
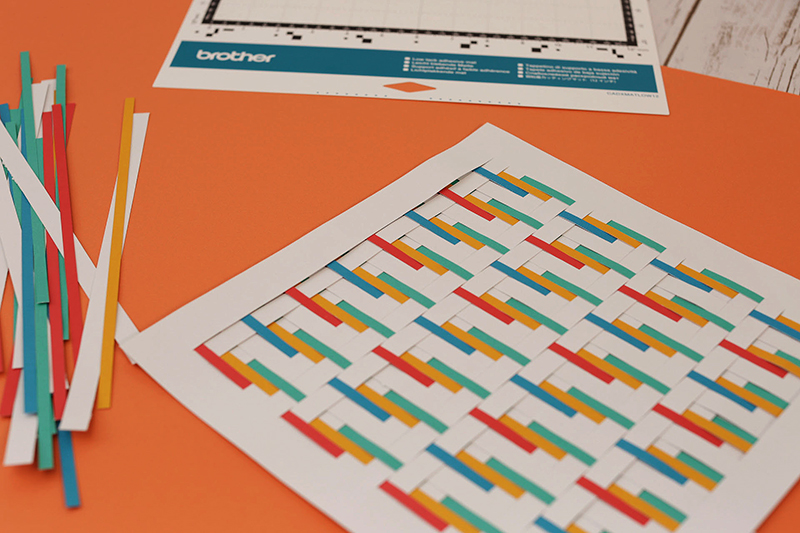
Paper Weaving
- Download “PaperWeaving_Warp.fcm” to your machine.
- Place a 12” x 12” piece of white cardstock onto your mat.
- Cut out the design. This piece will be the “warp” to your weaving - it makes up the basis of the weaving. Set aside.
- Download “PaperWeaving_Strips.fcm” to your machine.
- Choose your 4 separate colors of cardstock and make sure they are stuck to the mat in a way that is aligned with the cut files on the machine’s screen. Use the scanning function if needed.
- Cut out the strips. Make sure you have a good collection of all 4 colors and set aside.
- Now it’s time to make the weaving! Feel free to experiment with patterns and colors to create your own design. The basic pattern we followed is as follows:
- Working right to left, weave a strip over 3 vertical pieces, under 2. Repeat until the end of the row.
- Weave the next strip under 1 piece, over 3, under 2. Repeat until the end of the row.
- Weave the next strip under 2, over 3. Repeat until the end of the row.
- Weave the next strip under 1, over 3, under 2. Repeat until the end of the row.
- Repeat steps 8-11 to create your pattern. Vary the colors you use and experiment to make a weaving that’s unique to you!
Modern Collage

- Collect your decorative/patterned papers. Think about what colors you want to feature and what type of compositions you might play with. You can also use recycled papers like newspaper or magazines for an interesting effect.
- Download “Collage_Circles.fcm” to your machine. Cut out the patterns
- Repeat step 2 with the files “Collage_Grid.fcm” and “Collage_Foliage.fcm.” Feel free to explore the machine’s built-in patterns as well and cut out anything that you like.
- Gather the cut-out pieces and begin to arrange on a 12” x 12” paper surface. Play with the colors and shapes you have available to create a composition that you like.
- When you settle on a look that you like, take a photo with your phone! This will help you put the collage back together in this final phase.
- Begin to glue down the pieces, working carefully so as to not disturb your design too much. Refer back to the photo you took to get everything right.
- Once everything is pasted down, make sure that there are no loose edges.
- Done!
Related Projects
Stay Connected
* Required fields