Working with Fabric
The ScanNCut machine is unique in the sense that it was built for cutting both paper and fabric. As we all know, there are many differences between paper and fabric; the biggest difference being the thickness of the material. Because of this, we recommend you start all your projects by performing a test cut to check that your machine’s settings are to the needs of the material. For best results, we recommend starting your settings a little lower than what you think may be right for your material, and then work your way up from there. This will help prevent you from cutting through or damaging your mat.
There are a few things to keep in mind when cutting fabric with the ScanNCut machine. First, take a good look at your material. Is it a loose weave or a tight weave? Will it require stabilizer to maintain its shape or will it cut fresh off the bolt? The ScanNCut machine not only works well with most fusibles and stabilizers, but it also has the ability to create clean cuts from non-treated fabric when using the fabric mat system.
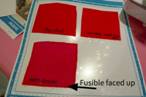
When working with fabric, it is important to take into consideration what you are using your cut designs for. If you are using your cuts for appliqué, then you may want to prepare your material with fusible beforehand. When cutting, and you are working with a dry fusible, we recommend placing it on your mat with the fusible side face up (if you have a design that requires specific orientation, you can always mirror image your design directly on the ScanNCut machine’s LCD display screen before cutting).
Now that you have an understanding of what you should take into consideration before beginning your cut, it is time to prepare your mat and machine. Since quilting cotton is a common material that is used for both quilting and appliqué, we will use it as an example for this post. It is important to keep in mind, however, that you should adjust your machine settings and start with a test cut when using different types of material.

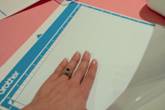
Begin by preparing your mats with the fabric mat system (a standard mat with a fabric support sheet). When applying the fabric support sheet to the mat, start by placing the glossy side down on the top of your standard cutting mat. Don’t forget to smooth out any bubbles that may be present after applying the fabric support sheet. (Note: The fabric support sheet is meant to be used multiple times and can easily be cleaned with unscented alcohol-free baby wipes.)

Prior to cutting your fabric, make sure that any preparations (iron, starch, fusible) that you would like done are completed before you begin. Place the fabric on the mat. (As mentioned earlier, if you are using a dry fusible, place face up and press out any wrinkles, bubbles or creases). Once your fabric is secure on your mat it is ready to cut.


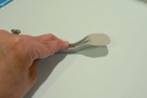
The cut outs above are about 2" in size. As you can see, the details of the design are great – even with the fabric that wasn’t pre-treated prior to cutting. In addition, this cotton is quite an open weave.


The basic fabric settings that we have seen work well in our demonstrations are standard blade depth “3”, cut pressure “6” and cut speed “1” (the “Quick Start Guide” suggestions work well, too). Always remember to begin by creating a test cut. Keeping a cut journal of all of your successes will allow you to have a guide to work off of when you begin a new project with the ScanNCut machine.
Related Projects
Stay Connected
* Required fields