Bon Voyage Luggage Tag with Free Design

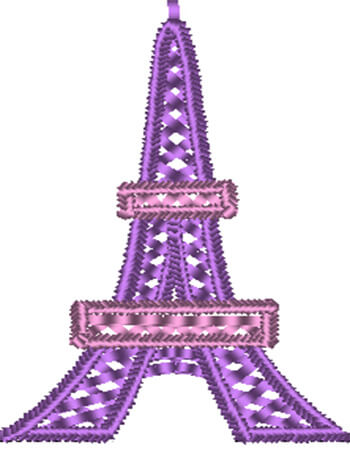
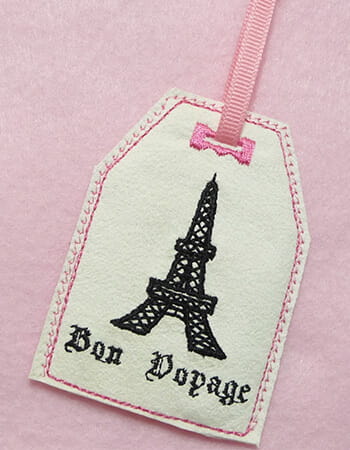
Whether you're traveling takes you near or far, travel is always more fun when you accessorize your luggage. Create this luggage tag using the Brother PE Design software program and decorate it with a Brother free design of the month, a beautiful Paris emblem. Just follow the step-by-step instructions to create your own custom crafted luggage tag. This also makes a fabulous gift!
Materials and Supplies
- Brother Sewing and Embroidery Machine with 4-inch hoop capability
- SA541 Brother light weight water soluble stabilizer
- SA190 Brother Non-Stick roller foot
- Brother Embroidery Thread and Bobbin Thread
- Brother PE Design Embroidery Software
and instruction manual. (Use the manual to familiarize yourself with the Layout and Editing tools, as well as the menu and icons.) PE Design 10 is featured in this article
.
- Basic sewing notions including all-purpose thread for sewing
- One piece of grosgrain ribbon measuring ¼-inch wide X 10-inches long.
- Faux suede or another non-ravel fabric such as firm felt for luggage tag, one piece measuring approximately 2 ½-inches wide X 3 ½-inches long.
- Firm felt for back side of luggage tag, one piece measuring approximately 3 ½-inches wide X 4 ½-inches long.
- Clear vinyl (12 gauge), for back side of luggage tag, one piece measuring approximately 3 ½-inches wide X 4 ½-inches long.
- Brother Free Design - Paris Emblem - Download Here
:
Steps to Create Luggage Tag
- Open the Layout & Editing portion of the PE-Design program. Select Option > Design Page Property. Select the 4-inch hoop size. Select View tab to change Grid Setup. Check boxes as shown.

- Create a rectangular shape to use as a placement line for the tag piece as follows:
- Select shapes from the Home tab, choose rectangle.
- Change to outline only with a straight stitch.
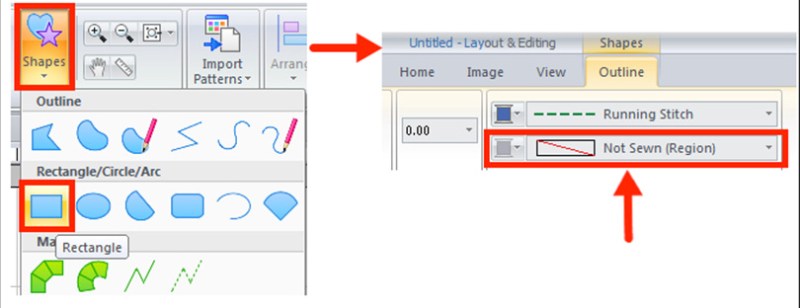
- Click and drag to draw a rectangle to the approximate size.
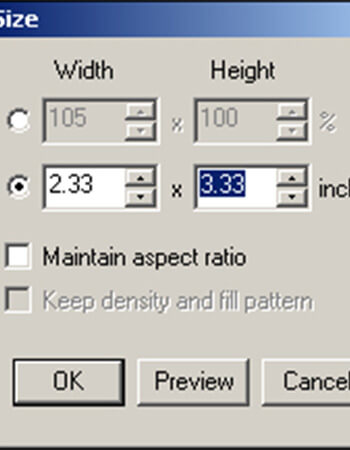
- Right click on the selected shape to use size option and set size at 2.33 X 3.33 inches.
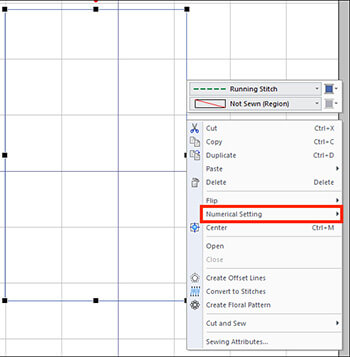
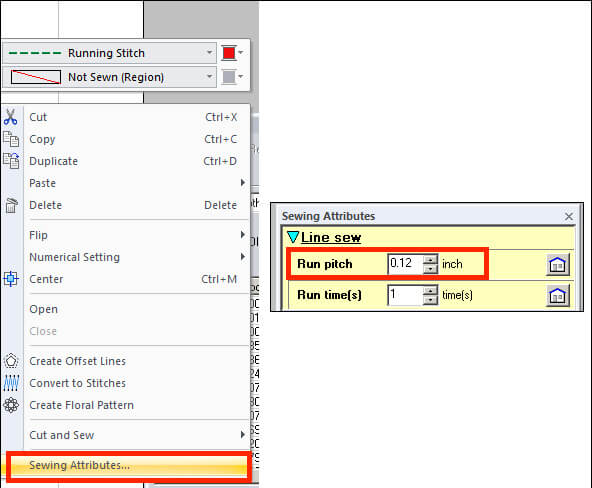
- Right click on the selected shape to change attributes for a longer stitch length. See below:
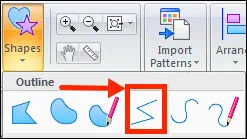
- To draw the outline for the tag, select the Outline tool from the Home tab, and then select the Open Straight Line tool.
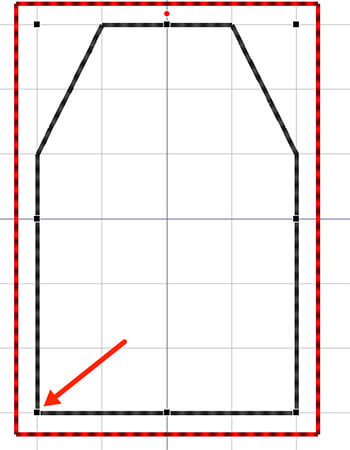
- This time select the Triple running stitch for the Line Sew Type. Draw the shape of the tag as shown, using the grid lines as a guide, and beginning and ending at the red arrow. Selecting the snap to grid option will make it east to draw straight and even lines. Double click to close the shape.
 Turn off the Snap to Grid option.
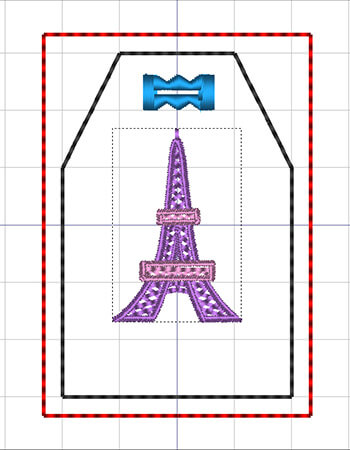
- To add a buttonhole at the end of the tag, select File > Import, from the top menu. Select the Design Library icon. Click on the arrow and choose Button Hole (S) from the drop down menu. Choose a decorative buttonhole to add to your tag. See Figure #6. Reposition the buttonhole near the tapered end of the tag.
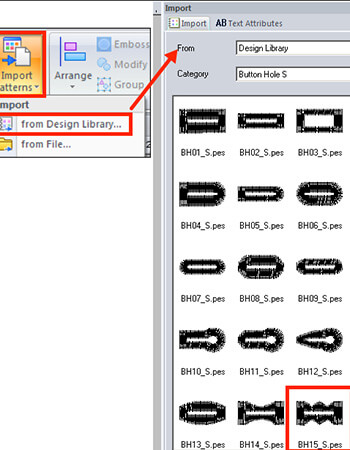 Click Import again and import the free design from the designated location on your computer.
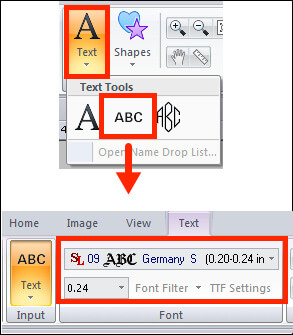
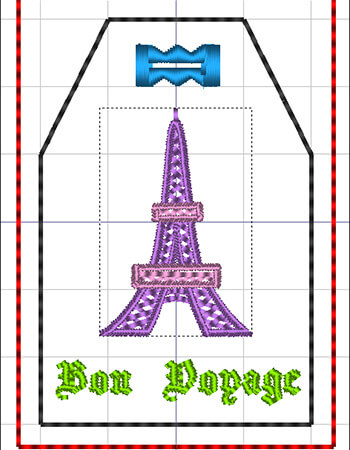
- Add a set of initials or the words “Bon Voyage” by using the Text tool. The featured lettering here is from the small font menu. See below:
 Note: Change thread colors for each segment to create a stop between colors on multi needle machines. Align all segments as desired then save and transfer to the machine.
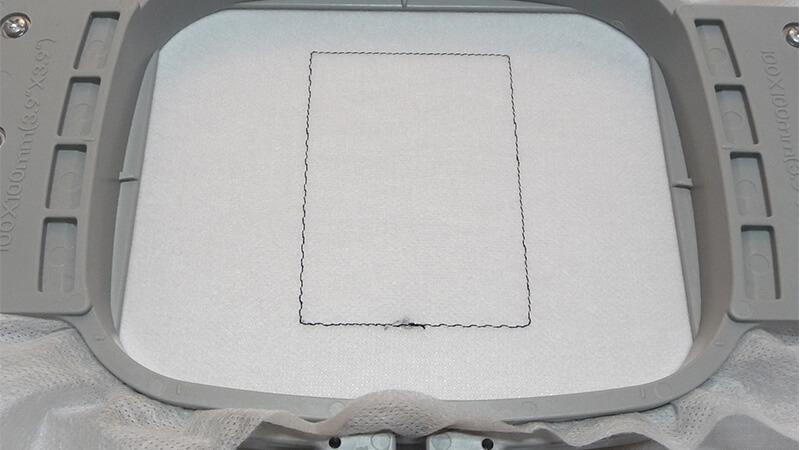
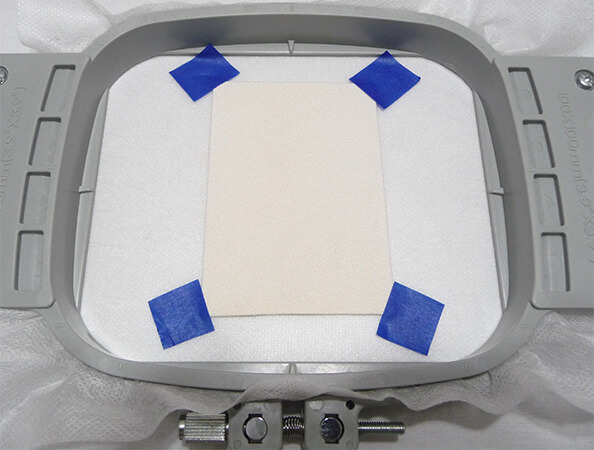
- To embroider tag, hoop water-soluble and stitch the rectangle. Place tag piece over the lines. Tape close to edges.
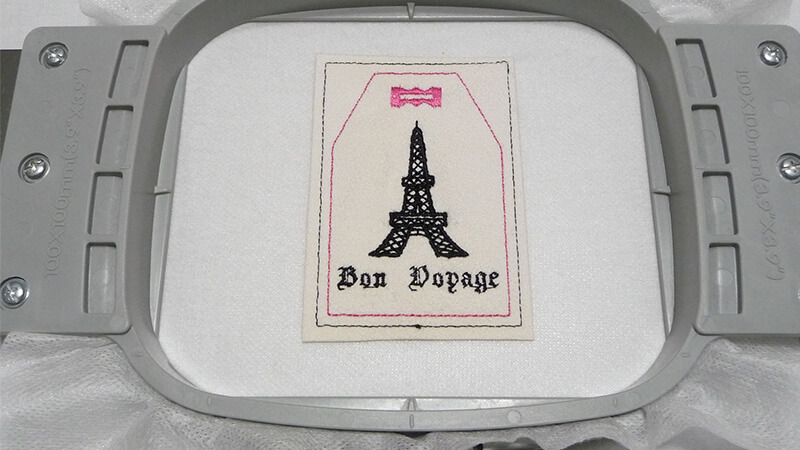
- Back up and stitch outline a second time. Embroider remaining motifs with desired colors.
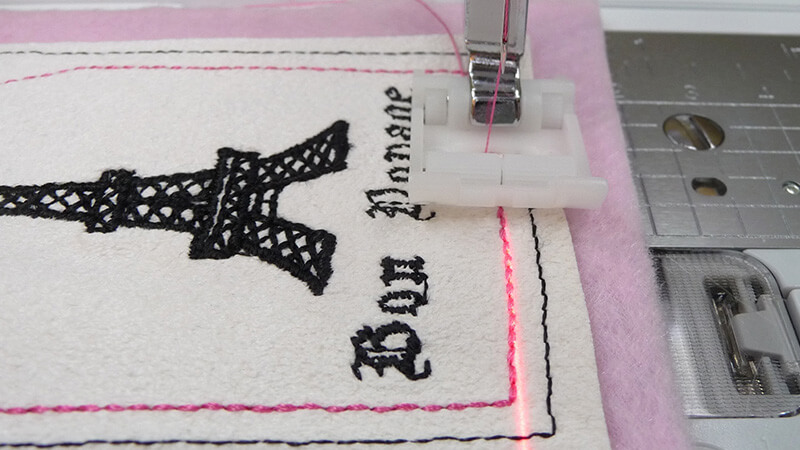
- Set up machine for sewing with non-stick roller foot. Place a layer of felt under the embroidered tag and stitch along shape of tag outline.
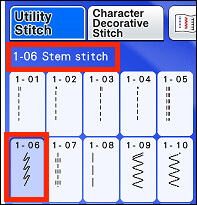
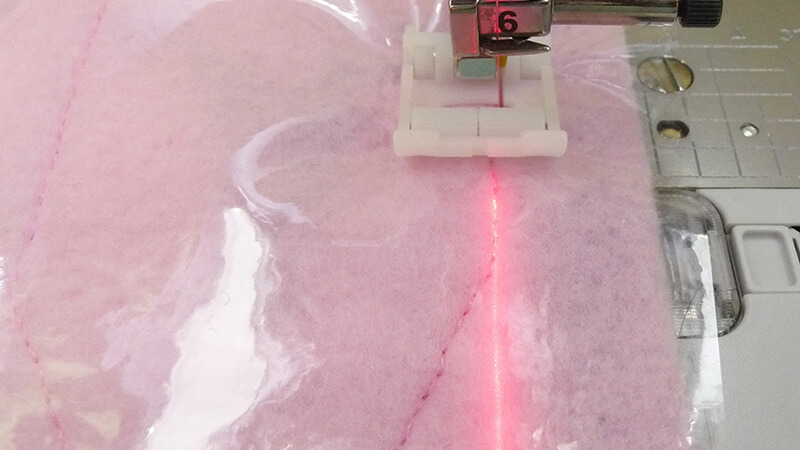
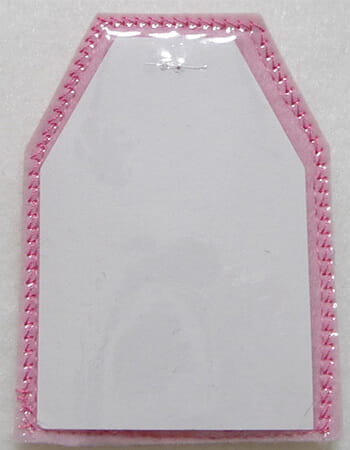
- Turn tag over and layer clear vinyl on top. Stitch around shape using a narrow zig zag or a stem stitch, leaving the bottom open to insert your printed name, address, etc.

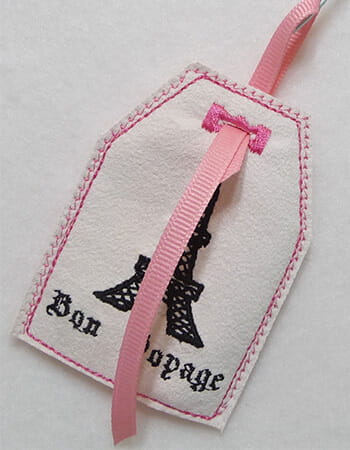
- Carefully trim around tag, trimming away rectangle. Cut heavy paper for contact information and slip inside the opening. Cut buttonhole open, cutting through all layers. Insert ribbon and tie to finish.
 We'd love to see your Luggage Tags! Be sure to tag us on Facebook
and Instagram
at #StitchingSewcial and @BrotherSews so we can follow along on your sewing journey!
- Brother Sewing and Embroidery Machine with 4-inch hoop capability
- SA541 Brother light weight water soluble stabilizer
- SA190 Brother Non-Stick roller foot
- Brother Embroidery Thread and Bobbin Thread
- Brother PE Design Embroidery Software
and instruction manual. (Use the manual to familiarize yourself with the Layout and Editing tools, as well as the menu and icons.) PE Design 10 is featured in this article
. - Basic sewing notions including all-purpose thread for sewing
- One piece of grosgrain ribbon measuring ¼-inch wide X 10-inches long.
- Faux suede or another non-ravel fabric such as firm felt for luggage tag, one piece measuring approximately 2 ½-inches wide X 3 ½-inches long.
- Firm felt for back side of luggage tag, one piece measuring approximately 3 ½-inches wide X 4 ½-inches long.
- Clear vinyl (12 gauge), for back side of luggage tag, one piece measuring approximately 3 ½-inches wide X 4 ½-inches long.
- Brother Free Design - Paris Emblem - Download Here
:

Steps to Create Luggage Tag
- Open the Layout & Editing portion of the PE-Design program. Select Option > Design Page Property. Select the 4-inch hoop size. Select View tab to change Grid Setup. Check boxes as shown.

- Create a rectangular shape to use as a placement line for the tag piece as follows:
- Select shapes from the Home tab, choose rectangle.
- Change to outline only with a straight stitch.

- Click and drag to draw a rectangle to the approximate size.
- Right click on the selected shape to use size option and set size at 2.33 X 3.33 inches.


- Right click on the selected shape to change attributes for a longer stitch length. See below:

- To draw the outline for the tag, select the Outline tool from the Home tab, and then select the Open Straight Line tool.

- This time select the Triple running stitch for the Line Sew Type. Draw the shape of the tag as shown, using the grid lines as a guide, and beginning and ending at the red arrow. Selecting the snap to grid option will make it east to draw straight and even lines. Double click to close the shape.
 Turn off the Snap to Grid option.
- To add a buttonhole at the end of the tag, select File > Import, from the top menu. Select the Design Library icon. Click on the arrow and choose Button Hole (S) from the drop down menu. Choose a decorative buttonhole to add to your tag. See Figure #6. Reposition the buttonhole near the tapered end of the tag.
 Click Import again and import the free design from the designated location on your computer.

- Add a set of initials or the words “Bon Voyage” by using the Text tool. The featured lettering here is from the small font menu. See below:
 Note: Change thread colors for each segment to create a stop between colors on multi needle machines. Align all segments as desired then save and transfer to the machine.

- To embroider tag, hoop water-soluble and stitch the rectangle. Place tag piece over the lines. Tape close to edges.


- Back up and stitch outline a second time. Embroider remaining motifs with desired colors.

- Set up machine for sewing with non-stick roller foot. Place a layer of felt under the embroidered tag and stitch along shape of tag outline.

- Turn tag over and layer clear vinyl on top. Stitch around shape using a narrow zig zag or a stem stitch, leaving the bottom open to insert your printed name, address, etc.


- Carefully trim around tag, trimming away rectangle. Cut heavy paper for contact information and slip inside the opening. Cut buttonhole open, cutting through all layers. Insert ribbon and tie to finish.


 We'd love to see your Luggage Tags! Be sure to tag us on Facebook
and Instagram
at #StitchingSewcial and @BrotherSews so we can follow along on your sewing journey!
- Open the Layout & Editing portion of the PE-Design program. Select Option > Design Page Property. Select the 4-inch hoop size. Select View tab to change Grid Setup. Check boxes as shown.
- Create a rectangular shape to use as a placement line for the tag piece as follows:

- Select shapes from the Home tab, choose rectangle.
- Change to outline only with a straight stitch.
- Click and drag to draw a rectangle to the approximate size.
- Right click on the selected shape to use size option and set size at 2.33 X 3.33 inches.
- Right click on the selected shape to change attributes for a longer stitch length. See below:


- To draw the outline for the tag, select the Outline tool from the Home tab, and then select the Open Straight Line tool.
- This time select the Triple running stitch for the Line Sew Type. Draw the shape of the tag as shown, using the grid lines as a guide, and beginning and ending at the red arrow. Selecting the snap to grid option will make it east to draw straight and even lines. Double click to close the shape.
- To add a buttonhole at the end of the tag, select File > Import, from the top menu. Select the Design Library icon. Click on the arrow and choose Button Hole (S) from the drop down menu. Choose a decorative buttonhole to add to your tag. See Figure #6. Reposition the buttonhole near the tapered end of the tag.
- Add a set of initials or the words “Bon Voyage” by using the Text tool. The featured lettering here is from the small font menu. See below:
- To embroider tag, hoop water-soluble and stitch the rectangle. Place tag piece over the lines. Tape close to edges.
- Back up and stitch outline a second time. Embroider remaining motifs with desired colors.
- Set up machine for sewing with non-stick roller foot. Place a layer of felt under the embroidered tag and stitch along shape of tag outline.
- Turn tag over and layer clear vinyl on top. Stitch around shape using a narrow zig zag or a stem stitch, leaving the bottom open to insert your printed name, address, etc.
- Carefully trim around tag, trimming away rectangle. Cut heavy paper for contact information and slip inside the opening. Cut buttonhole open, cutting through all layers. Insert ribbon and tie to finish.

 Turn off the Snap to Grid option.
 Click Import again and import the free design from the designated location on your computer.


Note: Change thread colors for each segment to create a stop between colors on multi needle machines. Align all segments as desired then save and transfer to the machine.


 We'd love to see your Luggage Tags! Be sure to tag us on Facebook
and Instagram
at #StitchingSewcial and @BrotherSews so we can follow along on your sewing journey!

