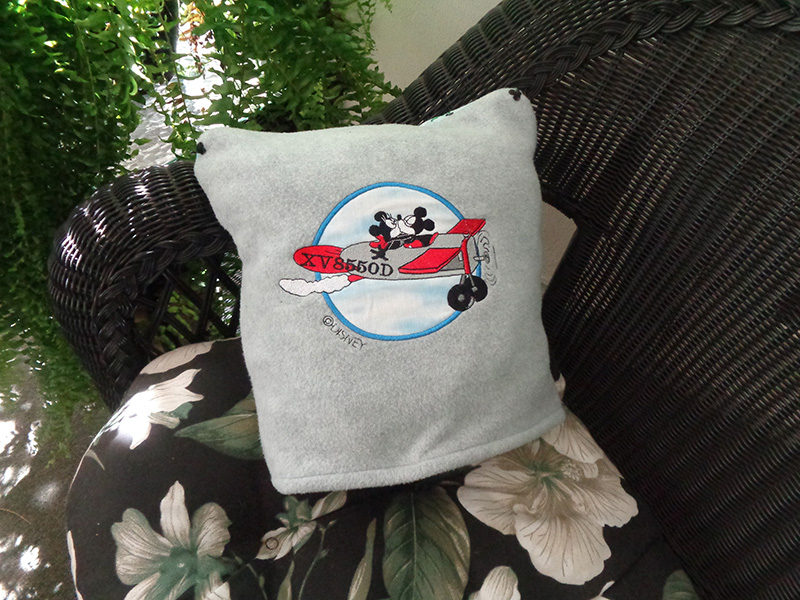
Comfy and Cozy Fly Away Quillow
A quillow is a unique and wonderful thing to have on hand anywhere. What is a quillow? A quillow is a pillow which unfolds into a “quilt” or blanket. With THE Dream Machine
or a Brother Disney embroidery/sewing combo,
you can make one which will be a welcome gift for anyone. This one is fleece lined with an aircraft-themed quilting fabric. For airline passengers, aviation fans and the growing number of pilots with their own personal planes, a quillow is especially handy. But once it transforms into a blanket, there is no pillow. So, a matching pillow completes this set. The cute iBroidery.com
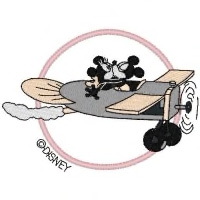
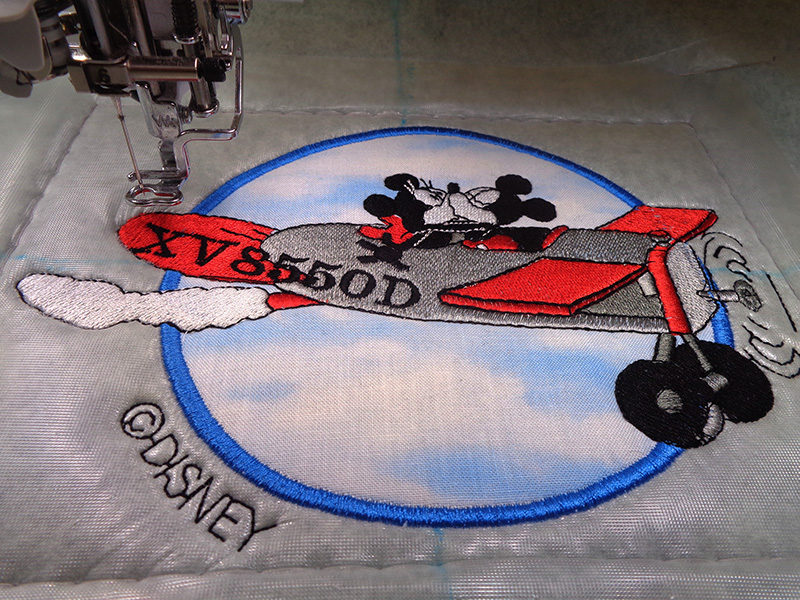
design with Mickey Mouse and Minnie Mouse flying off into the wild blue yonder in their bi-plane
inspired this project. Adding your machine model ID for tail numbers contributes a bit of whimsey. For owners of their own personal aircraft, a quillow gift with their tail numbers really makes them grin. A few small biplane embroideries hold the layers together. Use of the MuVit foot, the laser beam and easy editing on THE Dream Machine
make this a fun, easy and relatively quick project. So, let’s fly into it!
Quillow Requirements
- THE Dream Machine
or other Disney combo sewing/embroidery machine - Optional but oh so helpful: A walking foot or the MuVit foot SA196
—for excellent info on use and adjustment of this foot, see my dear friend Joanne Banko’s post here - iBroidery.com design item number: 200811214 Classic Mickey and Minnie:
Resized to 5.38 x 7.42
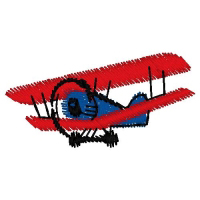
- iBroidery.com Item Number: 200810101 Air:
Size used as downloaded Width: 1.25 Inches Height: 0.62 Inches
- 2.5 yds. gray fleece gray fleece
- 3 yds. 45” biplane fabric for quillow backing, pocket backing and pillow front and backs
- 10” square of cloud fabric for appliqué
- Threads: embroidery, general sewing
- Optional: monofilament for free motion quilting on pillow top
- 10-20 office supply dot stickers, 10-20 small safety pins
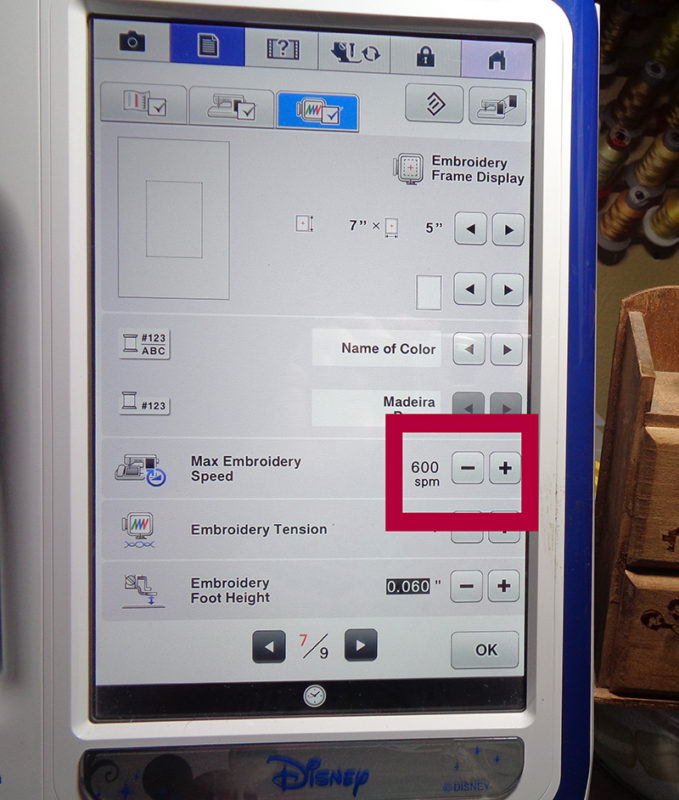
- Brother SA5810
medium weight tearaway stabilizer - Water soluble stabilizer (wss) for top covering of embroidery on fleece pocket fleece. The small biplane embroideries did not require wss on the fleece used for this project, but other, higher loft fleece might. Do a stitch rehearsal to see if it is necessary.
- Optional: 6 tiny black buttons
Pillow Requirements
- 16” Pillow form and extra poly-fil to stuff in floppy corners of embroidered pillowcase
- Optional: 16” square of light weight batting for free motion around some or all planes
- 72” X 2” strip of gray fleece
- (2) 20” x 16” pieces of airplane fabric
Pocket Directions:
1. Remove selvages from fleece and biplane fabric. 2. Cut a 16” strip down one side of fleece, leaving a 40-45” width, depending on the width of the fleece. From this, cut a 16” square from one end. 3. Load Classic Mickey and Minnie design into machine. 4. Edit size. The design downloads at Width: 3.71 Inches Height: 2.69 Inches and fits in the 4x4 frame. It was enlarged on THE Dream Machine to 5.38” x 7.42”, requiring the 7” x 12” frame or 8” x 8” frame if you have it. Of course, you may resize the design to fit your frame of choice or leave it sized for the 4x4 frame.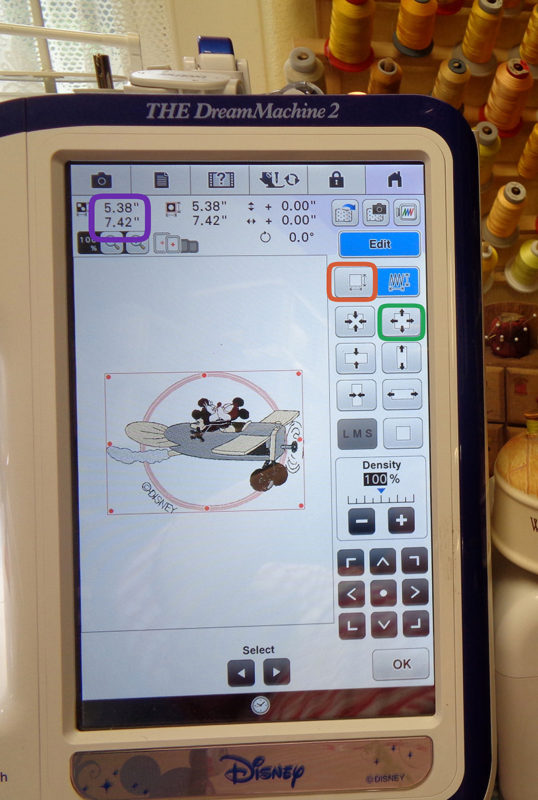 5. Change color of appliqué circle to blue in the EDIT menu. Change wing and other beige features to red in the same manner.
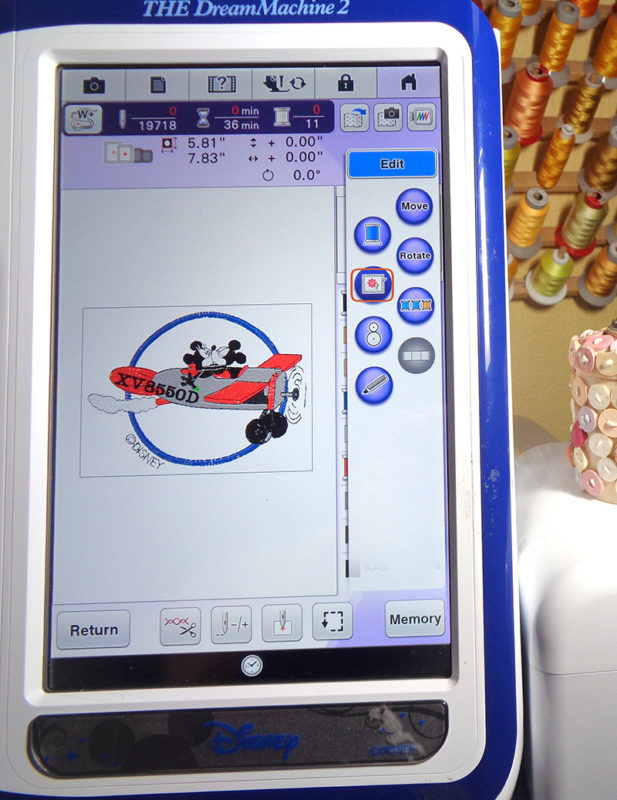
 6. Add tail numbers. Built in alphabet #2 was used, selecting the smallest size. It was then rotated to a position that did not overlap Minnie or Mickey. Smaller letter sizes are available in PE-Design
or BES 4.
7. Add basting frame.
 8. Adjust height of the embroidery foot to compensate for the thickness of the fleece.
 9. Cut a 16” square from the fleece strip. Mark vertical center and place horizontal center ¾” above the true center. When positioned upright, the pocket curves under at the bottom. Moving the design up causes it to present as if the design were in the center. Press onto Brother adhesive stabilizer.
10. Insert Brother 5810 tearaway stabilizer in frame. Spray lightly with a temporary adhesive. Center the design in the frame and press to adhere the fleece.
11. Cover fleece with wss and pin in place outside the design area.
12. Begin embroidery with basting frame. Take care to embroider tail numbers last.
9. Cut a 16” square from the fleece strip. Mark vertical center and place horizontal center ¾” above the true center. When positioned upright, the pocket curves under at the bottom. Moving the design up causes it to present as if the design were in the center. Press onto Brother adhesive stabilizer.
10. Insert Brother 5810 tearaway stabilizer in frame. Spray lightly with a temporary adhesive. Center the design in the frame and press to adhere the fleece.
11. Cover fleece with wss and pin in place outside the design area.
12. Begin embroidery with basting frame. Take care to embroider tail numbers last.
Note 1: For basting frame, use thread the same color as the fleece. The locking stitches at the beginning and end of the basting frame are tight and often difficult to remove from fleece. Using matching thread makes leftover fibers unnoticeable.
Note 2: The fleece used in this project required that the basting frame be repeated and stitched twice. On the first round, the first several stitches didn’t bite down through the fleece. Repeating the basting made the fleece secure in the hoop before embroidering. This may not be necessary with other fleece.
13. Use blue thread to stitch appliqué position (color stop #2). Place cloud fabric over the stitched area.
Note: It is helpful to apply a little spray adhesive to the cloud fabric before placing it. It is also helpful to drop the speed in order to control the appliqué fabric more easily.
14. Stitch cloud in place.
15. Trim cloud fabric to within a few threads outside the stitching. Reset speed to your normal preference. Work satin stitch around the cloud fabric. Continue with embroidery of design.
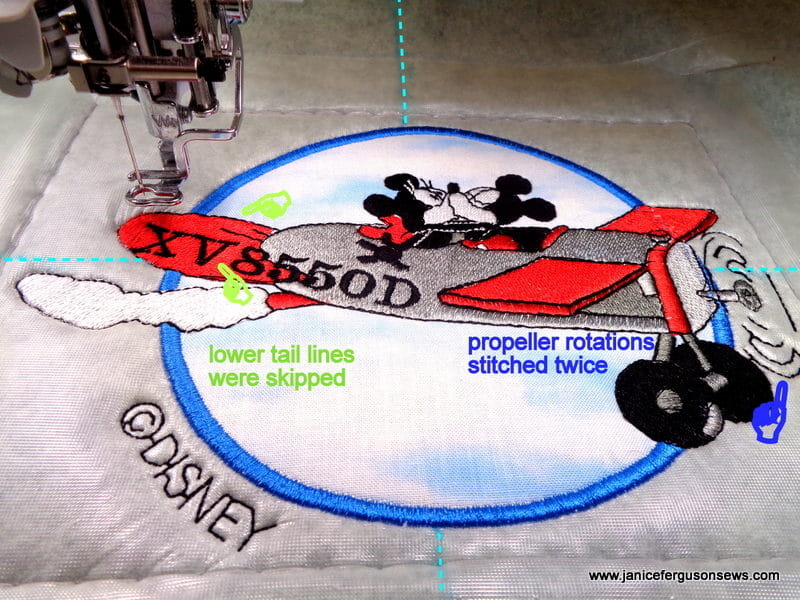
Note 1: Three lower lines on tail were skipped. They interfered with the tail numbers.
Note 2: Propeller rotations were stitched twice. On practice stitch out, those stitches pulled out when the wss was removed. Restitching them made them hold.
Note 3: The loft of the fleece seemed to cause poor coverage of the black stitches. On the final piece, a heavier black thread was used.
16. Compare final pocket with practice piece to see improvements.
 17. Make certain that the tail numbers are embroidered last. Remove fleece from hoop and remove tearaway stabilizer as much as possible.
18. Cut 16” square from biplane fabric.
19. Place fleece and 16” airplane fabric right sides together. Pin generously around the perimeter.
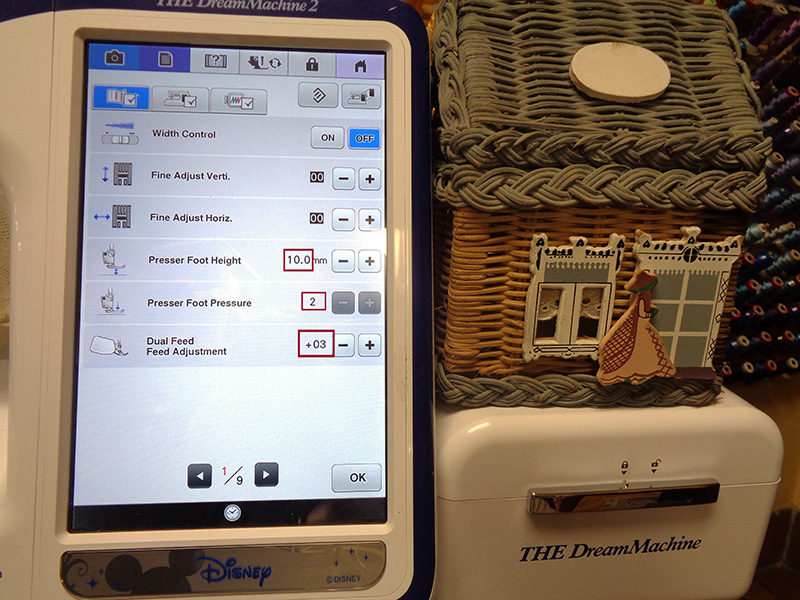
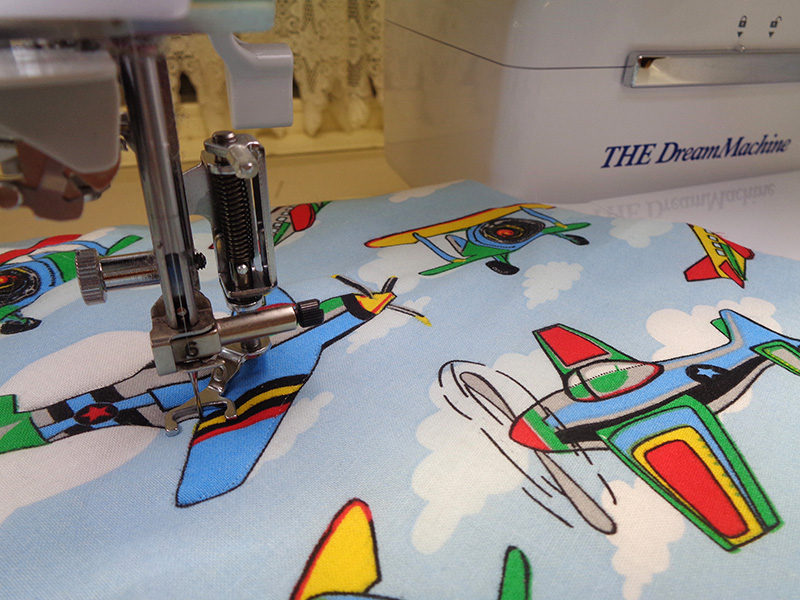
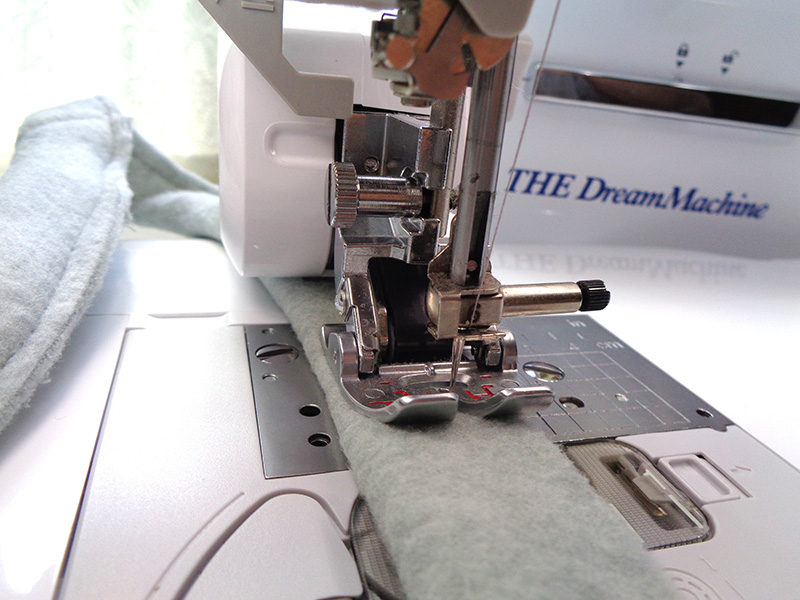
20. Attach MuVit foot and use fleece scraps to adjust settings for even feed. For this particular fleece and quilting cotton, these settings worked well.
17. Make certain that the tail numbers are embroidered last. Remove fleece from hoop and remove tearaway stabilizer as much as possible.
18. Cut 16” square from biplane fabric.
19. Place fleece and 16” airplane fabric right sides together. Pin generously around the perimeter.
20. Attach MuVit foot and use fleece scraps to adjust settings for even feed. For this particular fleece and quilting cotton, these settings worked well.
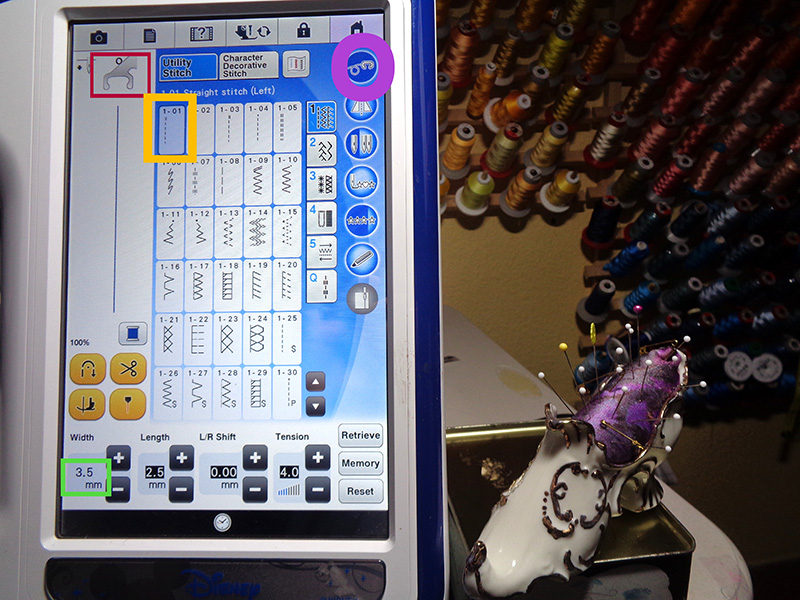
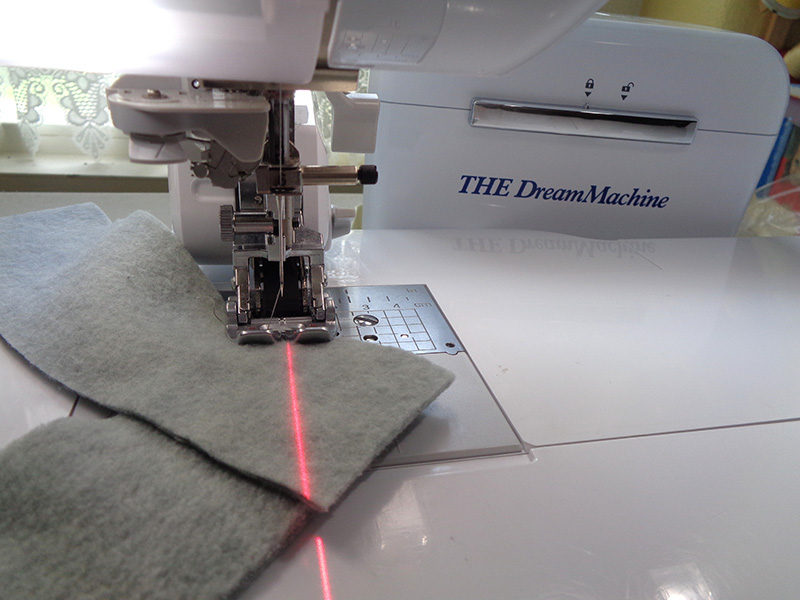
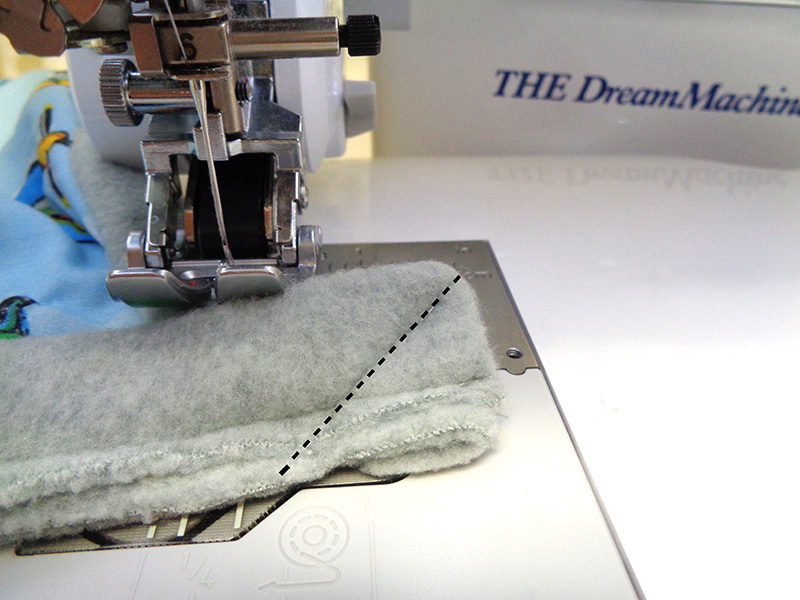
 21. Select straight stitch # 1-01 and move needle position to center, 3.5. Place the fleece on top. The outer edge of the MuVit foot was guided along the raw edge of the quilting cotton.
22. Engage laser to be in alignment with the center of the MuVit foot.
21. Select straight stitch # 1-01 and move needle position to center, 3.5. Place the fleece on top. The outer edge of the MuVit foot was guided along the raw edge of the quilting cotton.
22. Engage laser to be in alignment with the center of the MuVit foot.
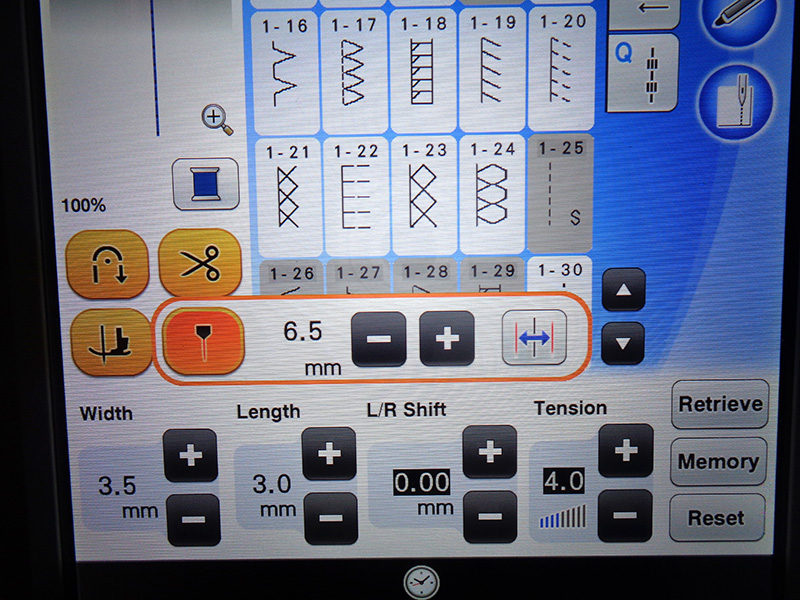
Note: Notice that greyed out stitches cannot be used with the MuVit foot.
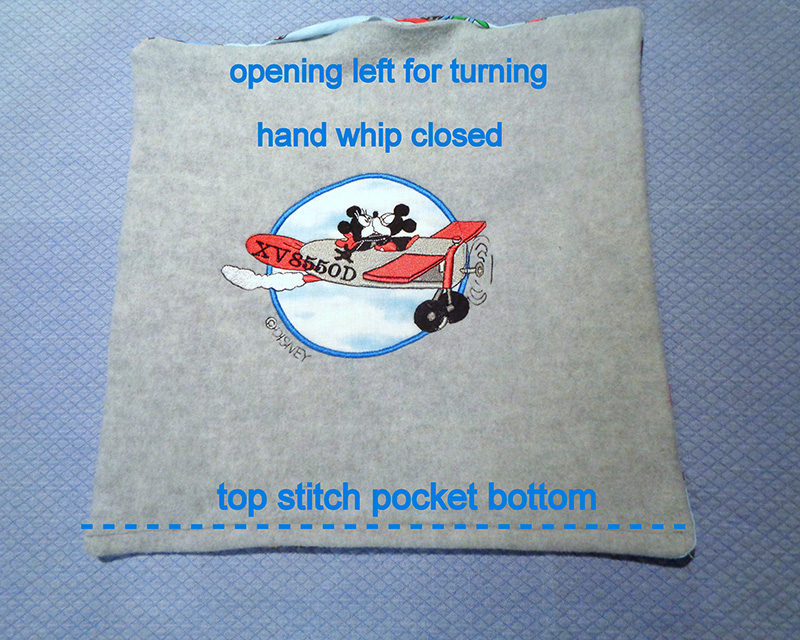
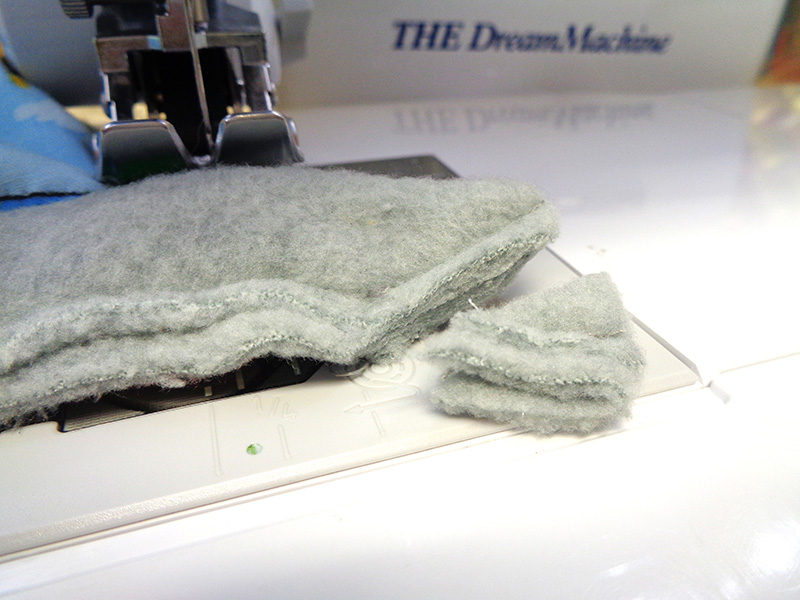
23. Straight stitch around the perimeter, taking a few diagonal stitches at corner for sharper points. Leave an opening for turning right side out.
24. Trim the corners to remove bulk.
25. Pull seamed piece through opening. Hand stitch the opening closed.
26. Top stitch at the pocket bottom.
27. Put the pocket aside.
Quillow Construction
1. Place fleece and airplane fabric right sides together with fleece on top. Smooth the fleece almost taut. 2. Trim airplane fabric to the size of the fleece. Generously pin layers together around the perimeter. 3. Leave MuVit foot attached and laser engaged. Select straight stitch # 1-01 and move needle position to center, 3.5. The outer edge of the MuVit foot is guided along the raw edge of the fleece. Check frequently to see that the airplane fabric has not shifted away from the matching fleece edge. 4. Straight stitch around the perimeter, taking a few diagonal stitches at corner for crisper corners. Leave an opening for turning right side out. 5. Trim the corners to remove bulk. 6. Pull seamed piece through opening. Hand stitch the opening closed. 7. Place quillow flat and generously pin the layers together around the perimeter. 8. Straight stitch around the perimeter with MuVit foot attached, fleece facing up, and laser function engaged.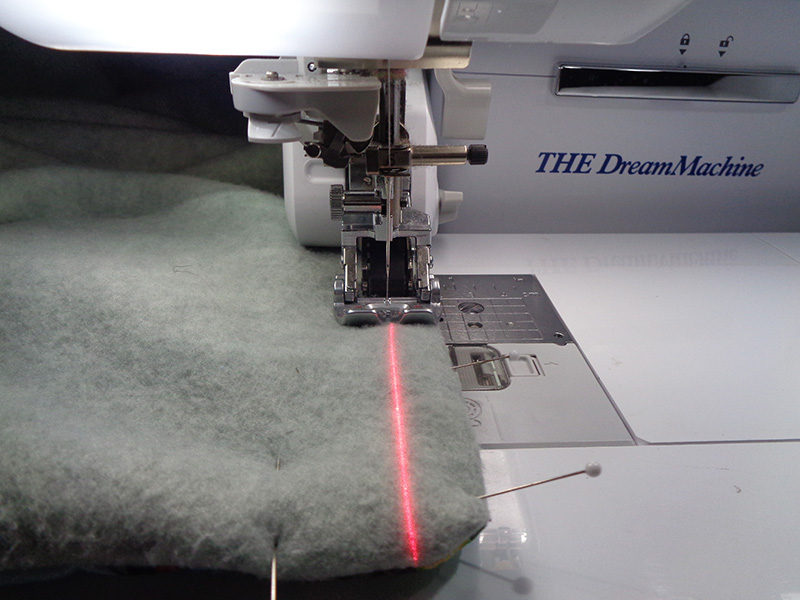 9. Center 16” square of airplane fabric (to be used later for the stand-alone pillow) at the edge of one short side. This marks off the area where the pocket will be placed.
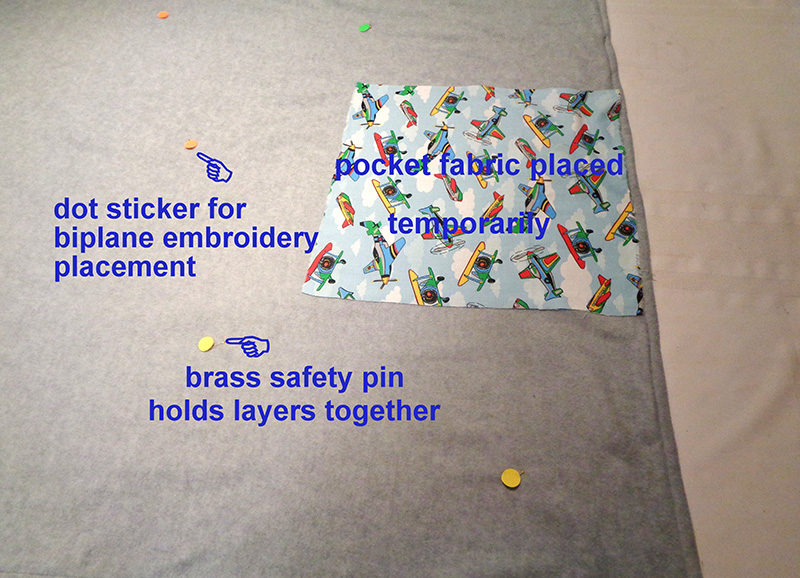
10. Place dot stickers where biplane will be embroidered. Place a small pin through both fabrics to prevent shifting of layers before quillow is taken to the embroidery machine.
9. Center 16” square of airplane fabric (to be used later for the stand-alone pillow) at the edge of one short side. This marks off the area where the pocket will be placed.
10. Place dot stickers where biplane will be embroidered. Place a small pin through both fabrics to prevent shifting of layers before quillow is taken to the embroidery machine.
Biplane Embroidery
11. Load iBroidery biplane design into machine. Add basting frame. 12. Hoop Brother medium-weight, tearaway stabilizer SA5810. 13. Insert Brother 5810 tearaway stabilizer in the frame. Spray lightly with a temporary adhesive and press one of the “dot” designs against the stabilizer.Note: By placing the first biplane embroidery in the most upper left position of the frame, it was possible to embroidery 5-7 designs in the same frame. After the first embroidery was complete, by removing the basting frame stitches and carefully tearing the biplane away from the stabilizer, I was able to move the design over on the screen, stitch the basting frame onto the stabilizer to be certain enough “stable” stabilizer remained. Next, another “dot” design was moved to that area and embroidered. It was possible to continue in this manner until several biplane designs were stitched in one hooping.
Pocket Attachment
14. Place quillow piece on flat surface with airplane lining right side up. 15. Center pocket on one short end with embroidered side facing down with nose of plane pointing down. This is counter intuitive, I know, but otherwise the open end of the quillow (think of it as a pillowcase) will be at the top of the embroidery instead of the bottom. [caption id="attachment_21249" align="aligncenter" width="800"]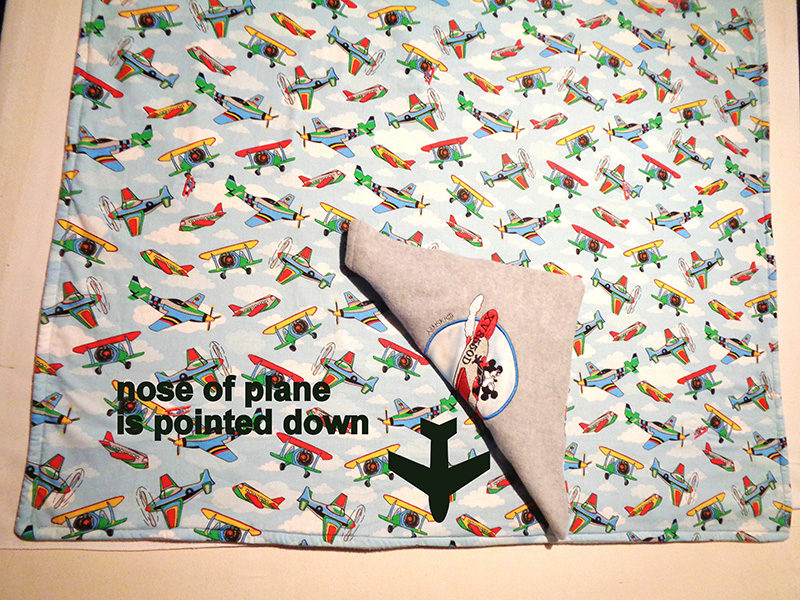 pock[/caption]
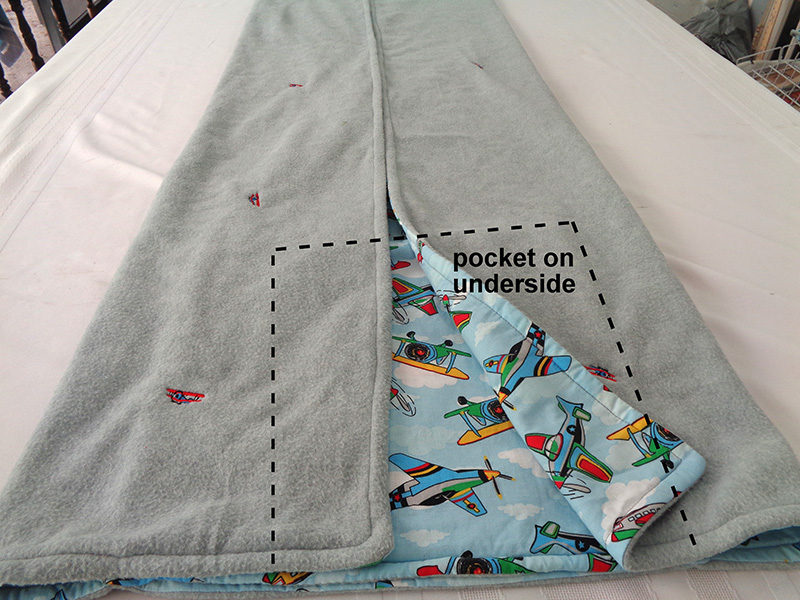
16. Pin generously and stitch with MuVit foot as before on three sides, leaving the top edge open.
pock[/caption]
16. Pin generously and stitch with MuVit foot as before on three sides, leaving the top edge open.
Folding the Quillow into its Pocket
This is hard to explain and hard to understand. As my husband was helping me, he kept saying, “This is NOT going to work! This will not fit in that little pocket.” But it did. So, trust and believe.
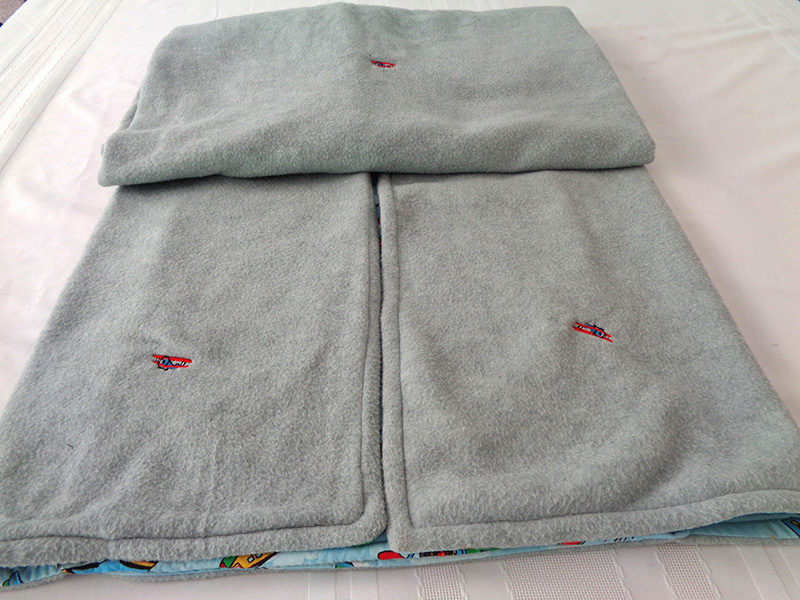
17. Place the quillow on a flat surface with airplane fabric facing. Fold each side to the center.
 18. Fold into thirds, beginning at the end opposite the pocket. Actually, the first fold must be a bit less than 1/3 because each successive fold is larger due to the bulk.
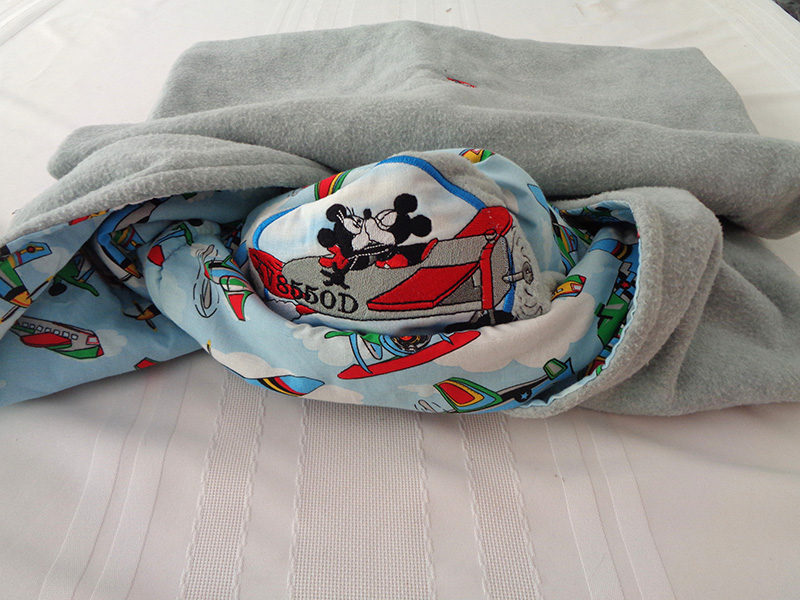
 19. Reach to the back and pull the pocket inside out, to the front. Then stuff the last fold into the pocket. It will require some poking and rearranging to get it to look like a pillow, but it can be done.
 There are many diagrams and line drawing illustrations on-line that you might want to refer to if you need more clarification. I found none that addressed a lined quillow with a directional pocket, so you’ll have to rely on these instructions for that. But the actual folding of a single layer, single fabric quillow is clearly diagramed on several sites.
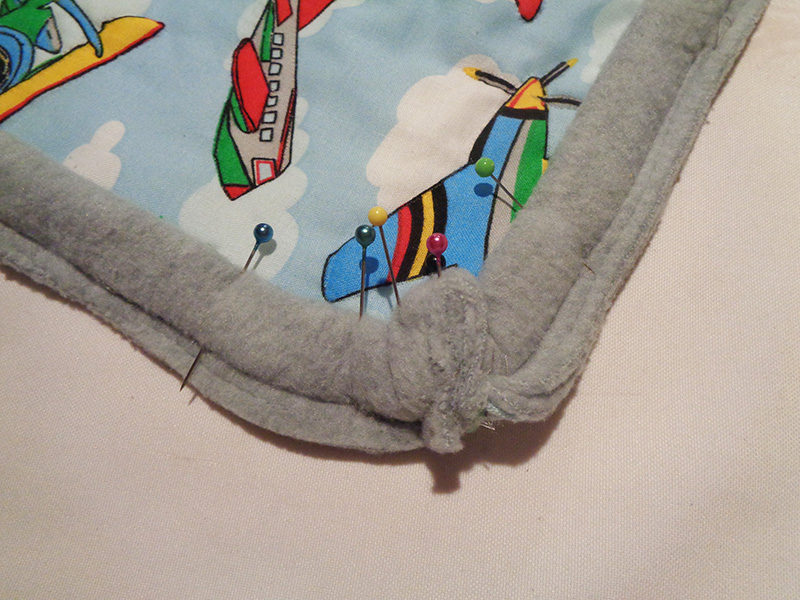
 20. Hand stitched (Oooh—unpopular phrase) in the upper corners are 3 tiny black buttons, a poor effort to mimic Mickey ears. Had that thought occurred to me earlier, they could have been machine stitched further in from the corner, thus more visible. Or they could have been stitched at the bottom by machine even after completion. Another too-late thought. Should you decide to do this, I’m sure you would have much better results, perhaps with larger buttons.
[caption id="attachment_21254" align="aligncenter" width="800"]
20. Hand stitched (Oooh—unpopular phrase) in the upper corners are 3 tiny black buttons, a poor effort to mimic Mickey ears. Had that thought occurred to me earlier, they could have been machine stitched further in from the corner, thus more visible. Or they could have been stitched at the bottom by machine even after completion. Another too-late thought. Should you decide to do this, I’m sure you would have much better results, perhaps with larger buttons.
[caption id="attachment_21254" align="aligncenter" width="800"]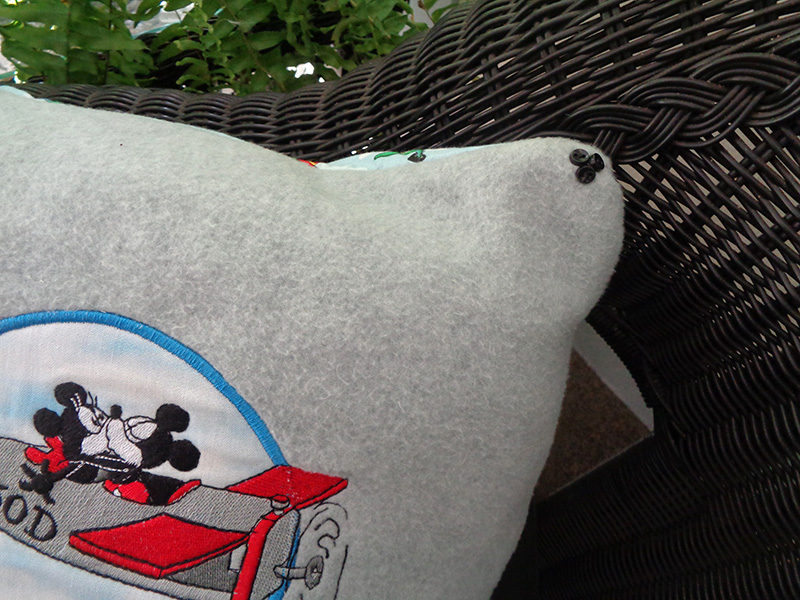 o[/caption]
Pillow Requirements:
- One 16” square airplane fabric
- Two 19 x 16” rectangles of airplane fabric
- One 16” square lightweight cotton batting
- 66 x 2” strip of gray fleece
- Notions: monofilament thread, spray adhesive, gray sewing thread
Suggestion For a different look, use a single 1” wide strip of fleece and serge one edge.
1. Starch and press 16” square of airplane cotton. Spray batting with spray adhesive and center cotton on top. Smooth in place.
2. Set up machine for free motion quilting. Thread needle with monofilament thread, use embroidery bobbin thread or other lightweight neutral thread in bobbin.
Next:
- Attach O foot
- Drop feed dogs
- Select stitch 1-01
- Move needle position to 3.5
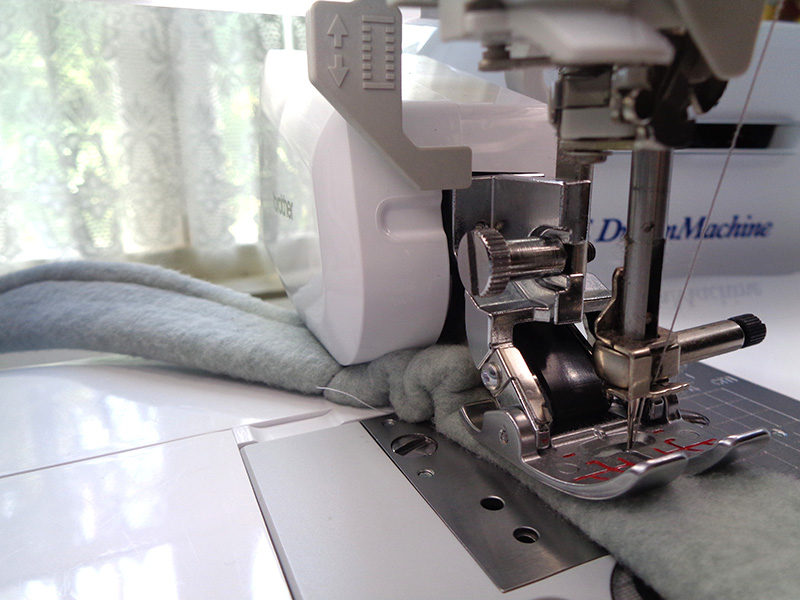
 4. Cut 2” fleece strips to equal 72”. Attach MuVit foot to join strips into one length. Use of laser is helpful to get a perfect 45-degree angle.
Note: Take care to keep right sides together when joining strips.
 5. Trim triangular excess ¼” from seam line.
6. Fold fleece in half rendering a strip 1” wide. With raw edges together, regular sewing thread in needle, and MuVit foot still engaged, sew folded strip together very close to raw edges. Move needle to far right position but extend the foot beyond the edge of the fleece. You need only secure the two pieces together.
5. Trim triangular excess ¼” from seam line.
6. Fold fleece in half rendering a strip 1” wide. With raw edges together, regular sewing thread in needle, and MuVit foot still engaged, sew folded strip together very close to raw edges. Move needle to far right position but extend the foot beyond the edge of the fleece. You need only secure the two pieces together.
Caution: There is not much room under the MuVit foot for the thick double layer of fleece. It easily bunches up and impedes the stitching progress. You often need to pull the fleece from under the MuVit foot.
 7. Stitch folded fleece strip to airplane/batting pillow top, with raw edges together, needle still in far-right position, +7, and the edge of the MuVit foot on the raw edge of the fabrics.
8. Cut the thread at the corner as the needle comes to the perpendicular seam line. Remove the piece from under the presser foot and fold the strip over itself with 1/8-1/4” extra, depending on the thickness of the fleece.
9. Sew from the folded edge, maintaining the same seam allowance as before.
[caption id="attachment_21260" align="aligncenter" width="800"]
7. Stitch folded fleece strip to airplane/batting pillow top, with raw edges together, needle still in far-right position, +7, and the edge of the MuVit foot on the raw edge of the fabrics.
8. Cut the thread at the corner as the needle comes to the perpendicular seam line. Remove the piece from under the presser foot and fold the strip over itself with 1/8-1/4” extra, depending on the thickness of the fleece.
9. Sew from the folded edge, maintaining the same seam allowance as before.
[caption id="attachment_21260" align="aligncenter" width="800"]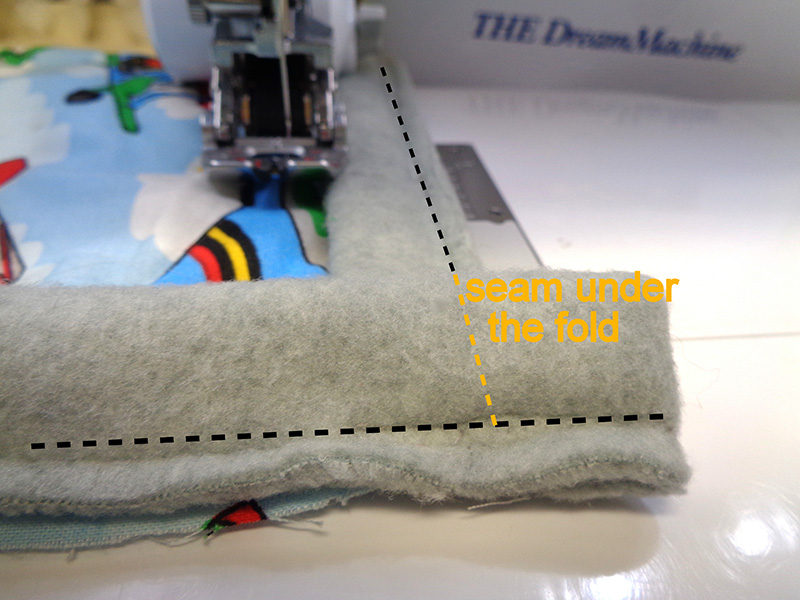 - - -[/caption]
10. Repeat with remaining 3 corners.
11. Seam corner. Begin at the intersection of the seams and stitch toward the fold. Do NOT stitch to the point but end the seam just before the point.
- - -[/caption]
10. Repeat with remaining 3 corners.
11. Seam corner. Begin at the intersection of the seams and stitch toward the fold. Do NOT stitch to the point but end the seam just before the point.
 12. Trim corner. Cut close to the seam.
 13. Fold each 19 x 16” rectangle in half, rending two pieces each 9.5” by 16.
14. Fold and pin the fleece corners to the center to avoid catching them in the final seam line.
13. Fold each 19 x 16” rectangle in half, rending two pieces each 9.5” by 16.
14. Fold and pin the fleece corners to the center to avoid catching them in the final seam line.
 15. Stack two folded pieces on quilted fleece edged piece, right sides and raw edges together. NOTE: If your fabric is directional like the airplanes, take care that the front and backs have featured items pointing the same direction.
16. Pin generously all around. With batting side up, stitch around perimeter on previous stitching line that held fleece border in place.
17. Turn pillow right side out and stuff with 16” pillow form.
15. Stack two folded pieces on quilted fleece edged piece, right sides and raw edges together. NOTE: If your fabric is directional like the airplanes, take care that the front and backs have featured items pointing the same direction.
16. Pin generously all around. With batting side up, stitch around perimeter on previous stitching line that held fleece border in place.
17. Turn pillow right side out and stuff with 16” pillow form.
Note: The corners are always floppy on the pillow forms. It helps to stuff poly-fil into the corners to fill them out.
Finished and ready to fly off to an adventure or cuddle up on the porch with the comfort of a quillow blanket and pillow!

Related Projects
Stay Connected
* Required fields