Free Design: Embroidered Days of the Week Towels
Brother Sews Blogger
 Brighten up your kitchen with a set of days of the week towels! To get you started, this month we are featuring a colorful wreath as the Brother FREE Design of the Month. The wreath design is pretty on it’s own but I added some custom lettering and embroidered it on a batik background to add extra interest. Use the wreath to decorate one towel and then create a complete set of days of the week towels by stitching lettering on multi-colored strips. Fabric trim is decorated with lettering from the BES 4 software program. See how much fun it can be to dress up plain towels with your Brother Embroidery Machine and Brother Lettering Software. Are you ready? Let’s go sew!
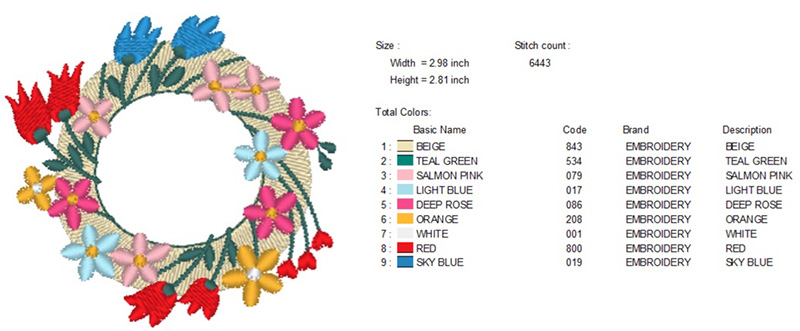 Figure #1[/caption]
 Figure #2a[/caption]
[caption id="attachment_24779" align="aligncenter" width="800"]
 Figure #2b[/caption]
• To add text click on Text icon and choose Normal. See Figure #3.
[caption id="attachment_24780" align="aligncenter" width="800"]
 Figure #3[/caption]
• Select Baked Fresh for the font style and change size to .59, the minimum recommended size for this font. Type Welcome into text box and click Apply. See Figure #4.
[caption id="attachment_24781" align="aligncenter" width="800"]
 Figure #4[/caption]
• To curve the lettering over the wreath select the envelope feature. See Figure #5.
[caption id="attachment_24782" align="aligncenter" width="800"]
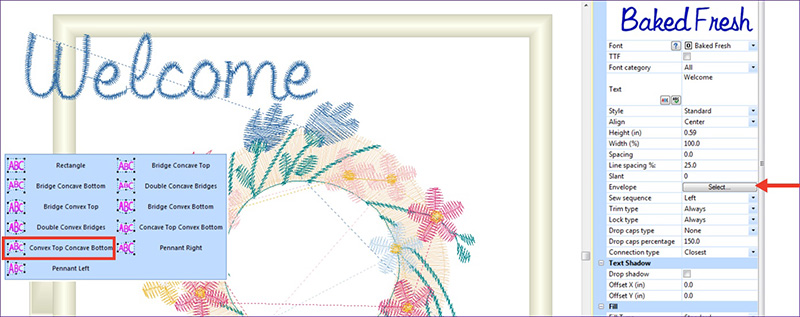 Figure #5[/caption]
• Rest the curser over lettering until you see the hand tool, then drag into position over the wreath. Rotate and move as needed to align lettering over the wreath. See Figure #6.
[caption id="attachment_24783" align="aligncenter" width="800"]
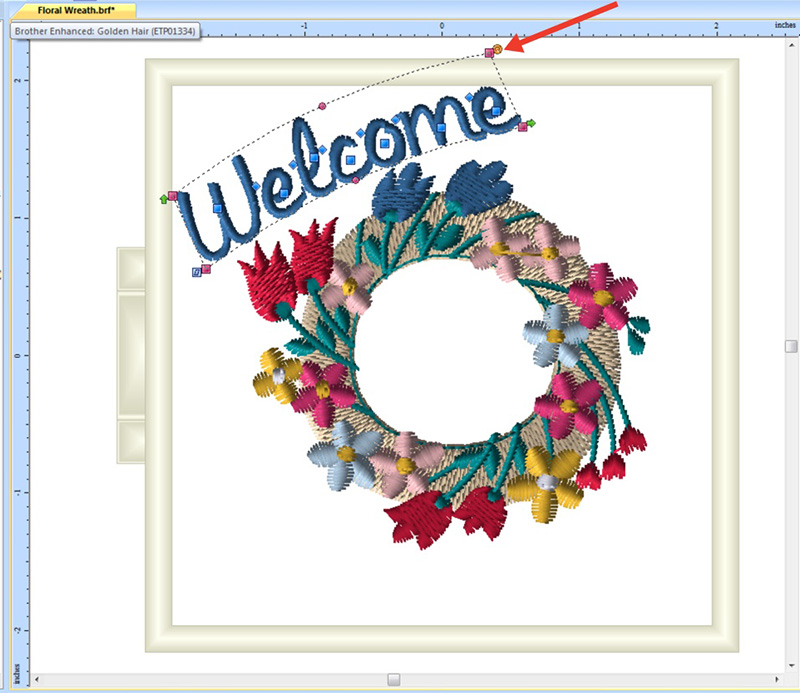 Figure #6[/caption]
• Repeat steps described above to add the word Friends, choosing an envelope style for curving in the opposite direction. Both top and bottom envelope styles are shown in Figure #7 below.
[caption id="attachment_24784" align="aligncenter" width="800"]
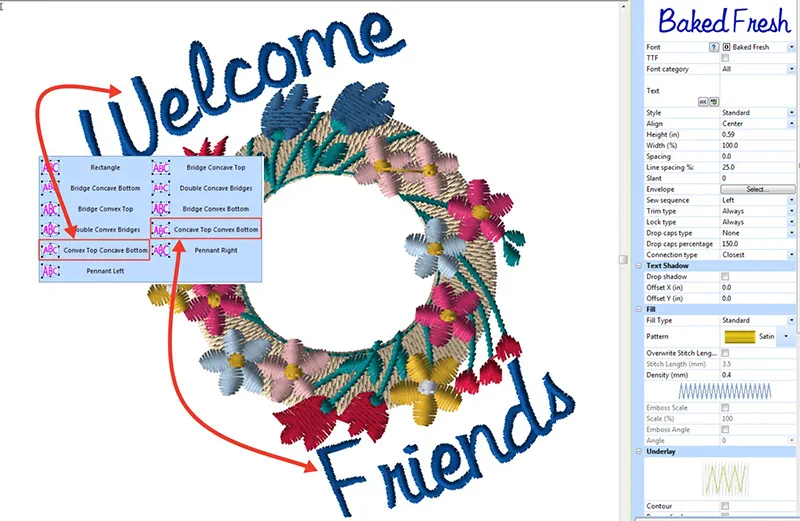 Figure #7[/caption]
4. To create days of the week lettering for each additional towel, begin with a new page, select the 5” X 7” hoop and use the same Baked Fresh font, creating lettering to fit the hoop.
5. Save each design and transfer to machine to stitch.
6. To embroider each strip, hoop fabric with a layer of tear away, centering strip in the hoop.
Tip: Choose thread colors for embroidering wreath and lettering. You’ll want to be sure your color choices for the “days” will stand out on the batik background. Embroider, remove tear away, and press strip.
7. Trim each strip to create a 6-inch band. To prepare each embroidered piece for sewing to the towel, fold and press under ½-inch along each long raw edge. Place band along lower edge of the towel. Pin in place tucking raw edges under at the sides and trimming excess if needed. Set machine for a zig zag stitch, with width set for 2.5 and length set for 1.8. Stitch a band to each of the towels, securing folded edges to towel with the narrow zig zag stitch. See examples in Figure #8a, Figure 8b, and Figure 8c.
[caption id="attachment_24788" align="aligncenter" width="800"]
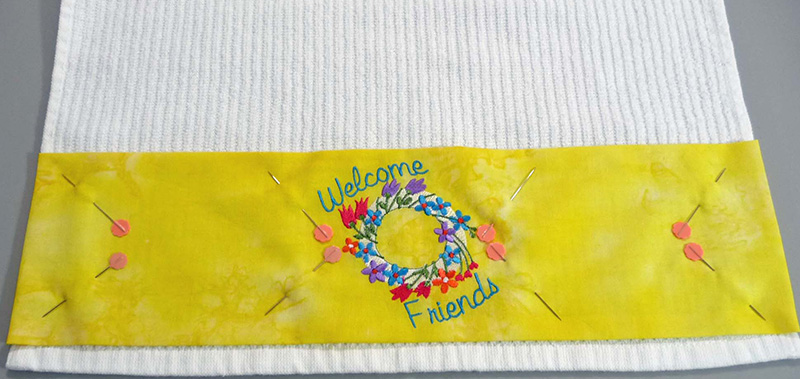 Figure #8a[/caption]
[caption id="attachment_24789" align="aligncenter" width="800"]
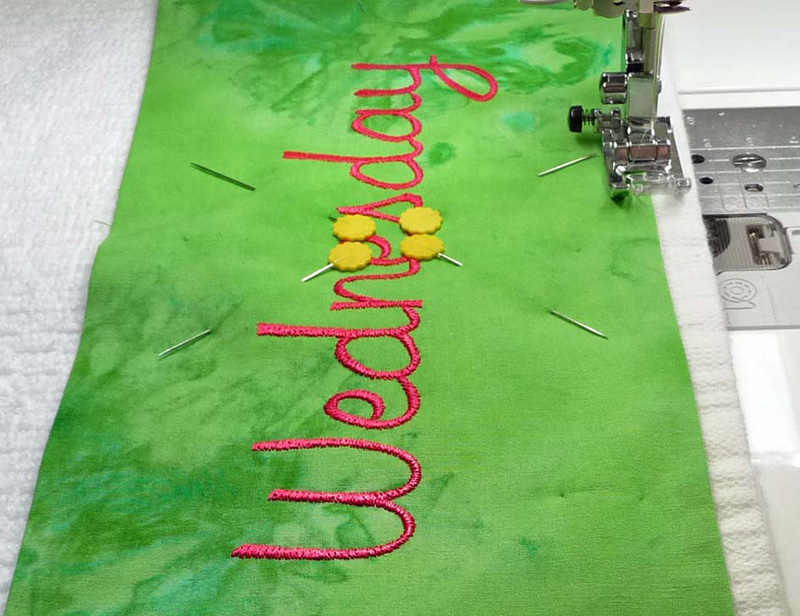 Figure #8b[/caption]
[caption id="attachment_24790" align="aligncenter" width="800"]
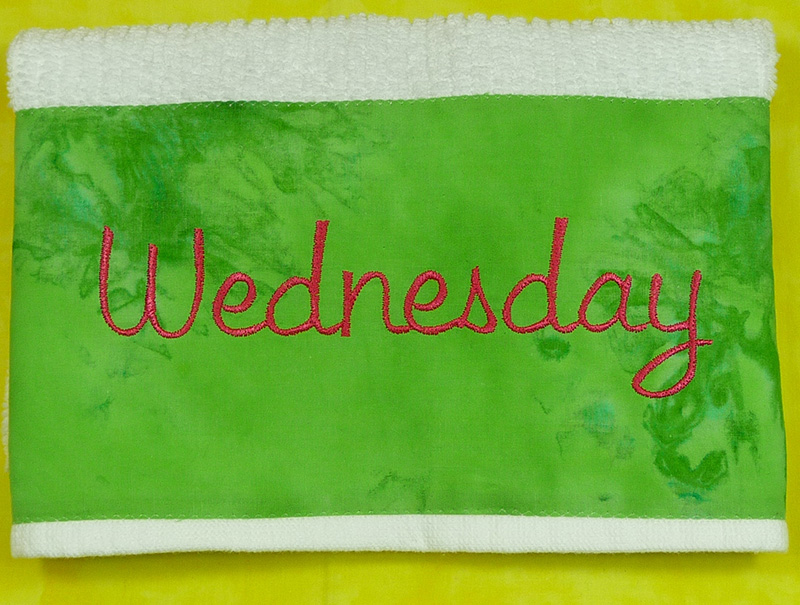 Figure #8c[/caption]
You are finished! These towels make a great gift set. Consider personalizing the wreath with a family name or other lettering as desired.
Free Design_ Embroidered Days of the Week Towels _ Stitching Sewcial.pdf
 Brighten up your kitchen with a set of days of the week towels! To get you started, this month we are featuring a colorful wreath as the Brother FREE Design of the Month. The wreath design is pretty on it’s own but I added some custom lettering and embroidered it on a batik background to add extra interest. Use the wreath to decorate one towel and then create a complete set of days of the week towels by stitching lettering on multi-colored strips. Fabric trim is decorated with lettering from the BES 4 software program. See how much fun it can be to dress up plain towels with your Brother Embroidery Machine and Brother Lettering Software. Are you ready? Let’s go sew!
Materials and Supplies
- Brother Sewing and Embroidery Machine
- Brother BES 4 Lettering Software
is featured in this project. You can create a similar design using built-in lettering or another Brother software program. - Brother Embroidery Thread
- Brother Bobbin Thread
for Embroidery - SA5810
Pacesetter Medium Weight Tear-Away Stabilizer - Size 11 embroidery needle for embroidery
- Basic sewing notions including thread to match or blend with fabrics
- Light spray starch or fabric finishing spray for firming up batik fabric
- Eight white kitchen dishtowels measuring approximately 18-inches Long X 16-inches Wide
- Eight cotton batik fat quarters for towel bands or fabric strips measuring 8-inches long times the width of the towel plus two extra inches for finishing ends.
Brother Free Design of the Month:
- FloralWreath.pes
- See Figure #1.
Note: This free design fits within a 4-inch hoop. To create a bolder look for days of the week lettering, I used a 5” X 7” inch hoop.
[caption id="attachment_24777" align="aligncenter" width="800"] Figure #1[/caption]
Steps to Create Days of the Week Towels
1. Launder towels and fabrics prior to embroidering. Press fabrics using starch. To determine size of strips, measure width of towel and add two additional inches for finishing side edges. Using this measurement for the width, cut one 9-inch long strip of fabric for each towel. 2. Transfer wreath design to machine. 3. Create a combination design for the first towel, adding lettering to the wreath using built-in lettering or software. Below you’ll find basic steps for adding lettering used in this example. • Open wreath design in Brother BES4 Dream Edition software program. Select the 4” X 4” hoop from the hoop icon and drop down arrow. See Figure #2a and Figure 2b. [caption id="attachment_24778" align="aligncenter" width="800"] Figure #2a[/caption]
[caption id="attachment_24779" align="aligncenter" width="800"]
 Figure #2b[/caption]
• To add text click on Text icon and choose Normal. See Figure #3.
[caption id="attachment_24780" align="aligncenter" width="800"]
 Figure #3[/caption]
• Select Baked Fresh for the font style and change size to .59, the minimum recommended size for this font. Type Welcome into text box and click Apply. See Figure #4.
[caption id="attachment_24781" align="aligncenter" width="800"]
 Figure #4[/caption]
• To curve the lettering over the wreath select the envelope feature. See Figure #5.
[caption id="attachment_24782" align="aligncenter" width="800"]
 Figure #5[/caption]
• Rest the curser over lettering until you see the hand tool, then drag into position over the wreath. Rotate and move as needed to align lettering over the wreath. See Figure #6.
[caption id="attachment_24783" align="aligncenter" width="800"]
 Figure #6[/caption]
• Repeat steps described above to add the word Friends, choosing an envelope style for curving in the opposite direction. Both top and bottom envelope styles are shown in Figure #7 below.
[caption id="attachment_24784" align="aligncenter" width="800"]
 Figure #7[/caption]
4. To create days of the week lettering for each additional towel, begin with a new page, select the 5” X 7” hoop and use the same Baked Fresh font, creating lettering to fit the hoop.
5. Save each design and transfer to machine to stitch.
6. To embroider each strip, hoop fabric with a layer of tear away, centering strip in the hoop.
Tip: Choose thread colors for embroidering wreath and lettering. You’ll want to be sure your color choices for the “days” will stand out on the batik background. Embroider, remove tear away, and press strip.
7. Trim each strip to create a 6-inch band. To prepare each embroidered piece for sewing to the towel, fold and press under ½-inch along each long raw edge. Place band along lower edge of the towel. Pin in place tucking raw edges under at the sides and trimming excess if needed. Set machine for a zig zag stitch, with width set for 2.5 and length set for 1.8. Stitch a band to each of the towels, securing folded edges to towel with the narrow zig zag stitch. See examples in Figure #8a, Figure 8b, and Figure 8c.
[caption id="attachment_24788" align="aligncenter" width="800"]
 Figure #8a[/caption]
[caption id="attachment_24789" align="aligncenter" width="800"]
 Figure #8b[/caption]
[caption id="attachment_24790" align="aligncenter" width="800"]
 Figure #8c[/caption]
You are finished! These towels make a great gift set. Consider personalizing the wreath with a family name or other lettering as desired.
Free Design_ Embroidered Days of the Week Towels _ Stitching Sewcial.pdf
