How To Trim Jump Stitches
Today, we’ll dive into a feature of machine embroidery called the jump stitch. Whether or not you are familiar with the jump stitching, you’ve more than likely seen jump stitches in many of the things you buy. Embroidery jump stitches are very common in items such as baby clothes, towels and t-shirts. This post will explore what a jump stitch is, how they are formed, and tips for trimming your jump stitches so they look professional. We’ll also talk about ways to use jump stitches to enhance the look of a finished project! Read on to learn how to jump stitch!
Supplies & Tools:
- Brother NQ1700e was used for this demonstration
- Brother embroidery thread
- Built-in embroidery design
- Cotton fabric and machine embroidery stabilizer
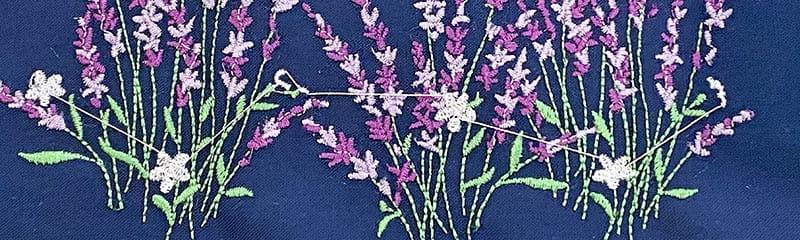
Have you ever seen long lines of thread stretched across an embroidery design?
They may have looked like the ones you see in this photo, or you may recognize them from your own embroidery projects.You might even have seen these lines of thread on an item that you’ve purchased from a store. They’re really common, and surprisingly easy to use in your own embroidery designs.
What are they? Let’s find out.
Join me today as we demystify jump stitches with this helpful FAQ!
What is a Jump Stitch?
A jump stitch is a type of embroidery stitch.
It is a long stitch formed between two separate design elements. As one element finishes stitching, the thread is dragged to a new one.
The thread that joins these two sections is not part of the final design, and lays over the top of the fabric.
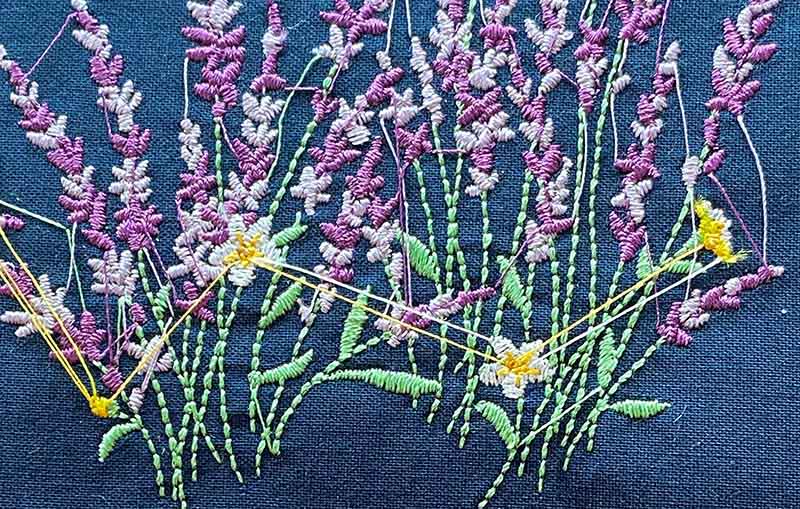
In most cases, like the ones seen in the photo below, you would remove them. However, it is not uncommon for tiny jump stitches to be left untrimmed. You’ve likely encountered many embroidered items with untrimmed jump stitches. When they are small, they are often not very noticeable.
In this example, you can see white and yellow jump stitches running between the flowers.
A jump stitch is easy to create with the help of an embroidery machine. There is little work for the machine to do beyond reinforcing the end of each stitch before moving to a new area.
There are no actual knots at the end of these stitches, just several short stitches that reinforce the thread and help to prevent it from unraveling.
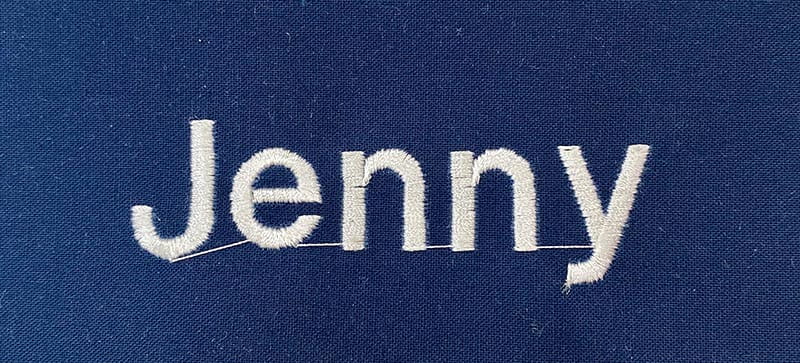
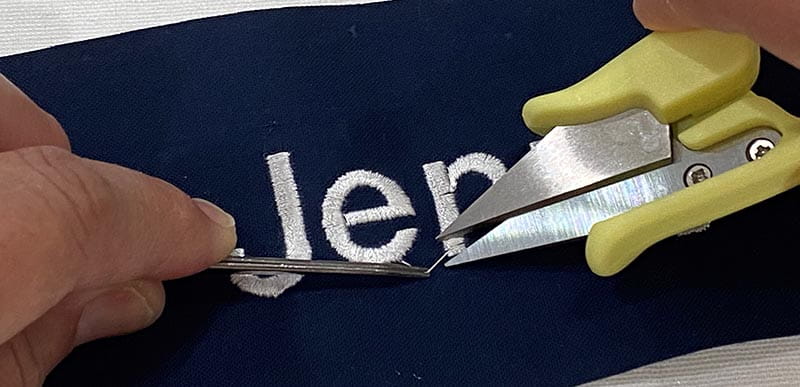
You may also have seen jump stitches in things you’ve purchased that contain lettering.
It is very common for jump stitches to occur between letters, especially letters that are small and/or close together.
Although with some machines, you must always trim your jump stitches, other embroidery machines have the ability to automatically cut these threads and eliminate this phenomenon altogether!
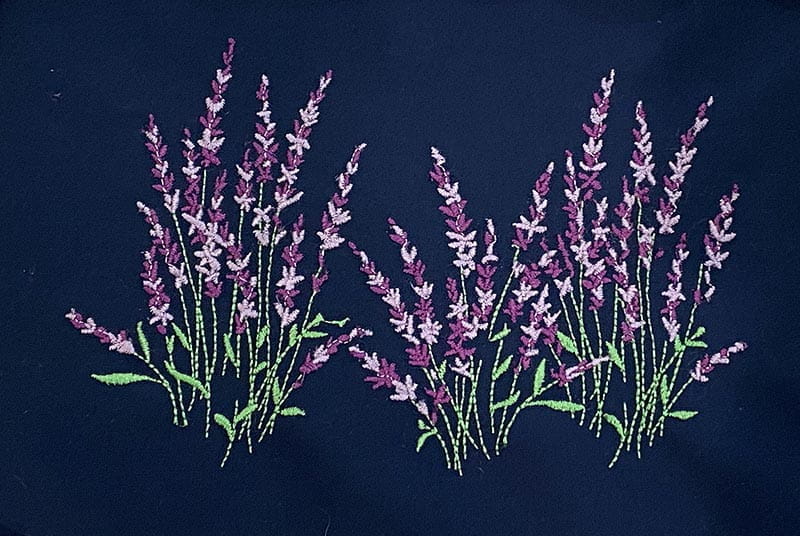
In this photo, notice that there are no threads between the flowers. The machine has done the trimming automatically.
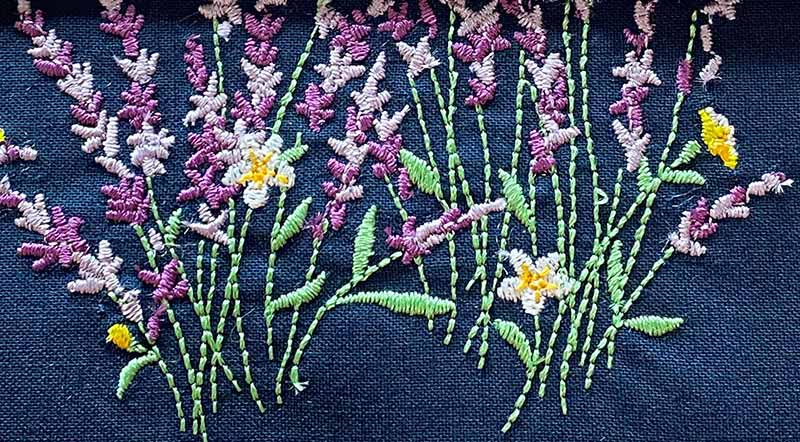
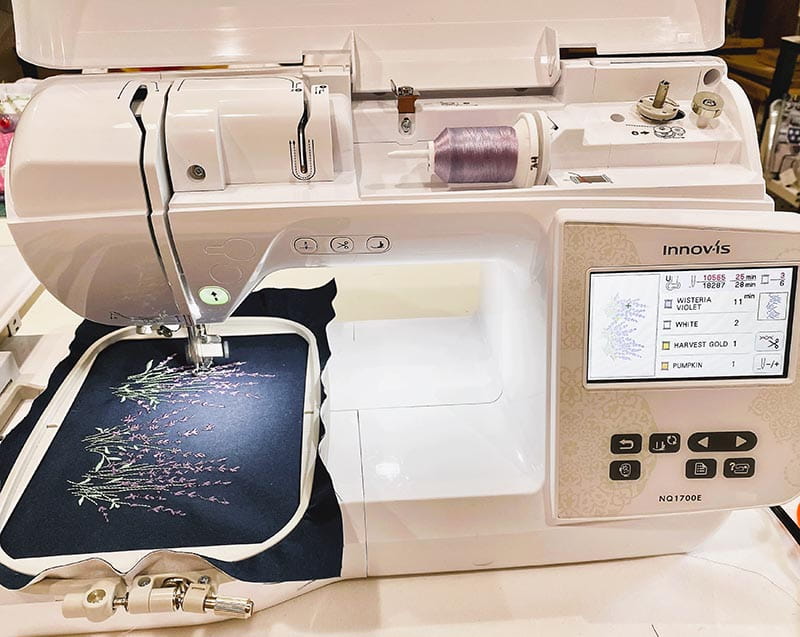
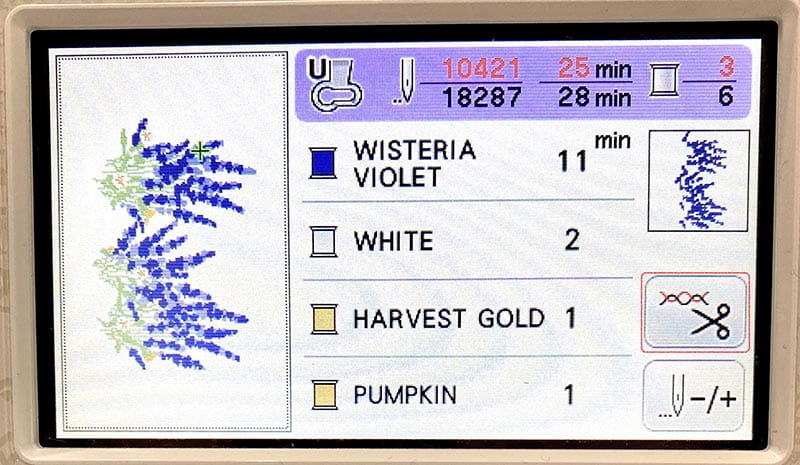
I stitched this floral scene on the Brother NQ1700e embroidery machine. This design is built into the machine and fits inside a 5” x 7” hoop.
Turning OFF Automatic Jump Stitch Trimming
If your machine has the capability to automatically trim jump stitches, it will come with this feature turned ON.
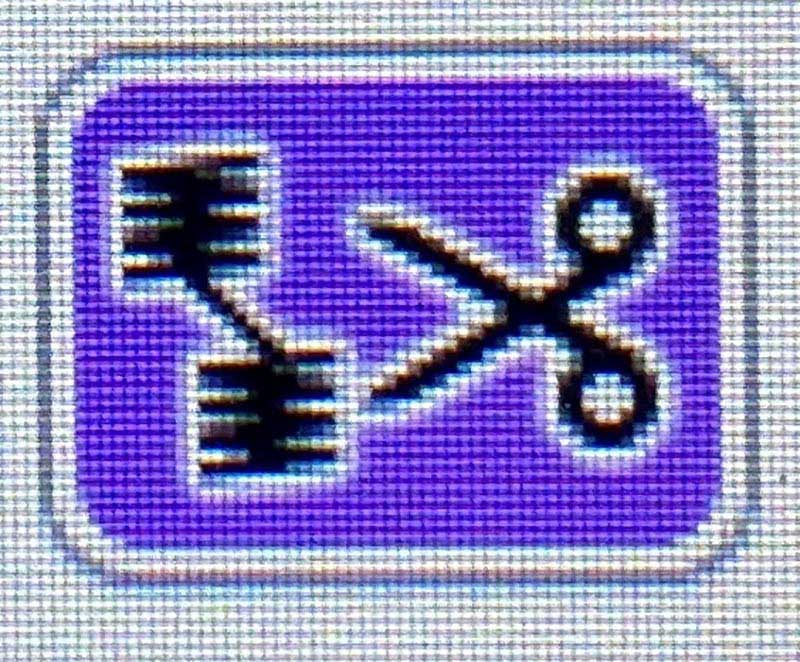
You can turn if off by pressing the Cut/Tension key
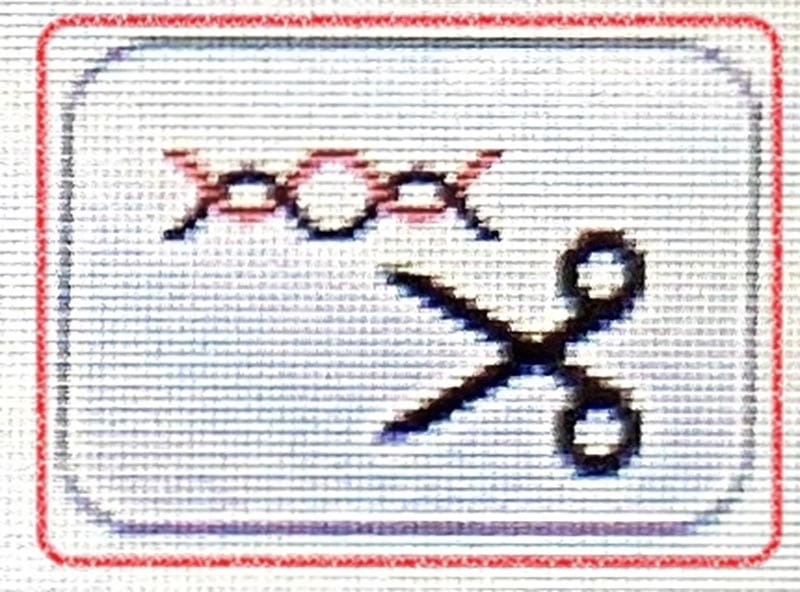
On the next screen you’ll see the Jump Stitch Trim key. Press this key once and the key will turn white. This temporarily disengages the feature and prevents the automatic jump stitch function from working.

Why turn this feature OFF?
Don’t I want my jump stitches automatically trimmed?
More than likely the answer to this question is yes!
Jump stitches require manual trimming that adds extra time, effort, and possible expense to your project. Having to stop and trim threads can cost you valuable time and money if you run a small business!
But in some cases, you may want to experiment with turning them off.
When using the jump stitch trim feature, the machine automatically makes a knot on the back of the fabric before trimming the thread and moving to the next area.
Knots are good! This means your stitches will not come undone after you’ve unhooped your project.
But sometimes you may want the back of the project to have a clean finish. This could be true of reversible projects like quilts or sheer fabrics when you will see the back of a project.
Quilting
Quilting “in the hoop” is very popular today. It’s wonderful that our embroidery machines can stitch quilting designs right in our hoop!
Some people prefer to keep the threads on the back side of their quilt long so they can be tied and buried just as they would with a traditional quilt.
When the jump stitch feature is turned off, the machine will reinforce a stitch but not create a knot. And it will leave the stitch ends long which makes tying a knot by hand simple!
Light Weight Fabrics
The same applies to lightweight or sheer fabrics where the stitches may be visible from the front.
Overall, it’s easier to get a cleaner finish on the backside of your project when the jump stitch cutting feature is turned off.
How do I trim Jump Stiches?
If your machine does not trim jump stitches, no problem! You can do this and still create professional, clean results all on your own!
Here are a few embroidery tips and tool suggestions to make this process easier.
And just a reminder:
Don’t forget to trim the jump stitches on the backside of the project. The bobbin thread jumps from stitch to stitch on the back just like it does on the top.
Tools
A pair of tweezers and small scissors will allow you to trim even the shortest jump stitches. In this photo there is a small amount of thread stretched between two flowers. I used the tweezers to gently hold the small thread taut while I trimmed both ends of the thread.
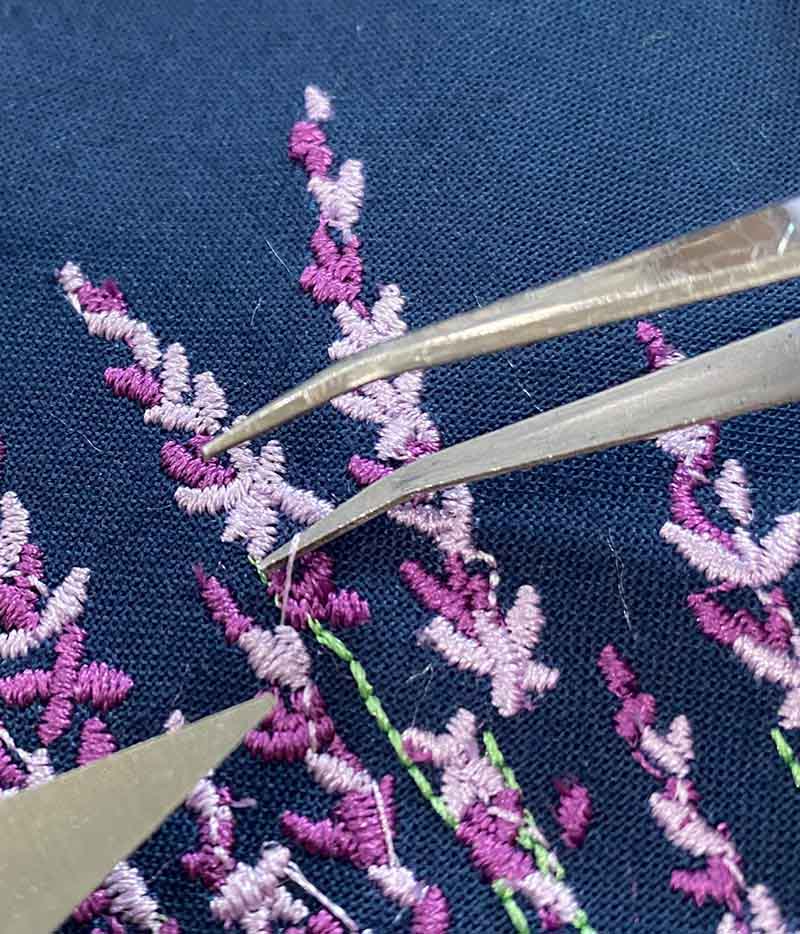
The same technique holds true for trimming small threads between letters.
Trimming jump stitches can be done with a few tools and a little time.
The results are every bit as beautiful as a design stitched on a machine with the ability to cut jump stitches. And keep in mind, there may be times when you want to turn off the jump stitch cutter as well!
Fortunately, with Brother machines, you can easily access this feature and use it for the benefit of whatever project you are working on.
Let me know what you think about jump stitches and if you have any tips you’d like to share!
Tags
Shop this Project
No sewing or embroidery machine? No problem! Any products mentioned in this project are available to buy here so you can stay stitching.

Brother Sewing and Embroidery Machines
- 258 built-in embroidery designs and 13 fonts
- 6” x 10” Maximum embroidery area
- WLAN Capability
Related Projects
Stay Connected
* Required fields