Free Embroidery Design of the Month for July – How to Embroider a Nautical Tote Bag with Decorative Stitching
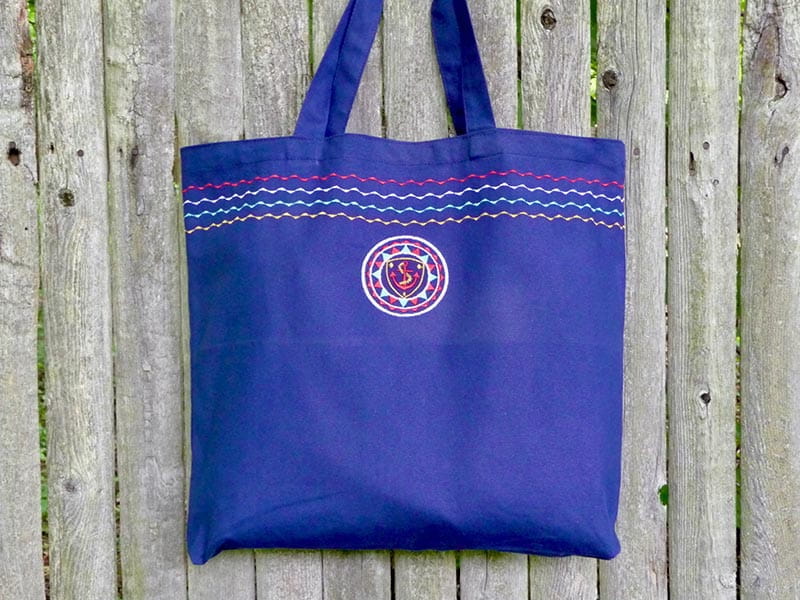
This DIY summer tote is decorated with the Brother free embroidery design of the month. The nautical theme is perfect for boating, the beach, or just a fun way to carry your gear with a classy custom look. This free pattern is perfect for beginner embroidery fans. Follow along and see how easy it is to embroider the design on a ready-made tote with the addition of frame shapes built into your Brother machine. Play around with elongation decorative stitches to further accent the tote. Learn about placement and hooping with sticky stabilizer too! Are you ready? Let’s go sew!
Materials and Supplies for Desk Tray:
- Brother sewing and embroidery machine with 4-inch hoop and template grid
- SA580 Brother medium-weight tear-away stabilizer for stabilizing decorative stitching.
- SA5815 Brother medium-weight adhesive backed tear-away stabilizer for embroidery.
- SA132 Quilt Guide for sewing evenly spaced decorative stitches.
- Embroidery threads for decorative stitching and for embroidery.
- Size 11- 12 needle for embroidering and decorative stitching. Note: I prefer Super Non-Stick needles for embroidering with sticky back tear-away stabilizer. Standard embroidery needles may require cleaning with rubbing alcohol to remove build-up of adhesive during the stitching process.
- Ruler such as SA530, the Brother Centering ruler for marking design placement.
- Wash away marking pencil, pen, or chalk. Note: Test marker in an inconspicuous spot before using it, to make sure marks are completely removeable.
- Ready-made cotton canvas type tote. Note: My navy tote measures 18-inches wide X 16-inches long X 3-inches deep.
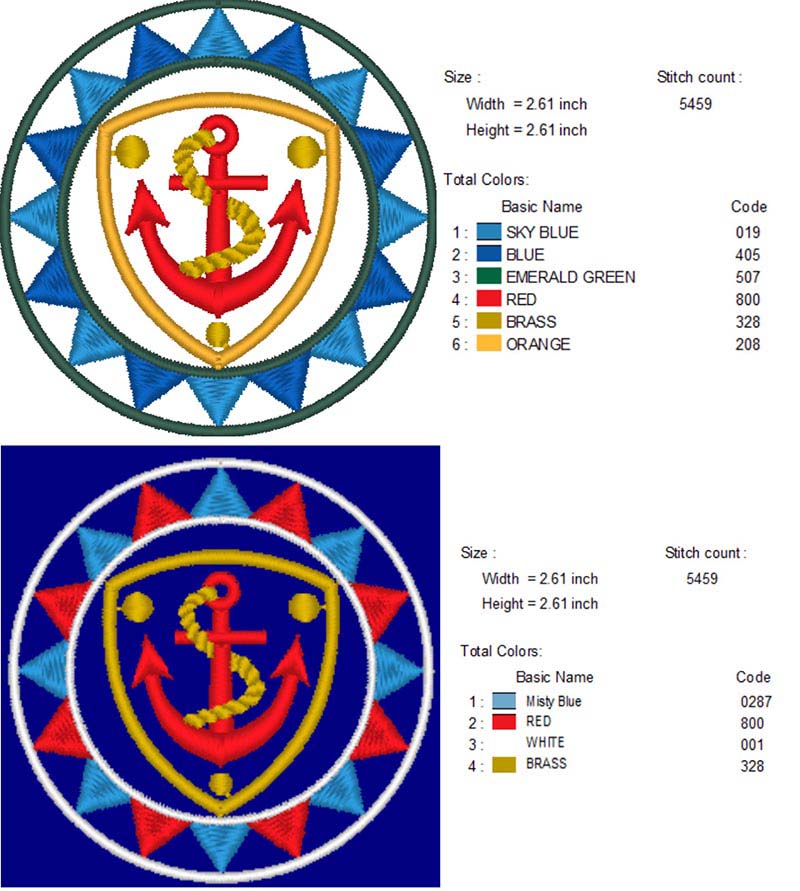
- Brother Free Design of the month, See Figure #1 below.
Note original thread colors on the top image and my modified thread colors with a blue background on the bottom image.
Figure #1
Machine featured in this project is Brother model NS1750D. Please read through all instructions before beginning this project. Basic steps are as follows:
- Add rows of decorative stitches to top of tote.
- Create a combination design with free design and added built-in frame shapes.
- Embroider design on tote.
Instructions for Tote:
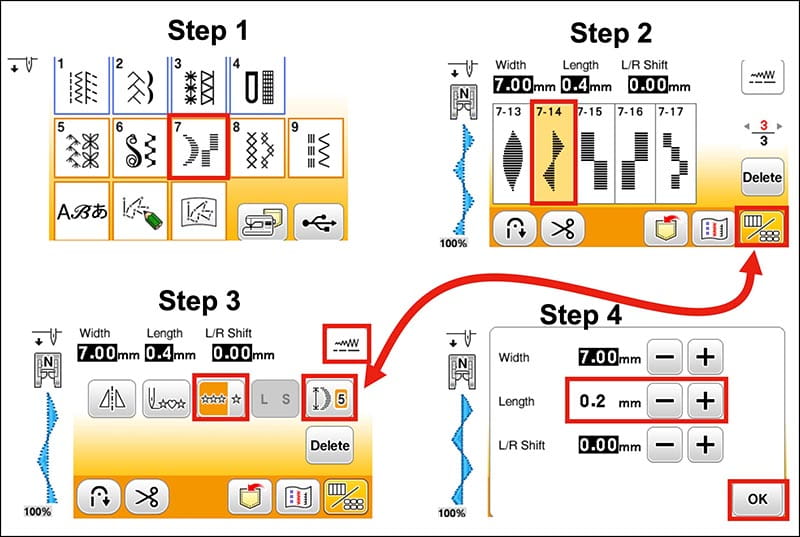
- Set up machine for sewing with the “N” foot. Wind a bobbin to match each selected embroidery thread color. Layer strips of tear away stabilizer on the wrong side and stitch multiple rows of decorative stitches to accent top edge of tote. I chose pattern 7-14 from the elongation menu, touched the key for additional options, changed the pattern size to 5, selected the row option, and then touched the width/length key and shortened the stitch length for a closer satin stitch. See steps in Figure #2.
- Set up machine for embroidery. Transfer nautical design to machine. Select design and touch Set. Touch Add to create a combination design by adding the first frame shape outline to the design. Touch the frame shape icon. Select circle shape. Next, select pattern No. 004 and touch Set. See steps 1 through 4 in Figure #4.
- Next, we’ll re-size the frame shape. Touch the size key. Increase size to equal 2.93” X 2.93” and touch OK. Touch Add to add a second circular frame shape from the menu, just as you did before. This time, choose pattern No.002, then touch Set. See steps 5 through 8 in Figure #5.
- We’ll re-size this frame shape to finish the combination design. Touch the size key as you did before and then increase the size to equal 3.25” X 3.25” and touch OK. See re-sized second circle in Figure #6. Combination design size is now 3.25” X 3.25.”
- Now it’s time to change colors as desired. Touch the color palette key and then use the plus minus keys to scroll through the design, selecting new colors for each part of the design you want to change. Once you’re happy with all your color changes touch OK. See keys for changing colors in Figure #7.
- At this point you could select elements in your combined design and make any other necessary changes. You can also touch the preview key to view your design in a larger size on the screen. If everything looks good, touch Edit End. See Figure #8.
- To prepare for embroidery, mark and hoop the tote as follows:
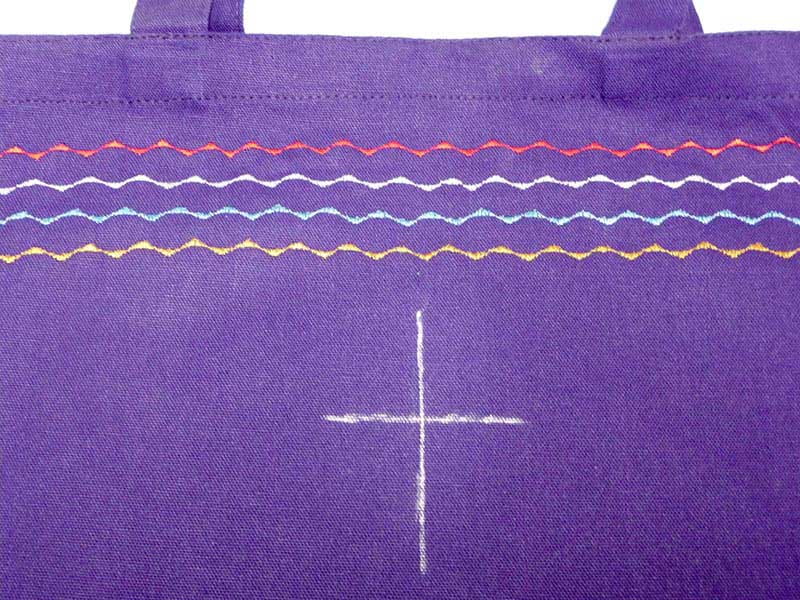
• Fold tote in half and mark center line of tote below decorative stitching.
• Measure and mark a cross hair for center of combined embroidery design. I used the Brother centering ruler for measuring and marking. Note that design measures 3.25-inches so halfway mark for this design is 1 5/8-inches from center point. See Figure #9a, #9b, & #9c.
- Place hoop on machine, taking care that fabric is undisturbed. At this point you can fine tune the alignment of the starting point before you stitch. If your needle is not pointing directly in the center of the design, simply use the arrow keys until the needle is targeted directly over marked center point. Note: Before stitching make sure no part of tote is trapped under hoop. See hooped tote on machine in Figure #14.
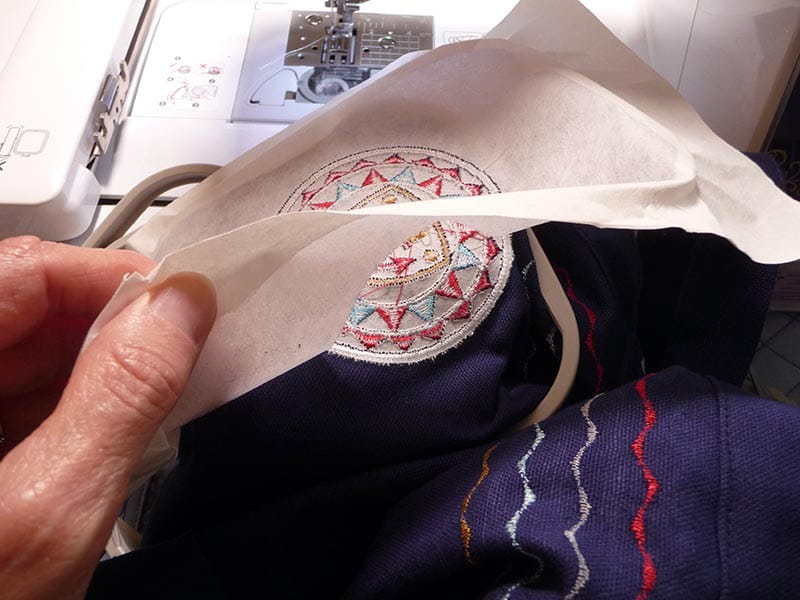
- Stitch design, remove from hoop, and tear away excess stabilizer when finished. See Figure #15a and #15b.
Figure #2
Note: To avoid bulk, begin first row of decorative stitching so it is below the stitching area for the handles. I began each line of stitching at the side seam. Stitch evenly spaced rows using the quilt guide. You can use this guide for your first line of stitching and for evenly spacing rows for remaining lines of stitching. The quilt guide easily inserts into the black hole at the back of the presser foot holder and slides from right to left for setting desired distance. See Figure #3a and Figure #3b.
Figure #3a
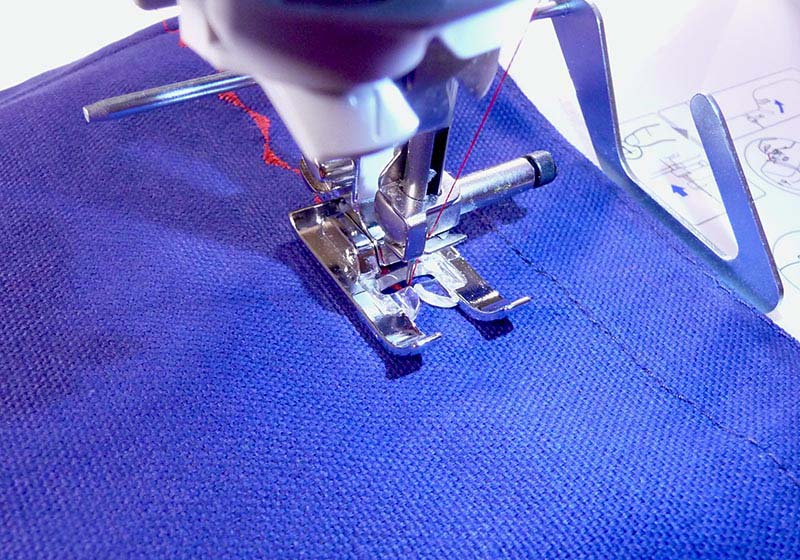
Figure #3b
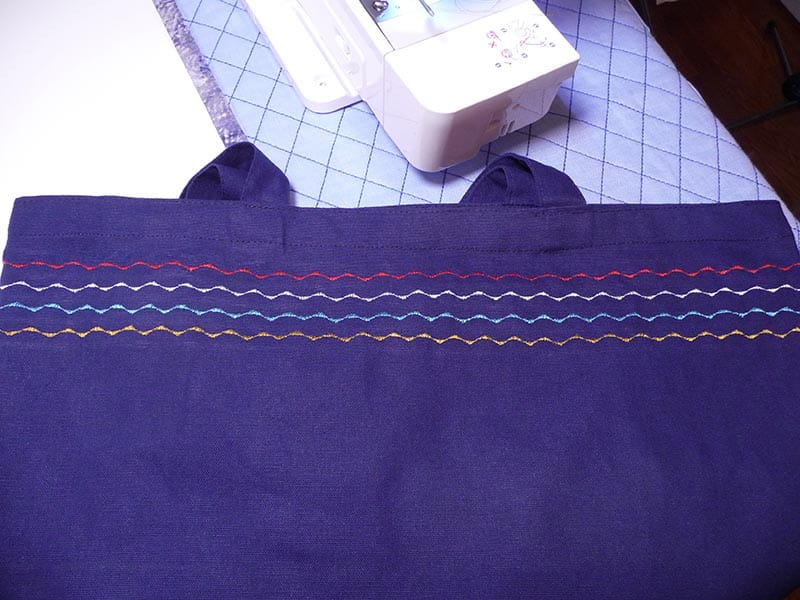
Figure #4
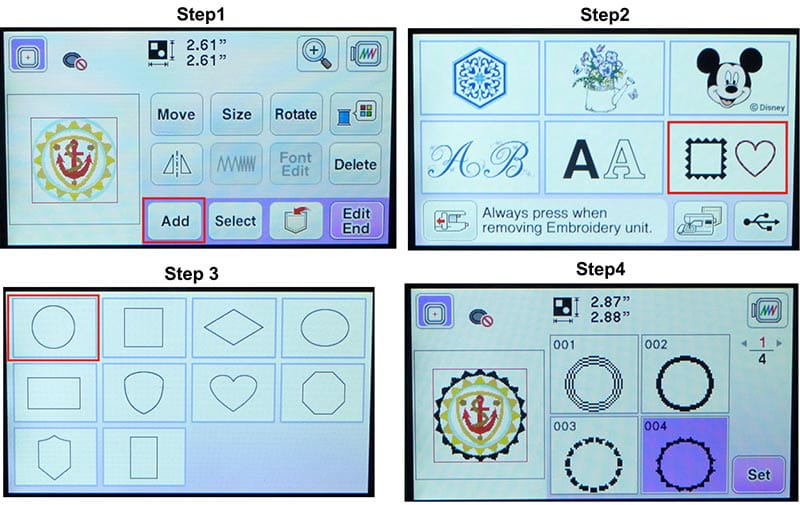
Figure #5
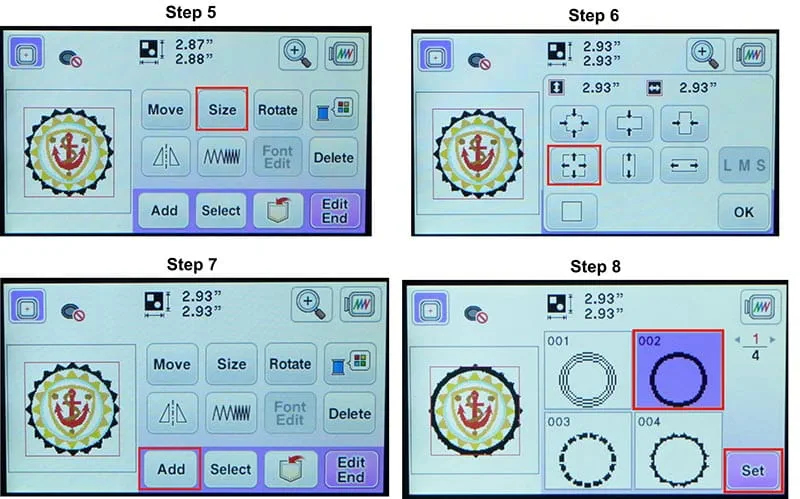
Figure #6
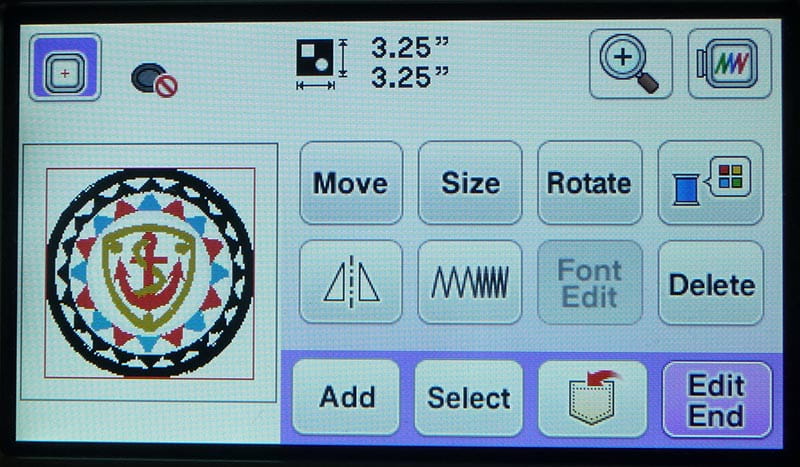
Figure #7
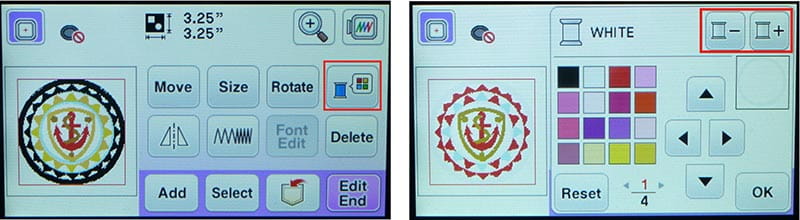
Figure #8
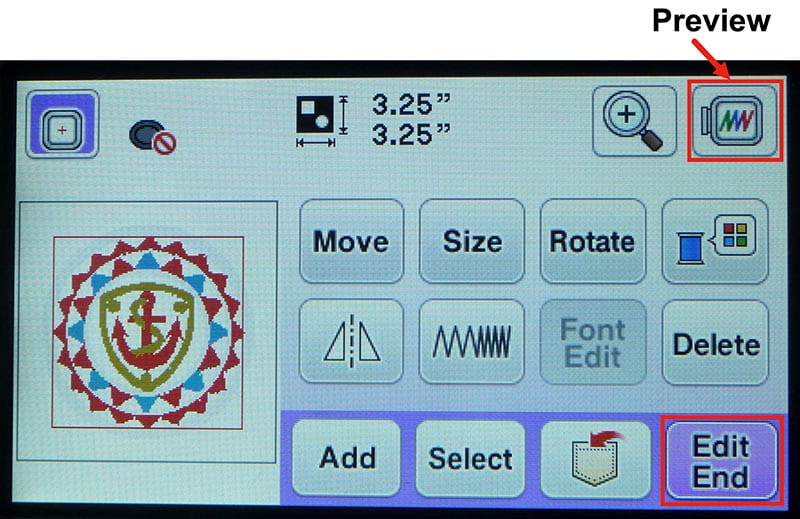
Figure #9a
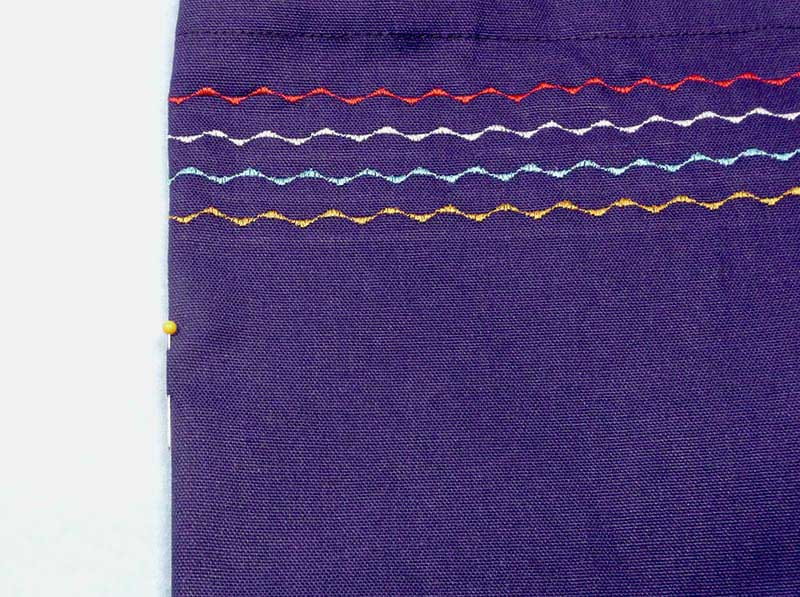
Figure #9b
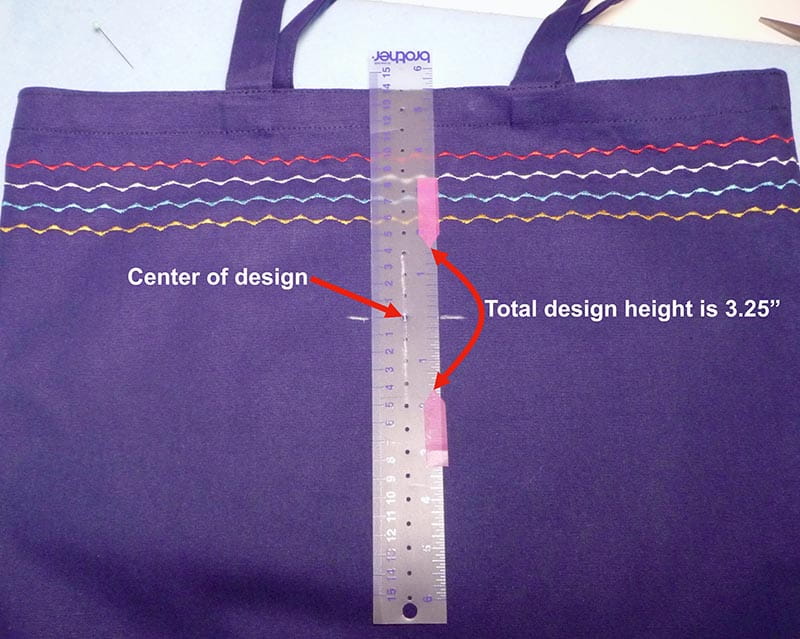
Figure #9c
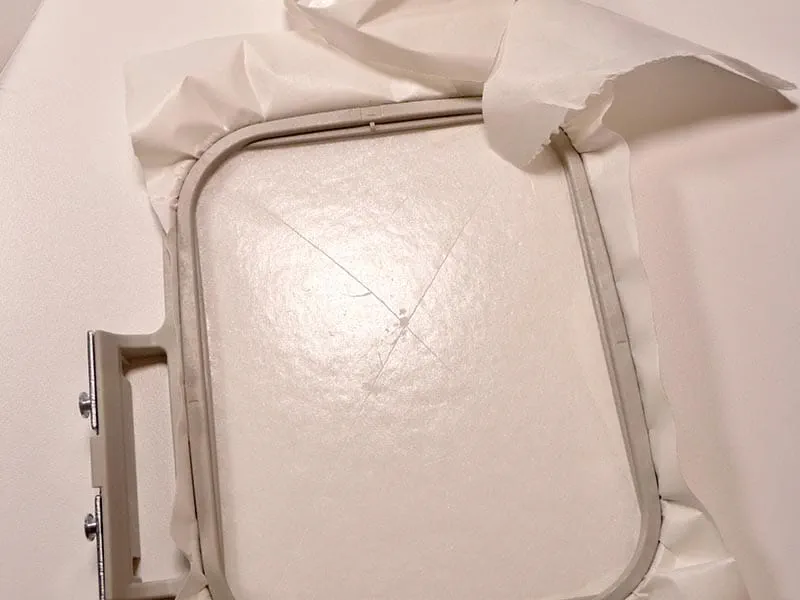
Place sticky stabilizer in hoop with shiny side of paper facing up, hooping it like you would a standard piece of fabric. Next, lightly score paper with a pin to expose sticky side. Peel all paper away. See Figure #10a and #10b.
Figure #10a
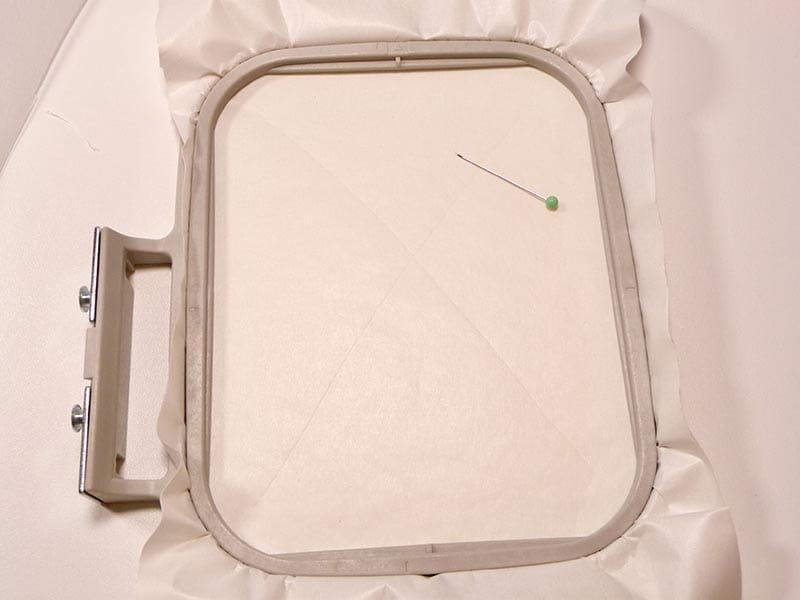
Figure #10b
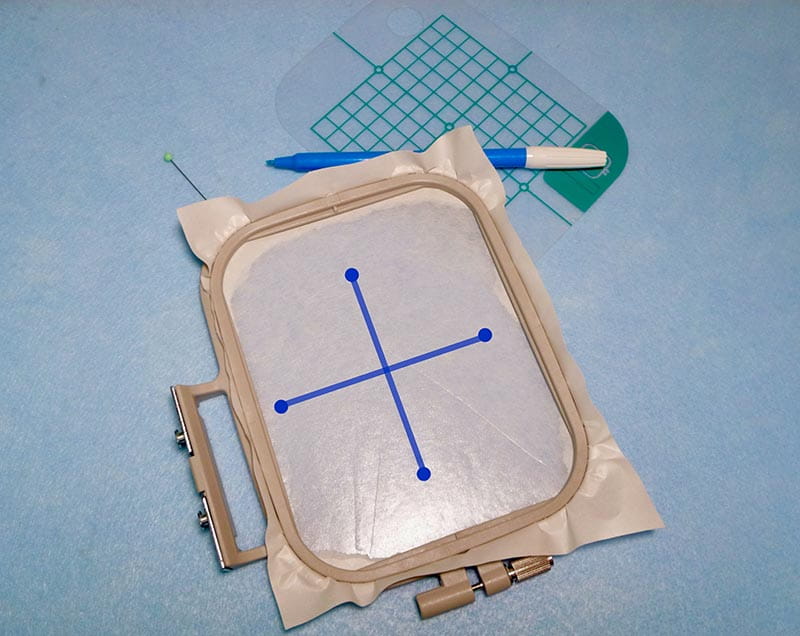
Next, we’ll mark the center of the stabilizer in the hoop with a removeable marker. Place template grid over the hoop, Use tip of pen to mark dots for center points both horizontally and vertically, and then remove grid and use a ruler to connect the dots and draw lightly marked lines. See Figure #11a and enhanced photo in #11b.
Figure #11a
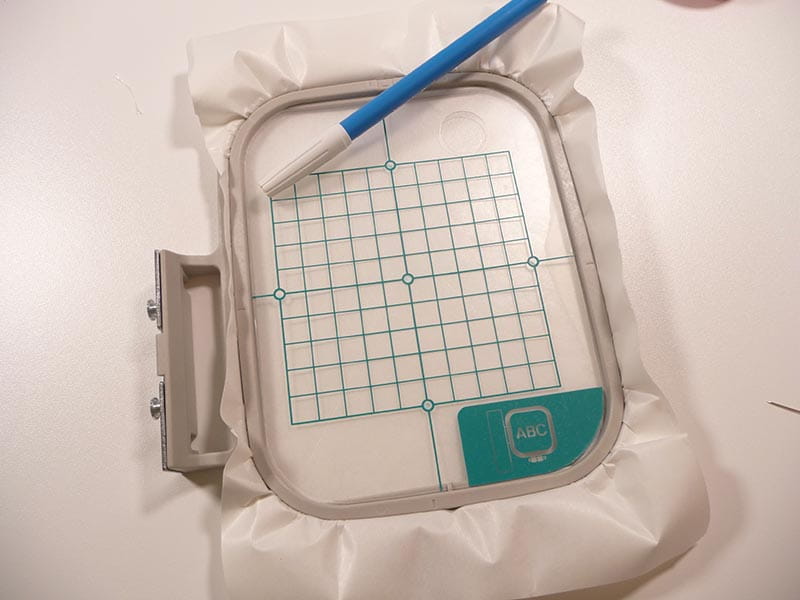
Figure #11b
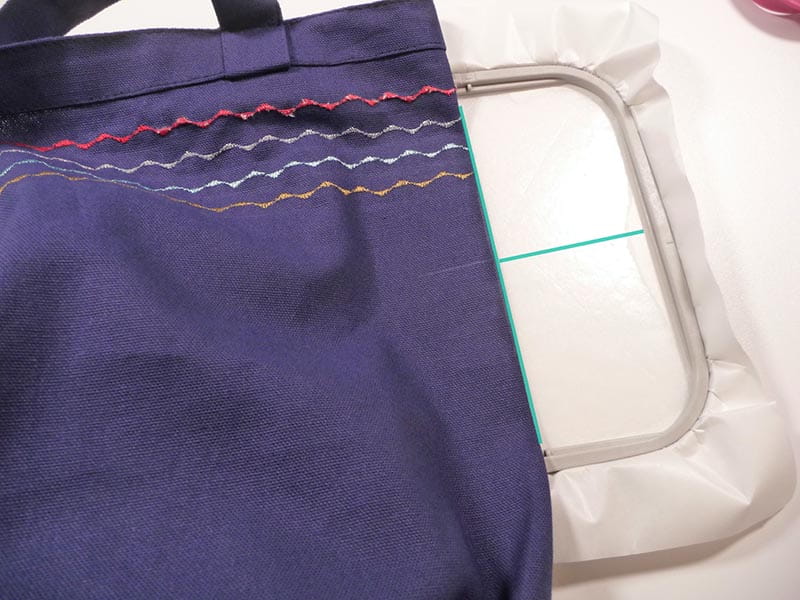
Transfer center markings on tote front to wrong side. Tip: I placed pins along the lines, used them as a reference to draw new lines, and then removed the pins. Carefully fold tote along center line and then unfold tote and attach to stabilizer with horizontal and vertical lines on tote matching lines drawn on stabilizer. See enhanced photo with green lines in Figure #12.
Figure #12
Smooth fabric so it is flat in the hoop. See hooped fabric from the right and wrong side in Figure #13a and #13b.
Figure #13a
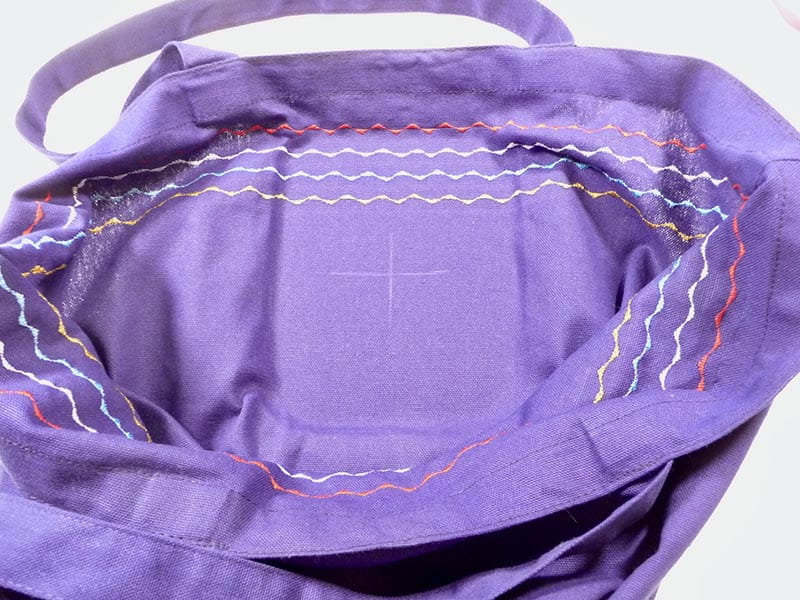
Figure #13b
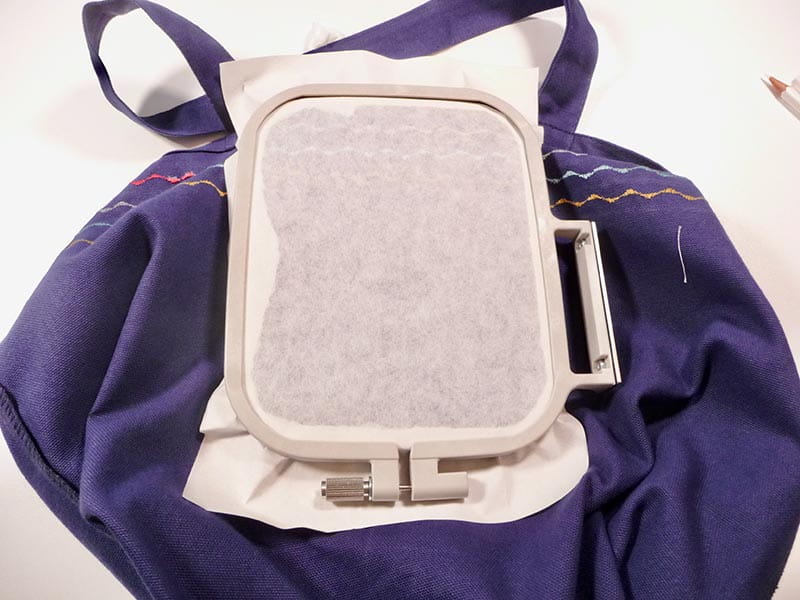
Figure #14
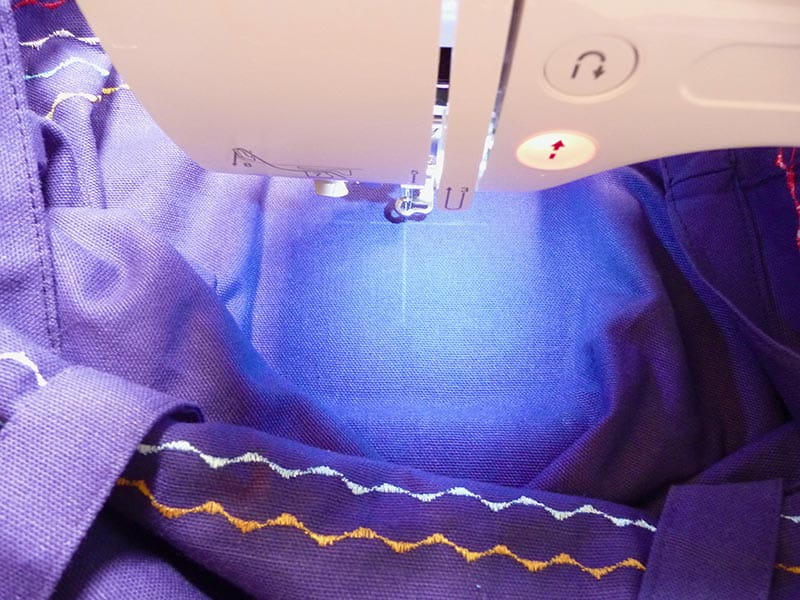
Figure #15a
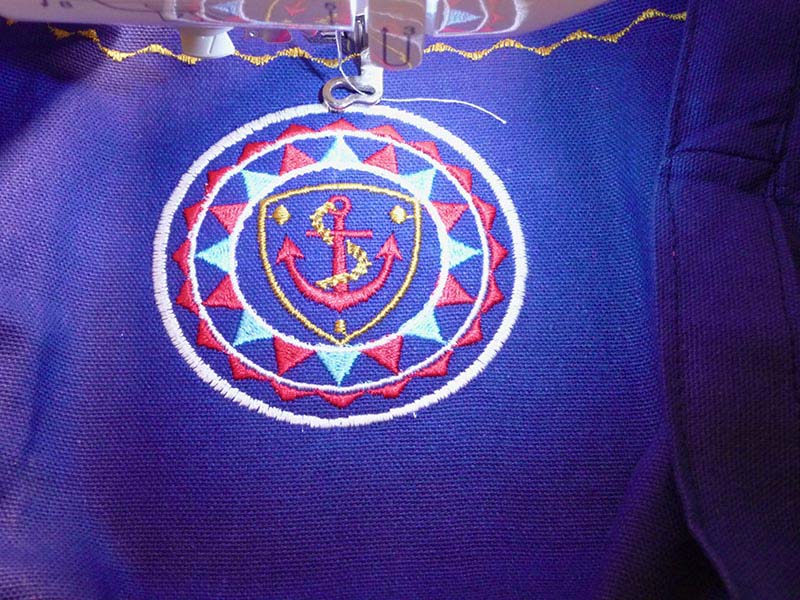
Figure #15b
You are finished! Enjoy!
Tags
Shop this Project
No sewing or embroidery machine? No problem! Any products mentioned in this project are available to buy here so you can stay stitching.

Brother Sewing and Embroidery Machines
Related Projects
Stay Connected
* Required fields