Foot of Month: Embroidered Shoe Bag with Decorative Stitches
Approximate finished measurements when bag is closed: 7-inches wide at the top, 13-inches wide at the bottom, and 16-inches high. Cute embroidered shoe bags make packing more fun! This is an easy project to make with your Brother sewing and embroidery machine! This month we are featuring the Brother Candle Wicking Foot,
using it to add rows of decorative Candle Wicking style stitches to our embroidered shoe bag. This special foot has a deep groove on the underside, designed to allow the raised candle wicking stitches to easily pass under the foot as you sew. Our instructions show examples of candle wicking stitches.
Materials and Supplies
- Brother Sewing and Embroidery Machine (Featured machine in this project is THE Dream Machine 2, Model XV8550D
) - Basic sewing notions including thread to match or blend with fabrics, a tool for turning drawstring, and a bodkin or safety pin for inserting drawstring.
- Removable marker for drawing lines on fabric.
Note: Be sure to check marker for compatibility with your fabric. In addition, be aware that markings often need to be removed before pressing to avoid leaving permanent marks on fabric.
Quilt weight fabric for bag, lining, and drawstring:
- For bag cut two pieces measuring 14-inches wide X 18-inches long.
- For bag lining cut two pieces measuring 14-inches wide X 18-inches long.
- Using one of the above fabrics cut one strip measuring 1 ½ -inches wide X 36-inches long for drawstring.
Note: Use a length of 3/8-inch ribbon as a substitute for the fabric drawstring.
- SA193
Candle Wicking Foot
Note: Check your machine to see if you have candle wicking stitches built in. If not, you can create a candle wicking stitch using the Brother My Custom Stitch feature. Visit the Free Sewing and Embroidery Machine Design Pattern section of brother-usa.com
for free instructions for creating this stitch.
for free instructions for creating this stitch.
- Brother Embroidery Thread and Brother Bobbin Thread
- SA5810
Brother medium weight tear-away stabilizer. - SABESLET4
Brother Lettering Software or lettering from built-in fonts. - Vintage High Heel Shoe
design from the Faux Embellishments collection on iBroidery.com. - See Figure #1.
 Figure #1[/caption]
- Item Number: eu012_07
- Vintage High Heel Shoe
- Width: 2.25 Inches Height: 1.81 Inches
Instructions for Creating Shoe Bag
1. Gather fabric pieces for making bag. See Figure #2. [caption id="attachment_20661" align="aligncenter" width="800"] Figure #2[/caption]
Set up machine for embroidery and transfer design. Create a combination design using two shoes and lettering of your choice. See example with lettering from Brother Lettering Software in Figure #3.
[caption id="attachment_20662" align="aligncenter" width="800"]
Figure #2[/caption]
Set up machine for embroidery and transfer design. Create a combination design using two shoes and lettering of your choice. See example with lettering from Brother Lettering Software in Figure #3.
[caption id="attachment_20662" align="aligncenter" width="800"] Figure #3[/caption]
2. Select one of the bag pieces to use for the front. Layer fabric with a square of stabilizer and hoop so design will be centered 8-inches from the lower edge. Slip a second piece of stabilizer under the hoop to use as a floating layer. Embroider combination design. See Figure #4.
[caption id="attachment_20663" align="aligncenter" width="800"]
Figure #3[/caption]
2. Select one of the bag pieces to use for the front. Layer fabric with a square of stabilizer and hoop so design will be centered 8-inches from the lower edge. Slip a second piece of stabilizer under the hoop to use as a floating layer. Embroider combination design. See Figure #4.
[caption id="attachment_20663" align="aligncenter" width="800"] Figure #4[/caption]
3. Remove fabric from hoop and press. Serge finish or overcast all raw edges of bag and lining piece if your fabric ravels easily. Set up machine for sewing with candle wicking foot. Note that this foot looks similar to an open toe foot on the top. On the bottom you’ll see the deep groove designed to flow over thick decorative stitches, such as the candle wicking stitches used in this project. These stitches create a beaded look due to their raised design. Experiment with using this foot for other thick decorative stitches as well. See top and bottom side of foot below:
Figure #4[/caption]
3. Remove fabric from hoop and press. Serge finish or overcast all raw edges of bag and lining piece if your fabric ravels easily. Set up machine for sewing with candle wicking foot. Note that this foot looks similar to an open toe foot on the top. On the bottom you’ll see the deep groove designed to flow over thick decorative stitches, such as the candle wicking stitches used in this project. These stitches create a beaded look due to their raised design. Experiment with using this foot for other thick decorative stitches as well. See top and bottom side of foot below:

 4. Draw lines for decorative stitching above embroidery design, spacing them 1-inch apart. Place stabilizer underneath. See Figure #5.
[caption id="attachment_20664" align="aligncenter" width="800"]
4. Draw lines for decorative stitching above embroidery design, spacing them 1-inch apart. Place stabilizer underneath. See Figure #5.
[caption id="attachment_20664" align="aligncenter" width="800"] Figure #5[/caption]
5. Decide on the stitches you want to use for the first and second color. Thread top with thread that coordinates with the embroidery design and use embroidery bobbin thread in the bobbin. See examples in Figure #6a and Figure #6b.
[caption id="attachment_20665" align="aligncenter" width="520"]
Figure #5[/caption]
5. Decide on the stitches you want to use for the first and second color. Thread top with thread that coordinates with the embroidery design and use embroidery bobbin thread in the bobbin. See examples in Figure #6a and Figure #6b.
[caption id="attachment_20665" align="aligncenter" width="520"] Figure #6a[/caption]
[caption id="attachment_20666" align="aligncenter" width="530"]
Figure #6a[/caption]
[caption id="attachment_20666" align="aligncenter" width="530"] Figure #6b[/caption]
Stitch three rows of candle wicking stitches over the lines. See below:
Figure #6b[/caption]
Stitch three rows of candle wicking stitches over the lines. See below:
 Select the next stitch and choose a second color to stitch between the lines. See below:
 6. Select drawstring strips. Press and fold under 1-inch on each short edge. Next, place right sides together with long edges matching and sew strips using a ¼-inch seam. Turn right side out and press flat. Set aside temporarily.
7. Remove excess stabilizer. Press front piece and prepare to construct bag. See Figure #7.
[caption id="attachment_20667" align="aligncenter" width="800"]
6. Select drawstring strips. Press and fold under 1-inch on each short edge. Next, place right sides together with long edges matching and sew strips using a ¼-inch seam. Turn right side out and press flat. Set aside temporarily.
7. Remove excess stabilizer. Press front piece and prepare to construct bag. See Figure #7.
[caption id="attachment_20667" align="aligncenter" width="800"] Figure #7[/caption]
Using a ½-inch seam allowance, sew bag and bag lining as follows:
Figure #7[/caption]
Using a ½-inch seam allowance, sew bag and bag lining as follows:
- Place bag front and back right sides together and sew bottom seam.
- Place lining pieces right sides together. Sew the bottom seam, marking off an opening measuring 5-inches wide to allow for turning bag right sides out.
- Next, you’ll need to form a casing at the top for the drawstring to go through. Begin by making a mark 1-inch from the top edge on one side seam of the bag. Measure down 1-inch and make another mark. Sew side seam, leaving the seam open between marks. Sew second side seam of bag.
Tip: In this example the opening was left on the right-hand side of the bag. This is ideal for right-handers, but you can choose any side that works for you.
- Sew side seams of lining without leaving any opening.
 Figure #8[/caption]
9. Working from the right side, run a line of stitching close to top edge of bag to secure bag to lining. To form a casing for the drawstring sew a line of stitching above and below opening. See enhanced photo in Figure #9.
[caption id="attachment_20669" align="aligncenter" width="800"]
Figure #8[/caption]
9. Working from the right side, run a line of stitching close to top edge of bag to secure bag to lining. To form a casing for the drawstring sew a line of stitching above and below opening. See enhanced photo in Figure #9.
[caption id="attachment_20669" align="aligncenter" width="800"] Figure #9[/caption]
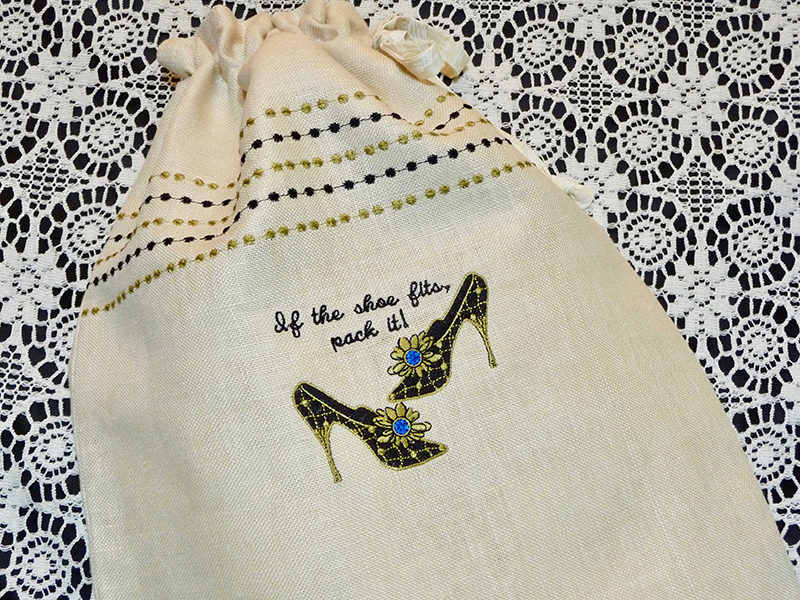
10. Press the bag to prepare it for finishing. See Figure #10.
[caption id="attachment_20670" align="aligncenter" width="800"]
Figure #9[/caption]
10. Press the bag to prepare it for finishing. See Figure #10.
[caption id="attachment_20670" align="aligncenter" width="800"] Figure #10[/caption]
Insert drawstring evenly into casing and knot the ends. Close opening in lining with machine or hand stitches.
You are finished! Enjoy!
Figure #10[/caption]
Insert drawstring evenly into casing and knot the ends. Close opening in lining with machine or hand stitches.
You are finished! Enjoy!
Options and ideas:
- This shoe bag size will accommodate most any pair of shoes. Feel free to adjust size of the rectangles smaller or larger as desired.
- Use cording in place of the drawstring and add a cord lock for easy opening and closing.
- This same bag would be great for organizing many items in your suitcase, including lingerie and any other items you wish to keep separate.
Related Projects
Stay Connected
* Required fields