Foot of the Month: Quilted Potholders Created with the Circular Attachment
Nothing beats the Brother Circular Sewing Attachment for sewing perfect circles! This month we are featuring this attachment as our Foot of the Month. In this project, we’ll show you how to create clever quilted potholders that are neatly finished on both sides. Are you ready? Let’s go sew!
Materials and Supplies
- Brother Sewing Machine
model suitable for use with Circular Sewing attachment. - SACIRC1
Circular Attachment Bundle. Note: The circular sewing attachment works on many Brother model machines. Check with your local dealer for the most current compatibility list. - Manual for SAIRC1 Circular Attachment Bundle.
Review set up and usage instructions in manual before beginning this project. - SA540
Brother lightweight water-soluble stabilizer. Cut two pieces measuring 6-inches square for each potholder. - SA5810
Brother lightweight tear-away stabilizer. Cut one piece measuring 2-inches square for each potholder. - Basic sewing notions, including thread to match or contrast with fabrics, and an erasable marker.
- Small sharp scissors for trimming.
Fabric requirements for each potholder:
- Two 10-inch squares of cotton, one for front of potholder and one for back.
- Two 10-inch squares of thin cotton batting, one for front of potholder and one for back.
- One 6-inch square of contrasting cotton fabric for center circle. Fuse medium weight interfacing to wrong side of square.
- One narrow strip of fabric measuring 2-inches wide X 6-inches long for creating loop.
Note: Finished size of each completed potholder is a circle with a circumference of 8-inches. See back of potholder in Figure #1.
[caption id="attachment_19123" align="aligncenter" width="800"] Figure #1[/caption]
Instructions for Creating Potholders
You can make each potholder in just a few easy steps! Complete all steps for each potholder you wish to make.- Fold under ½-inch on each long side of narrow strip, pressing toward center. Layer each of the 10-inch squares with a piece of batting. Assemble all pieces for creating potholders. See Figure #2.
 Figure #2[/caption]
- Set up machine for sewing with the circular attachment. See Figure #3.
 Figure #3[/caption]
Thread top and bottom with thread to match 6-inch square. Layer 6-inch square with two pieces of water-soluble stabilizer on the wrong side. Place pivot pin through center of all layers. See front and back side in Figure #4.
[caption id="attachment_19126" align="aligncenter" width="800"]
Figure #3[/caption]
Thread top and bottom with thread to match 6-inch square. Layer 6-inch square with two pieces of water-soluble stabilizer on the wrong side. Place pivot pin through center of all layers. See front and back side in Figure #4.
[caption id="attachment_19126" align="aligncenter" width="800"] Figure #4[/caption]
Create a small circle with satin stitched edges as follows: Transfer fabric and pivot pin to designated position on attachment and set scale to 50mm. Select a straight stitch in the left needle position. Sew circle. See Figure #5.
[caption id="attachment_19127" align="aligncenter" width="800"]
Figure #4[/caption]
Create a small circle with satin stitched edges as follows: Transfer fabric and pivot pin to designated position on attachment and set scale to 50mm. Select a straight stitch in the left needle position. Sew circle. See Figure #5.
[caption id="attachment_19127" align="aligncenter" width="800"] Figure #5[/caption]
- Next, stop and slide attachment to the left. See enhanced photo below:
 Carefully trim away fabric close to circle, leaving stabilizer in place. See below:
 Change to foot “N” for satin stitching. Set scale to 45, select a zig zag stitch set for 5.0 wide and 0.4 long, and stitch around circle. See below:
 Remove excess stabilizer, wash out remainder and dry.
- Select a set of layered cotton and batting. Add small piece of stabilizer in the center on the wrong side. Place pivot pin through center of all layers and transfer to attachment. Quilt both top and bottom pieces with concentric circles, starting with the scale set at 60, then 70, 80, 90, and 100. Stitch one final circle set at 115. Repeat steps for second set. See Figure #6
 Figure #6[/caption]
- Form circles by trimming each set of quilted squares just beyond the final circle stitched at 115mm. See example of trimming before and after in Figure #7.
 Figure #7[/caption]
- Remove attachment from machine. Set machine for sewing with standard foot. Sew along folded edges of strip. Form a loop and pin to top of front piece. See Figure #8.
 Figure #8[/caption]
- Place circles right sides together and sew a ¼-inch seam all around the outer edge.
Tip: Change stitch width setting to 5.5 and sew with fabric along edge of presser foot for a consistent ¼-inch seam. See Figure #9.
[caption id="attachment_19131" align="aligncenter" width="800"] Figure #9[/caption]
In order to turn the piece right side out, you’ll need to mark off a small opening on the top piece. Carefully cut fabric using markings as a guide and taking care to cut through just the top layer of fabric and batting. See below:
Figure #9[/caption]
In order to turn the piece right side out, you’ll need to mark off a small opening on the top piece. Carefully cut fabric using markings as a guide and taking care to cut through just the top layer of fabric and batting. See below:

 Turn to right side and press. Layer small circle on top, covering the opening in the process. Stitch across, and then around small circle to anchor it through all layers. See Figure #10a and #10b.
[caption id="attachment_19132" align="aligncenter" width="800"]
Turn to right side and press. Layer small circle on top, covering the opening in the process. Stitch across, and then around small circle to anchor it through all layers. See Figure #10a and #10b.
[caption id="attachment_19132" align="aligncenter" width="800"] Figure #10a[/caption]
[caption id="attachment_19133" align="aligncenter" width="800"]
Figure #10a[/caption]
[caption id="attachment_19133" align="aligncenter" width="800"] Figure #10b[/caption]
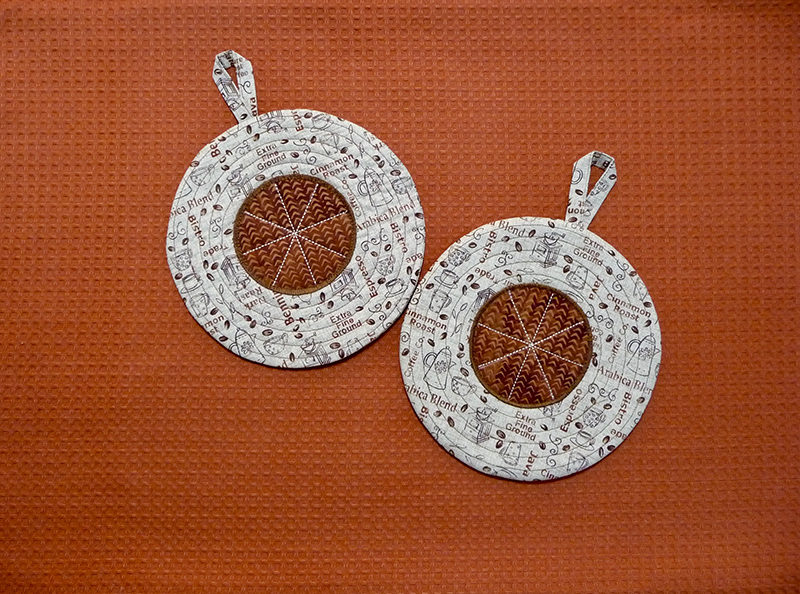
You are finished. Enjoy! See front side of finished potholder below:
Figure #10b[/caption]
You are finished. Enjoy! See front side of finished potholder below:

Related Projects
Stay Connected
* Required fields