Candy Hearts Machine Embroidered Quilt Block
Sew a sweet quilt block with the classic look of candy hearts and loving sentiments. This quick and easy log cabin block looks great when you choose bright “candy like” colors. Instructions show you how to decorate the patchwork block with an easy in-the-hoop appliqué and bold lettering. Stitch as many blocks as you like to make a quilt, or consider creating just one block for a pretty little pillow. You’ll find the heart shape and lettering options are all built-in to your Brother embroidery machine! Are you ready? Lets go sew!
Finished Size
Fabric requirements are based on a finished quilt block size of 10-inches wide by 12-inches long with ¼-inch seam allowance included. Finished Quilt shown is 40" x 60" plus ruffle.Materials and Supplies
- Brother Sewing and Embroidery Machine with 5 X 7-inch hoop capability
- Brother embroidery thread and bobbin thread.
White thread is featured for outlining each heart with a satin stitch. I used assorted coordinating bright colors for the lettering. - SA5810 medium weight tear-away stabilizer for embroidering each block
- SA185 Brother ¼-inch foot with guide for sewing patchwork pieces
- SA140 Brother Walking foot for quilting layers
- SASCISSKIT with curved tip scissors for trimming embroidered appliqué
- A rotary cutter, clear ruler, and self healing mat are recommended for accurately cutting blocks and strips of fabric.
- Basic sewing supplies, including good quality sewing thread for patchwork and quilting.
Note: Block and strip sizes listed below are for one block.
Cut the following pieces for each block:
- Pink for center square: One piece measuring 6½-inches X 6½-inches.
- White eyelet for center square overlay: One piece measuring 6½-inches X 6½-inches.
- Yellow for strip #1: One piece measuring 2½-inches wide X 6½-inches long.
- Purple for strip #2: One piece measuring 3½-inches wide X 8½-inches long.
- Turquoise for strip #3: One piece measuring 2½-inches wide X 9½-inches long.
- Orange for strip #4: One piece measuring 3½-inches wide X 10½-inches long.
- Any bright color for heart shaped center appliqué: One piece measuring 6-inches X 6-inches.
Tip: These instructions include strips cut to exact size. Another method for piecing a log cabin style block is to cut full-length strips of fabric cutting from selvedge to selvedge, sew long strip to block, and then trim to size after sewing. Use whatever method makes you happy!
Note: Featured fabrics are quilt-weight cottons featuring bright colors and a white dotted print. The center square includes an overlay of white eyelet allowing the pink base layer to peek through. I selected white eyelet for the ruffle accent to tie together the color scheme. See figure #1.
[caption id="attachment_5256" align="aligncenter" width="800"]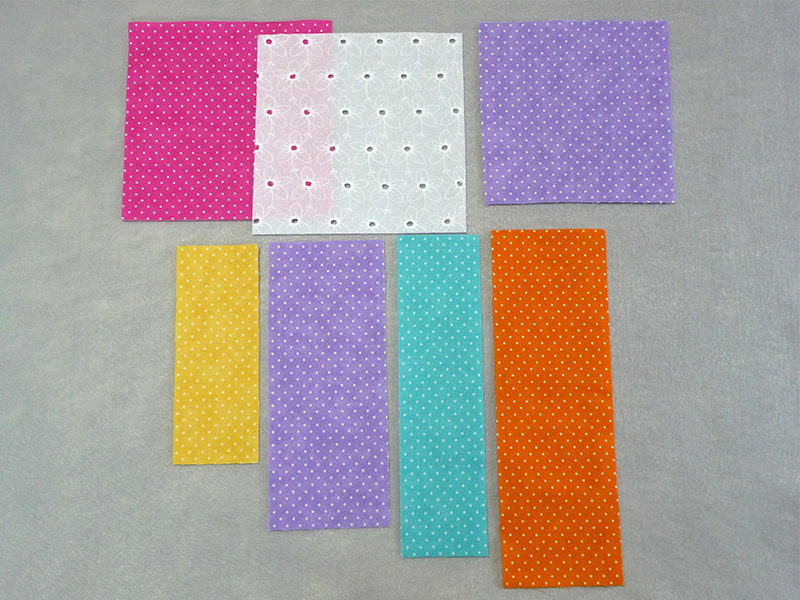 Figure #1[/caption]
Figure #1[/caption]
Additional supplies for creating a quilt or pillow:
- Purchase coordinating backing fabric and a matching size piece of lightweight quilt batting to cover the back of your quilt or pillow.
- Purchase additional white eyelet yardage to create a ruffle for the outer edge of your quilt or pillow, or purchase pre-ruffled eyelet trim.
Instructions for Creating a Quilt Block with Embroidery
Tip: Finger press seams to one side as you sew or press with a dry iron. Thoroughly press the entire block with the iron when finished with the piecing.
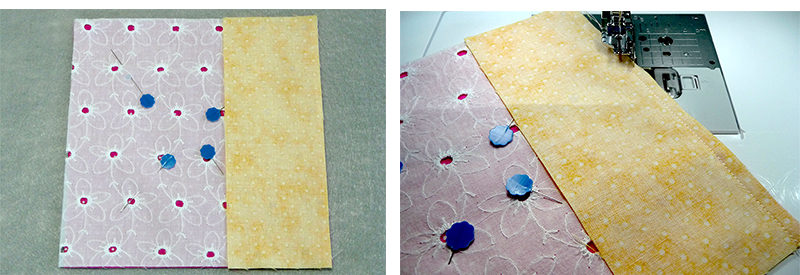
- Place eyelet over the pink center square and pin layers together. See figure #2.
 Figure #2[/caption]
- Set up machine for sewing with ¼-inch foot. Select a center needle straight stitch. For patchwork seams I prefer a stitch length setting of approximately 1.8. By using a super short a length such as this I avoid having to backstitch and simply cut the thread at the end of each seam. Sew all seams with fabrics facing right sides together.
Tip: When sewing with the quarter inch foot you want to run the raw edges right up against the guide. Keep the raw edges even and watch the guide as you sew for perfect and consistent patchwork seams. Take a look at the photo below for an example.
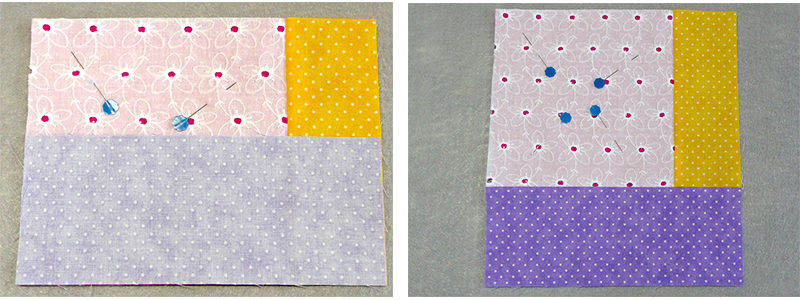
- Place strip #1 along right hand edge of the block. Sew seam and then press.
 Placing Strip #1.[/caption]
- Place strip #2 along lower edge of the block. Sew seam and press.
 Placing strip #2.[/caption]
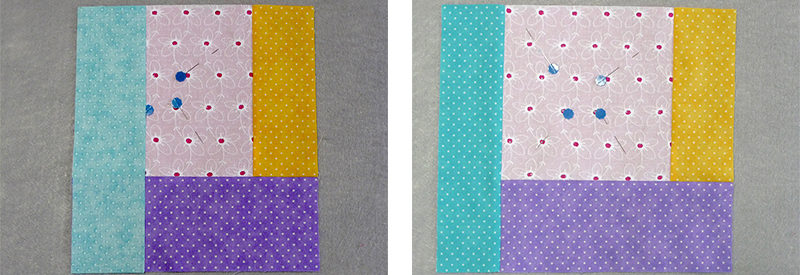
- Place strip #3 along left hand edge of the block. Sew seam and press.
 Placing strip #3.[/caption]
- Place strip #4 along top edge of the block. Sew seam and press.
 Placing strip #4.[/caption]
- Set up the machine for embroidery. Mark the center of the block. Hoop block with a layer of tear-away stabilizer, having the center mark aligned with the center of the 5 X 7-inch hoop.

Tip: If you plan to wash your finished item go ahead and use a wash out marker. If not, consider temporarily marking the center with crossed pins. Use the template grid included with your hoop for the utmost in accuracy while hooping. Be sure to remove the template and the pins before you take the hoop to the embroidery machine.
- Place the appliqué square over the eyelet square. If desired, you can tape this piece in place with low tack tape to keep layers from shifting. However, cotton tends to stick to itself so this may not be necessary.
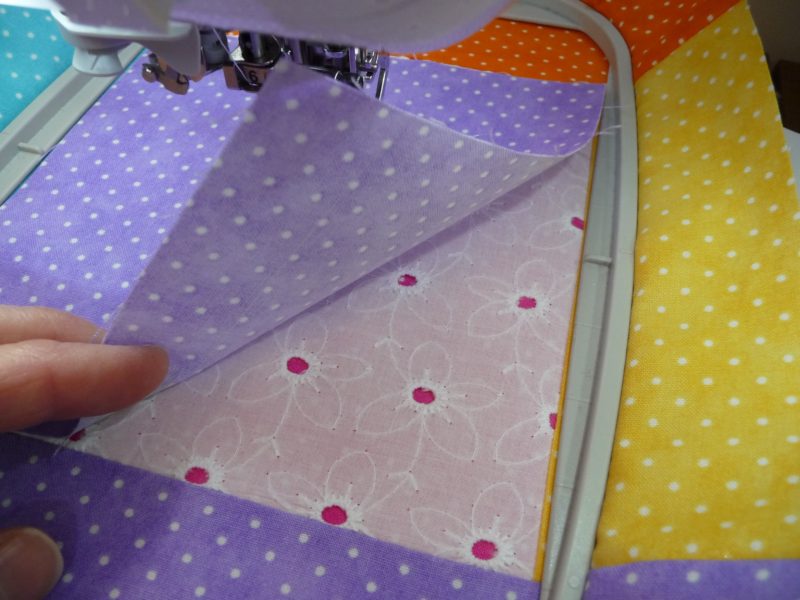
Creating the Appliqué and Adding Lettering
It’s time to create the heart appliqué and add lettering for the candy heart design. The exact steps for this will vary depending on the Brother model machine you are using. In addition, the exact size of your heart and lettering will vary slightly. Use the sizes shown in these instructions as an approximate guide for a heart design that fits within the 5 X 7-inch hoop. If you have a machine with edit mode capability you can easily create the heart and lettering design as one complete combination. If you have a machine without edit mode you will need to select, and then stitch each part of the design one at a time, leaving the fabric in the hoop until you have completed each step. Please read through all the remaining instructions and then use the capabilities built into your Brother model machine to create a heart design that is similar.Tip: It’s a good idea to make a sample of one complete heart appliqué, especially if you have never used this method before.
Note: The example below is shown on a machine without edit mode.
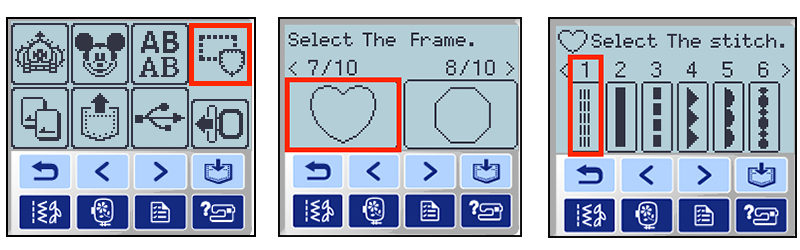
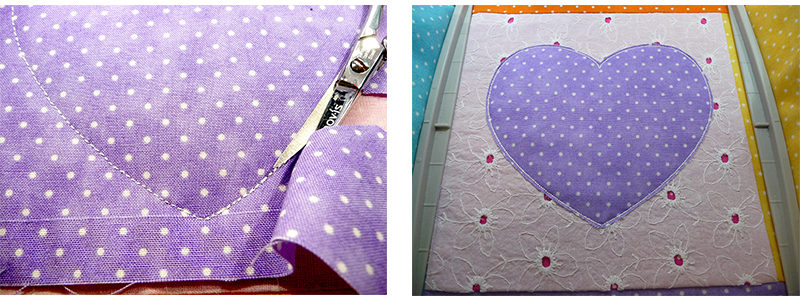
- Create the first heart shape with a Straight Stitch outline as follows.
- Select the heart from the frame shape menu, and choose the triple straight stitch outline.
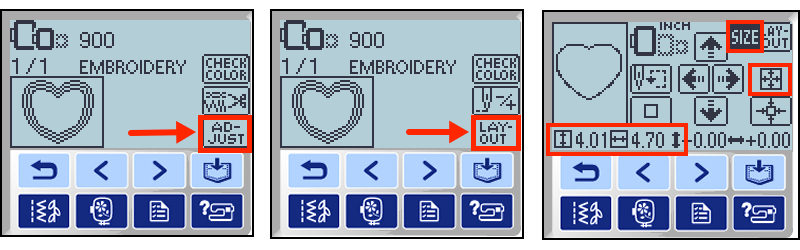
- Increase the heart size to approximately 4.01 X 4.70. Embroider and then trim excess fabric outside stitching line.
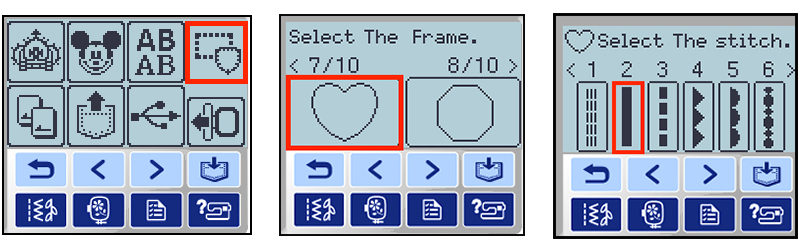
- Create the second heart shape with Satin Stitch Outline as follows.
- Select a second heart from the frame shape menu and select the satin stitch.
- Adjust the size so it measures approximately .25-inches or 6mm larger than the first heart. Embroider the satin stitch heart to cover the cut raw edges.

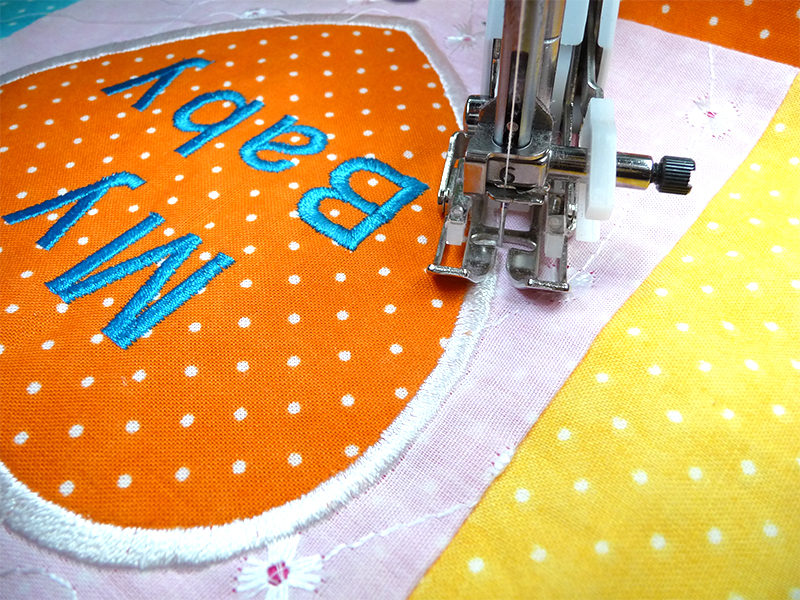
- Add first line of lettering as follows.
- Select simple block font beginning with medium size. Program the first word in the design.
- Adjust lettering within the layout, changing size and making sure it will fit within heart. My lettering is slightly under 1-inch high.
- Use arrow keys to move letters, and then use the trial feature to test where the lettering will stitch. Move as necessary, using the trial feature until you are sure of the position. Stitch the first line of lettering.
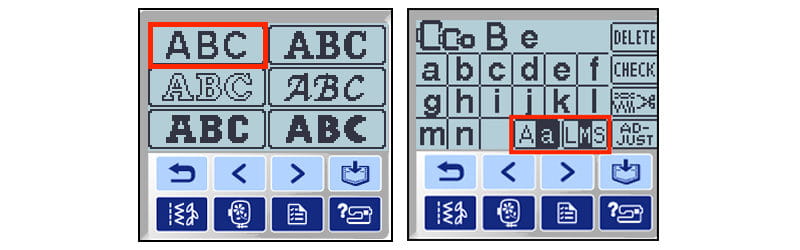


- Add the second line of lettering as follows.
- Repeat each of the lettering steps shown above and use the same font to program a second line of lettering to stitch below the first. Repeat the process of adjusting lettering within the layout, changing size and making sure it will fit within the heart. Be sure to re-size letters to match the height of the first. Move letters and use the trial feature once again, testing where the lettering will stitch and then adjusting the position as necessary. Stitch the second line of lettering.

- Below are photos showing the actual steps for stitching each heart shape.
- Stitch a built-in heart shape using the triple straight stitch. Trim close to the stitching using the curved tip scissors.
- Select a second heart frame shape using the satin stitch option. Embroider the second satin stitch heart so it covers the trimmed raw edges.
- Program lettering to fit within the heart shape. Stitch lettering. Remove block from hoop, gently tear away excess stabilizer, and press lightly. Repeat the entire process if you are making multiple blocks, adding new sentiments for each one.

Finishing
When you have finished your single or multiple blocks you can layer with batting and form a pillow, or sew blocks into rows and create a quilt using your favorite method. To make my quilt I created a total of twenty blocks and sewed them into rows, staggering the blocks to create a variety. Then used a super simple “pillowcase” method to add the batting and backing and sew the quilt layers together.
Here’s how: First I added an eyelet ruffle around the outer raw edge of the quilt top, and machine basting it in place. Next, I cut backing fabric and a layer of thin batting to equal the size of the quilt. I layered batting against the right side of the quilt, and then placed the backing on top with the right side facing down. I sewed all around the quilt leaving a generous opening for turning, turned the quilt right side out and then closed the opening with small hand stitches. To finish, I quilted through all layers using the walking foot, quilting around each block and around each heart.
 Try using this same basic method to create embroidered appliques with other shapes! It’s a fun and easy technique.
One last thought. Thanks to Kimberli MacKay for designing this project and sending it over for me to work up with the appliqué & embroidery technique. Our collaboration is always fun! Kimberli is a Pattern Maker, Sewing Expert, and Product Specialist at Brother. She also moderates your questions on this blog, so stop by and leave a comment!
Enjoy!
Try using this same basic method to create embroidered appliques with other shapes! It’s a fun and easy technique.
One last thought. Thanks to Kimberli MacKay for designing this project and sending it over for me to work up with the appliqué & embroidery technique. Our collaboration is always fun! Kimberli is a Pattern Maker, Sewing Expert, and Product Specialist at Brother. She also moderates your questions on this blog, so stop by and leave a comment!
Enjoy!Related Projects
Stay Connected
* Required fields