Free Design: Embroidered Snack Mat
~Joanne Banko, Brother Sews Ambassador What exactly is a snack mat, you ask? I would say that it’s a cross between a placemat and a mug rug. The 8-inch X 10-inch size is simply perfect for a little “me time” with a beverage and a snack. Use the Brother free design of the month fancy heart design to create this fun and colorful snack mat. This project makes a wonderful gift for friends and loved ones. Are you ready? Let’s go sew!
Materials and Supplies:
- Brother
sewing and embroidery machine. Note: Machine featured in this project is the Brother Luminaire. You can use any machine with a 4 X 4-inch hoop to embroider this design. - Brother
Embroidery Threads and Bobbin Thread for embroidering. - SA147
7mm Open Toe Clear Foot - SA5906
Brother Adhesive Backed Water-Soluble Stabilizer for holding fleece fabric in the hoop. - SA540
Brother Fibrous Water-Soluble Stabilizer for topping on fleece and decorative edging. - Basic notions, including a removable marker or chalk, and sewing thread for constructing snack mat. Tip: If you plan to iron over marks before removal, be sure to test your marker on your fabric beforehand.
- One piece of fabric for the front of the snack mat, backed with a layer of fusible craft fleece. Note: The size of this piece will vary depending on your hoop size and the method you use for hooping. You’ll need to make sure your fabric is large enough to hoop each of the corners if you’re using a four-inch hoop and hooping each motif separately. For the Luminaire I used the 10 5/8-inch square hoop included with SAVRXPUGK1
, Premium Pack 1 Upgrade for XP1 and included with XP2. Using this hoop allowed me to stitch all four designs at one time by hooping a piece of fabric measuring 13-inches X 15-inches, centering each design in the four corner blocks. - One piece of matching fabric measuring 8 ½-inches X 10 ½-inches for the back of the snack
- Four pieces of cotton print measuring 3 ½-inches wide X 2 ¾-inches long.
- Ruffled lace trim, 1 1/8th yard of 1- 1 ½-inch wide lace.
- Brother Free Design of the Month
FD_2_2021.pes. See Figure #1 for size and thread color information.
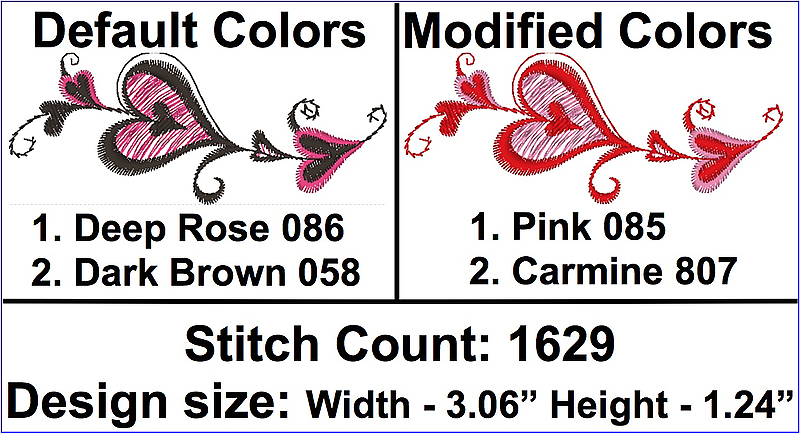 Figure #1[/caption]
Basic Steps for Creating Snack Mat:
- Embroider designs on fabric for the front of the snack mat.
- Stitch appliqué pieces to front.
- Add lace trim.
- Sew backing to finished front piece.
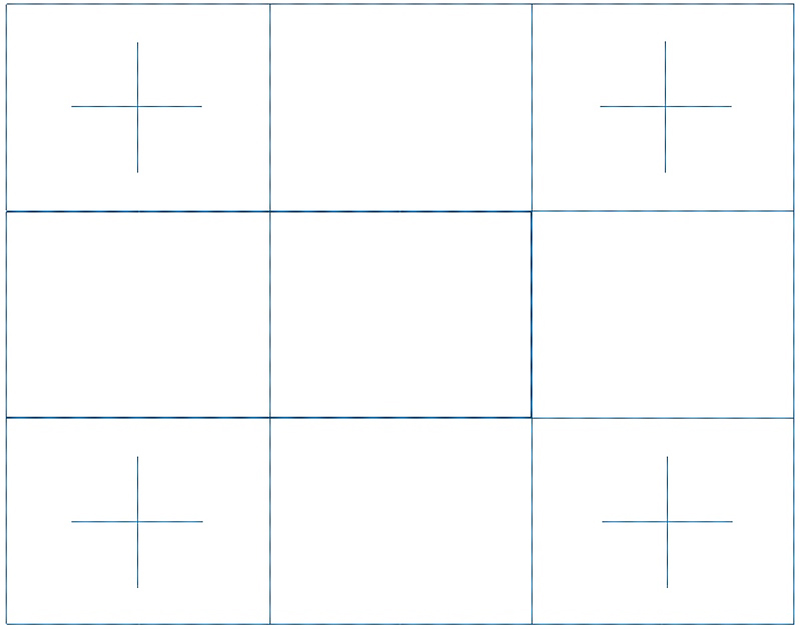 Figure #2[/caption]
Transfer the heart design to your machine and stitch all four, taking care to mirror image the design and stitch with the orientation shown below in the Figure #3 graphic.
[caption id="attachment_26810" align="aligncenter" width="800"]
Figure #2[/caption]
Transfer the heart design to your machine and stitch all four, taking care to mirror image the design and stitch with the orientation shown below in the Figure #3 graphic.
[caption id="attachment_26810" align="aligncenter" width="800"]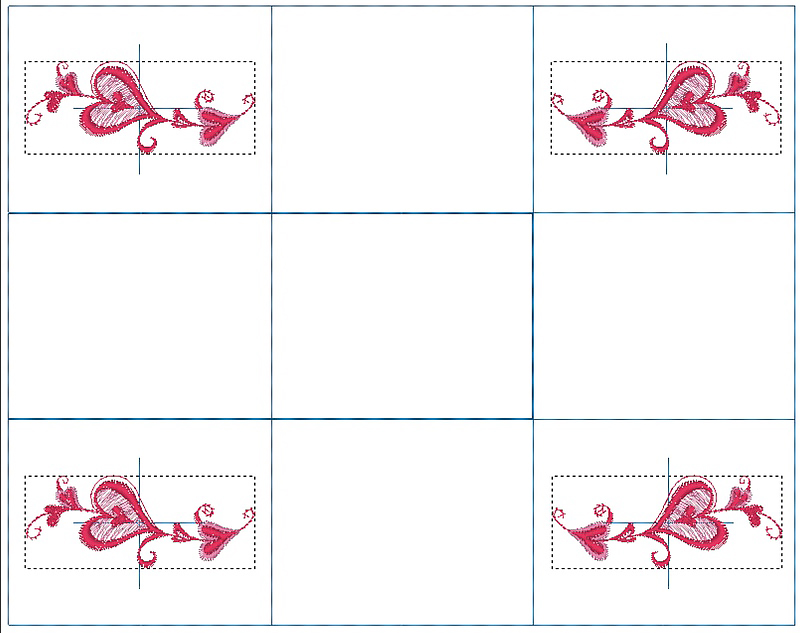 Figure #3[/caption]
Add lettering as desired to fit the center rectangle. Trim piece to equal 8 ½-inches X 10 ½-inches with a ¼-inch seam allowance outside the drawn rectangle. Assemble pieces and trim to complete the snack mat. See Figure #4a and Figure #4b.
[caption id="attachment_26811" align="aligncenter" width="800"]
Figure #3[/caption]
Add lettering as desired to fit the center rectangle. Trim piece to equal 8 ½-inches X 10 ½-inches with a ¼-inch seam allowance outside the drawn rectangle. Assemble pieces and trim to complete the snack mat. See Figure #4a and Figure #4b.
[caption id="attachment_26811" align="aligncenter" width="800"]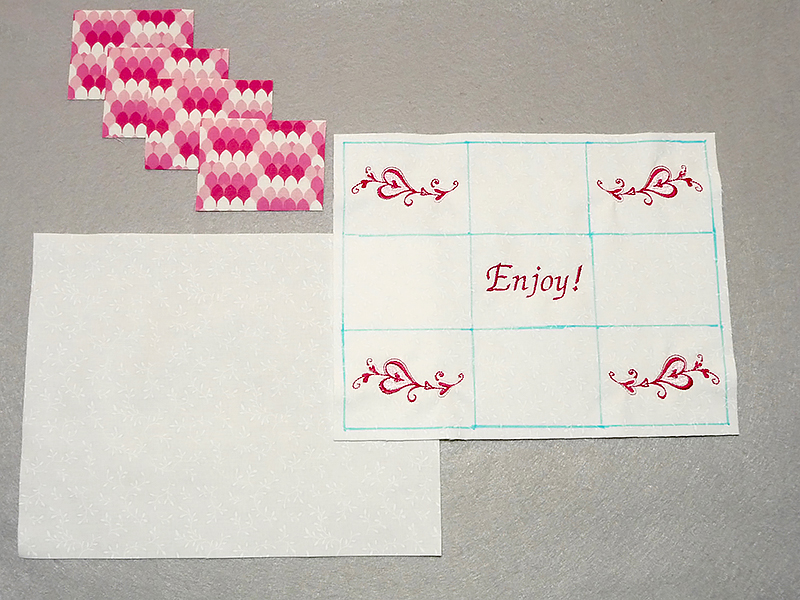 Figure #4a[/caption]
[caption id="attachment_26812" align="aligncenter" width="800"]
Figure #4a[/caption]
[caption id="attachment_26812" align="aligncenter" width="800"]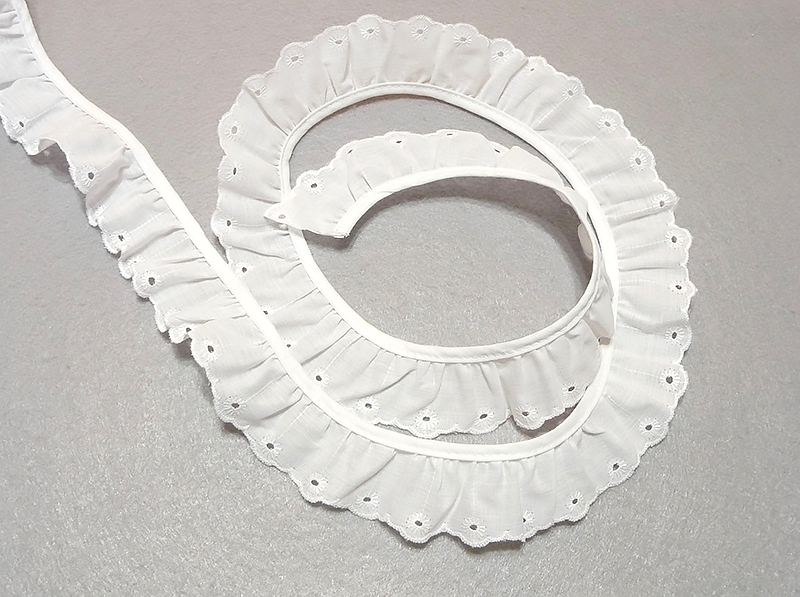 Figure #4b[/caption]
2. Place rectangles for appliqué in remaining sections. See Figure #5.
[caption id="attachment_26813" align="aligncenter" width="800"]
Figure #4b[/caption]
2. Place rectangles for appliqué in remaining sections. See Figure #5.
[caption id="attachment_26813" align="aligncenter" width="800"]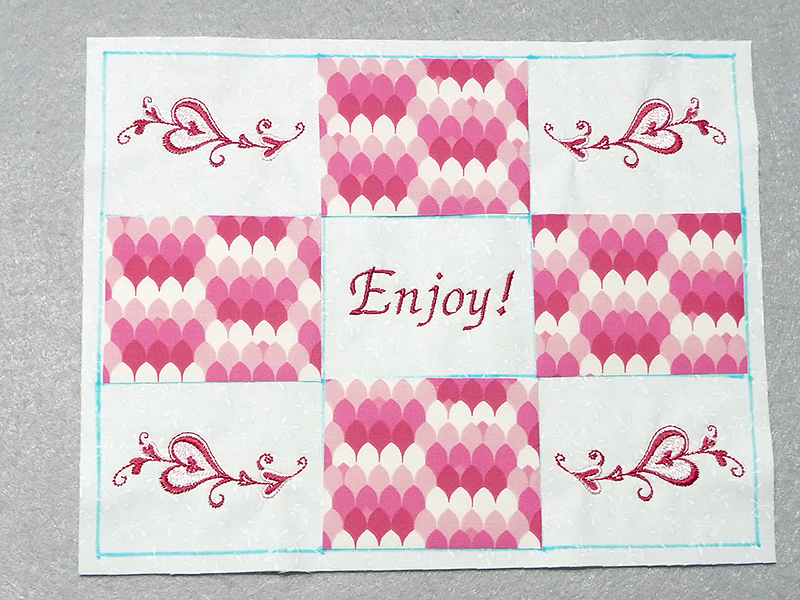 Figure #5[/caption]
3. Attach the clear foot and set machine for a zig zag stitch using Width: 3.5 and Length: 1.0. Stitch around each shape to secure to the front of the mat. See Figure #6.
[caption id="attachment_26814" align="aligncenter" width="800"]
Figure #5[/caption]
3. Attach the clear foot and set machine for a zig zag stitch using Width: 3.5 and Length: 1.0. Stitch around each shape to secure to the front of the mat. See Figure #6.
[caption id="attachment_26814" align="aligncenter" width="800"]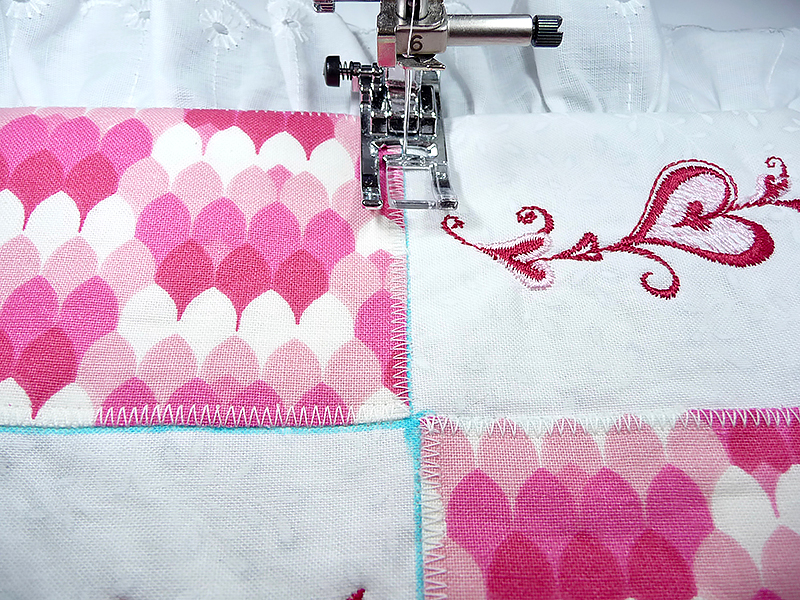 Figure #6[/caption]
4. Pin lace along edge with right sides together, beginning by folding under the raw edge at the center of the bottom, rounding the four corners to shape lace around the rectangle, overlapping folded edge at the end. See Figure #7.
[caption id="attachment_26815" align="aligncenter" width="800"]
Figure #6[/caption]
4. Pin lace along edge with right sides together, beginning by folding under the raw edge at the center of the bottom, rounding the four corners to shape lace around the rectangle, overlapping folded edge at the end. See Figure #7.
[caption id="attachment_26815" align="aligncenter" width="800"]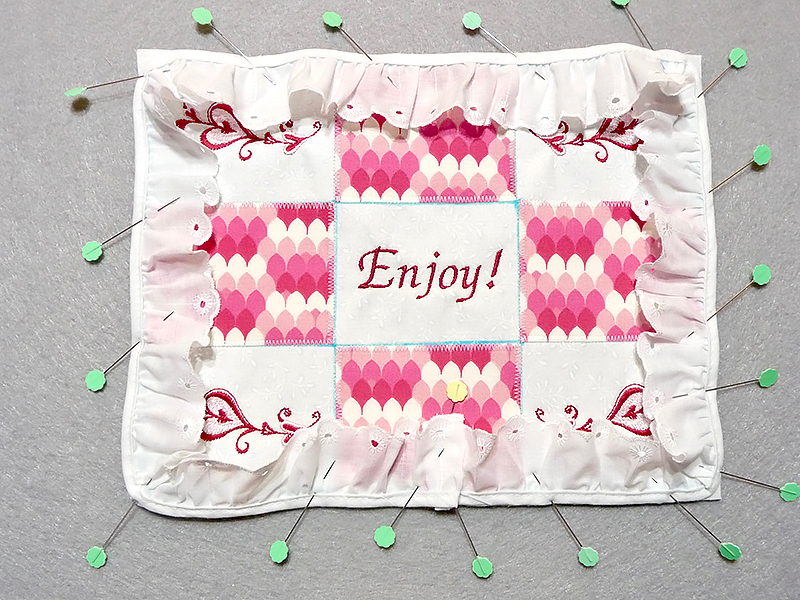 Figure #7[/caption]
5. Switch to standard sewing foot. Baste lace in place, stitching a scant 1/4-inch from the raw edge.
6. Layer front with back, keeping right sides together. Figure #8.
[caption id="attachment_26816" align="aligncenter" width="800"]
Figure #7[/caption]
5. Switch to standard sewing foot. Baste lace in place, stitching a scant 1/4-inch from the raw edge.
6. Layer front with back, keeping right sides together. Figure #8.
[caption id="attachment_26816" align="aligncenter" width="800"]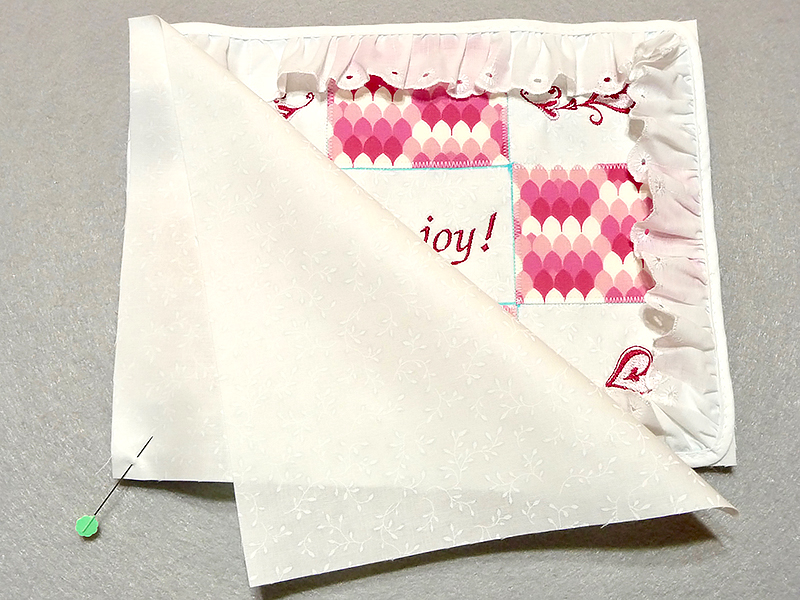 Figure #8[/caption]
7. Mark off a 4-inch opening along the center of one side to allow for turning and sew pieces together using a ¼-inch seam allowance or a slightly deeper seam to hide the heading of the lace.
8. Turn right side out, fold under open edges and close opening with small hand stitches.
9. Remove marks as needed and press piece well. Stitch from side to side and top to bottom to quilt layers together between rectangles. See finished front and back in Figure #9a and Figure 9b.
[caption id="attachment_26817" align="aligncenter" width="800"]
Figure #8[/caption]
7. Mark off a 4-inch opening along the center of one side to allow for turning and sew pieces together using a ¼-inch seam allowance or a slightly deeper seam to hide the heading of the lace.
8. Turn right side out, fold under open edges and close opening with small hand stitches.
9. Remove marks as needed and press piece well. Stitch from side to side and top to bottom to quilt layers together between rectangles. See finished front and back in Figure #9a and Figure 9b.
[caption id="attachment_26817" align="aligncenter" width="800"] Figure #9a[/caption]
[caption id="attachment_26818" align="aligncenter" width="800"]
Figure #9a[/caption]
[caption id="attachment_26818" align="aligncenter" width="800"]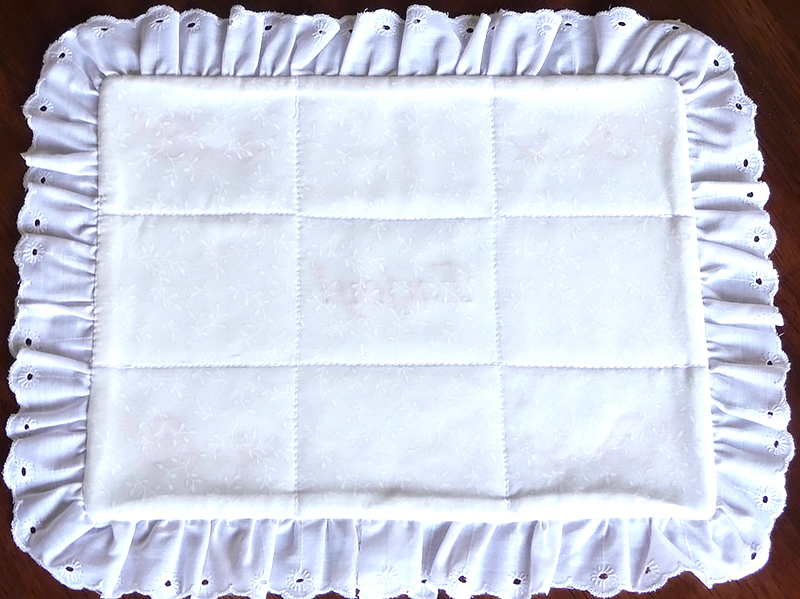 Figure #9b[/caption]
You are finished! Enjoy!
CLICK HERE FOR PDF!
Figure #9b[/caption]
You are finished! Enjoy!
CLICK HERE FOR PDF!Tags
Shop this Project
Have you ever seen a project (like this one) and said, 'I want to try that?' Well, Brother has you covered! The products in this fun project are available for purchase, so you can click, shop, and get to embroidery!
Embroidery machines
Related Projects
Stay Connected
* Required fields