Glamorous Circular Rosette
Have you ever found yourself looking for a special accent to dress up an outfit or accessory? This little rosette may be ideal for your next project in need of a glamorous touch! Make this rosette quickly and easily using your Brother Circular Sewing attachment. Fashion the rosette in any color you choose and then use your finished flower to add dimension and decoration to a hat or purse, embellish the bow on a dress, top off a bridal headpiece, wear on a lapel, etc. The list of possibilities is endless! Are you ready? Let's go sew!
Materials and Supplies:
- Brother Sewing machine with circular sewing capability. Please visit Brothersews.com
for a list of compatible models. - SACIRC1 Brother Circular Attachment Bundle
- SA5810 Brother Medium Weight Tear Away Stabilizer
- Basic sewing notions including thread to match fabric and a hand needle to make gathering stitches.
Fabrics and additional supplies for rosette:
- Soft woven satin such as crepe back satin, two pieces measuring 7-inches square.
- Color coordinated sheer organza, two pieces measuring 6-inches square and two pieces measuring 5-inches square.
- 1/2-inch pearl button or another suitable decorative bead or button to attach to the center.
Steps to Create Rosette
- Set up machine for sewing with the circular attachment using thread to match fabric. Change stitch length to 2.0. Pin layers at the corners. See Figure #1.
Tips for Circular Sewing: It is usually best to decrease your stitch length slightly when sewing fine fabrics, and when sewing around tight curves. Prior to stitching, prepare each set of same-sized fabric squares by placing fabrics right sides together and layering with a piece of tear-away stabilizer. When making circles with this attachment it is essential to use some form of stabilizer, unless your fabric is very firm and stiff in and of itself. Note that most organza has no visible right or wrong side.
[caption id="attachment_14040" align="aligncenter" width="800"] Figure #1[/caption]
- Begin by making the largest circle using the following guidelines:
- Locate the approximate center of the set of 7-inch satin squares. Set attachment to #70.
- Place the included pin through the center point, and attach to the bed of the circular sewing attachment.
- Sew a complete circle using a straight stitch set for a length of 2.0. Overlap stitches slightly to re-enforce them at the end.
Tip: Smooth fabric layers as you stitch by using one hand to gently pat the layers as they feed in toward the needle. See Figure #2a.
[caption id="attachment_14041" align="aligncenter" width="800"] Figure #2a[/caption]
- Use the same guidelines to stitch set of 6-inch organza squares with attachment set at #60, and 5-inch organza squares set at #50. See Figure #2b.
 Figure #2b[/caption]
- Carefully remove tear away. Trim circles leaving a scant 1/4-inch seam allowance. See Figure #3.
 Figure #3[/caption]
- Slash through a single layer of each circle, forming an "X" and then turn each circle right side out through the opening. Note: Pinch the fabric to separate the layers and grab just a single layer. Make sure cuts are no longer than 1-inch. You only need enough space to get your fingers through for turning. See Figure #4.
 Figure #4[/caption]
- Press edges of each turned circle using an iron temperature suitable for the fabric. Tip: No need to be too concerned with circle perfection. These soft fabrics are a little fussy and the gathering step will mask any "wobbles" that occur from the super soft fabric
- Layer and pin the three circles together. See Figure #5.
 Figure #5[/caption]
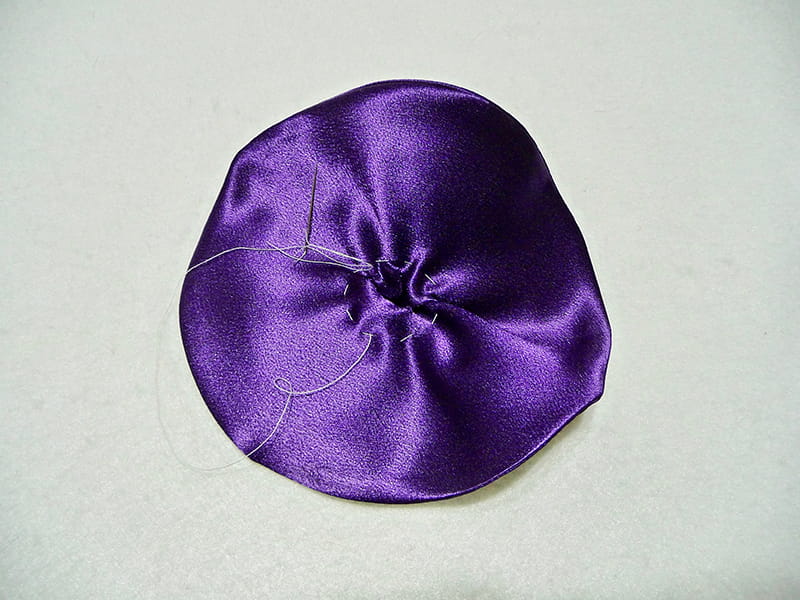
- Use a hand needle and strong matching thread to run a circle of gathering stitches just outside the X, knotting the thread at the beginning. Pull tightly to gather center of circle.
Note: Contrast thread is shown here for better visibility. See Figure #6.
[caption id="attachment_14046" align="aligncenter" width="800"] Figure #6[/caption]
- Hand sew button or bead in the middle to accent rosette. You are finished!
Options and Ideas:
- Use special glue or a sew-on jewelry pin back to make your rosette removable.
- Vary the size a little for each set of additional circles and make a cluster of flowers for decorating larger items.
- Consider adding synthetic leaves gathered from faux silk plants, feathers, ribbons, or other interesting trims to create a unique bouquet.
- Feel free to create a bouquet using various rosette colors mixed together.
- Add small beads or free standing lace embroidery designs to the center of your rosette.

