Little Princess Special Occasion Dress Part 1
Brother Sews Blogger
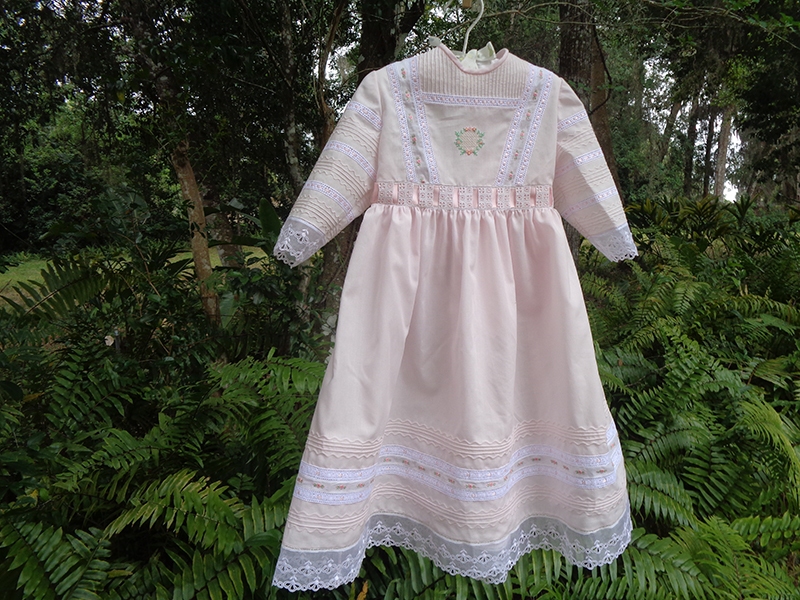 Special occasions require special dresses and the little princess wearing this heirloom confection will capture the center of attention at any event. The frilly frock features a medley of pintucks, machine embroidery, Swiss beading, satin ribbon, entredeux and Swiss edging on a base of fine batiste. The pattern is a variation of Connie Palmer’s exquisite Genevieve, available as a free .pdf download with the purchase of Classic Sewing Magazine, Spring 2018, sizes 4-10. With your Brother sewing/embroidery machine, a 4x4 frame and a pintuck foot, you can create an elegant yet simpler version.
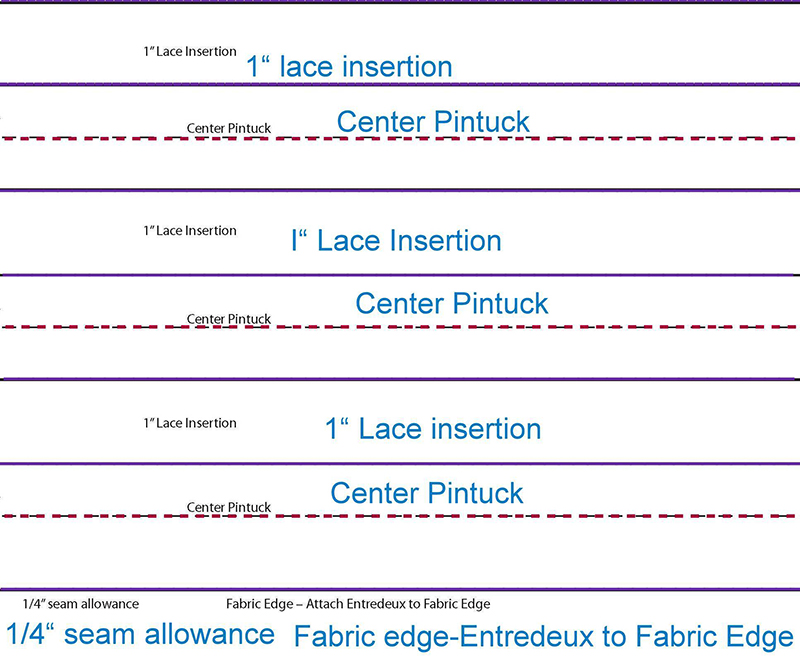 This is the point at which you will see how handy it is to have heat erasable markers in two colors. By marking the outer edge of the tuck area with one color and the center tuck with another, it is less confusing when you begin to stitch. Without two colors, you can mark the outer lines of the tuck area with dots. Extend marks at least 2” beyond the measurement of the sleeve on each side.
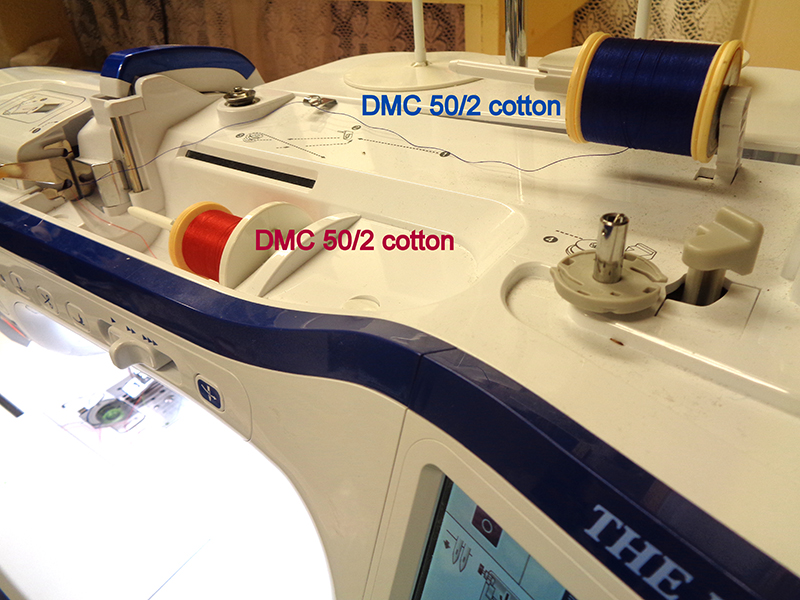
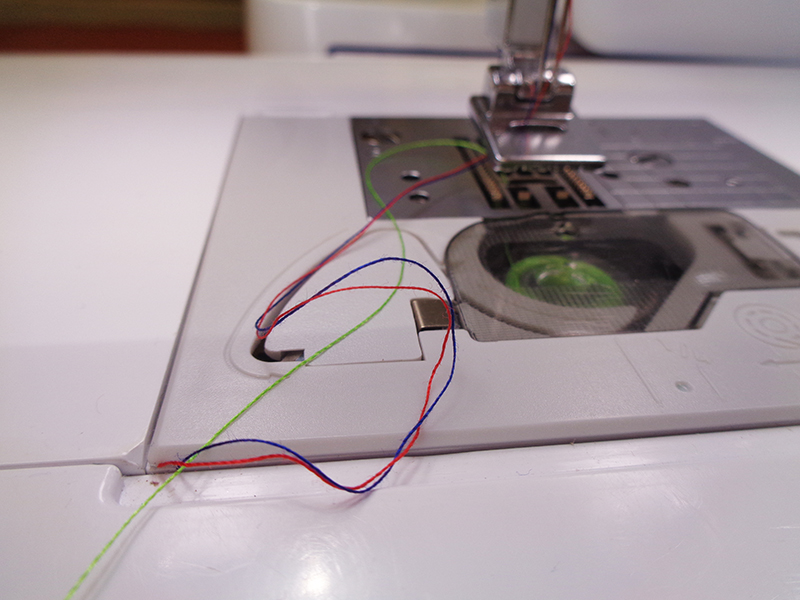
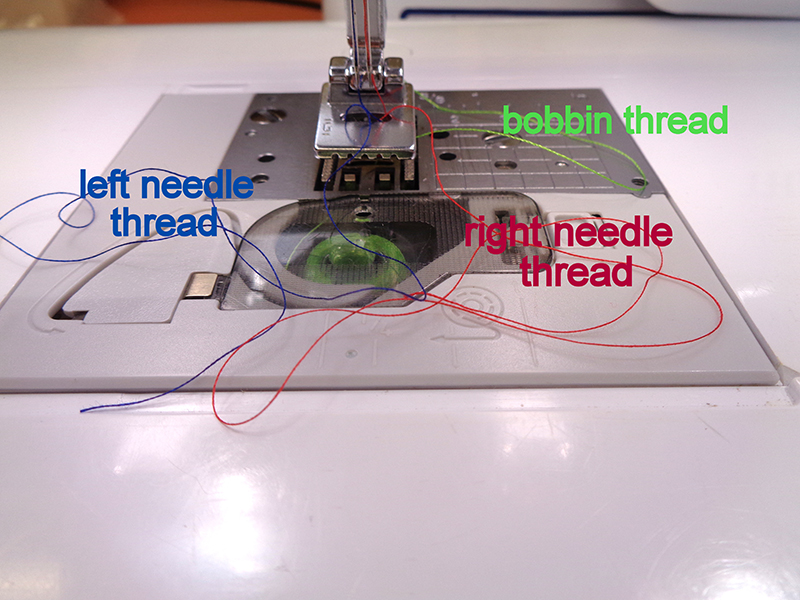 7. Press needle down to bring the bobbin thread (shown in green) above the needle place. At this point, the needle threads are above the pintuck foot while the bobbin thread is below. If sewing is begun now, there is a possibility of a jam or at least an ugly mess on the underside of the fabric. The needle threads need to be pulled under the foot along with the bobbin.
8. Grasp the bobbin thread and lasso the needle threads to the back.
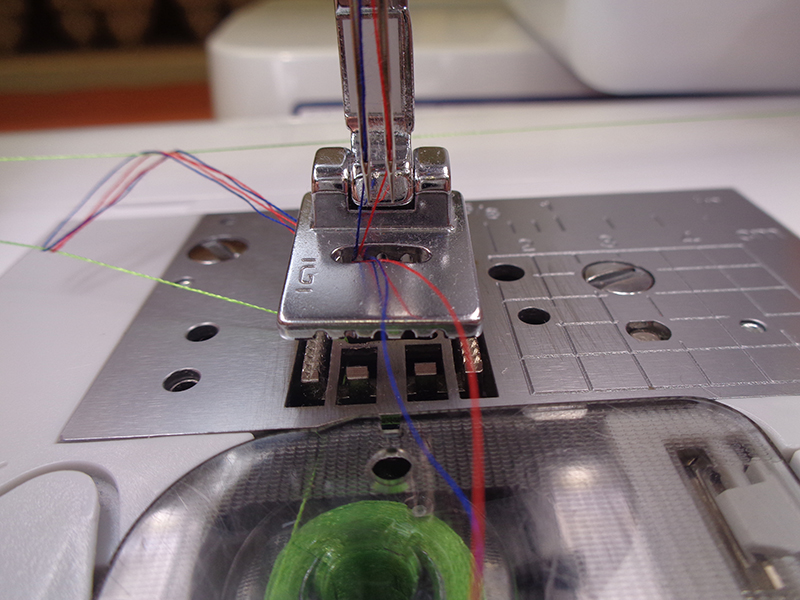 Now all 3 threads (though yours will be all of the same color!) are under the pintuck foot and ready to tuck your fabric.
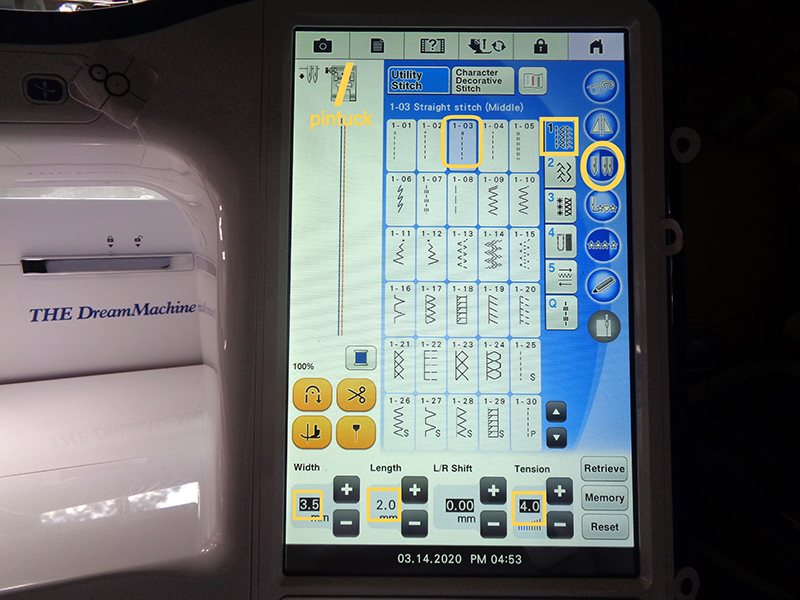
 9. Select utility stitch #1-03 center straight stitch, W 3.5, L. 2.0. tension 4.0 with twin needle function activated.
 10. Begin stitching on center line (red) of pintuck area of first sleeve block. Repeat on center line of each tuck section.
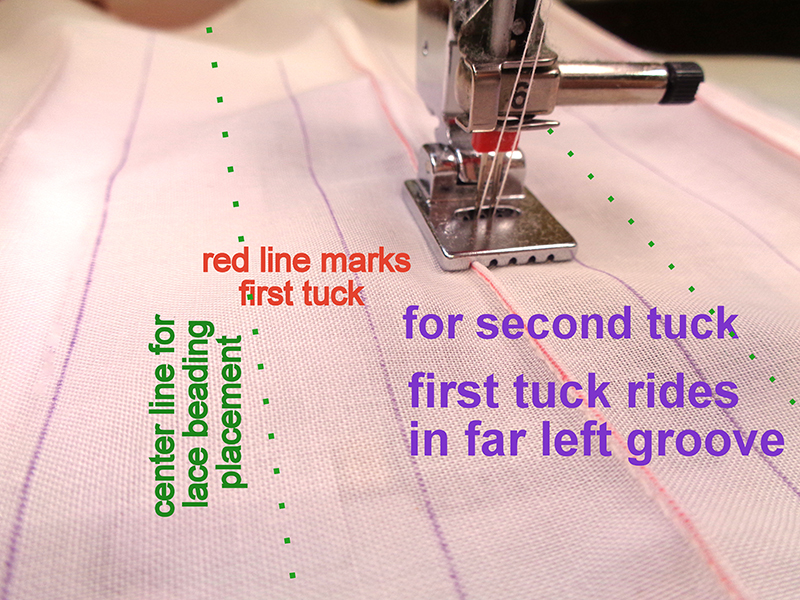
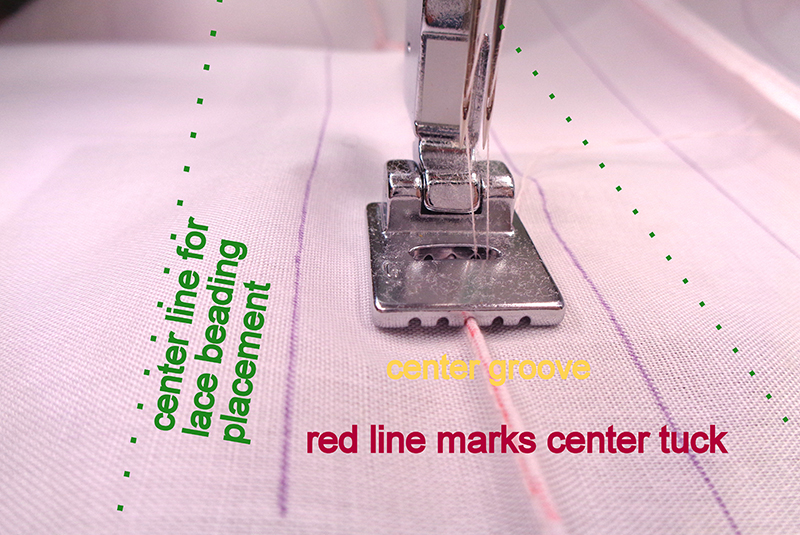 11. Move first pintuck to far left groove of pintuck foot. Stitch second tuck as first tuck rides in the groove. Repeat on each pintuck area. Reverse to create a third pintuck on the opposite side of the center pintuck, again riding the center tuck on the outside groove.
 There will be 3 parallel pintucks before the serpentine tucks are stitched.
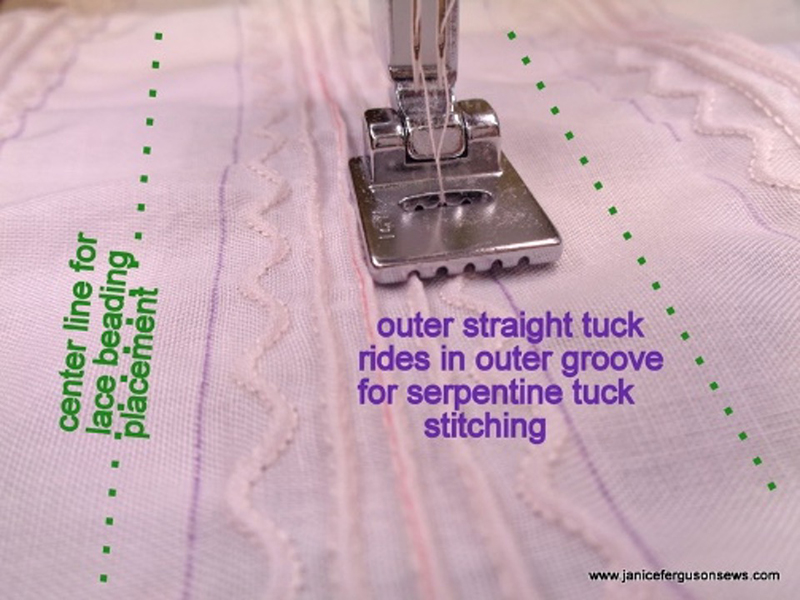
12. Select utility stitch 2-08, W 5.0. L 1.0, tension 4.0 with twin needle function still activated. Set outer tuck in outer groove then stitch serpentine pintuck on each side of straight pintuck trio.
 13. Machine baste along center beading placement lines with brightly colored thread.
14. Press tucked sleeve panel flat. This will erase all heat erasable lines leaving the stitched placement line.
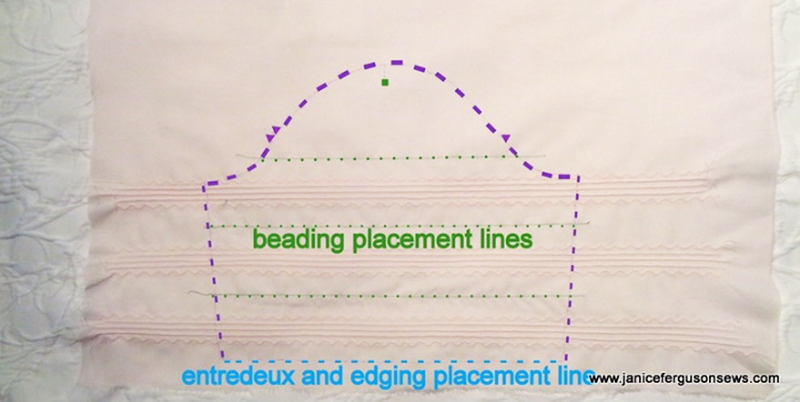
15. Place pressed, tucked sleeve panel over sleeve pattern piece. Trace sleeve pattern outline and all marks.
 16. Repeat for second sleeve panel.
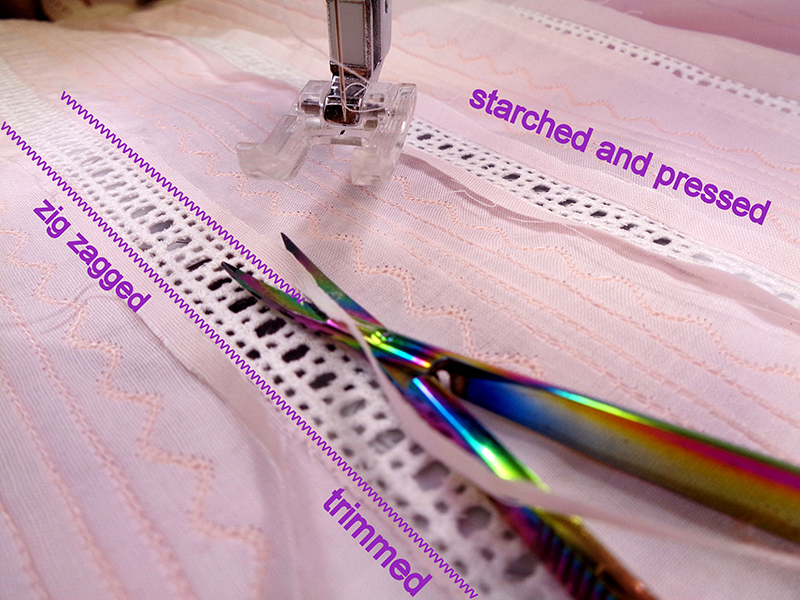
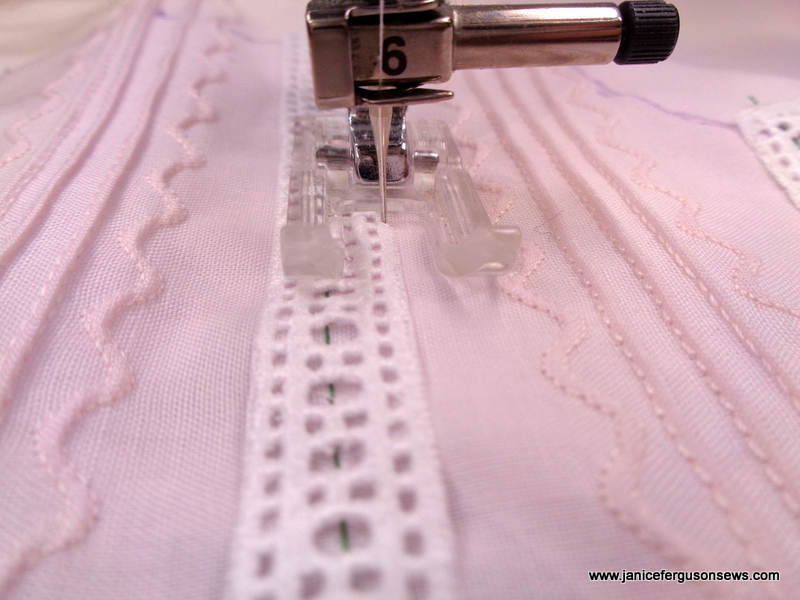 18. Cut through batiste under beading along basting stitch. Remove basting threads. On the wrong side of the fabric, starch and press trimmed fabric away from the trim.
19. Stitch narrow zig zag into each hole and just over the beading header. Trim away the excess fabric from the back.
 20. Weave ribbon through beading. Knot ends of ribbon to prevent its escape from beading while being handled.
Note: It is likely that sections of the sleeve pattern were erased when the beading was ironed. Simply retrace these areas.
21. Repeat all steps on second sleeve.
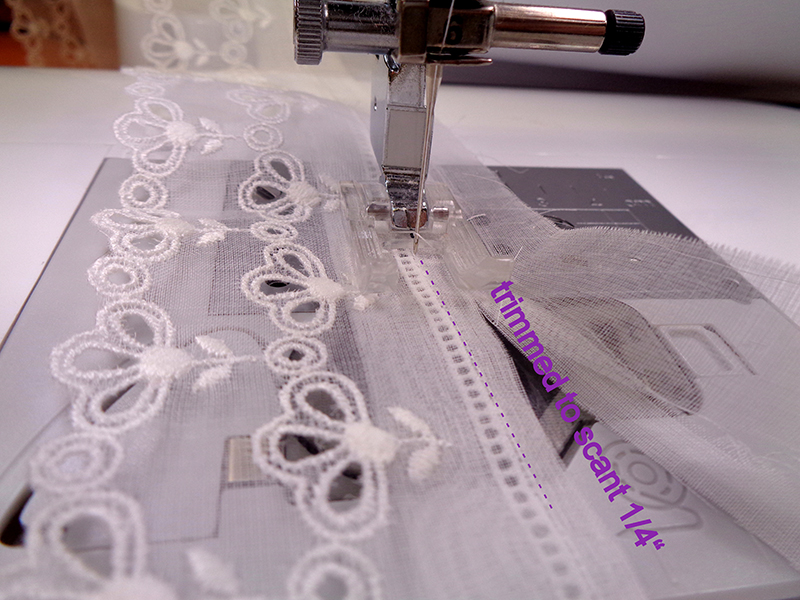 23. Zig zag from the ditch over the raw edge. The edge will roll and create a neat finish. Settings used were w 3.5 L 1.2 Your settings might vary depending on the weight of your edging.
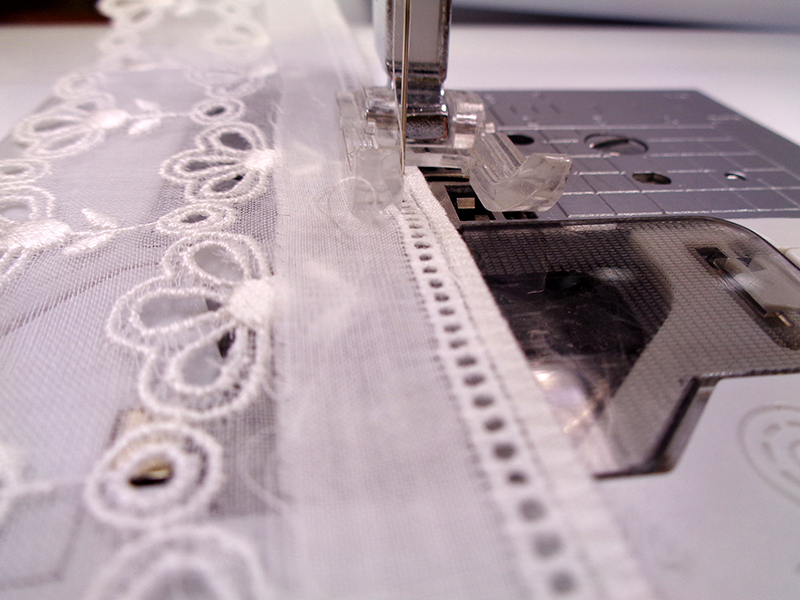 24. Press open with tiny seam away from entredeux holes. Stitch a tiny zig zag into each hole and into the tiny seam, just as in step #19. The purpose is to keep the edging from kicking up. Settings used were W 1.5 L 1.2 but yours might vary depending on the size of the entredeux holes. Repeat the same stitch between the batiste and the entredeux.
25. Press finished sleeve. Repeat with second sleeve.
 24. Set sleeves aside.
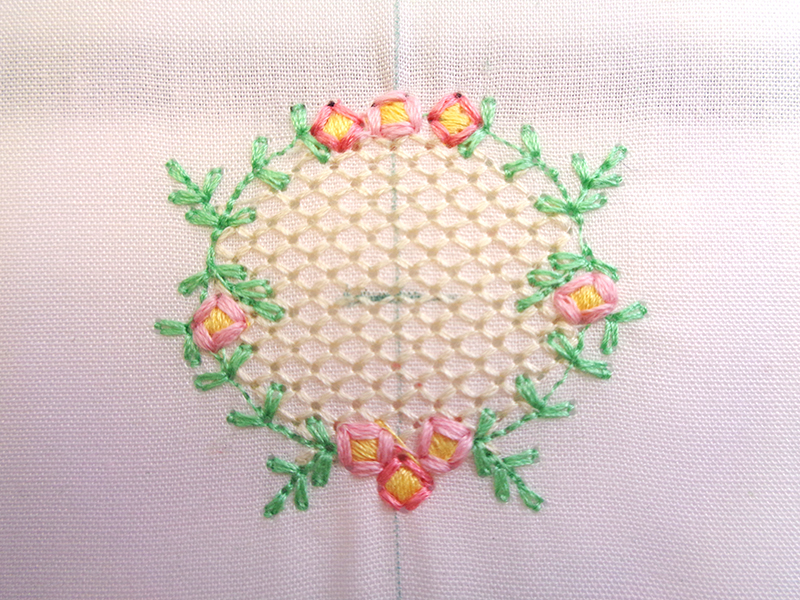 29. Remove Wing Needle.
30. Complete embroidery. Remove from frame and trim away stabilizer.
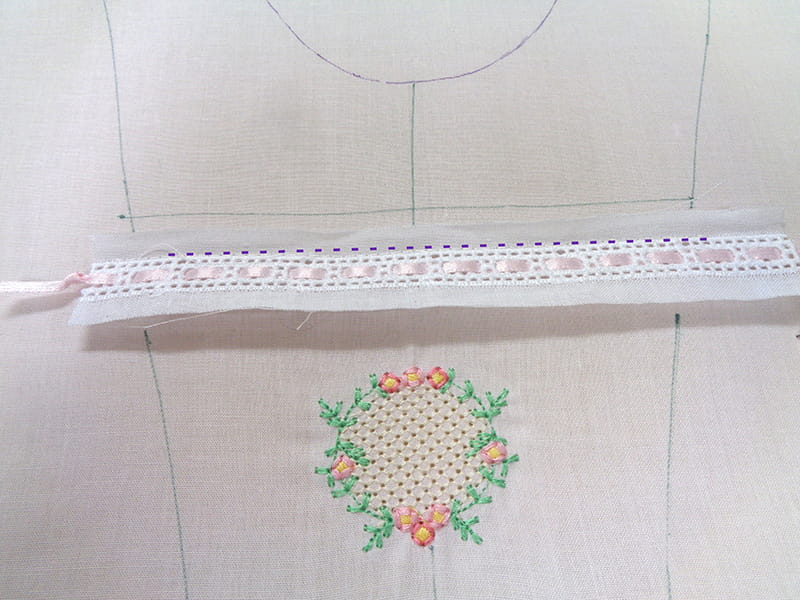
31. Stitch in the ditch of the lower edge of beading along bottom of horizontal placement line. Press the beading up toward the neck but do not stitch it down. Set this aside as you work on the diagonal fancy bands with embroidered insertion and more Swiss beading.
 32. Create bodice 18” fancy band by joining beading, Swiss embroidered insertion and another row of beading.
33. Trim beading fabric edge to 1/8”, place on embroidered insertion, right sides together, raw edges matching. Stitch in the ditch.
34. Stitch the beading to each side of the embroidered insertion, right sides together, just as was done on the sleeves. First stitch in the ditch, trim to approximately 1/8”, zig zag over the raw edge, press toward the embroidered insertion, work tiny zig zag over insertion into the beading holes.
35. Press. Weave ribbon through beading. Cut in half, rendering 9” for each side of bodice.
36. Place fancy band face down as shown, with the placement line visible in the entredeux holes. Stitch to each side of the embroidered panel, in the ditch, stopping at the base of the horizontal beading. Leave the upper portions of fancy band free.
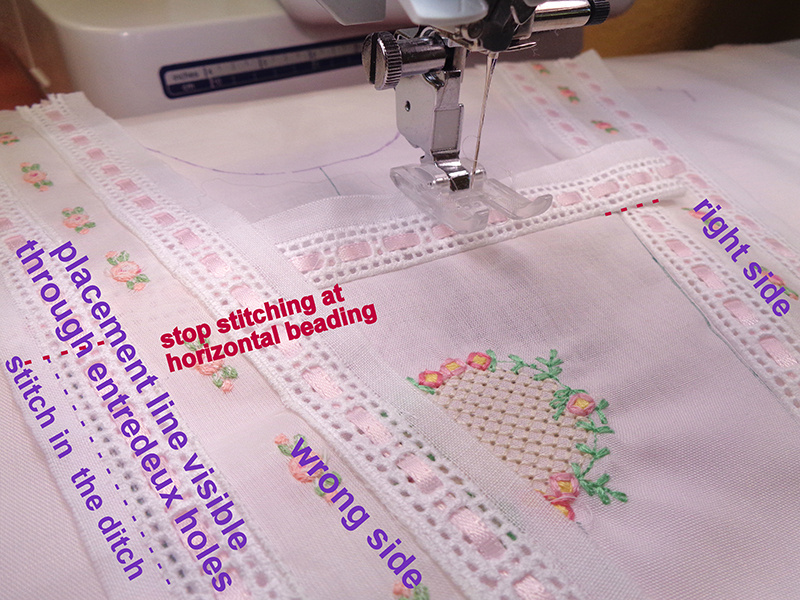 37. Trim away upper seam allowance on horizontal beading and beading on unattached fancy band beading, not that which is joined to the embroidered batiste, leaving just entredeux edge. Press and place over bodice pattern piece.
38. Cut away all batiste outside the fancy band toward the armscye, away from the center. SAVE these cutaway pieces as later they will be reattached.
 43. Slip tuck panel under fancy band and horizontal beading. Pin both in place, taking care that tucks are perpendicular to horizontal beading.
44. Baste tucked panel in place just between entredeux holes and ribbon.
45. Finish edges of fancy band between embroidered panel. Secure ends of horizontal beading to fancy band with zig zag.
46. Press bottom of tucked panel away from horizontal beading. Baste in place. Zig zag into beading entredeux holes. Trim away excess tucked fabric.
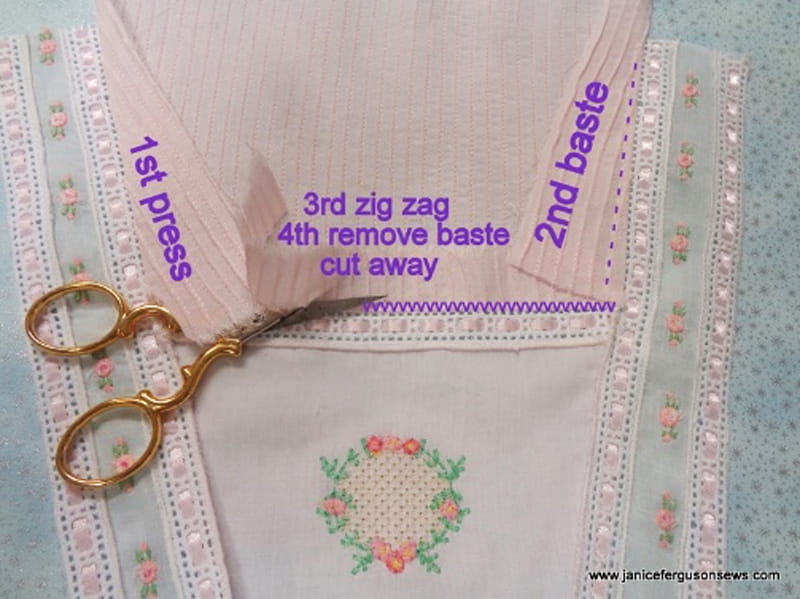 47. Repeat on each side of the tucked panel.
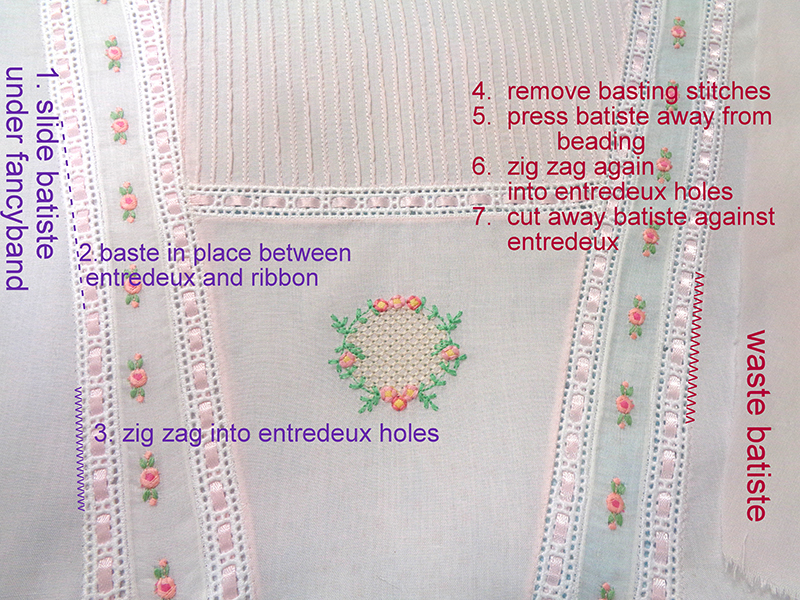 49. Follow the steps in the image: press, baste, zig zag, remove basting stitches, press away from beading, zig zag again, cut away excess batiste.
50. Starch and press. Place over front pattern piece and redraw bodice lines.
 53. Use pintuck foot to stitch a row of twin needle tucks as was done on the sleeves. Center the first tuck on the drawn line. See steps #9-12, 3 straight tucks (W 3.5 L 2.0 T 4.0) bracketed by serpentine tucks, stitch 2-08 (W 5.0 L 1.0 T 4.0)
Note: It is helpful to begin tucks in advance of the area where they are in place. It takes a few stitches for the bobbin thread to draw the tucks up to standing position.
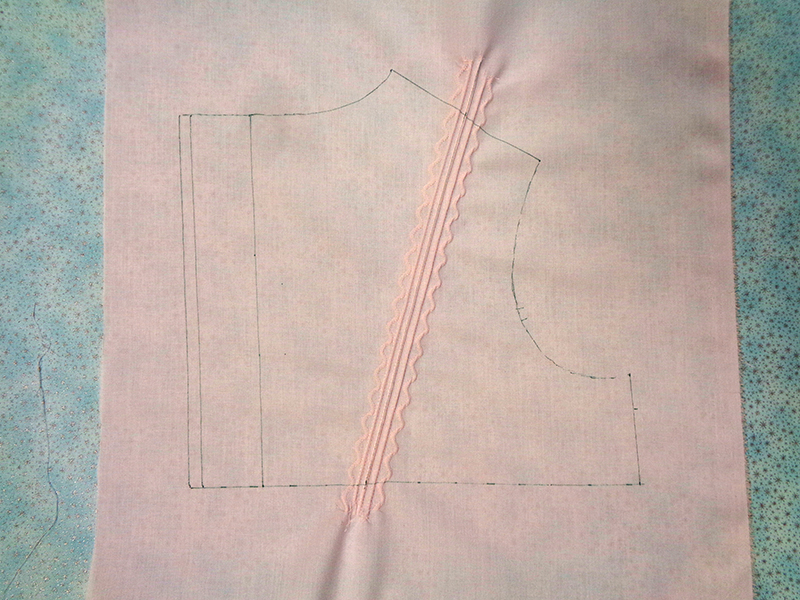 As the puckered area above and below the tucks show, the pattern lines will need to be redrawn after the tucks and embroidery is complete.
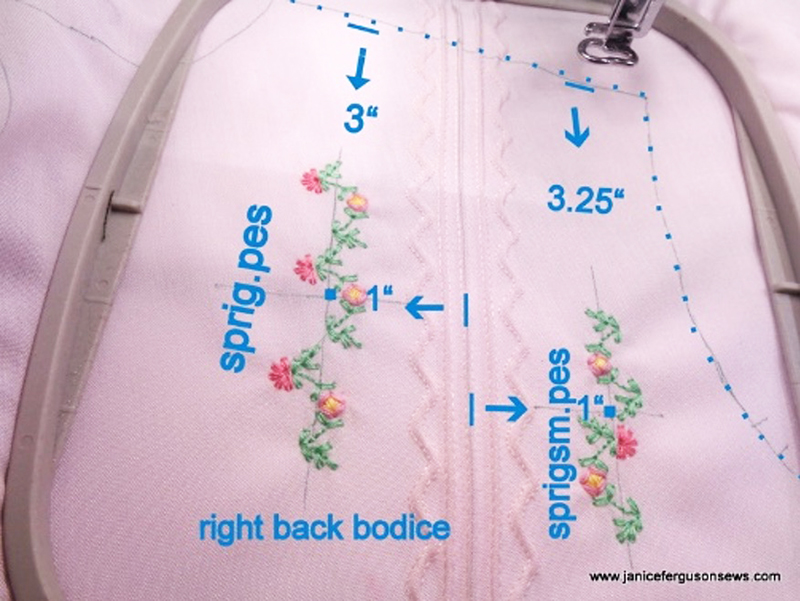
54. Mark placement for 2 embroidery designs. The center of the larger design, sprig.pes, is 3” below the shoulder cutting line and 1” from the center pintuck. The smaller design, sprigsm.pes, is 3.25” below the shoulder cutting line and 1” from the center tuck.
 56. Stitch opposite back bodice with mirrored tucks and embroidery.
57. Machine baste the fold line, neck line, shoulder seam and bottom edge as they will disappear when pressed. The pattern can be redrawn with these lines as “landmarks.” Cut away excess stabilizer. Press to remove heat erasable lines. Soak to remove stabilizer and any water-soluble lines. Allow to air dry.
58. Press in fold lines and finish raw edges of facing.
Note: I prefer to hand whip the facing in place in order to avoid the bulk of a zig zag or other machine finish. Because the facing must be opened to attach the waist band, it is just basted in place now.
Redraw pattern lines and cut out right and left back bodices. Baste facings in place.
 Special occasions require special dresses and the little princess wearing this heirloom confection will capture the center of attention at any event. The frilly frock features a medley of pintucks, machine embroidery, Swiss beading, satin ribbon, entredeux and Swiss edging on a base of fine batiste. The pattern is a variation of Connie Palmer’s exquisite Genevieve, available as a free .pdf download with the purchase of Classic Sewing Magazine, Spring 2018, sizes 4-10. With your Brother sewing/embroidery machine, a 4x4 frame and a pintuck foot, you can create an elegant yet simpler version.
Disclaimer: The PDF download listed above is from Classic Sewing Magazine and Brother International Corporation makes no representation or warranties regarding this product.
Requirements shown are for size 4. Check pattern for yardage required for larger sizes.
- Fabric-polycotton blend pink batiste: 2.5 yds.
- Trims—Swiss beading for 1/8” ribbon: 6 1/2 yds.
- Swiss beading for 1” ribbon: 1 yd.
- Swiss pink rose embroidered insertion 1” wide: 2 2/3 yds.
- Pink satin ribbon 1/8” wide 6 1/2 yds.
- Pink satin ribbon 1” wide 1 yd.
- Swiss edging 1 ¾” wide: 30” for sleeve edge and 2 1/8 yds for hemline
- Entredeux to join Swiss edging to sleeves: 30”
- Entredeux to join Swiss edging to hemline: 2 1/8yds.
- Notions: 4 buttons, Brother SA540 water soluble stabilizer, spray starch, darning needle to weave ribbon through beading, heat erasable marking pens. Note: It is helpful to have 2 in different colors.
- Needles: 75 for construction and embroidery, wing needle, 60-65 for joining trims, 2.5 twin needle
- Fine thread: 2 spools 50/2 DMC machine embroidery thread to match fabric for twin needle pintucks, Fine cotton sewing thread such as DMC 50/2 machine embroidery Article or 60/2 Mettler Article #240 and/or Madeira Cotona 80/2, white for joining trims; and ecru, lt. pink, dark pink, yellow and green for machine embroidery
- Brother sewing/embroidery machine,
4 x 4 frame, open toe foot, 5 groove pintuck foot, multipurpose foot for construction. - Seam allowances all ½” except at neckline which is ¼”
- For front bodice: JFergusonFToval.pes
- For back bodices: sprig.pes
and sprigsm.pes
Tip: Use of the knee lift is very helpful. Also engaging the “lock” key will prevent unintended changes in stitch length, width or even stitch selection. Forgetting to “lock” cost me valuable time “unstitching.”
Preparation
1. Print pattern and templates. Have handy the instructions from Classic Sewing though the directions here will deviate significantly from those. You will find it helpful to have that valuable information available for heirloom sewing techniques. 2. Cut blocks for size four: • SLEEVES (2) 13 x 16w • FRONT BODICE (1) 13 x 20” and (1) 10 x 9” for tucks above embroidery • BACK BODICE (2) 13x 13” • SKIRTS (2) 36” w x 19 L”. Press. 3. Mark 2 sleeve blocks for tucks and lace placement with template. Be sure to use the scale on the downloaded template to verify the print is 100%. This is the point at which you will see how handy it is to have heat erasable markers in two colors. By marking the outer edge of the tuck area with one color and the center tuck with another, it is less confusing when you begin to stitch. Without two colors, you can mark the outer lines of the tuck area with dots. Extend marks at least 2” beyond the measurement of the sleeve on each side.
Instructions
Sleeve
Tucks
4. Press fabric. Insert 2.5 twin needle. Attach pintuck foot. Note: DO NOT USE AUTOMATIC NEEDLE THREADER OR THREAD CUTTER WITH TWIN NEEDLE. 5. Wind bobbin with fine thread matching thread to be used for twin needle pintucks. Load two spool pins with same fine thread then thread twin needles.
Note: I’ve been using twin needles for a long time, when top-of-the-line machines were not as cooperative as they are now. Still, I use the same threading techniques I have always used, as they have served me well these many years. This is how I work with them.
6. Note: You will use two thread spools of the same color as your fabric. The different colored threads shown here are only for illustration. Consider the top spool, shown as navy, to be dedicated to the left needle. Pull a generous amount of thread free as you begin the threading process. Do not run this thread through the last thread guide above the needle. Hand Thread It through the left needle. A generous amount of the lower spool, shown in red, will be run through the thread guide then hand threaded through the right needle. The excess thread pulled from the spool can then be run through the thread path without disturbing the first thread.
 7. Press needle down to bring the bobbin thread (shown in green) above the needle place. At this point, the needle threads are above the pintuck foot while the bobbin thread is below. If sewing is begun now, there is a possibility of a jam or at least an ugly mess on the underside of the fabric. The needle threads need to be pulled under the foot along with the bobbin.
8. Grasp the bobbin thread and lasso the needle threads to the back.
 Now all 3 threads (though yours will be all of the same color!) are under the pintuck foot and ready to tuck your fabric.
 9. Select utility stitch #1-03 center straight stitch, W 3.5, L. 2.0. tension 4.0 with twin needle function activated.
Note: With all pintucking, be sure to take time for stitch rehearsal on an identical fabric scrap with the grain in the same direction, using the same thread. Depending on your fabric, the stitch length and tension may require adjustment to get satisfactory results. MAKE CERTAIN TO RECORD SETTINGS FOR EACH TRIAL AND FINALLY FOR YOUR SUCCESSFUL TUCKS AS YOU WILL BE MAKING MORE IN OTHER SECTIONS OF THE DRESS.
 10. Begin stitching on center line (red) of pintuck area of first sleeve block. Repeat on center line of each tuck section.
 11. Move first pintuck to far left groove of pintuck foot. Stitch second tuck as first tuck rides in the groove. Repeat on each pintuck area. Reverse to create a third pintuck on the opposite side of the center pintuck, again riding the center tuck on the outside groove.
 There will be 3 parallel pintucks before the serpentine tucks are stitched.
12. Select utility stitch 2-08, W 5.0. L 1.0, tension 4.0 with twin needle function still activated. Set outer tuck in outer groove then stitch serpentine pintuck on each side of straight pintuck trio.
 13. Machine baste along center beading placement lines with brightly colored thread.
14. Press tucked sleeve panel flat. This will erase all heat erasable lines leaving the stitched placement line.
15. Place pressed, tucked sleeve panel over sleeve pattern piece. Trace sleeve pattern outline and all marks.
 16. Repeat for second sleeve panel.
Beading
17. Center beading over basted line. With thread to match beading straight stitch L 3.0 stitch in the beading header just to hold the trim in place. 18. Cut through batiste under beading along basting stitch. Remove basting threads. On the wrong side of the fabric, starch and press trimmed fabric away from the trim.
19. Stitch narrow zig zag into each hole and just over the beading header. Trim away the excess fabric from the back.
 20. Weave ribbon through beading. Knot ends of ribbon to prevent its escape from beading while being handled.
Note: It is likely that sections of the sleeve pattern were erased when the beading was ironed. Simply retrace these areas.
21. Repeat all steps on second sleeve.
Edging
22. Join 21” of entredeux to 21” of flat sleeve lace edging. Place right sides together, matching raw edges. Stitch in the ditch of the entredeux with a stitch length of 3. Note: The sleeve edging used was wider than desired. Entredeux was placed at the desired width and stitched there. Normally, it would have been placed against the raw edge of the trim. 23. Zig zag from the ditch over the raw edge. The edge will roll and create a neat finish. Settings used were w 3.5 L 1.2 Your settings might vary depending on the weight of your edging.
 24. Press open with tiny seam away from entredeux holes. Stitch a tiny zig zag into each hole and into the tiny seam, just as in step #19. The purpose is to keep the edging from kicking up. Settings used were W 1.5 L 1.2 but yours might vary depending on the size of the entredeux holes. Repeat the same stitch between the batiste and the entredeux.
25. Press finished sleeve. Repeat with second sleeve.
 24. Set sleeves aside.
Front Bodice
Embroidery 25. Press and starch 14 x 20” bodice piece. Trace bodice pattern piece and markings onto fabric. 26. Hoop Brother SA540 water soluble stabilizer and bodice fabric with embroidery mark centered in 4x4 frame. 27. Insert wing needle and thread needle and bobbin with ecru Madeira Cotona 80/2 thread or other fine thread. Machine embroidery thread will work but the holes will not be as open. 28. Load design JFergusonFToval.pes into your Brother embroidery machine and stitch color #1. Embroider at reduced speed. 600 stitches per minute worked well for me. 29. Remove Wing Needle.
30. Complete embroidery. Remove from frame and trim away stabilizer.
31. Stitch in the ditch of the lower edge of beading along bottom of horizontal placement line. Press the beading up toward the neck but do not stitch it down. Set this aside as you work on the diagonal fancy bands with embroidered insertion and more Swiss beading.
 32. Create bodice 18” fancy band by joining beading, Swiss embroidered insertion and another row of beading.
33. Trim beading fabric edge to 1/8”, place on embroidered insertion, right sides together, raw edges matching. Stitch in the ditch.
34. Stitch the beading to each side of the embroidered insertion, right sides together, just as was done on the sleeves. First stitch in the ditch, trim to approximately 1/8”, zig zag over the raw edge, press toward the embroidered insertion, work tiny zig zag over insertion into the beading holes.
35. Press. Weave ribbon through beading. Cut in half, rendering 9” for each side of bodice.
36. Place fancy band face down as shown, with the placement line visible in the entredeux holes. Stitch to each side of the embroidered panel, in the ditch, stopping at the base of the horizontal beading. Leave the upper portions of fancy band free.
 37. Trim away upper seam allowance on horizontal beading and beading on unattached fancy band beading, not that which is joined to the embroidered batiste, leaving just entredeux edge. Press and place over bodice pattern piece.
38. Cut away all batiste outside the fancy band toward the armscye, away from the center. SAVE these cutaway pieces as later they will be reattached.
Tucks
39. Trace pattern and template onto pressed but not starched 14” wide x 9” batiste. For size 4 and other sizes, the finished tucked piece must be 1” larger in each direction than the tucked area on the template. 40. Prepare to create pintuck panel for area at top of bodice as was done for the sleeves by inserting twin needle, attaching pintuck foot, etc. 41. Mark the center of the piece and begin tucking there. Work to the right and then the left, spacing the tucks a little further apart if desired. 42. Press the tucked piece. Spray starch, pin to a padded surface, and straighten tucks before pressing. Allow to dry thoroughly. 43. Slip tuck panel under fancy band and horizontal beading. Pin both in place, taking care that tucks are perpendicular to horizontal beading.
44. Baste tucked panel in place just between entredeux holes and ribbon.
45. Finish edges of fancy band between embroidered panel. Secure ends of horizontal beading to fancy band with zig zag.
46. Press bottom of tucked panel away from horizontal beading. Baste in place. Zig zag into beading entredeux holes. Trim away excess tucked fabric.
 47. Repeat on each side of the tucked panel.
Bodice Side Panels
48. Retrieve the batiste pieces cutaway from the bodice panel. Pin them in place under the fancy band. Take care that the grain line is vertical. Press, then baste them in place between the ribbon and entredeux. 49. Follow the steps in the image: press, baste, zig zag, remove basting stitches, press away from beading, zig zag again, cut away excess batiste.
50. Starch and press. Place over front pattern piece and redraw bodice lines.
Back Bodice
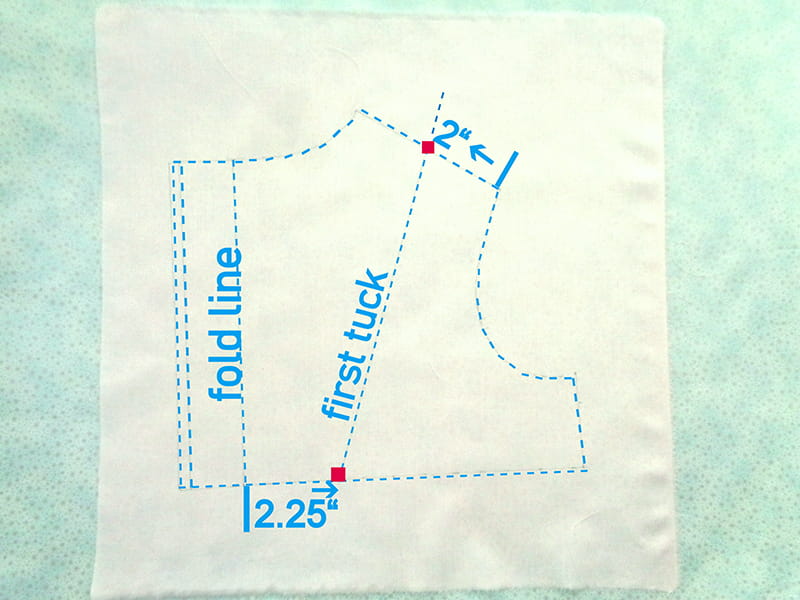
51. Trace back bodice pattern onto 13 x 13” batiste square, including all marks and matching grain line. 52. Place a mark at the shoulder cutting line 2” from the armscye. Place another at the bottom of the bodice 2.25” from the fold line. Draw a line connecting these marks. 53. Use pintuck foot to stitch a row of twin needle tucks as was done on the sleeves. Center the first tuck on the drawn line. See steps #9-12, 3 straight tucks (W 3.5 L 2.0 T 4.0) bracketed by serpentine tucks, stitch 2-08 (W 5.0 L 1.0 T 4.0)
Note: It is helpful to begin tucks in advance of the area where they are in place. It takes a few stitches for the bobbin thread to draw the tucks up to standing position.
 As the puckered area above and below the tucks show, the pattern lines will need to be redrawn after the tucks and embroidery is complete.
54. Mark placement for 2 embroidery designs. The center of the larger design, sprig.pes, is 3” below the shoulder cutting line and 1” from the center pintuck. The smaller design, sprigsm.pes, is 3.25” below the shoulder cutting line and 1” from the center tuck.
Note: These designs were digitized before the miracle of cut jump threads. Stitching these will renew your appreciation for the progress of Brother’s technology through the years.
55. Hoop back bodice piece with 2 layers of Brother SA540 water soluble stabilizer. Both designs can be hooped and embroidered in one 4x4 frame. Repeat on opposite bodice back. Note: Depending on your fabric and thread, reducing the tension may give best results. The embroidery shown was stitched with -2 tension.
 56. Stitch opposite back bodice with mirrored tucks and embroidery.
57. Machine baste the fold line, neck line, shoulder seam and bottom edge as they will disappear when pressed. The pattern can be redrawn with these lines as “landmarks.” Cut away excess stabilizer. Press to remove heat erasable lines. Soak to remove stabilizer and any water-soluble lines. Allow to air dry.
58. Press in fold lines and finish raw edges of facing.
Note: I prefer to hand whip the facing in place in order to avoid the bulk of a zig zag or other machine finish. Because the facing must be opened to attach the waist band, it is just basted in place now.
Redraw pattern lines and cut out right and left back bodices. Baste facings in place.

