Heirloom Baby Dress
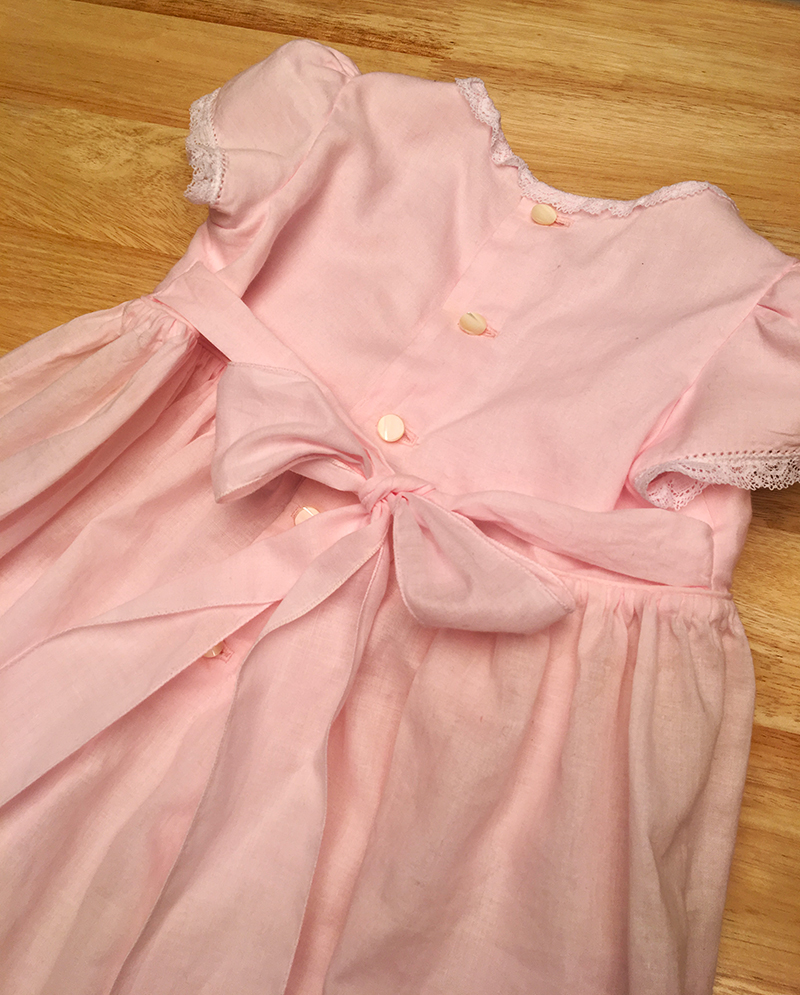
This baby dress is an example of heirloom sewing, also known as fine machine sewing. You've seen examples, whether or not you recognized them by name or category. Heirloom sewing is a (relatively) new name for the fine art of French hand sewing, the techniques and materials of which were used on garments before the advent of commercially machine-made fine clothing. Most commonly it is seen on infant and children's clothing, including but not limited to special occasion garments such as baptismal gowns, Easter, and first communion dresses. The Simplicity pattern used here is designed for christening attire. Stitched in pastel pink, it would be so pretty for a baby to wear to a wedding or other important event. Traditionally, natural fiber fabrics such as fine cotton batiste and linen were embellished with lace, ribbon, hemstitching, tucks, smocking, ruching, embroidery, and more. Today, most of these hand-work techniques can be replicated beautifully and in a fraction of time with THE Dream Machine.
If you've never tried heirloom sewing, this tutorial can be your introduction and first lessons. If heirloom sewing is not new to you, I hope you will find a few new ideas, techniques or inspiration. Select one or more of the techniques as an introduction to the satisfying beauty of heirloom sewing. Techniques included in this project include lace insertion, lace shaping, gathered lace to flat lace, pin stitch, roll and whip, and lace width reduction.
Requirements:
Many heirloom materials such as cotton batiste, heirloom lace, and fine thread will be available at Brother dealerships which support heirloom sewing and smocking. If you do not have a local dealer, many on-line shops carry these goods.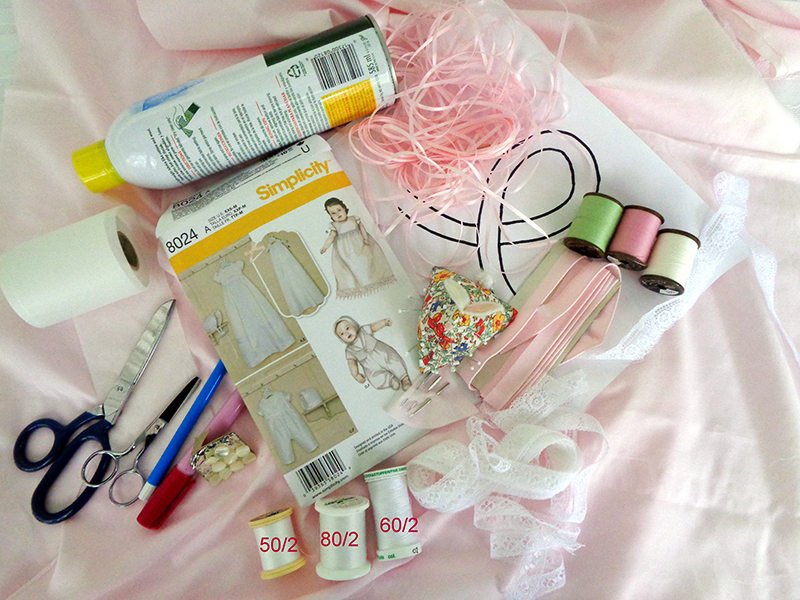
- 2 yds. pink 100% cotton batiste
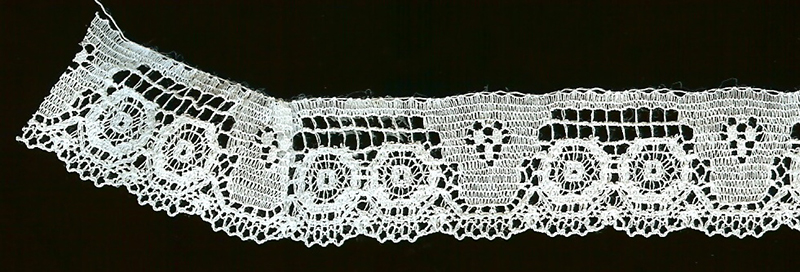
- Heirloom lace (at least 90% cotton)
- 6 yds. Lace insertion --straight on both sides, 3/8"wide

Lace edging:
- 4.5 yards lace edging -- one decorative edge, one straight edge, ½-7/8" wide; 90" for lace at hem, 40" for lace at sleeve edge, 18" for lace at neckline.
Embroidery designs:
- Single flower extracted from Brother EDB Floral 1 design 02017 for bodice and scallop points
- Flower cluster extracted from EDB Assorted 03 design 34058 for lace loop
Thread:
- For construction-fine sewing thread (to match fabric); For lace work and hemstitching-white very fine sewing thread size 50/2, 60/2 or preferably 80/2; for machine embroidery-white, green and pink.
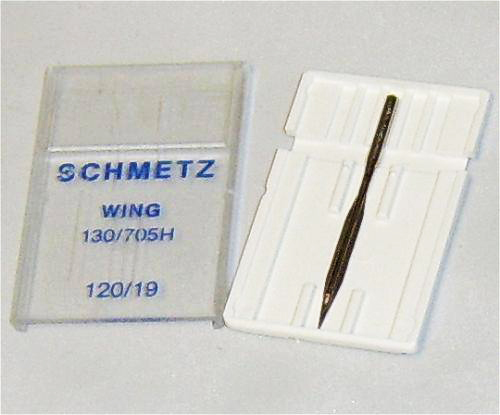
- Needles: For construction- #65, for lace joining- #60; for hemstitching- wing or #100 sharp.
- Notions: Glass head straight pins (very important), water soluble marking pen, tissue paper weight stabilizer, five 3/8" mother-of pearl buttons, 27" baby piping, spray starch
Optional:
If lace insertion will accommodate ribbon, 2.5 yards can be added, "kindergarten scissors" with blunt nose for cutting behind lace insertion.Tip: Many modifications have been made to this pattern in the creation of this dress. Read the directions carefully and refer to the pattern guide sheet when necessary.
Basic tips:
- Starch and press lace which is not shaped but inserted straight.
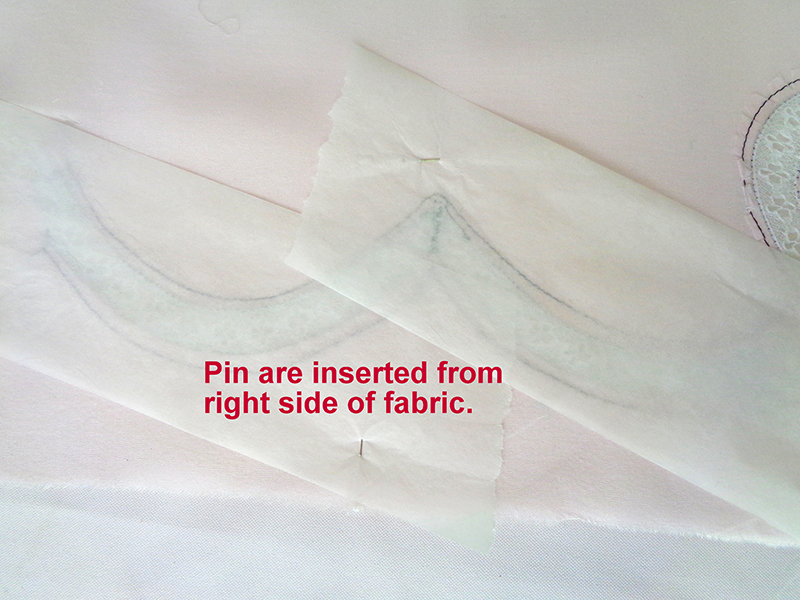
- Place tissue paper weight stabilizer behind fabric where lace is to be pin stitched.
- Use finest cotton thread available for lace work and pin stitch, such as 50/2 (50 wt. 2 ply), 60/2 or preferably 80/2.
- Press fabric away from lace when it has been split behind lace insertion.
- Use a small needle (#60 or #65) for lace placement, joining and construction.
- Use a wing or #100 needle for hemstitching.
Study the guide sheet layout.
Note: It is helpful to cut the back skirts an inch wider than the pattern. Careful rearrangement of 45" layout guide and cutting two sash ties 2" x 32" instead of as directed on guide sheet will allow this. Extra skirt width makes placement of the scallops easier when drawing them out. With 55-60" fabric, adding an extra inch on the skirt at center back is easy. You may cut skirt as directed EXCEPT cut 2 sash ties 2" x 32". Also cut yokes and sleeves as directed for view B. Take care to transfer all marks.
Tip: Heat erasable markers are unsuitable for this project. There are so many steps which require pressing that your heat erasable marks will erase before you get to use them.
Skirt
- Stitch skirt side seams, joining front to backs. Sew French seams or use any seam finish suggested in the pattern directions. Do NOT sew center back seam.
- Spray starch the bottom 6" and press again. Fabric must be "crisp" for the upcoming techniques. Press a vertical crease at front center.
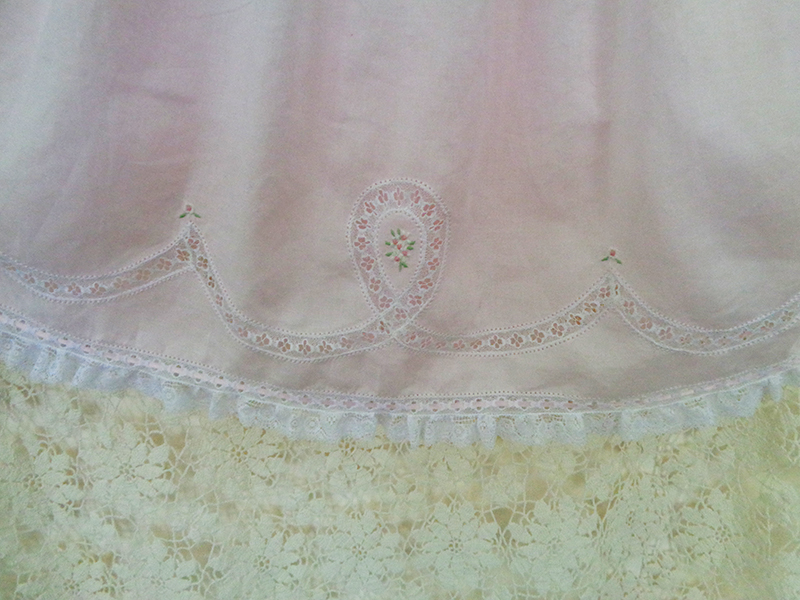
Note: The skirt features a shaped lace loop and multiple scallops. Of course, you may include only the loop or only the scallops or any combination of loops and scallops. You may also simply insert lace straight across the width of the skirt on the 1.5" mark above the raw hemline.
Tracing Skirt Scallop and Loop Pattern
- Draw a line 1.5 inches from the raw edge at the hemline. The bottom edge of the lace loop insertion will rest on that line. Draw a parallel line 1.5 inches above that. This is where the bottom edge of the lace will peak. Embroidery will come later.
- Trace the lace loop at the skirt's center front with your water erasable pen. Then plan the scallops. Each peak should be approximately 5" but evenly spaced from the center crease, with the side seam falling about 2.5" from the last peak. This places the seam in the middle of a scallop.
- Make a short tick mark where the peaks will be, then draw a vertical line. Place the fabric over the template. Center the template loop line on the center crease.
- Adjust scallops as necessary to have the side seam fall in the middle of a scallop. Use a china saucer, bowl or similar item to draw scallops.
- Continue marking across the skirt back with the remaining half of the side seam scallop, 2 complete scallops and then another half scallop.
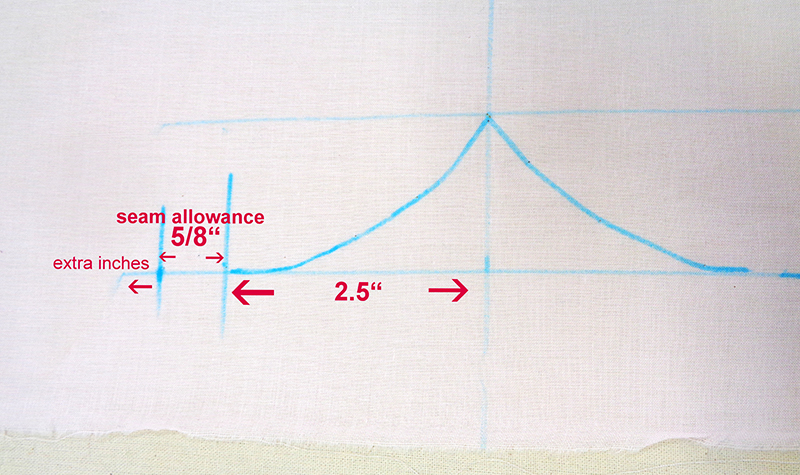
- Mark a short line indicating the 5/8" seam allowance beyond the half scallop at center back. This is where you will place the long side of the skirt pattern piece. Take care to allow 2" beyond the seam line for the placket extension at the top of the skirt pattern piece.
Lace Shaping
This is most easily done on a padded surface. Your ironing board will do. Work short sections at a time, perhaps 2 scallops.- Place the skirt fabric right side up on the ironing board with the lace loop at the center. Pull the fabric gently taut and hold in place with glass head pins.
- Measure a 52-55" length of lace insertion (a little less for XXS and a little more for M size) but do not cut lace, leaving the remaining insertion attached. Fold in half to find center. Pin center "header" (the lace equivalent to a selvage) to top of lace loop. Continue pinning to loop and on to scallop. The inside of the lace loop and remaining unpinned edge will be floppy.
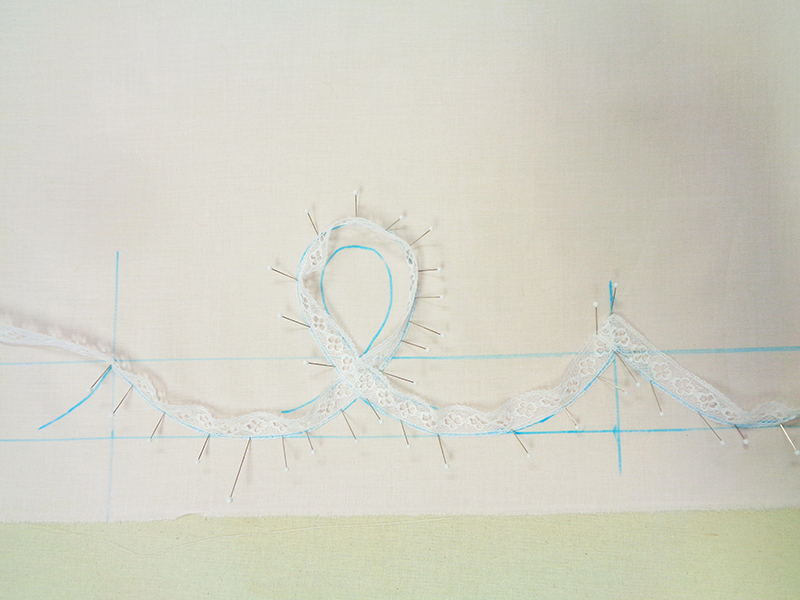
- Identify gathering thread at top of lace in the "header." It is the very, very top thread. Pick that out with a pin and pull gently, snugging up the inside curves so they lay flat.
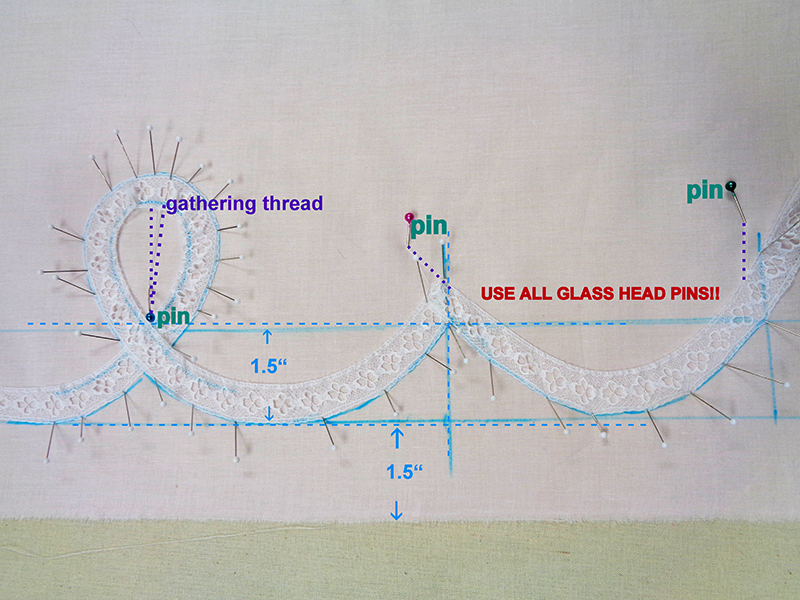
- Iron this section flat, pressing right over glass head pins.
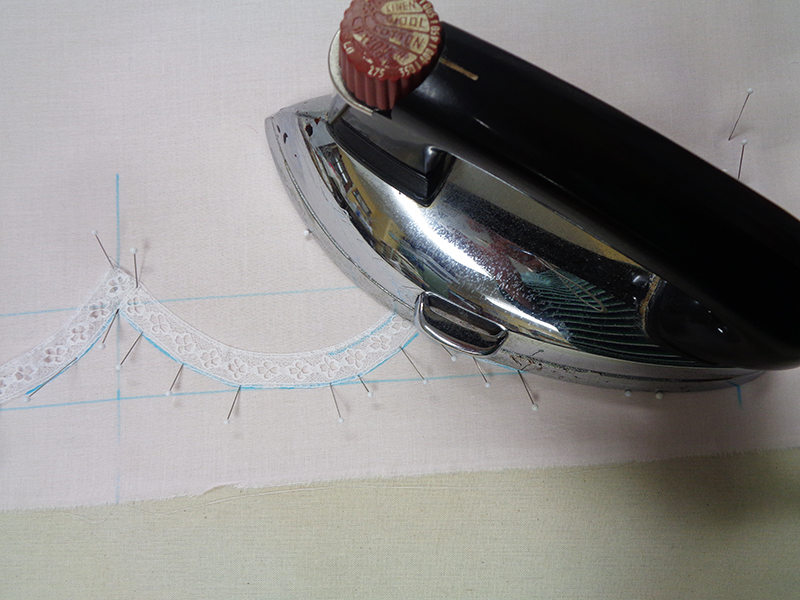
- Press fold at scallop peaks.
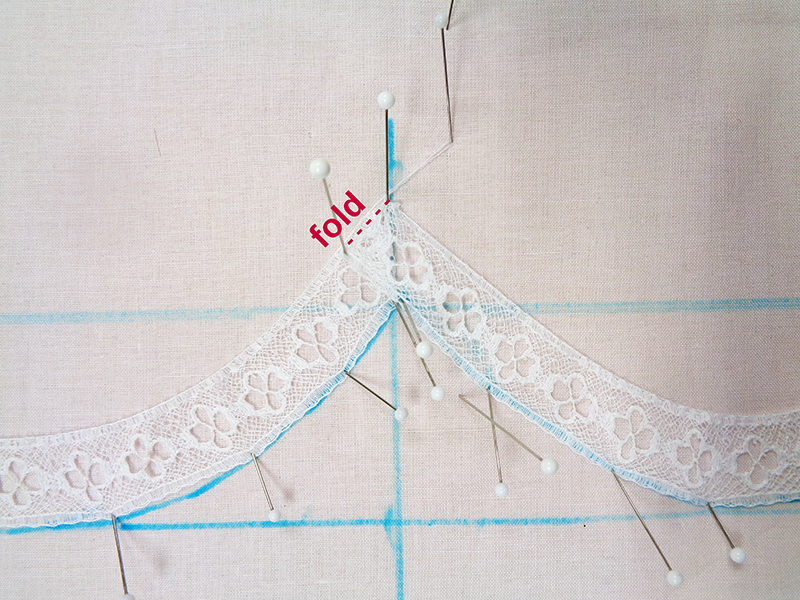
- Note position of back half scallops.
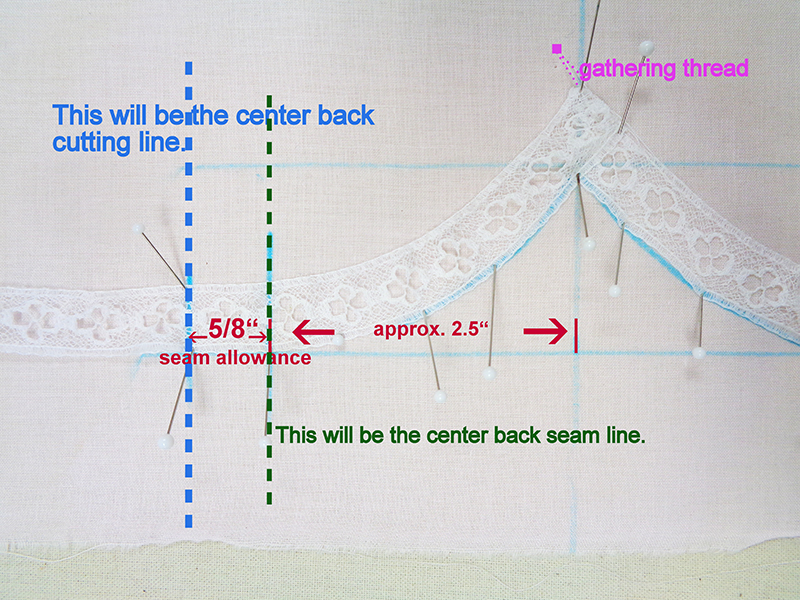
- Remove pins gently from padded surface, one at a time, and pin lace to fabric.
- Continue pining, pulling gathering thread and then pressing across the full width of the skirt.
Note: If you choose to shape only the loop, continue pinning lace insertion along the straight line 1.5" above the raw hem.
- Stitch lace to fabric in the header, close to the outer edge. Do not stitch through the fold at the scallop peak.
Note: Pivoting is so much easier with use of the knee lift. Remember to place lightweight stabilizer behind lace.
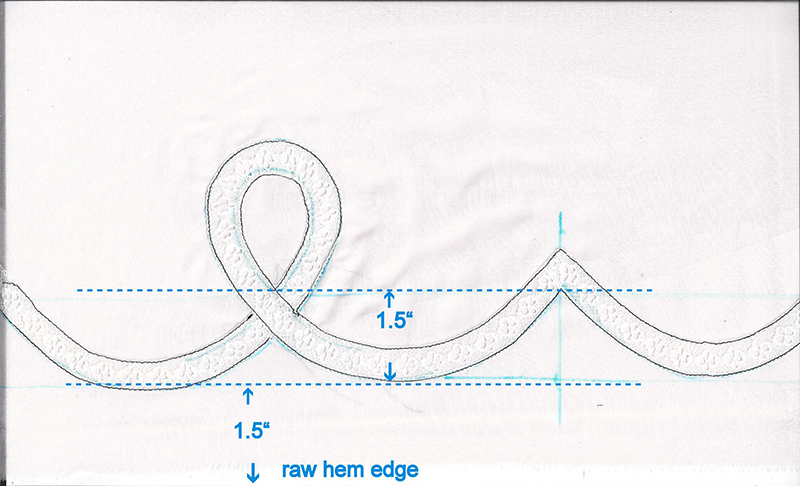
Note: All stitching is done with black thread for visibility. On the actual garment, use white to match the lace.
- Flip to wrong side and remove paper stabilizer. Cut through fabric behind lace, between stitching, in the center and parallel to stitching.
- Rinse out blue marks and allow to air dry.
- Clip curves, spray starch and press away from lace.
- Baste the fabric tabs close to outer raw edge.
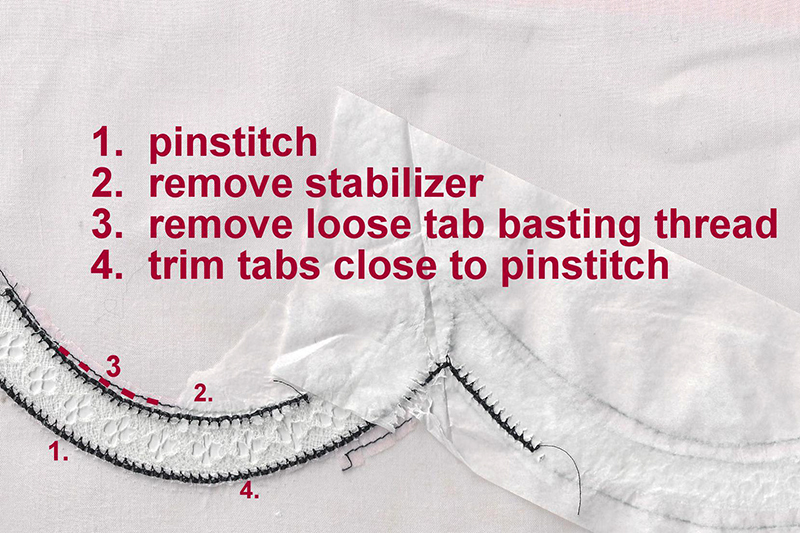
- Stitch a tiny zig zag at the intersection of the overlapping lace. Cut away the lace on the underside.
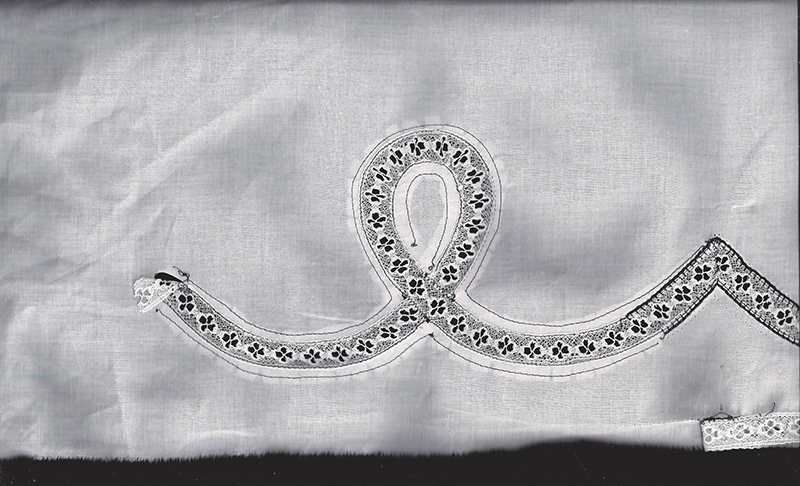
- Press fold with excess lace at top of peaks.
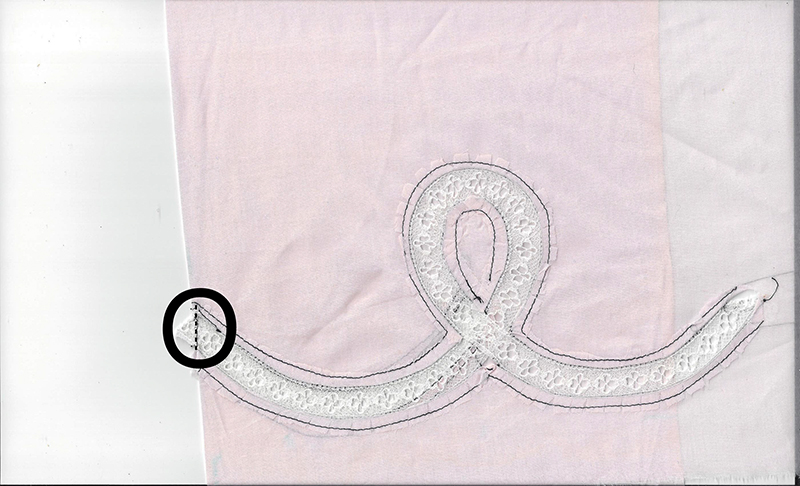
- Pull fold at scallop peaks to wrong side and stitch from top of peak to bottom.
- Cut through fold, press open and place stabilizer under mitre. Tiny zig zag L 1.0 W 2.0 along seam. Trim close to stitching. Repeat with each scallop point.
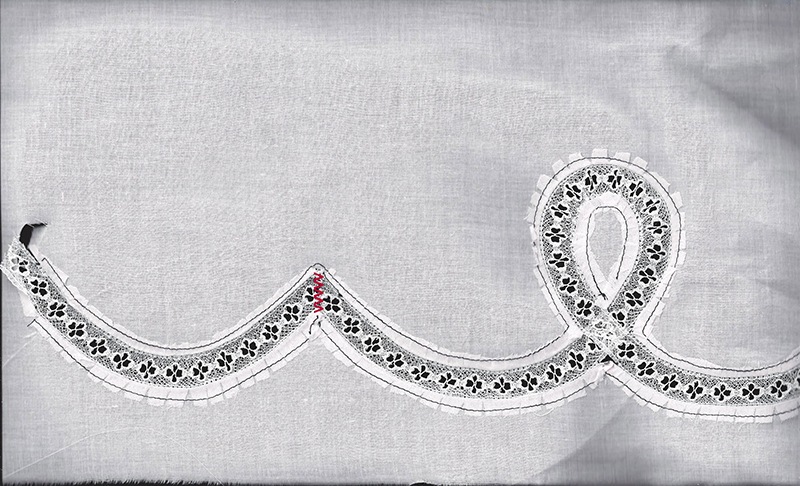
Pin Stitch - also known as Parisian Hemstitch
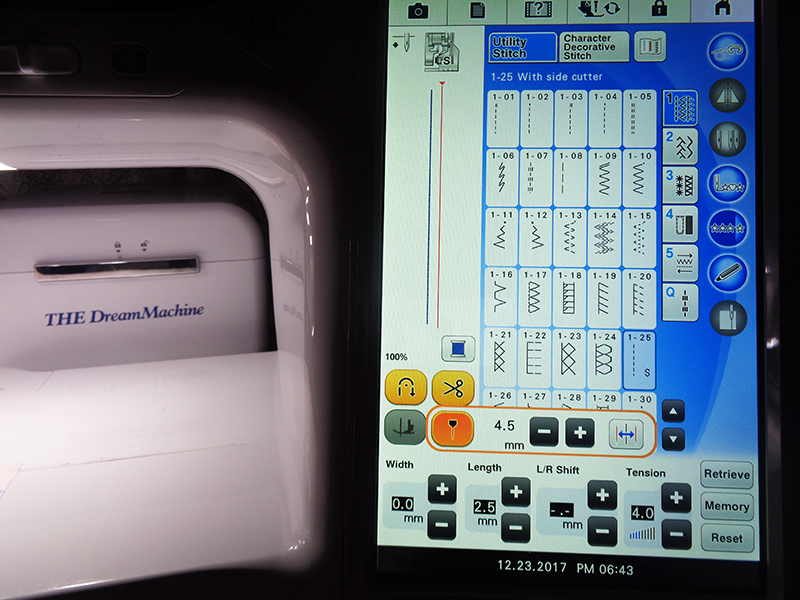
This beautiful stitch is shaped like the letter L and requires 6-8 stitches for each hole, which appears at the base of the L. The stitch width will vary with the width of the header and the tension may need adjustment depending on the weight and crispness of the starched fabric. For this project my settings were W. 2.0, L. 3.0 and tension 3.6. Doing a "stitch rehearsal" on a mock up with a scrap of fabric and lace will be time well spent. The goal is to enclose the header in the single horizontal stitch. Don't be tricked into using a stitch that has two horizontal stitches. Those are usually for applique' and will not give the same look as a genuine pin stitch. Select stitch #304 on THE Dream Machine XV8500D,Quattro 6000D
and Duetta 4500D.
For other models, check your instruction manual for stitch description and number.
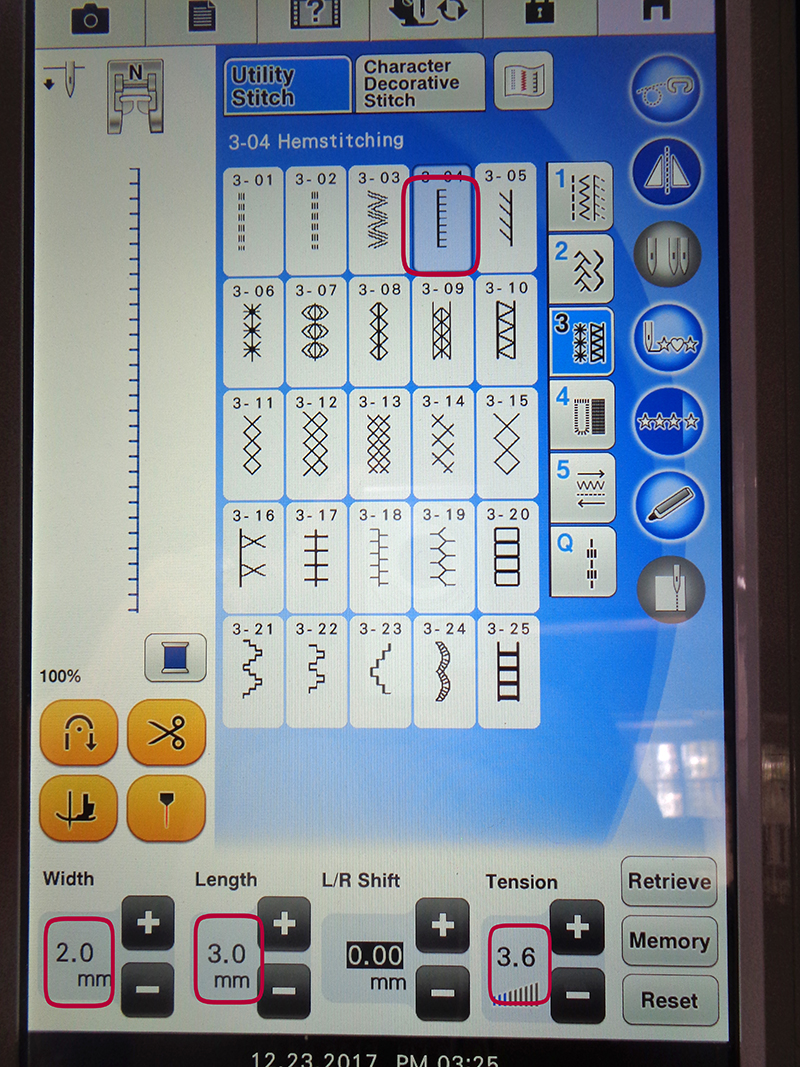
- Pin stitch looks like this in the machine menu.
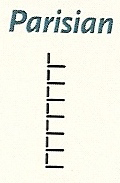
- Insert #100 sharp or a wing needle size #100 or #120. Thread both the needle and bobbin with fine thread and set width and length to suitable settings. If fabric is not "crisp" apply spray starch and press again.
- Pin lightweight paper stabilizer to the underside of the area to be pin stitched.
- Flip skirt to right side and begin pin stitching on lower edge of lace. Pivot frequently and only when the needle returns to the fabric after its horizontal stitch into the lace. Again, use of the knee lift makes all that pivoting so much easier.
- Remove stabilizer after pin stitch is complete. Remove basting threads holding fabric tabs away from lace. Trim tabs close to lace.
Note: There is no need to remove the white thread stitching which held the lace in place.
- Beginning at center back, place starched lace insertion even with raw hem edge. Put stabilizer under lace and hem. Secure in place with straight stitch in top header.
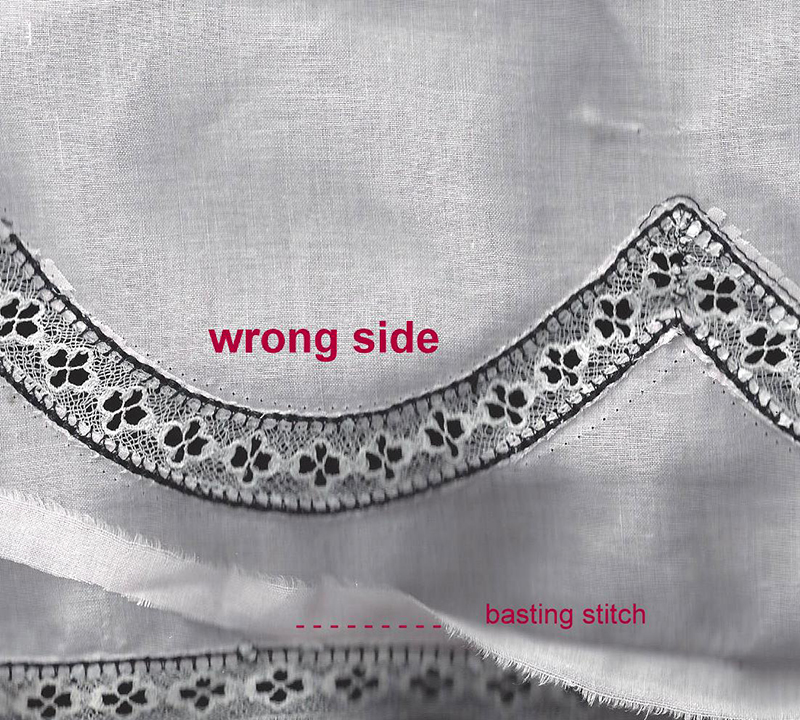
- Press hem fabric away from lace. Baste in place then pin stitch.
- Remove stabilizer and trim fabric close to pin stitching. Press.
- Measure 1.5 times the length of the hemline. Do not cut lace, but mark the end with a small brass safety pin. Divide the lace in quarters and mark each quarter.
- Gather lace, pinning center at center front and each quarter at side seams.
- Butt gathered lace edging to lace insertion and zig zag with approximate settings of W. 2.5 and L 1.0.
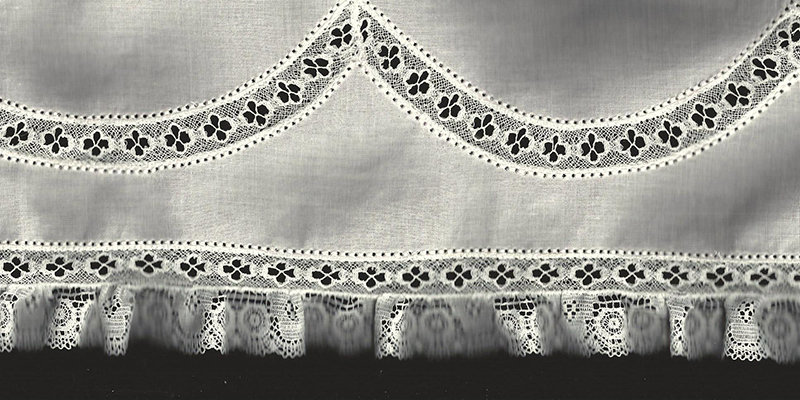
- Embroider single flower at peak of each scallop. Optional: Weave ribbon through straight insertion at hemline.
- Finish skirt and placket as directed in guide sheet. Stitching back seam taking care to match lace scallop ends.
- Stitch 2 buttonholes as marked.
Sash Ties
- Roll and whip one 32" side of the sash. The right swing of the needle just misses the fabric edge, stitching "in the air." The left needle swing penetrates the fabric and after a stitch or two, rolls and whips the edge. Use a scrap to practice this.
Tip: Putting tension on the fabric with a gentle pull from either end seems to help get the fabric in the mood to roll.
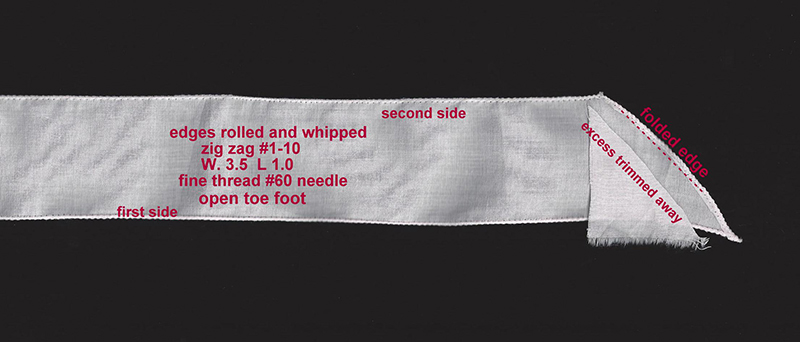
- Make a pleat in raw end of each sash. Pin end of ties to outside of bodice back. Baste in place. See illustration #3 on guide sheet.
Bodice
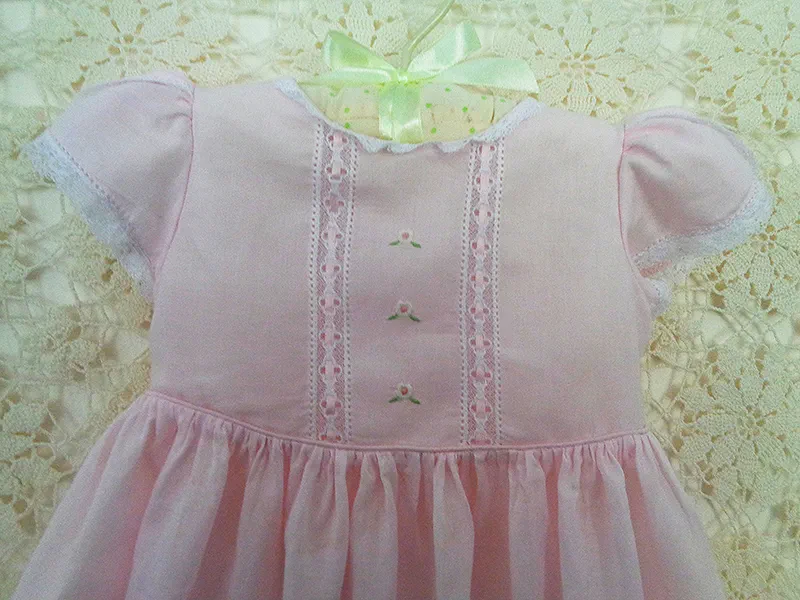
- Stay stitch around neckline 1/4" from neck edge as shown on guide sheet. Join front to backs at shoulder seam. Press crease at center front.
- Mark a lace placement line 1" to either side of center crease.
- Starch and press a length of lace insertion long enough to reach from highest point of shoulder to lower edge of bodice. Place stabilizer under marked lines.
- Place lace edge on marked line and straight stitch in place.
Note: Use of laser is helpful in keeping the lace straight.
Note: This is a demonstration sample. The shoulder seams should be in place and stay stitching worked at neckline.
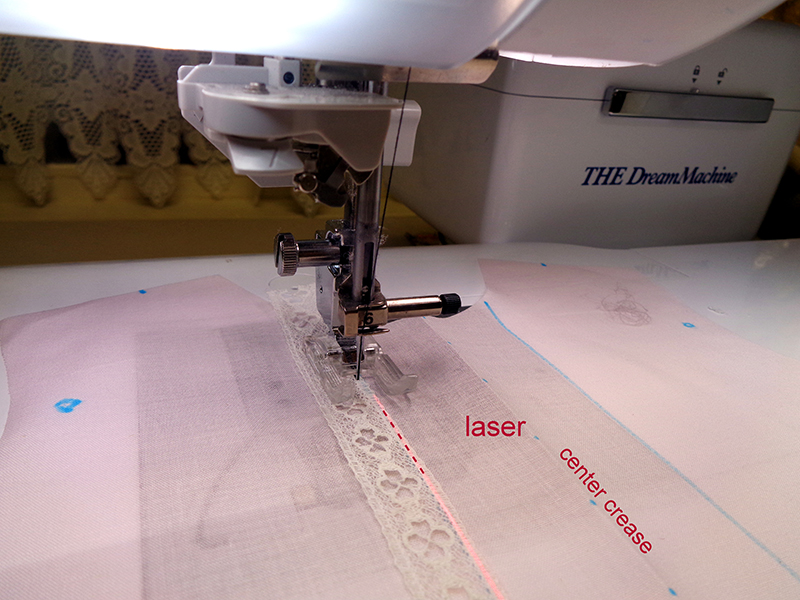
- Stitch inside both headers, then remove stabilizer.
- Slit fabric down the center behind lace and press away from lace. Baste in place.
- Pin stitch on lace edge, as done on skirt.
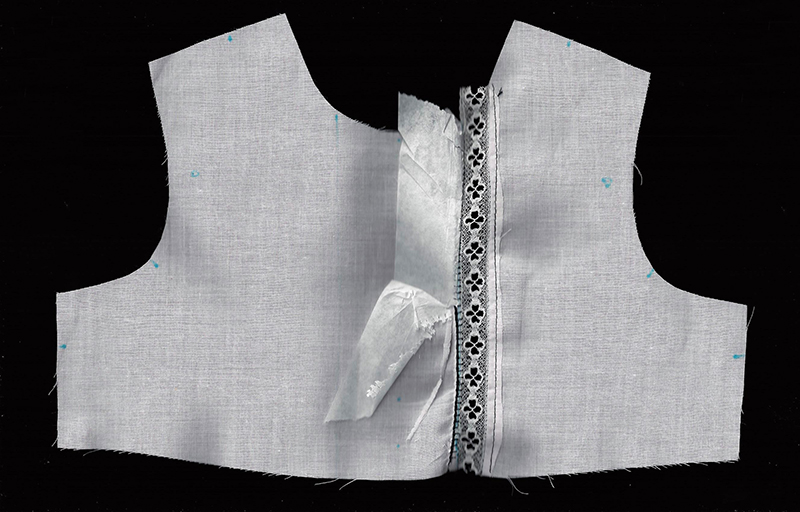
- Repeat on opposite lace strip.
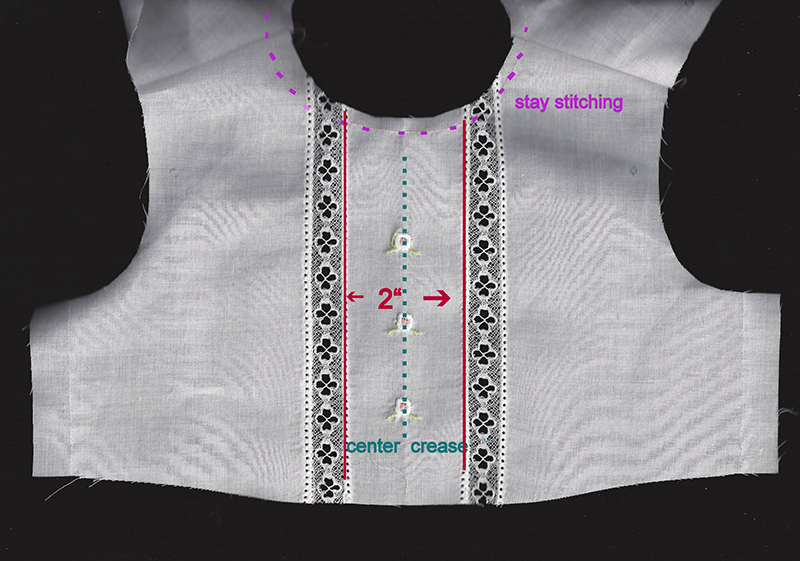
- Embroider three single flowers at center front.
Note: The embroidery is placed to fall a little below the center because baby's chin often covers the top edge of the dress.
- Embroider a single flower on the skirt at the peak of each scallop.
- Embroider floral cluster in center of lace loop.
- Construct bodice as directed in guide sheet.
- Attach baby piping along bodice bottom, NOT through lining. Maintain 5/8" seam allowance.
- Put bodice/yoke and skirt aside.
Sleeves
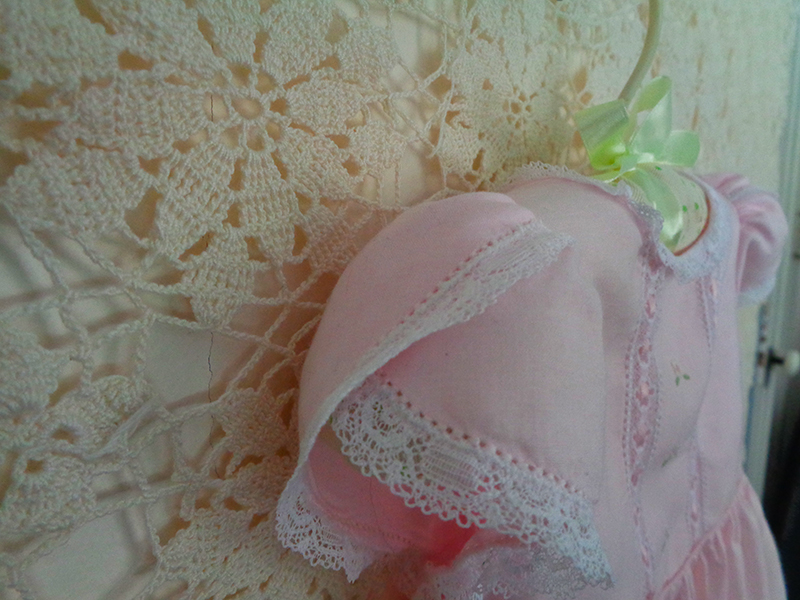
- Cut out 4 sleeves as per instructions. Take extra care that all position marks are transferred clearly.
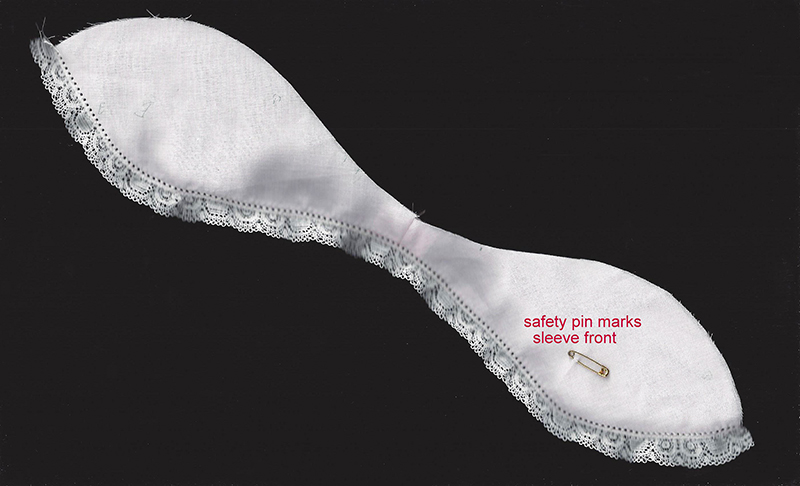
Note: It is helpful to mark each sleeve front with a small brass safety pin.
- Trim away the 3/8" seam allowance from bottom notched (or marked) edge of each constructed sleeve. No lace trim was included in the pattern. The added lace will give the sleeve the same depth.
- Do not stitch lower edge but instead baste layers together close to raw edge.
- Use 40" of 3/8" lace or reduce width of 7/8" lace edging to 3/8". Edging 7/8" wide is lovely for the hemline but too wide for the sleeves and neckline. So the width was reduced to 3/8".
To reduce width…
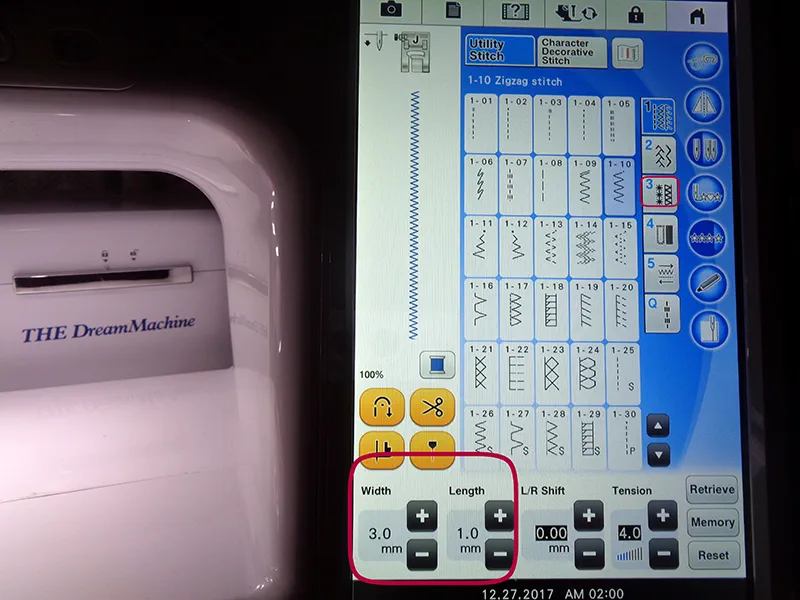
- 40" of lace edging must be trimmed to 5/8", enough for both sleeves, to 5/8". Set machine to zig zag W.3, L.1.
- Tie a chunky knot at the end of a 45" length of quilting or regular sewing thread.
- Place thread a scant ¼" in from newly cut edge with knotted end extending 1" beyond the beginning of lace. Attach open toe or J foot. Zig zag stitch #1-10 w. 3, L. 1.0, over the quilting thread, with the right swing of the needle "in the air," just missing the edge of the lace. The left swing covers the thread and rolls the lace over it. Take care not to catch gathering thread in the stitches. This is called rolling and whipping, most often done on fabric.
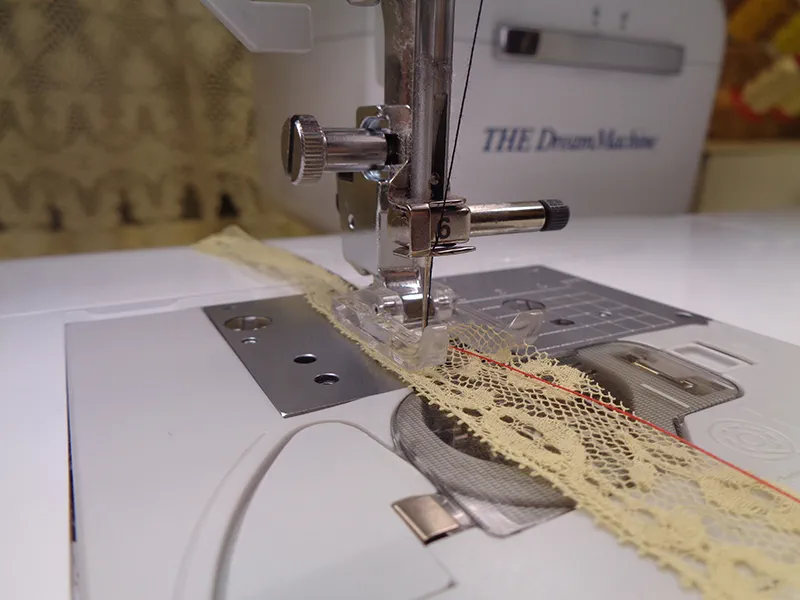
Note: Parchment colored lace, black sewing thread and red quilting thread are shown for visibility. Use white thread.
- Gather lace edging slightly, using quilting thread for pull.
- Position at bottom of sleeve with lace edge even with raw edge. Straight stitch in place. Use no more than half the lace, saving the remaining portion for the second sleeve.
- Pick out a length of gathering thread before cutting. Repeat on the second sleeve.
- Pin stitch through both layers of sleeve. Trim fabric under lace close to stitching.
- Construct sleeve as indicated in pattern, matching circles. There are many marks required. I found it helpful to insert a small brass pin on the sleeve front.
- Gather sleeves as directed and insert sleeves into bodice, leaving lining free.
Dress Construction
- Begin ½" from bodice back raw edge. Stitch gathered 3/8" lace to neckline on ¼" stay stitching. Stop ½" from opposite end.
- Apply piping to bottom of bodice on 5/8" seam allowance line.
- See step #17 on pattern guide sheet to join skirt to bodice.
- Join bodice to bodice lining as directed in steps 20 & 21.
- Stitch buttonholes on back bodice. Attach buttons.
Now wasn't that fun?
It takes longer to read the instructions than it does to work through the steps. And each time a technique is practiced, it gets better and faster. I hope you will try heirloom sewing.Suggested additional embellishments:
- Embroider single flower between buttonholes
- Add gathered lace to ends of sash ties
- Embroider single flower on end of each sash tie
- Add ribbon rosettes at above or below each row of bodice lace insertion
- Add a loop "ribbon carrier" at center back waist to support sash bow.

