Little Princess Special Occasion Dress Part 2
Brother Sews Blogger
 61. Pin to neckline with raw edges even. Disregard the ripples. They lie above the ¼” seam allowance and cause no problem.
 62. Sew with ¼” seam allowance. Stitch a second time a scant 1/8” from previous seam, closer to raw edge. Trim near 1/8” seam line.
63. Fold neckband over the narrow seam allowance and pin in place. Tuck raw ends under.
NOTE: A glue stick is helpful for holding the ends and the binding in place.
64. Stitch in the ditch from the right side.
65. Hand whip the back facings in place.
62. Sew with ¼” seam allowance. Stitch a second time a scant 1/8” from previous seam, closer to raw edge. Trim near 1/8” seam line.
63. Fold neckband over the narrow seam allowance and pin in place. Tuck raw ends under.
NOTE: A glue stick is helpful for holding the ends and the binding in place.
64. Stitch in the ditch from the right side.
65. Hand whip the back facings in place.
 66. Add buttons and buttonholes.
 70. Pin sleeve and bodice right sides together. Begin stitching at bottom of sleeve with ½” seam. Continue up sleeve and down bodice side. Sew side with ½” seam allowance. Clean finish seam. Press.
 74. Join two skirt pieces on one side with French seam.
75. Set up for twin needle pintucks (see steps #4-8). Mark a line 1 ¾” above bottom raw edge.
76. Stitch center tuck along that line. Continue in same pattern as on sleeves (steps #9-12), 3 straight tucks bracketed by a serpentine tuck on each side. Press the pintucks.
77. Trim the fabric edge of the entredeux from each side of the fancy band.
78. Draw a line 3/4” above the uppermost serpentine tuck. Place the lower edge of the fancy band along this line so that the line is visible through the entredeux holes. With a fine needle (#60-65) and fine thread, carefully straight stitch L 3.0 through the lower edge of the entredeux. See image #32.
79. Press the fancy band up toward the bodice. Baste in place through the upper beading. Again, stitch through the upper edge of the entredeux as in step #77.
74. Join two skirt pieces on one side with French seam.
75. Set up for twin needle pintucks (see steps #4-8). Mark a line 1 ¾” above bottom raw edge.
76. Stitch center tuck along that line. Continue in same pattern as on sleeves (steps #9-12), 3 straight tucks bracketed by a serpentine tuck on each side. Press the pintucks.
77. Trim the fabric edge of the entredeux from each side of the fancy band.
78. Draw a line 3/4” above the uppermost serpentine tuck. Place the lower edge of the fancy band along this line so that the line is visible through the entredeux holes. With a fine needle (#60-65) and fine thread, carefully straight stitch L 3.0 through the lower edge of the entredeux. See image #32.
79. Press the fancy band up toward the bodice. Baste in place through the upper beading. Again, stitch through the upper edge of the entredeux as in step #77.
 80. Draw another line 1 1/8” above the upper edge of the beading. Stitch the middle pintuck of the same pattern along this line. Complete the 5 pintuck pattern just as the one below the fancy band.
81. Remove basting thread in the upper beading. Cut a straight line in batiste centered behind embroidered insertion. Press away from fancyband.
NOTE: It is helpful to baste or pin the batiste away from the entredeux.
82. Work tiny zig zag into entredeux. Repeat this zig zag for extra security. Trim away excess batiste.
80. Draw another line 1 1/8” above the upper edge of the beading. Stitch the middle pintuck of the same pattern along this line. Complete the 5 pintuck pattern just as the one below the fancy band.
81. Remove basting thread in the upper beading. Cut a straight line in batiste centered behind embroidered insertion. Press away from fancyband.
NOTE: It is helpful to baste or pin the batiste away from the entredeux.
82. Work tiny zig zag into entredeux. Repeat this zig zag for extra security. Trim away excess batiste.
 83. Join 74” Swiss edging to entredeux. Stitch to skirt hemline ¾” below serpentine tuck.
84. Weave ribbon through beading. Seam two skirt pieces together along second side, carefully matching tucks, fancyband and Swiss edging at seam line.
83. Join 74” Swiss edging to entredeux. Stitch to skirt hemline ¾” below serpentine tuck.
84. Weave ribbon through beading. Seam two skirt pieces together along second side, carefully matching tucks, fancyband and Swiss edging at seam line.
 Little Princess Special Occasion Dress Part 2 _Stitching Sewcial.pdf
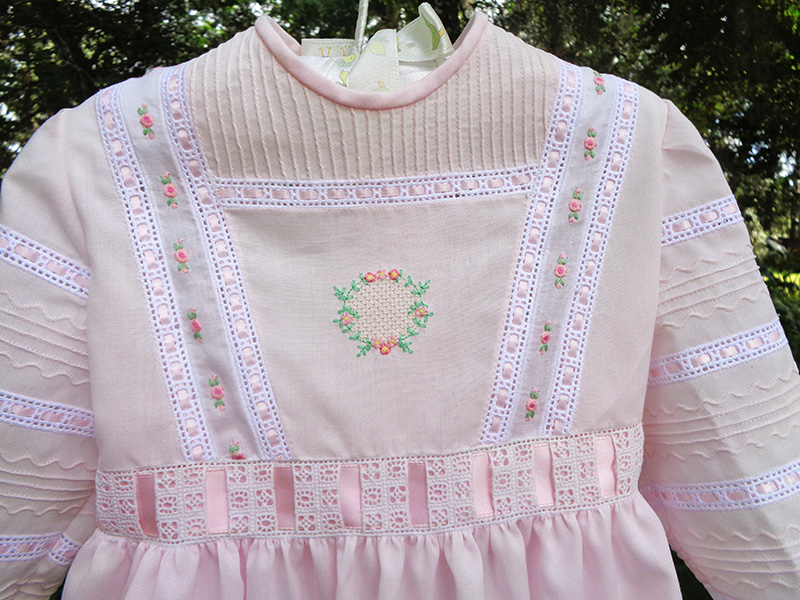
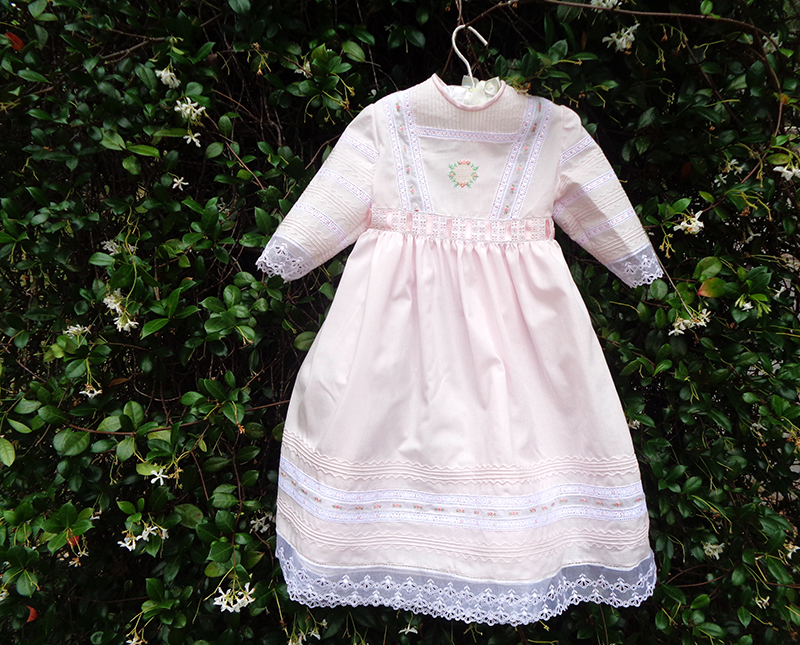
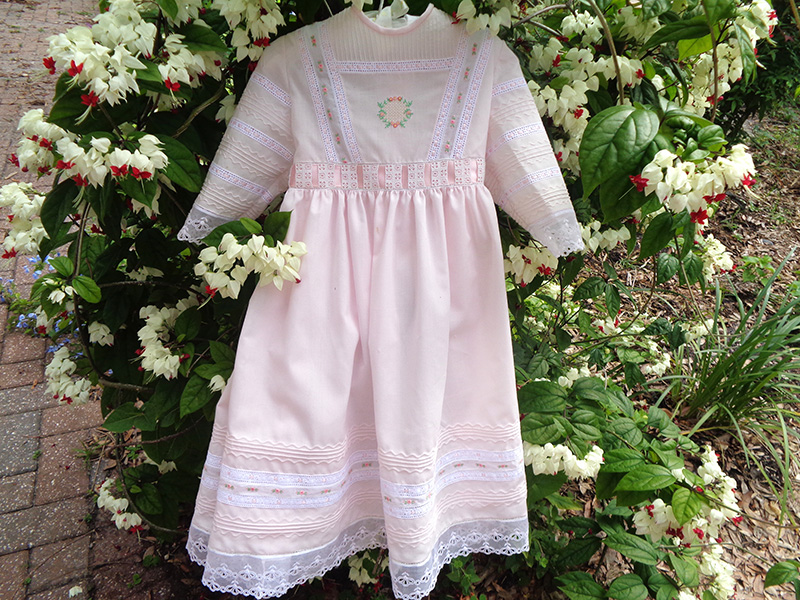
Part 2 of the Little Princess Occasion Dress
Note: Part One can be found here!
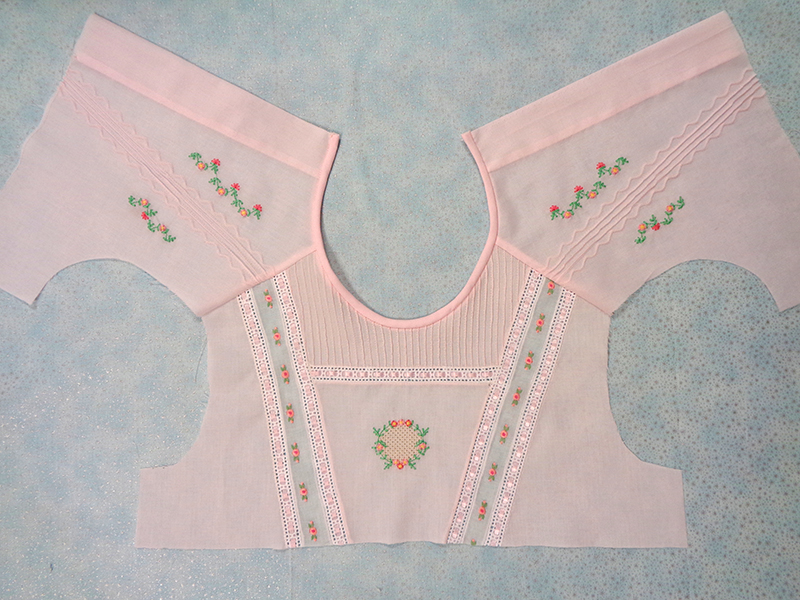
Construct Bodice
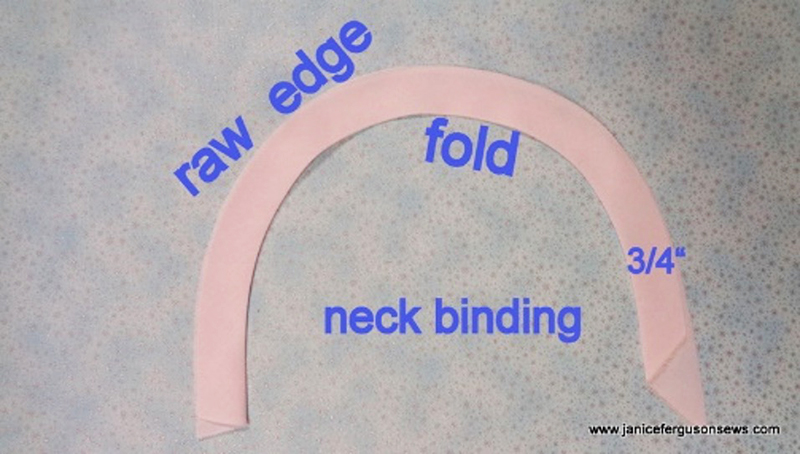
59. Seam front to back bodices at shoulder with French seams. 60. Cut a bias strip 1.5” x neck circumference + 1”. Fold in half to measure ¾” then press to mirror curve of neckline.
61. Pin to neckline with raw edges even. Disregard the ripples. They lie above the ¼” seam allowance and cause no problem.
62. Sew with ¼” seam allowance. Stitch a second time a scant 1/8” from previous seam, closer to raw edge. Trim near 1/8” seam line.
63. Fold neckband over the narrow seam allowance and pin in place. Tuck raw ends under.
NOTE: A glue stick is helpful for holding the ends and the binding in place.
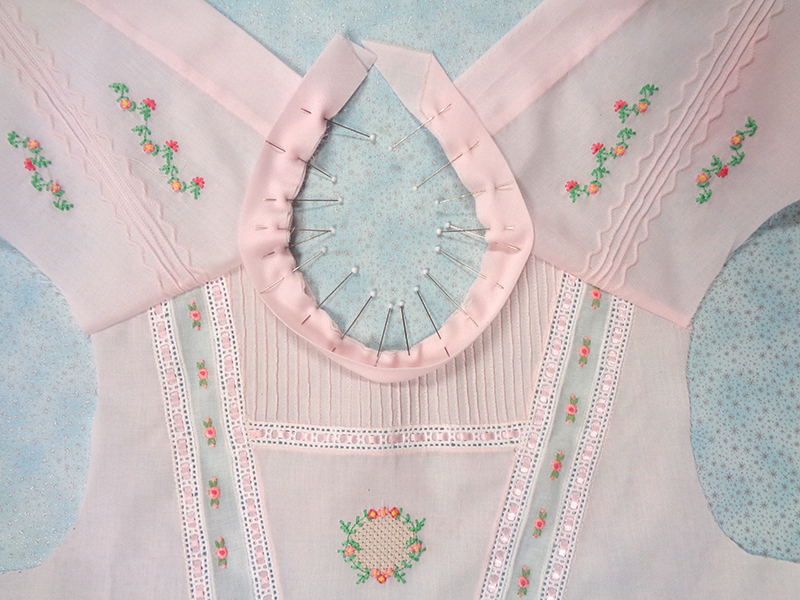
64. Stitch in the ditch from the right side.
65. Hand whip the back facings in place.
66. Add buttons and buttonholes.
Insert Sleeves
67. Stitch three rows of basting threads between notches on sleeves. Draw up gathers, pin to armscye matching notches and shoulder dot. Pin in place. 68. Seam in place with ½” seam allowance. Stitch 1/8” above that seam line toward raw edge then trim close to those stitches. 69. Zig zag over the tiny seam allowance W 3.5 L 1.2 or adjust to reach from seam line just across the raw edge, stitching “in the air.”
70. Pin sleeve and bodice right sides together. Begin stitching at bottom of sleeve with ½” seam. Continue up sleeve and down bodice side. Sew side with ½” seam allowance. Clean finish seam. Press.
Waist Band
71. Measure the circumference of the waistline, including the opened facing. Mark Swiss beading which fits 1” ribbon to that measurement + 1”. 72. Join beading to bodice as other entredeux edged beading was joined, i.e. right sides together, stitch in the ditch, trim to scant 1/8’, zig zag off the edge and into the ditch, press the tiny seam away from the entredeux holes, tiny zig into each hole and then zag barely penetrating the outer edge of the batiste. Press.
Construct Skirt
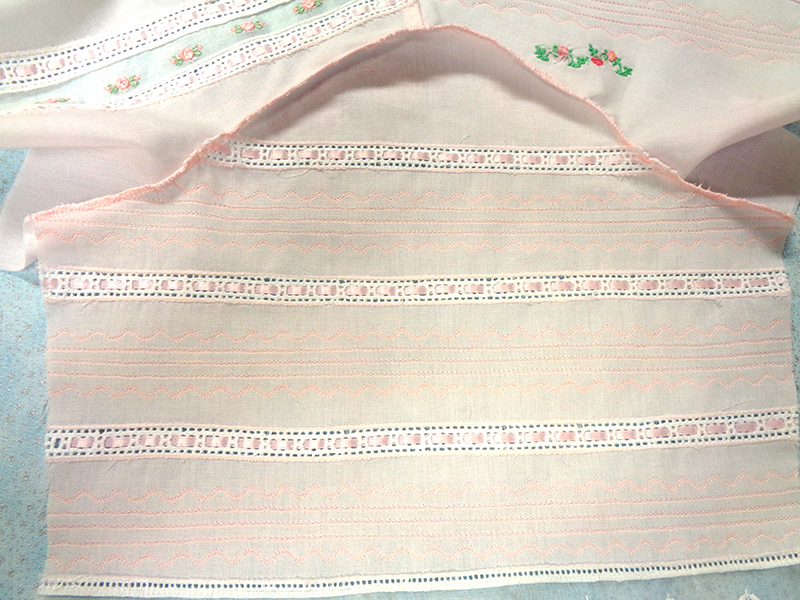
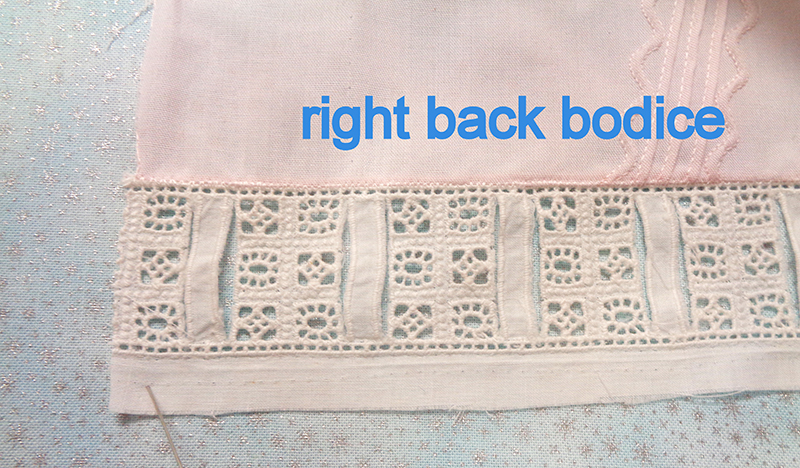
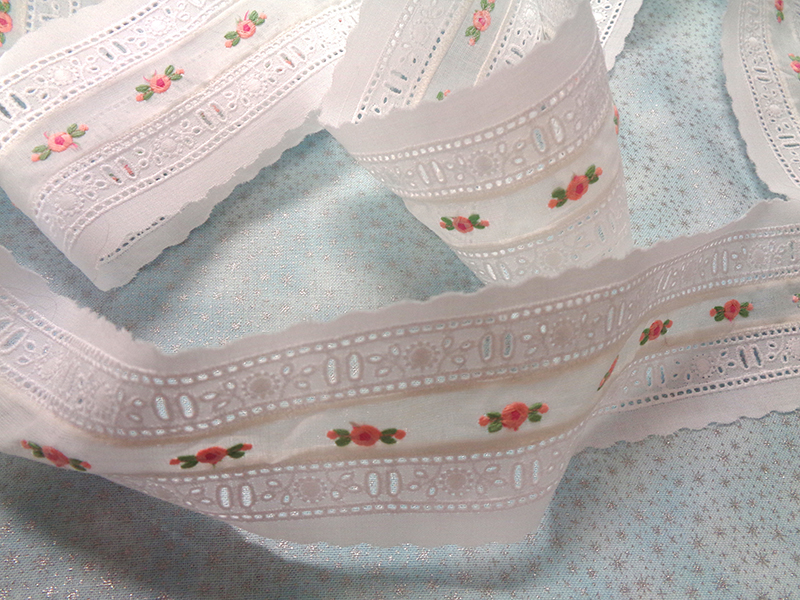
73. Create 74” fancy band, mimicking the diagonal bands on the bodice. Join Swiss beading to either side of the Swiss embroidery, repeating each step #32-34. Set aside.
74. Join two skirt pieces on one side with French seam.
75. Set up for twin needle pintucks (see steps #4-8). Mark a line 1 ¾” above bottom raw edge.
76. Stitch center tuck along that line. Continue in same pattern as on sleeves (steps #9-12), 3 straight tucks bracketed by a serpentine tuck on each side. Press the pintucks.
77. Trim the fabric edge of the entredeux from each side of the fancy band.
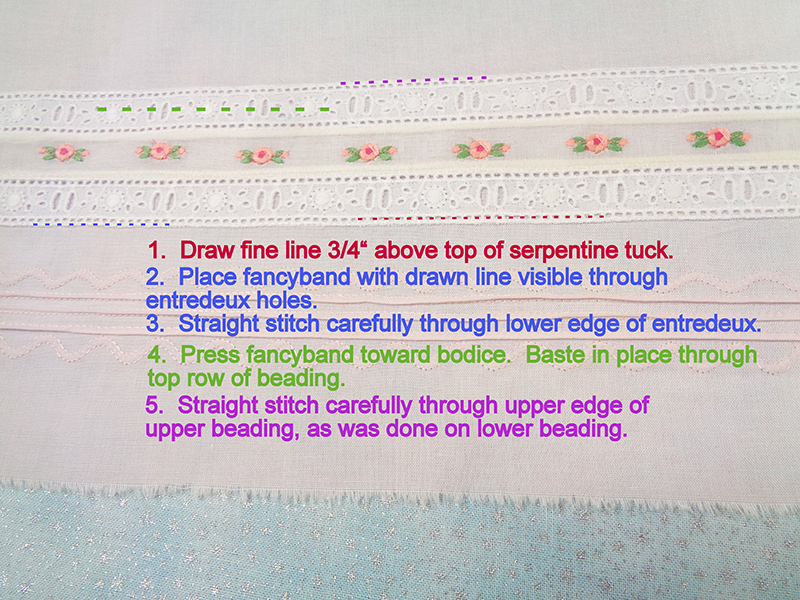
78. Draw a line 3/4” above the uppermost serpentine tuck. Place the lower edge of the fancy band along this line so that the line is visible through the entredeux holes. With a fine needle (#60-65) and fine thread, carefully straight stitch L 3.0 through the lower edge of the entredeux. See image #32.
79. Press the fancy band up toward the bodice. Baste in place through the upper beading. Again, stitch through the upper edge of the entredeux as in step #77.
80. Draw another line 1 1/8” above the upper edge of the beading. Stitch the middle pintuck of the same pattern along this line. Complete the 5 pintuck pattern just as the one below the fancy band.
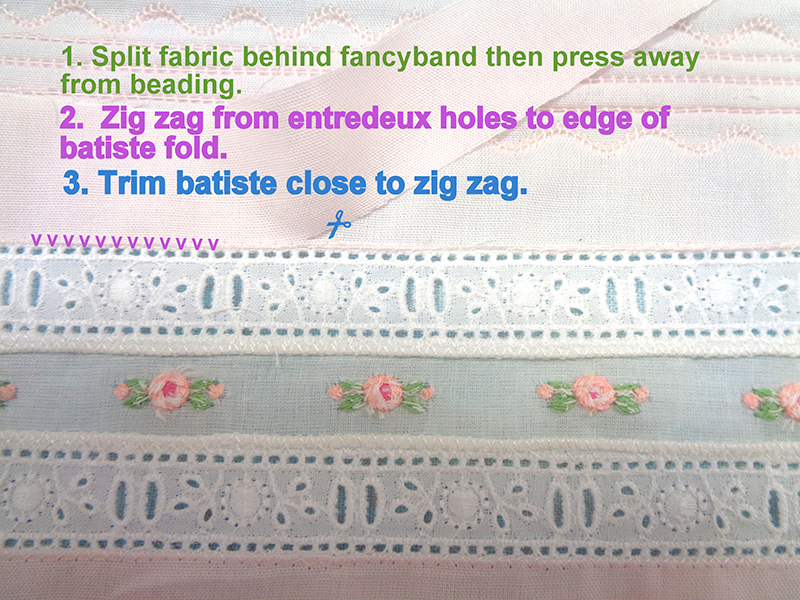
81. Remove basting thread in the upper beading. Cut a straight line in batiste centered behind embroidered insertion. Press away from fancyband.
NOTE: It is helpful to baste or pin the batiste away from the entredeux.
82. Work tiny zig zag into entredeux. Repeat this zig zag for extra security. Trim away excess batiste.
83. Join 74” Swiss edging to entredeux. Stitch to skirt hemline ¾” below serpentine tuck.
84. Weave ribbon through beading. Seam two skirt pieces together along second side, carefully matching tucks, fancyband and Swiss edging at seam line.
Final Construction
85. Calculate desired finished center back length. Measure bodice and adjust skirt length at the top to meet that desired finished length. NOTE: Garment shown is tea length for a flower girl dress. 86. Insert placket per Genevieve instructions. 87. Mark center front of skirt and center of beading at waist. Stitch gathering threads along skirt top. 88. Join skirt to waistline beading as per Genevieve instructions, matching center front and side seams. Weave ribbon through waistline beading. It’s finished! Now isn’t that lovely?
Little Princess Special Occasion Dress Part 2 _Stitching Sewcial.pdfRelated Projects
Stay Connected
* Required fields