May Free Design: Embroidered Bookmark
The Brother Free Design for this month is a beautiful decorative buttonhole. In this project you'll find a Free Bonus Design and a blank bookmark design file. Combine the two designs together, add some lettering to personalize the bookmark, and you have the makings of a great little gift. Why not make one for Mom to help her celebrate Mother's day?
Materials and Supplies
- Brother Sewing and Embroidery Machine
with 5-inch by 7-inch hoop. Note: The rose buttonhole design fits in a 4-inch hoop. The free bonus bookmark design file requires a 5-inch by 7-inch hoop. - Brother Embroidery Thread and bobbin thread.
- SA540 Brother Pacesetter lightweight water-soluble stabilizer.
- Brother Free Design of the Month.
- Brother Free Bonus design – Blank Bookmark.
- Embroidery needle for embroidering.
- Fabric for bookmark appliqué: Good quality cotton or another fabric such as linen or silk dupioni, two pieces measuring 4 & ½-inches wide X 8 & ½-inches long. Fuse medium weight interfacing to wrong side of each piece. Note: This project features silk dupioni.
- One piece of ribbon measuring ¼-inch wide X 3-inches long for tassel at top of bookmarker.
- Low tack tape to secure appliqué fabric to stabilizer in hoop. Clear perforated medical tape is recommended.
- Sharp, small scissors for trimming appliqué.
Click Here to Download the Brother Free Design of the Month
- Design size: 1.81” High X 0.99" Wide

Steps to Create Book Marker
- Transfer free rose buttonhole design and bonus bookmark (appliqué) design to your machine. Open bookmark design. Add buttonhole design. Rotate buttonhole design 180 degrees to the left so that the buttonhole is at the top and the majority of the flowers are at the bottom. Next, center the buttonhole at the top of the bookmark. Add lettering to fit as desired. See Figure #1.
 Figure #1[/caption]
Tip: You may want to save design combination in case you need to stop before you finish.
- Tightly hoop two pieces of the water-soluble stabilizer in 5 X 7 hoop.
Note: This design is stitched in a special order. Be sure to follow the directions so the design elements are hidden on the backside of the bookmark, the buttonhole goes through all layers and the satin stitching on bookmark is last.
- Begin by stitching the Appliqué Material placement line. See Figure #2.
 Figure #2[/caption]
- Tape first appliqué piece over the line making sure it covers completely with approximately ½-inch margin all around. Be generous with taping the raw edges, taping close to the raw edge on all sides.
- Stitch Appliqué Position next. See Figure #3.
 Figure #3[/caption]
- Remove tape. Carefully trim excess fabric beyond the straight stitching. See Figure #4.
Tip: When performing this step, be sure you do not distort the fabric in the hoop.
[caption id="attachment_15272" align="aligncenter" width="800"] Figure #4[/caption]
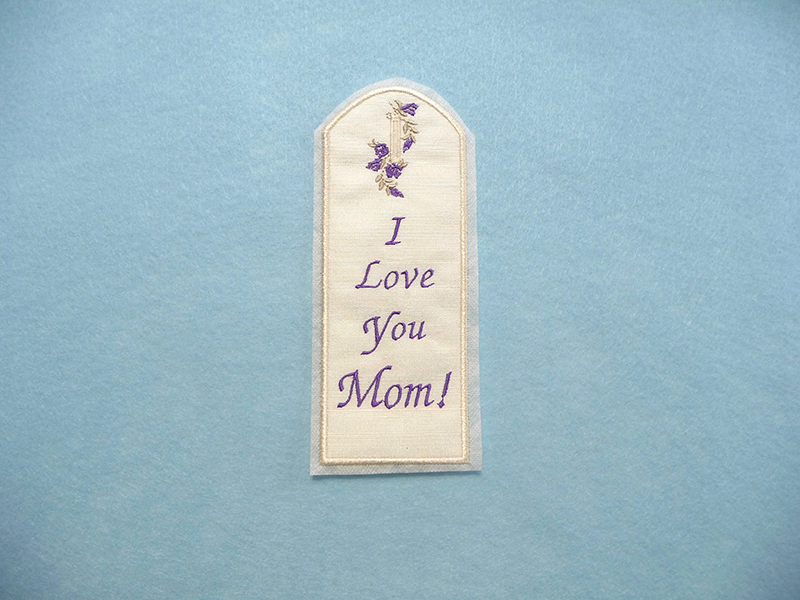
- Skip forward to advance to leaves around buttonhole. Stitch leaves and roses, skip buttonhole, and then embroider lettering. See Figure #5.
 Figure #5[/caption]
- Return to the beginning of the combined design and skip to the Appliqué Position. Carefully remove the hoop from the machine and place it upside down on a flat surface. Without distorting fabric, tape second appliqué piece in place on the backside of the hoop generously taping so tape overlaps by approximately 1/2-inch. See Figure #6.
 Figure #6[/caption]
- Change bobbin to match upper thread. At this point you will achieve the best results by increasing your upper tension slightly.
- Generally, it is good to increase upper tension by one whole number to balance the satin stitching on the raw edge. Note that this may vary from machine to machine. Be sure to return to normal tension once satin stitching is finished. Place hoop back on machine. Stitch the Appliqué Position. Remove from machine, remove tape, and carefully trim as you did for the top piece. See Figure #7.
 Figure #7[/caption]
- Advance to Appliqué to stitch the tack down and satin outline. Now return to the buttonhole. Advance to buttonhole and stitch last to finish. See Figure #8a and #8b.
 Figure #8a[/caption]
[caption id="attachment_15277" align="aligncenter" width="800"]
Figure #8a[/caption]
[caption id="attachment_15277" align="aligncenter" width="800"] Figure #8b[/caption]
- Remove from hoop. Trim excess stabilizer.
- Gently wash out excess stabilizer. Let dry and press. Open buttonhole and insert ribbon at top of marker. You are finished! Enjoy!
Options:
- Stitch entire design on felt hooped with tear-away. When finished apply interfacing to the back to cover the stitches. Trim close to satin stitching and open buttonhole from the topside. As an alternative you could fuse a piece of fabric over the back using a fusible webbing product designed for appliqués.
Related Projects
Stay Connected
* Required fields