National Dog Day: Dog Collar and T shirt Set
-Brother Sews Ambassador
Did you know that August 26th is National Dog Day!?! We love our furry friends, don’t we? Why not use your Brother machine to create a custom collar for your dog and then create a coordinating T-shirt to wear for those leisurely walks with your dog? Everyone will want to know where “Mooch and Mooch’s mom’s stylish wearables came from!
In part one of this tutorial you’ll learn how to embroider on narrow ribbon and then use the technique to customize a dog collar. I created a bonus tiny dog bone design you can download for free to further customize your collar. In part two you’ll learn how to use BES4 lettering to create a coordinating design for a T-shirt. Wear this whimsical T-shirt and let the world know you’re a proud mom of an adorable adopted dog. Follow these instructions to create this project using a machine with any hoop size, including a 4-inch hoop. Are you ready? Let’s go sew! Materials and Supplies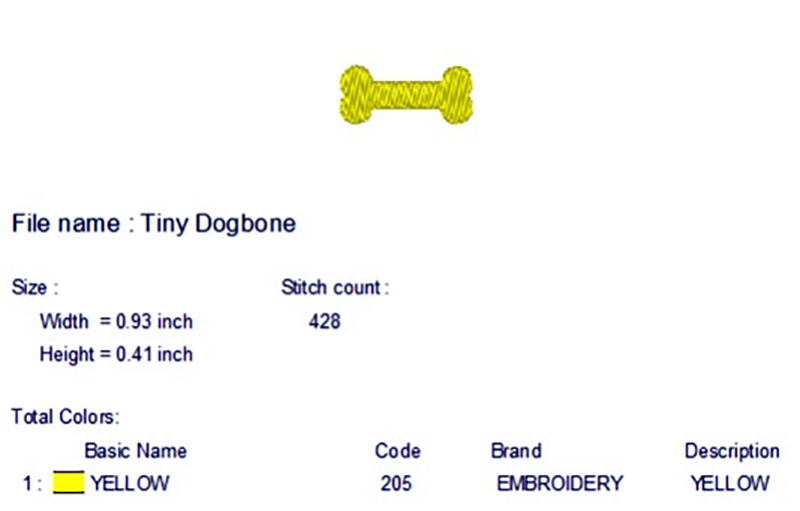 Figure #1[/caption]
Steps to Create Collar
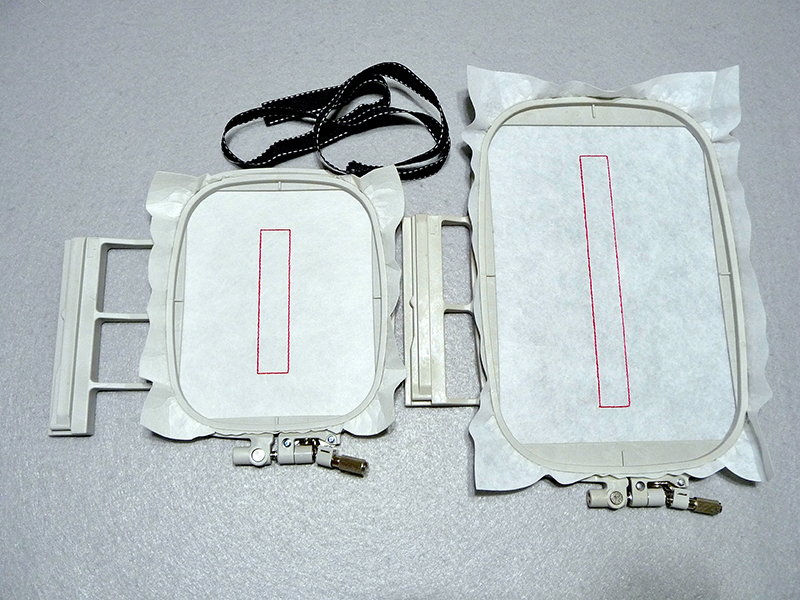 Figure #2[/caption]
Tip: Sewing the rectangle as an outline for your ribbon ensures that the lettering ends up in the center of the ribbon. Embroidering on ribbon instead of directly on the collar avoids issues of dealing with a bulky collar. This method works no matter what hoop size you have for your machine. If you have a 4-inch hoop and wish to add more lettering, you can simply embroider another rectangle and reposition your ribbon to add to it. Do this as many times as necessary to achieve your desired length.
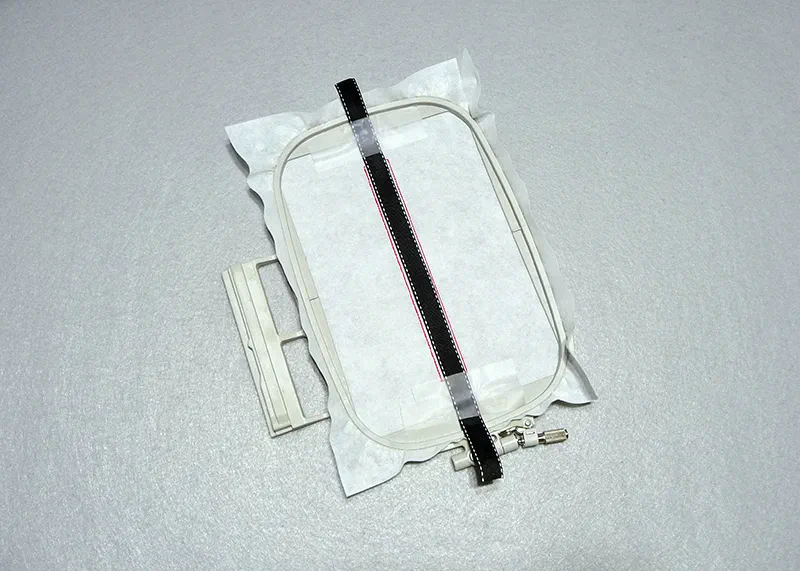 Figure #3[/caption]
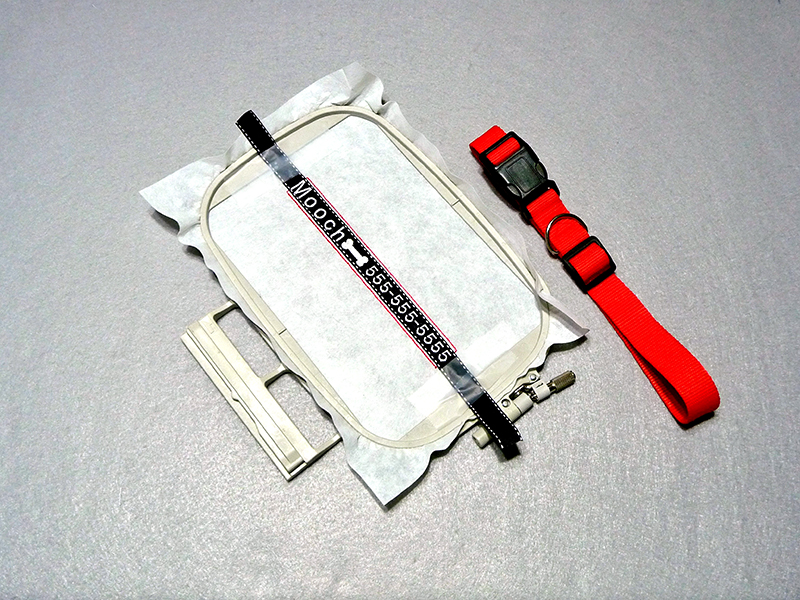 Figure #4[/caption]
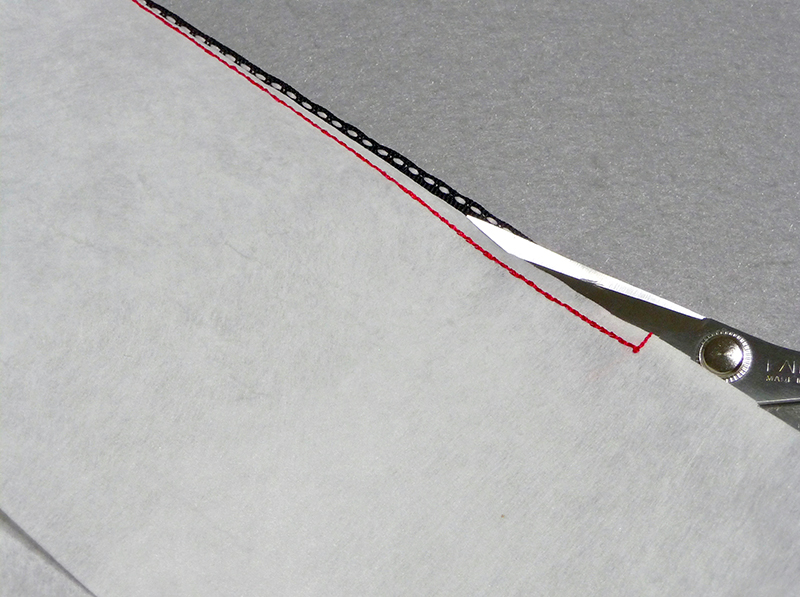 Figure #5[/caption]
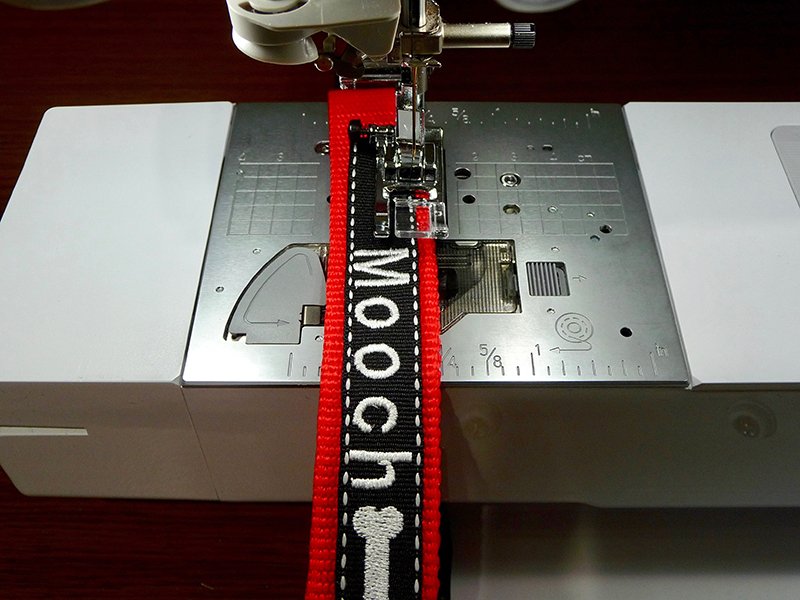 Figure #6a[/caption]
[caption id="attachment_25452" align="aligncenter" width="800"]
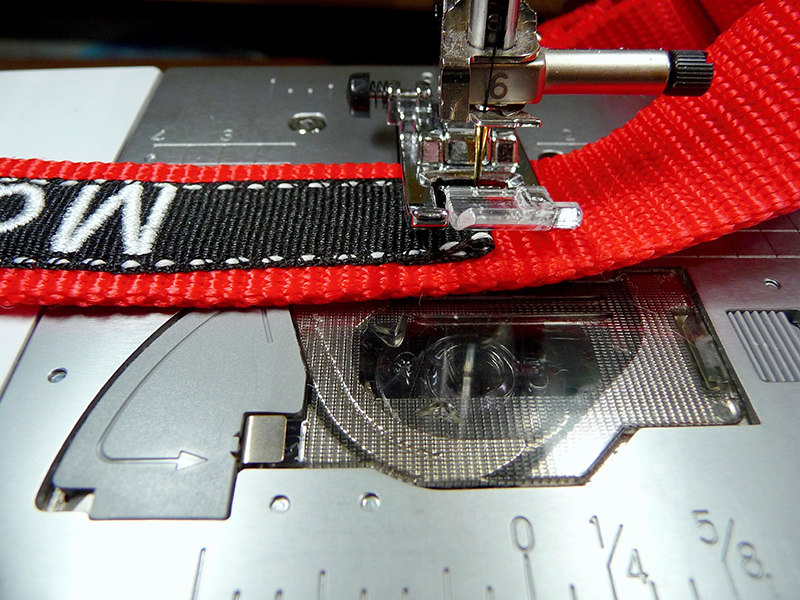 Figure #6b[/caption]
View close-up of finished collar below in Figure #6c:
[caption id="attachment_25453" align="aligncenter" width="800"]
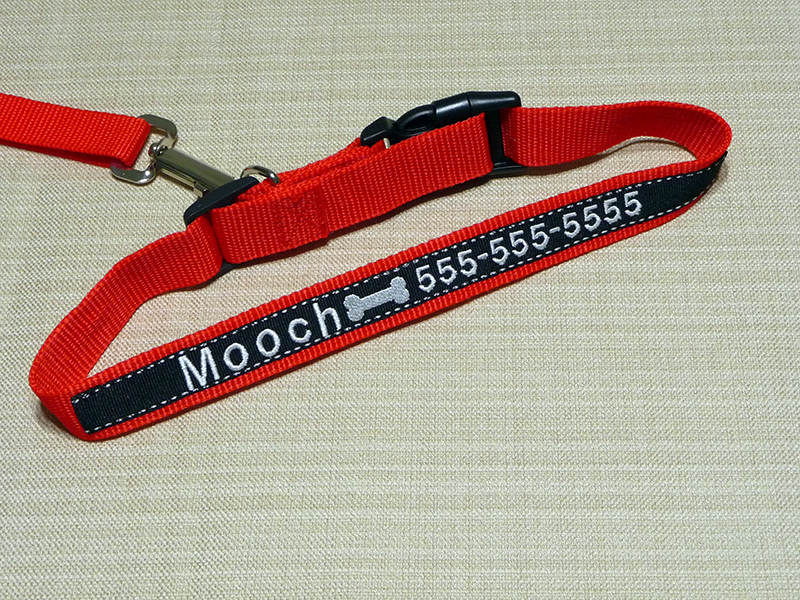 Figure #6c[/caption]
Steps to Create T-shirt Embroidery
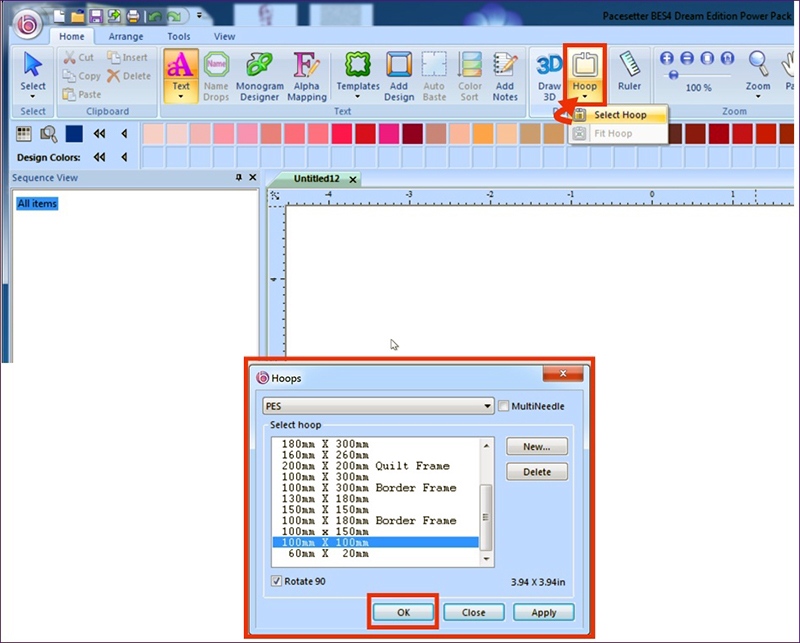 Figure #7[/caption]
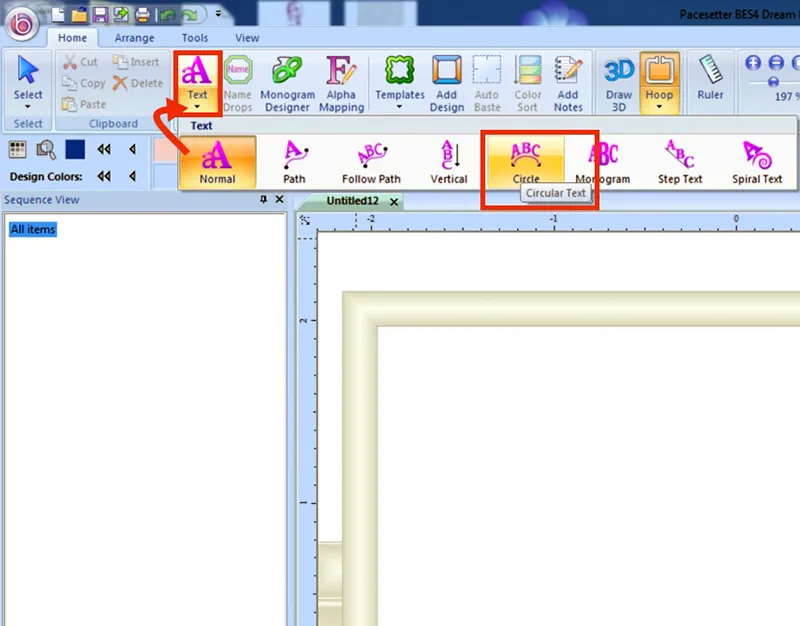 Figure #8[/caption]
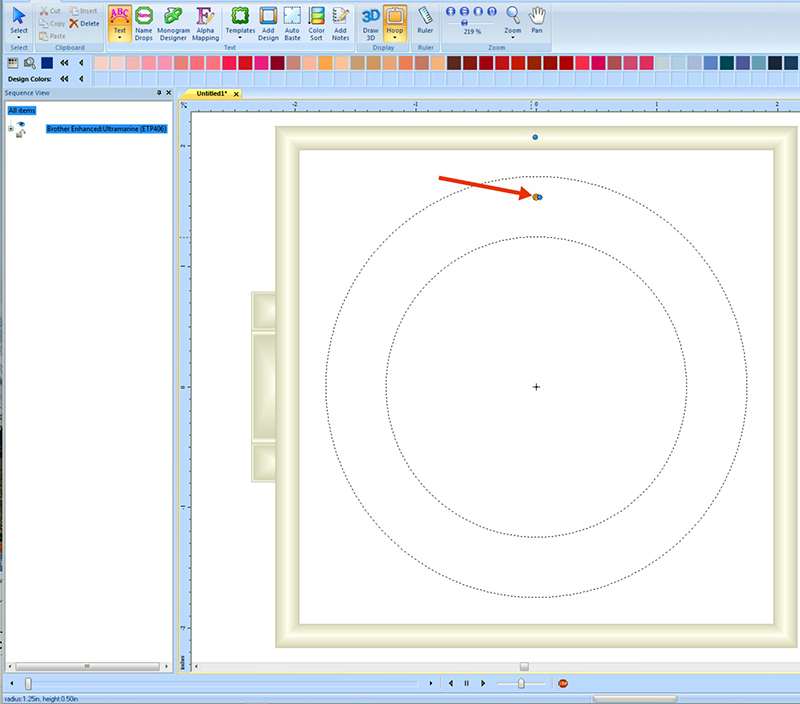 Figure #9[/caption]
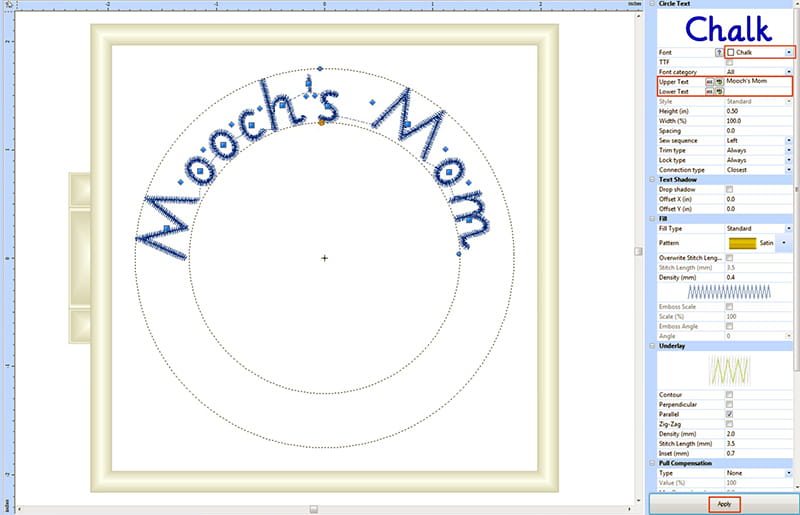 Figure #10[/caption]
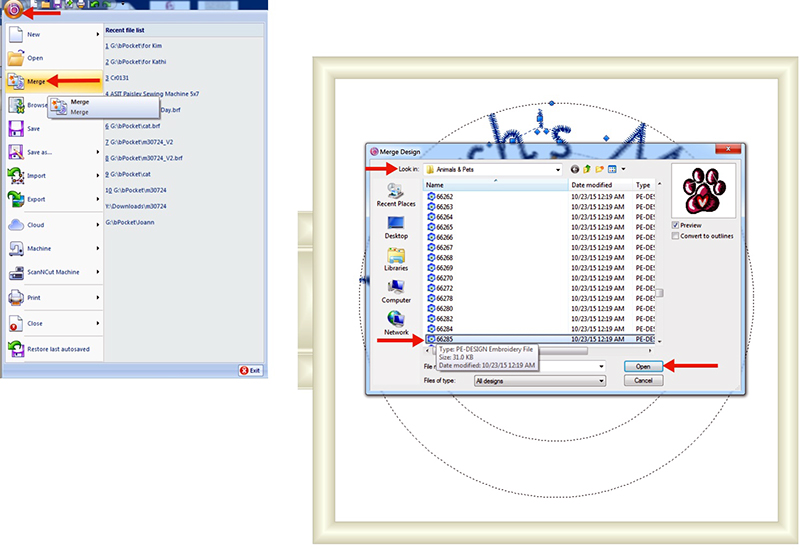 Figure #11[/caption]
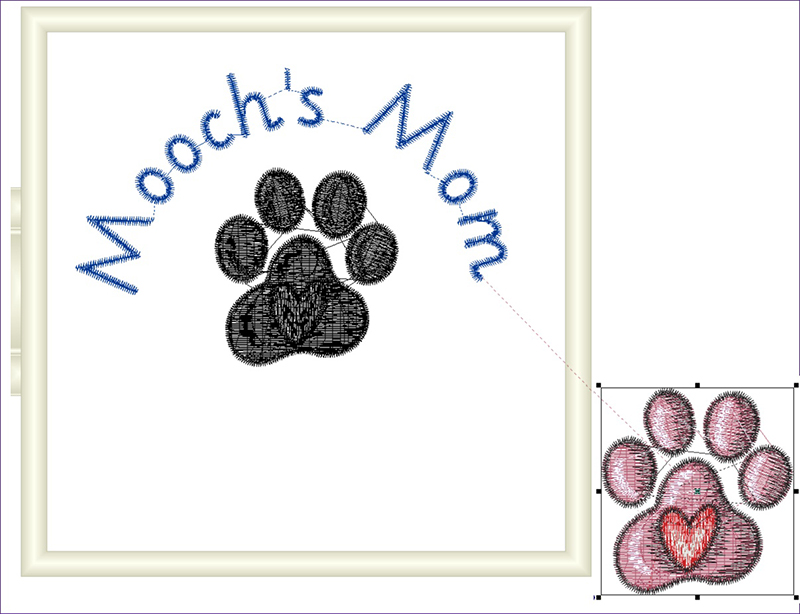 Figure #12[/caption]
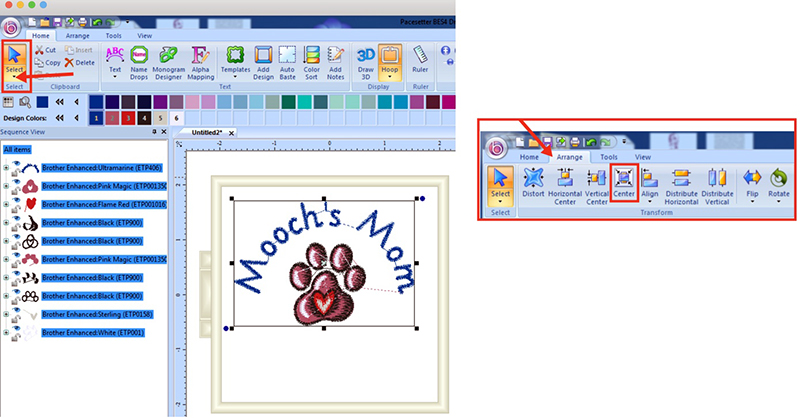 Figure #13[/caption]
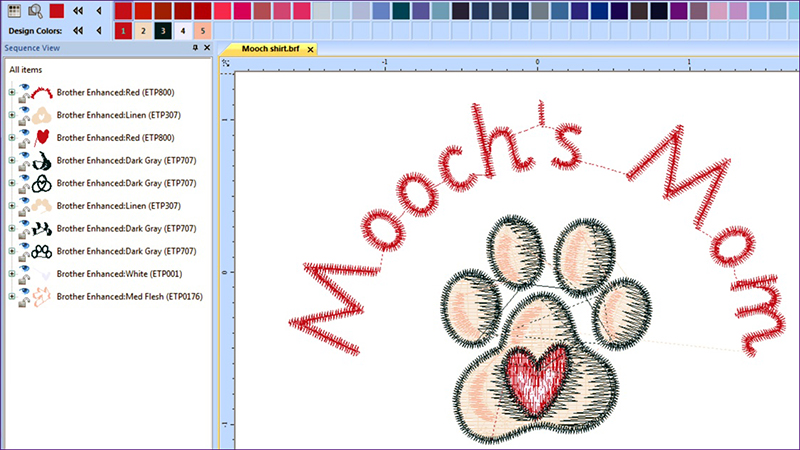 Figure #14[/caption]
Below you’ll find links to two valuable resources for embroidering on T-shirts: Resource #1: Brother Stitching Sewcial blog post Embroidered T-Shirt with Roses and Ruching
Resource #2: I demonstrated software options for T-shirts and shared important embroidery tips on the Brother Sponsored It’s Sew Easy TV show 910-1. Watch the video below from my YouTube channel. Enjoy! https://youtu.be/vzMms0_-Bqw
CLICK HERE FOR PDF!
Did you know that August 26th is National Dog Day!?! We love our furry friends, don’t we? Why not use your Brother machine to create a custom collar for your dog and then create a coordinating T-shirt to wear for those leisurely walks with your dog? Everyone will want to know where “Mooch and Mooch’s mom’s stylish wearables came from!
In part one of this tutorial you’ll learn how to embroider on narrow ribbon and then use the technique to customize a dog collar. I created a bonus tiny dog bone design you can download for free to further customize your collar. In part two you’ll learn how to use BES4 lettering to create a coordinating design for a T-shirt. Wear this whimsical T-shirt and let the world know you’re a proud mom of an adorable adopted dog. Follow these instructions to create this project using a machine with any hoop size, including a 4-inch hoop. Are you ready? Let’s go sew! Materials and Supplies
- Brother Sewing and Embroidery machine.
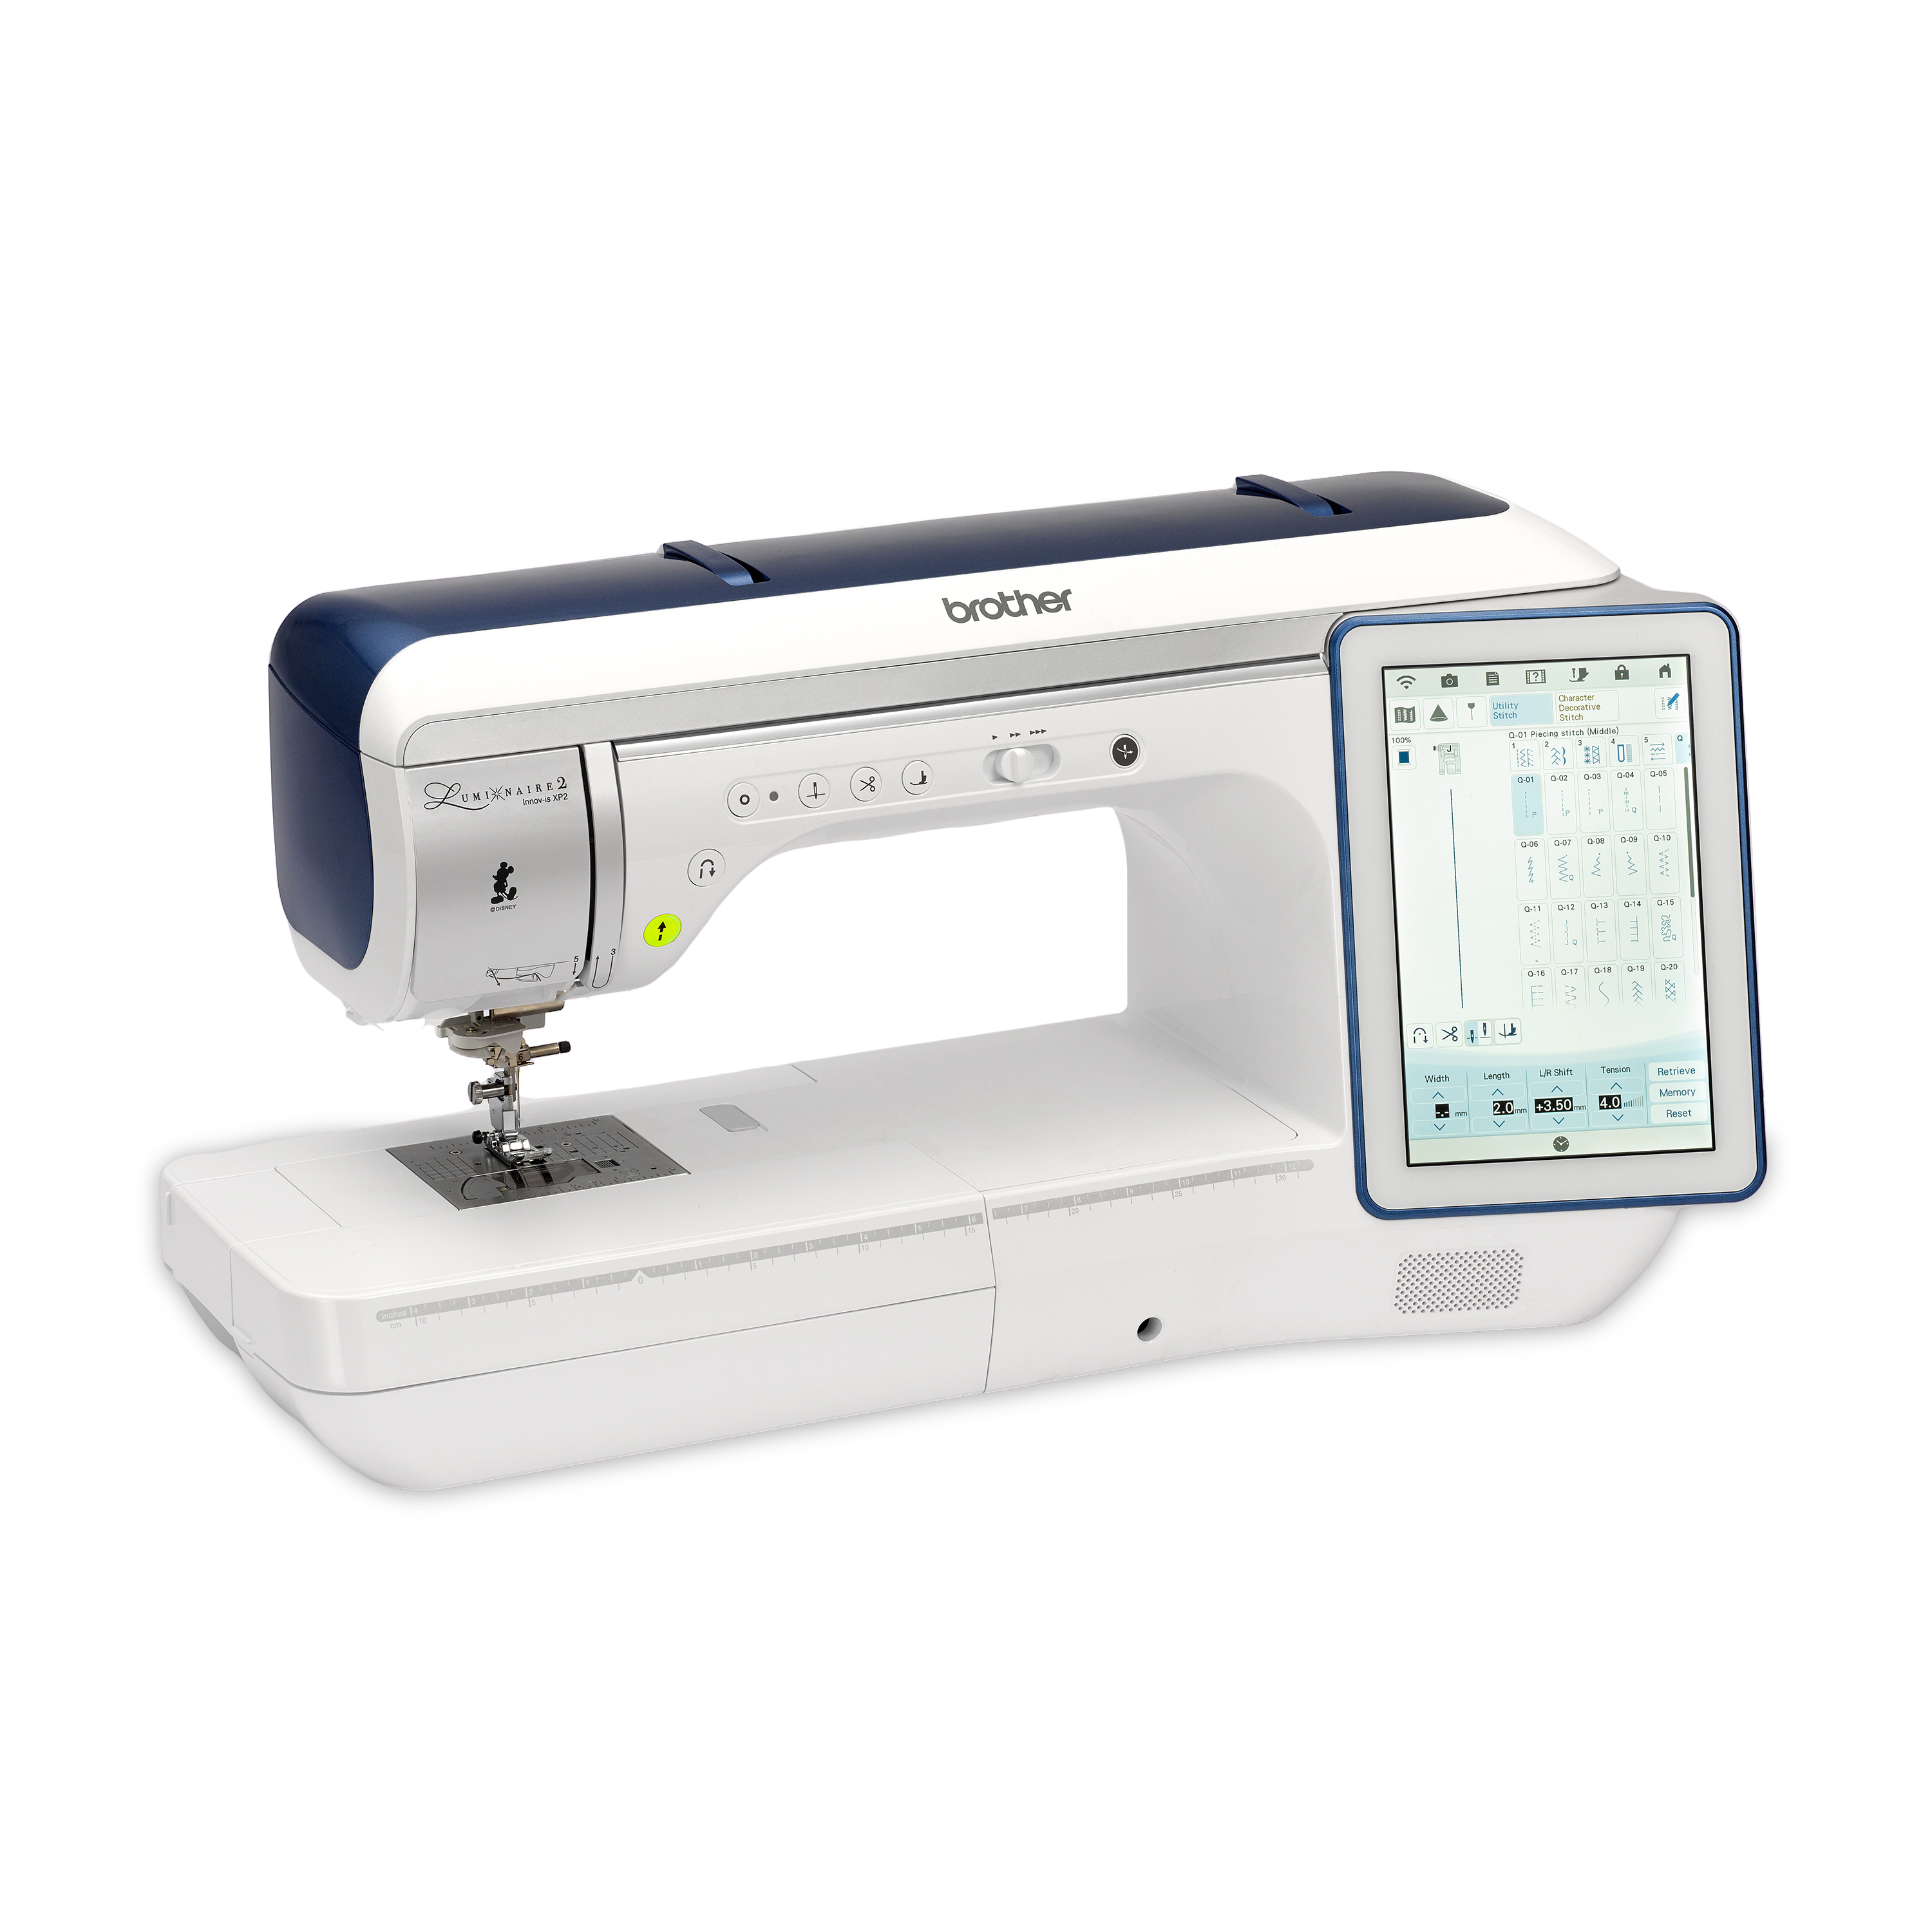
Your desired lettering will determine hoop size. This sample features the 5-inch X 7-inch hoop for the ribbon, and the 4-inch hoop for the T-shirt. Designs were stitched on the Brother Luminaire machine. - Brother Embroidery Thread
- Brother Bobbin Thread for Embroidery
- SAEMB2500 Brother USB Embroidery
collection for featured paw print design on T-shirt. - Brother BES4 Dream Edition Embroidery Lettering Software
for featured paw print design on T-shirt. - SA5929
Pacesetter Heavy Weight Cut-Away Stabilizer for ribbon embroidery. - SA5931
Medium Weight Fusible Cut-Away Stabilizer for T-shirt embroidery. - SA580
Medium Weight Tear-Away Stabilizer for T-shirt embroidery. - Sharp curved tip or appliqué scissors for trimming stabilizer from ribbon.
- Temporary adhesive spray for attaching ribbon to stabilizer.
- Size 11 embroidery needle for embroidering.
- Size 14 jeans needle for sewing ribbon on collar.
- Standard dog collar
- Grosgrain ribbon in desired width to fit dog collar. I used 5/8-inch wide ribbon for a 1-inch dog collar.
- Pre-purchased T-shirt
- Bonus Free Brother Design: JB1.pes
. See Figure #1.
 Figure #1[/caption]
Steps to Create Collar
- Set up machine for embroidery. Hoop cut-away stabilizer in your chosen hoop. Select the rectangular frame shape from built in frame patterns. Re-size rectangular shape to fit length of hoop, and change width of shape so it is slightly larger than your ribbon. Embroider rectangle directly in the center of your hoop. Sample below shows the rectangle stitched in both a 4-inch hoop and a 5-inch X 7-inch hoop. See Figure #2.
 Figure #2[/caption]
Tip: Sewing the rectangle as an outline for your ribbon ensures that the lettering ends up in the center of the ribbon. Embroidering on ribbon instead of directly on the collar avoids issues of dealing with a bulky collar. This method works no matter what hoop size you have for your machine. If you have a 4-inch hoop and wish to add more lettering, you can simply embroider another rectangle and reposition your ribbon to add to it. Do this as many times as necessary to achieve your desired length.
- Lightly spray wrong side of ribbon with adhesive and center ribbon inside the rectangle. Add tape at each end to keep ribbon secure. See Figure #3.
 Figure #3[/caption]
- Transfer the free Tiny Dogbone.pes design to your machine if you wish to use it on your ribbon. Program lettering and add design. Be sure to keep sizing for lettering well within the width of the ribbon, leaving a small margin on each edge.
- Embroider your design on the ribbon. See Figure #4.
 Figure #4[/caption]
- Remove from hoop and cut away excess stabilizer. See Figure #5.
 Figure #5[/caption]
- Set up machine for sewing. Finish collar as follows: Center ribbon on collar and use a narrow zig zag stitch to attach, folding raw ends of ribbon under at each end. See Figure #6a and Figure #6b.
 Figure #6a[/caption]
[caption id="attachment_25452" align="aligncenter" width="800"]
 Figure #6b[/caption]
View close-up of finished collar below in Figure #6c:
[caption id="attachment_25453" align="aligncenter" width="800"]
 Figure #6c[/caption]
Steps to Create T-shirt Embroidery
- Open BES4 Lettering program and select the 4-inch hoop from the drop-down arrow. See Figure #7.
 Figure #7[/caption]
- Click on Text tab and select Circular Text. See Figure #8.
 Figure #8[/caption]
- Click inside the hoop to generate the circle. Click on the small orange dot at the top of the circle shape. The cursor will change to a semi-circle with arrows at each end. Click and drag until the circle fits within the 4-inch hoop. See Figure #9.
 Figure #9[/caption]
- Select font style Chalk from the drop-down arrow in the Properties window. Type text and click Apply. Note: You can modify your text as desired using the various options available in the software. For instance, you can click on the same orange dot and swirl your lettering right to left. Click on the blue dot to increase or decrease the size of the lettering. Watch for a future tutorial with more information on the topic of modifying text in BES4. See Figure #10 for settings used in this example.
 Figure #10[/caption]
- To add a design from the featured collection, insert media into your computer, click on the “B” icon click Merge, and open design file No.66285. See Figure #11.
 Figure #11[/caption]
- Click on the design to select it and then drag it into place under the lettering. See Figure #12.
 Figure #12[/caption]
- Click the drop down arrow for Select and click on Select All. Click on Arrange tab and click center to move the group to the center of the hoop. See Figure #13.
 Figure #13[/caption]
- Click on individual segments in the sequence view to change colors. Save the design as a .brf if you wish to edit any further in the future. Save as a suitable .pes format and send to your machine to stitch. See Figure #14.
 Figure #14[/caption]
- Determine placement for design. Stabilize T-shirt with fusible cut-away, hoop and stitch. Tip: I like to print a template on regular printer paper, tape it to the desired area on the shirt, hoop with the template in the general center of the hoop, and then make fine tuning adjustments using the layout function and arrow keys on the machine before stitching.
Below you’ll find links to two valuable resources for embroidering on T-shirts: Resource #1: Brother Stitching Sewcial blog post Embroidered T-Shirt with Roses and Ruching
Resource #2: I demonstrated software options for T-shirts and shared important embroidery tips on the Brother Sponsored It’s Sew Easy TV show 910-1. Watch the video below from my YouTube channel. Enjoy! https://youtu.be/vzMms0_-Bqw
CLICK HERE FOR PDF!


