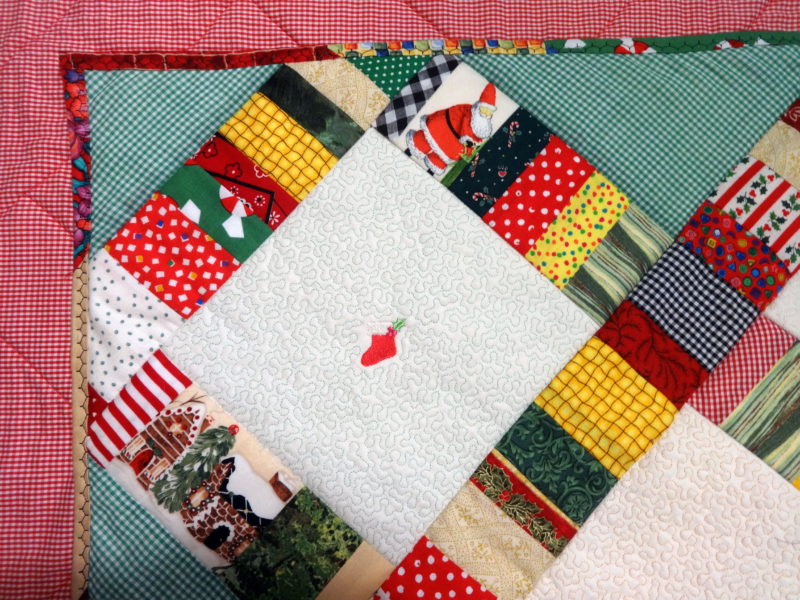
Mickey & Friends Christmas Quilt (In September? Yes!)
EDITOR'S NOTE: Yes, it is September! No, you haven't lost a few months! Quilts take time, so we thought it best to bring you this wonderful Christmas quilt in plenty of time to have it actually made to enjoy for the holidays!
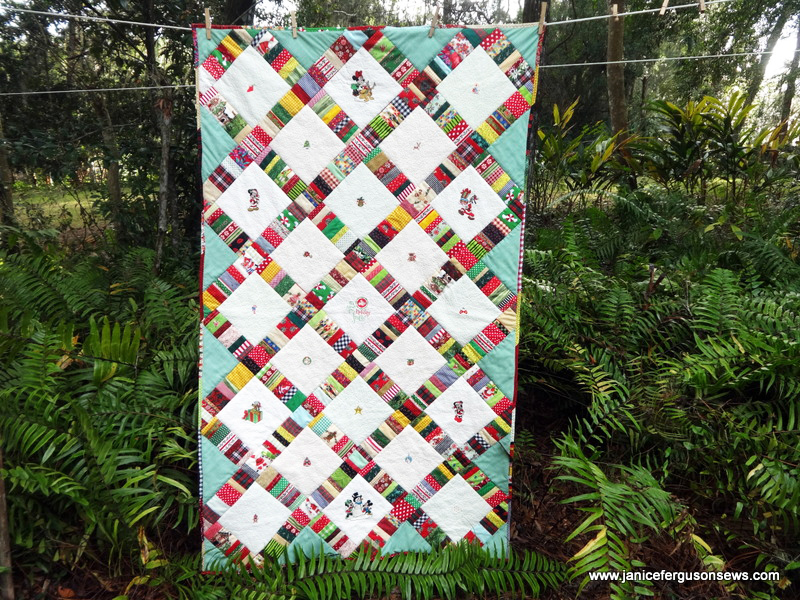
Create a Christmas keepsake with this gala stippled Disney character quilt. Hang it, cover a napping child or drape it over a chair. It combines the magic of Disney with the wonder of Christmas, not to mention the joy you will get from learning how to stipple around a design with your Dream Machine. Or you can stipple with traditional free motion stitching or simply skip that feature entirely. Using this light weight quilt for inspiration, you can whip up a smaller throw, wall hanging or pillow top. The 4x4 designs are all available at iBroidery.comand they are so much fun. Let the Christmas celebrations begin!
Machine, Hoop and Feet
- THE Dream Machine® Innov-ís XV8500D
- SA446 Embroidery Hoop, 8"x8"
- ¼” foot
- walking foot
Feature Used:
- My Design Center
Materials and Supplies
- Fabric—white muslin or quilting cotton (background), green gingham for side triangles, 2 yds.45” wide red gingham for backing, red, green, yellow, Christmas print scraps for border
- Cotton batting-very lightweight
- Notions: heat erasable marking pen, basting spray
- Rotary cutter, mat, and ruler
- iBroidery.com Disney Christmas designs - to be stippled in white
- iBroidery.com small designs - to be stippled in green
- iBroidery.com small designs - to be stippled in yellow
- OTHER SOURCE - to be stippled in yellow
- Brother Christmas Card #28
- design Bcd28017—Santa
- design Bcd28011—poinsettia and ribbons extracted from this design
NOTE: Snowmen and Santas with big beards on perimeter of design were avoided. This is because when “cleaning up” the shadows on a scanned design, it is very difficult to see the white embroidery against a white background. Also, those features tend to blend into the background unless they have a dark outline. The disappearing star in row 7 illustrates this. Finished size 67” L x 40” wide
Preparations
- Cut 23 squares 13 x 15” from white background fabric. Starch and press.
- Cut 23 squares 13 x 15” of very thinnest cotton batting.
- Cut 16 green gingham 7 ¼” squares. Starch, press and set aside.
- Assemble a laundry basket with red, green, yellow and Christmas fabric scraps larger than 3” on one side. Set aside larger pieces for the scrappy binding.
- Set embroidery foot height to .040”. Make this change on pg. 7 of the Info Sheet, the lined page icon at the top of your screen.
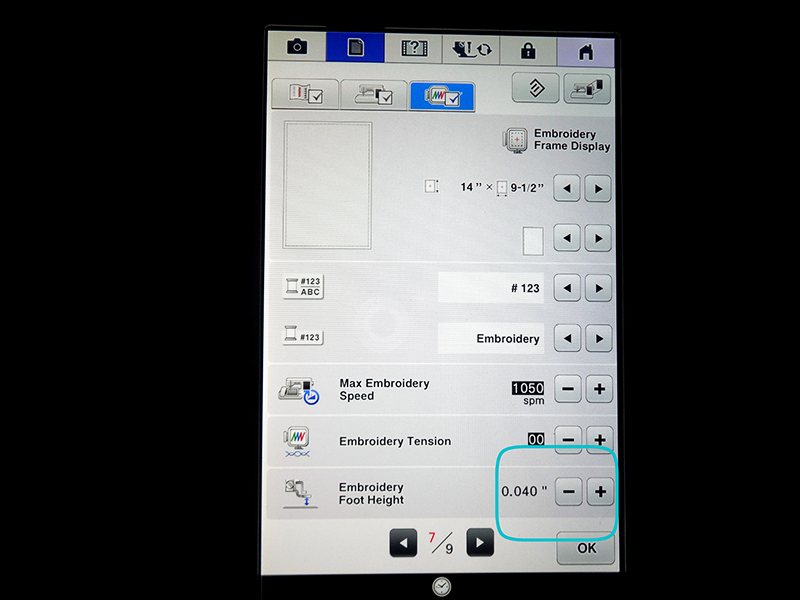
Embroidery and Stippling
- Hoop a 13x15” rectangle of batting and background fabric with no stabilizer in 8x8 frame.
- Select Christmas DMCRT05, the holiday fun design.
- Go to Edit menu and click Size. Rotate 45 degrees.
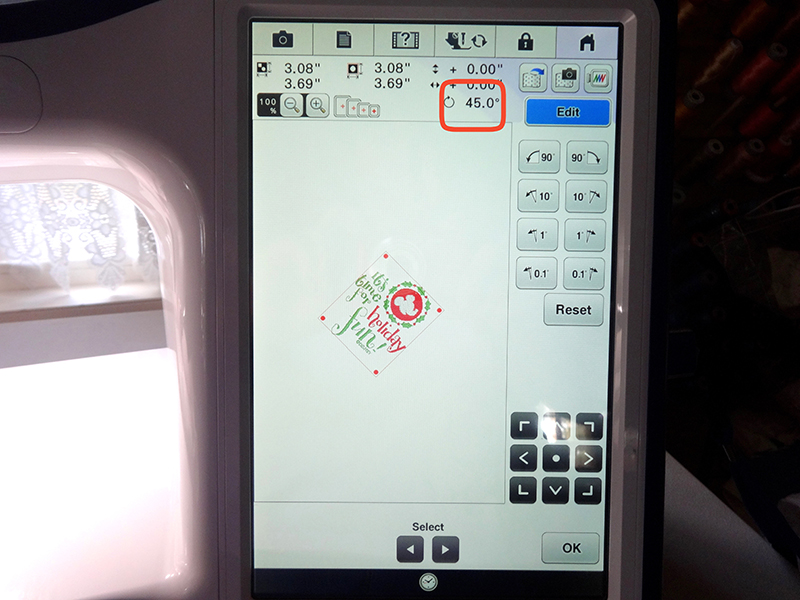
- Edit to include basting frame as far away from design as allowed.
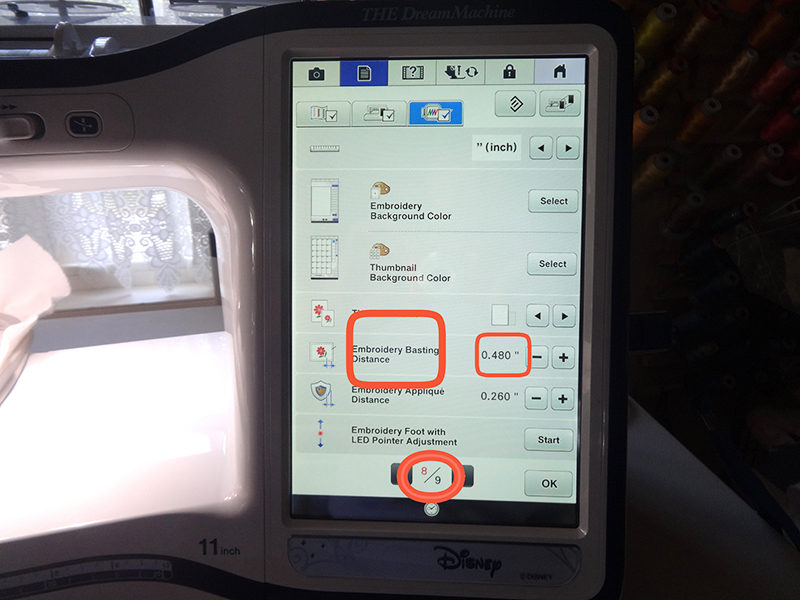
NOTE: Black thread was chosen for basting frame for photo visibility. White thread or thread the color of the background fabric is a better choice as no remaining fibers will show when the basting stitches are removed.
- Embroider design.
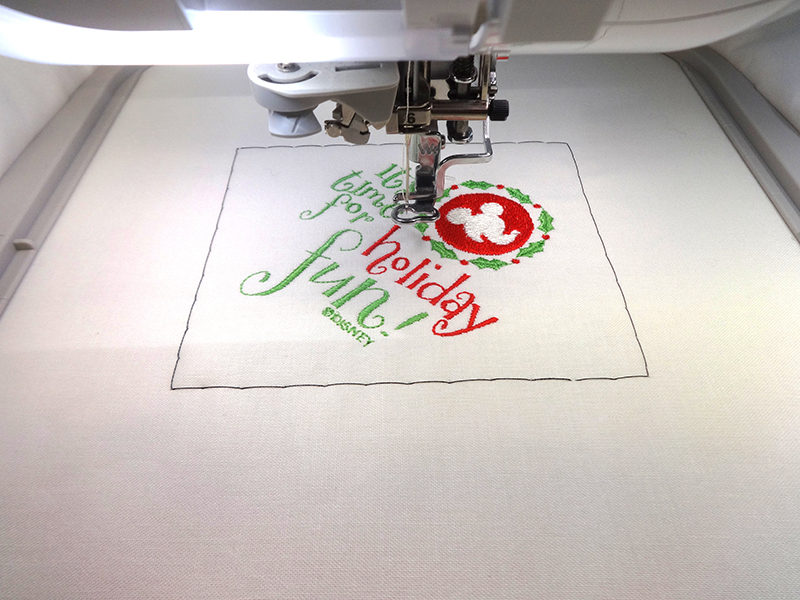
- Remove basting stitches
My Design Center
NOTE: Remember that on most screens in My Design Center, the black arrow at the bottom of the screen will take you back to the previous screen. I’d be embarrassed if you knew how much time I wasted before I realized that.
- Open My Design Center.

- Scan design.
TIP: Make certain that the needle is unthreaded before scanning. Failure to do so may leave a thread dragging across the embroidered design during the scan. That will show up and cause considerable aggravation. If that happens, it’s best to remove the thread and rescan.
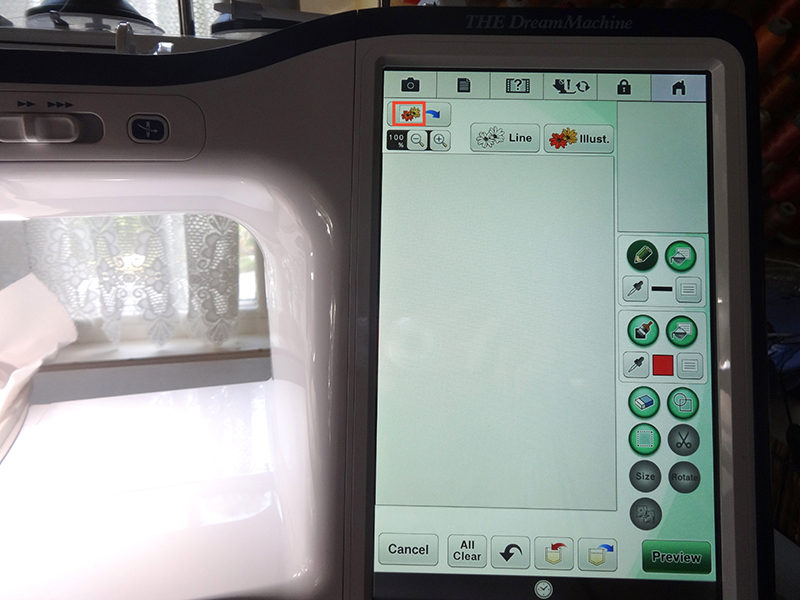
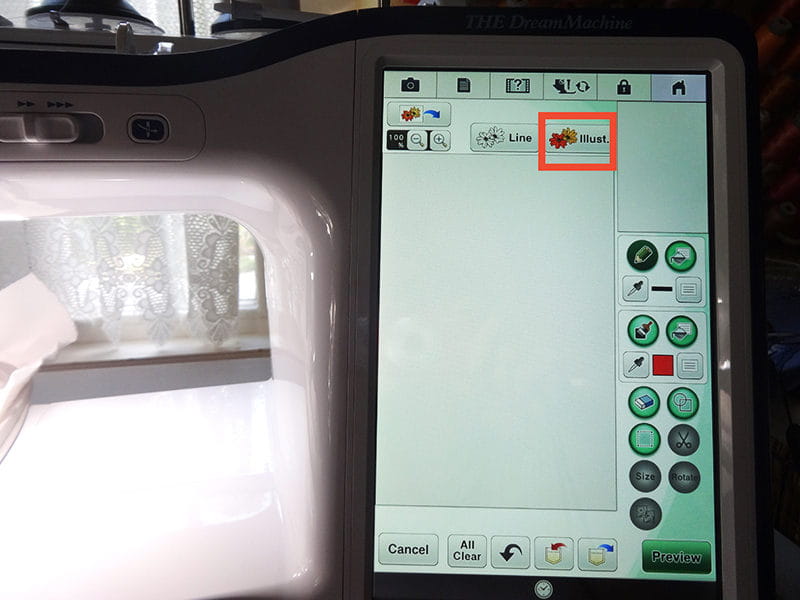
- Select Illustration Key which turns the design on the screen into embroidery. Yes, I know that you have already stitched the design, but this is step #1 in an easy way to add stippling to an embroidered design.
- Frame (crop) the image with the corner handles. Press OK and “wait a while” as instructed.
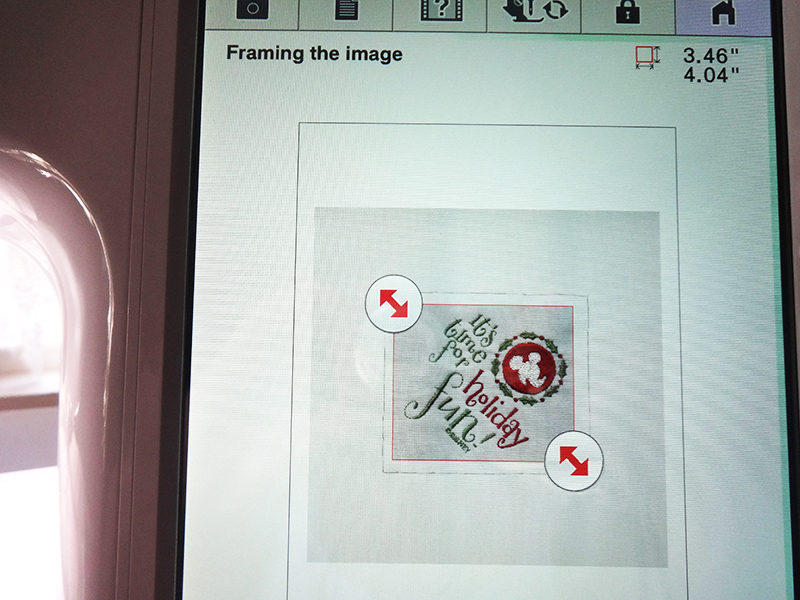
- Press OK again then Set.
- Enlarge the view as much as 400% for better visibility of shadows. At 200- 400% you will see stray shadow stitches that are not visible at 100%. They will haunt you when the stipple pattern detours around them.
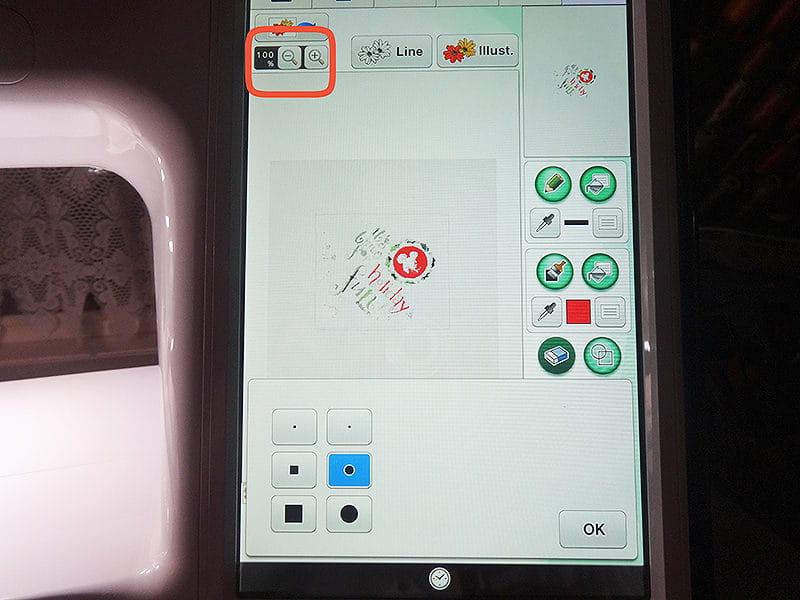
- Engage the Eraser Key circled in orange to clean up the image.
NOTE: Because the batting adds loft, the scan picks up shadows and read them as stitches. The “shadow stitches” must be erased.

- Several options will appear. Choose the larger erasers for larger areas, smaller for small areas.
NOTE: Use of the magnification option makes it easier to erase more accurately
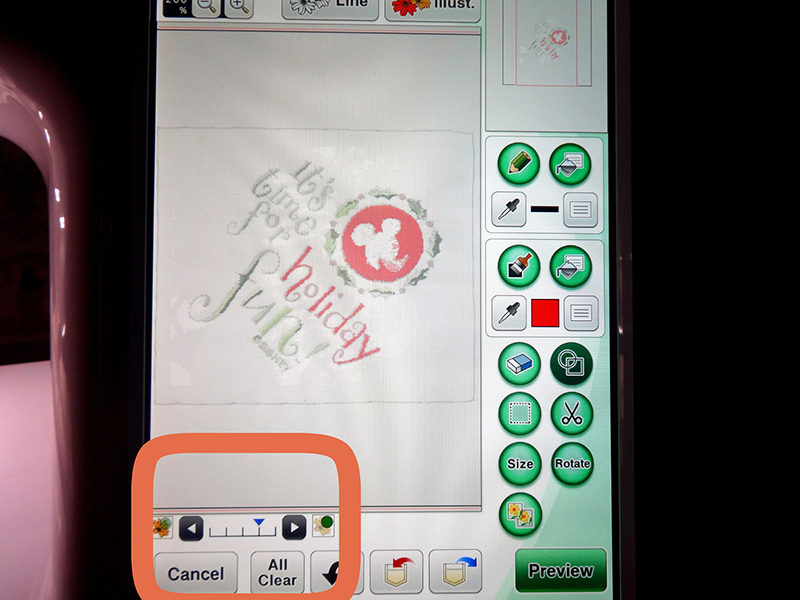
- Use your stylus to remove unwanted portions of the scan. Remember that you have the black BACK arrow if your erasing goes too far and you erase a part of the original embroidery.
- Lift the stylus frequently. Doing so sets the previous erasures. The BACK arrow will go back to the place where you last lifted the stylus. NOTE: You may also switch to different erasers.
- Notice the sliding scale at the bottom left of the screen. This allows you to brighten or darken images for better visibility.
- Return the magnification to 100%.
- Select the Region Key circled in orange. The next screen offers options.
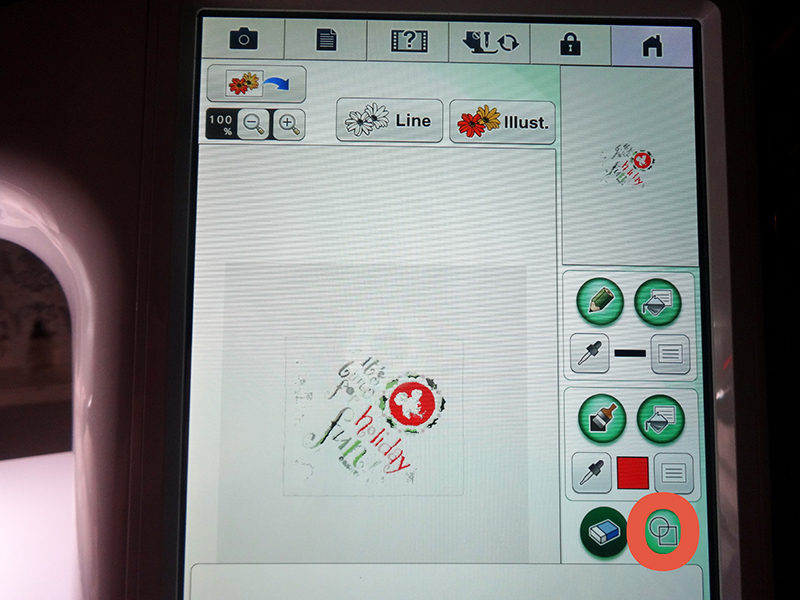
- Select the options in blue because the block will be square. Click OK.
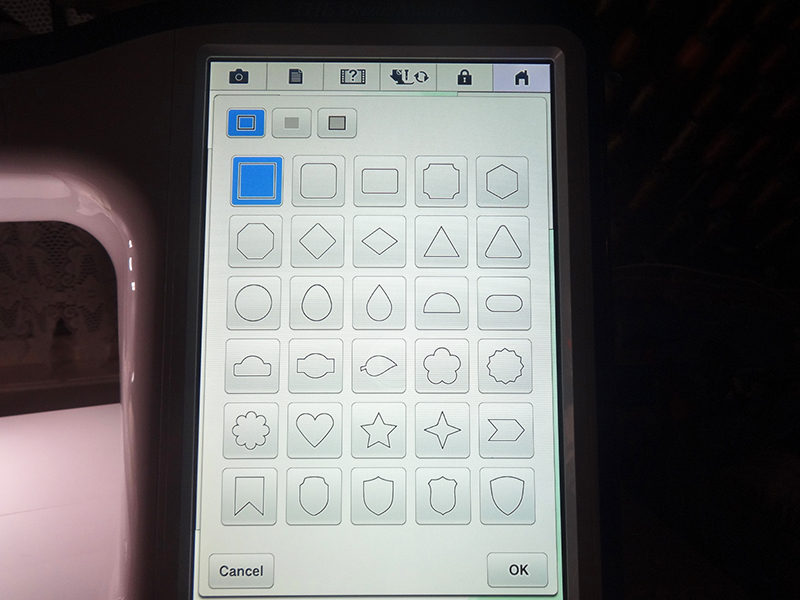
- Click on the Size button.

- Resize the design to 6.90.

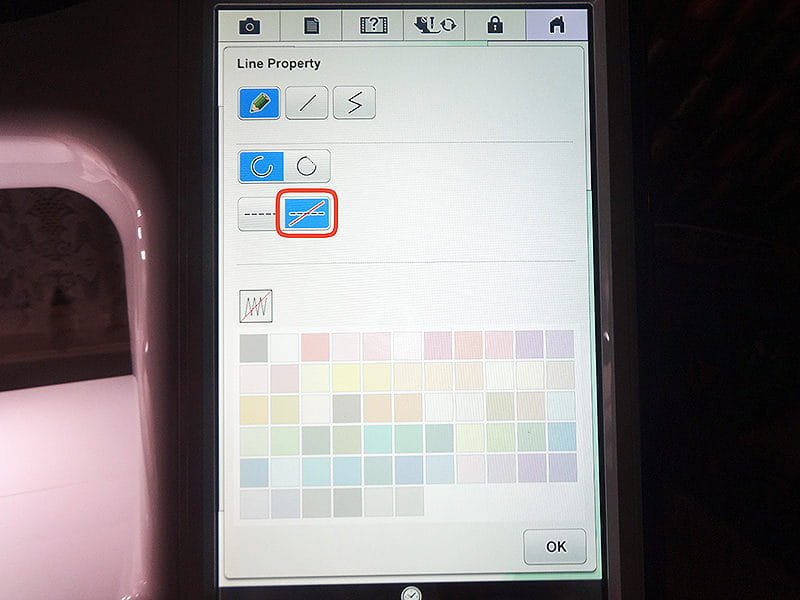
- Select the Line Property key in the black box below. Another screen will appear.

NOTE: The red box was added for clarity. The line on the screen is a single black line. This is the box you do not want to stitch. It only identifies the area to which you want to add stippling.
This creates a light gray box around the area to be stippled. But you don’t want that box to be stitched. So…
- Select the No-sew box option boxed in red. Press OK.
- Select the Line Property Application key, circled in yellow.
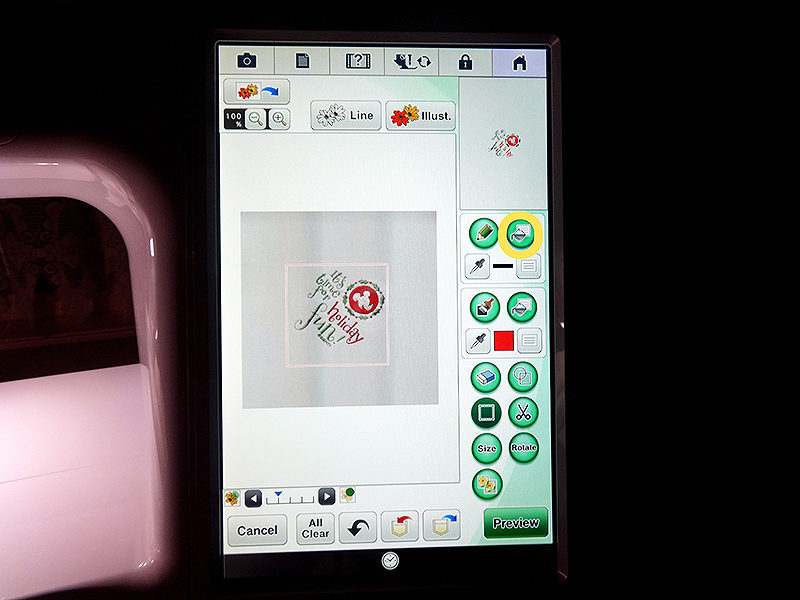
- Apply that function by touching the perimeter of the box with your stylus. That line becomes a broken gray line which will not be stitched.
- Select the Region Key in the purple box to create the stipple region. When this screen comes up select the highlighted icons. Press OK.

- Select the Stipple Function in the purple box on the next screen.
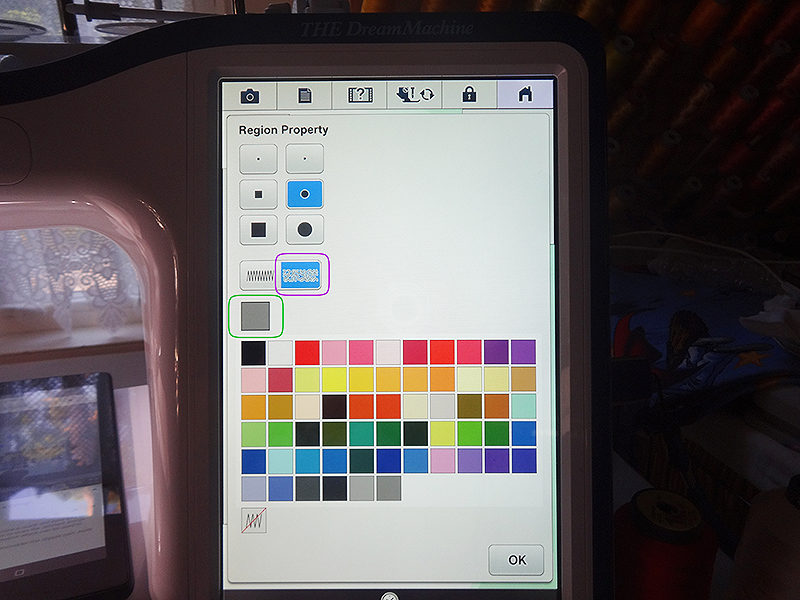
- Select a color for the stipple stitches. This does not have to be the actual color you will use. It needs to be one which gives good contrast. You can see that grey, in the green box, has been chosen. Press OK.
ADVICE: Do not choose a color which is in the design, particularly not the last color. When the stippling was applied to the Goofy design and it was time to embroider, the gray just happened to be the last color in that design. So there was no color stop between the grey stippling and the grey which was the last color in Goofy. It was necessary to scroll through the gray Goofy color in order to get to the stippling. Much easier to use a strongly contrasting color.
NOTE: A lot of grey shadows appear within the design and are being read as stitches. Removal and erasure of these was unnecessary because they are in the area where stippling will not be applied. Only stitches outside the perimeter of the embroidery were removed.
- Select the Stipple Fill key (pitcher) circled in blue.
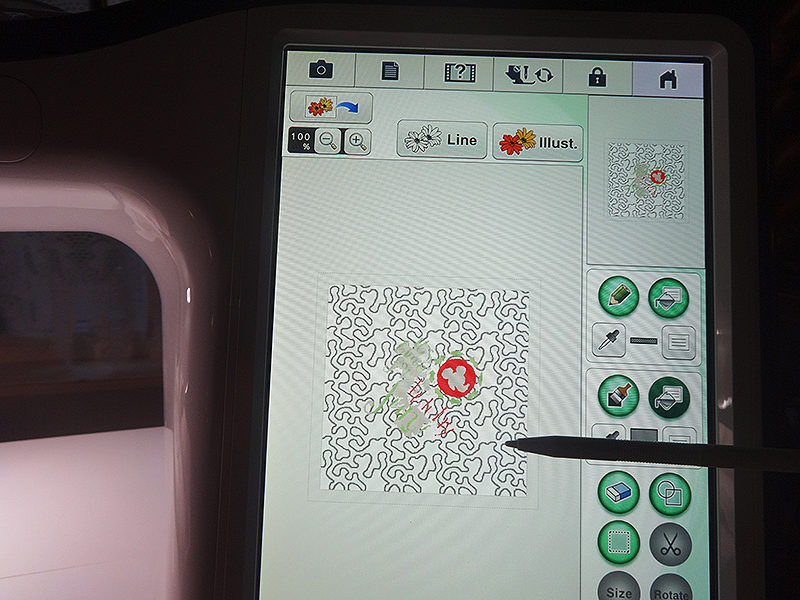
- Touch next screen with stylus to insert stippling.
NOTE: The stippling disregards the embroidery design. That will be remedied in upcoming steps.
- Select PREVIEW at the bottom of the page. It will inform you that the image will not be saved as you leave My Design Center for embroidery. Click OK to continue.
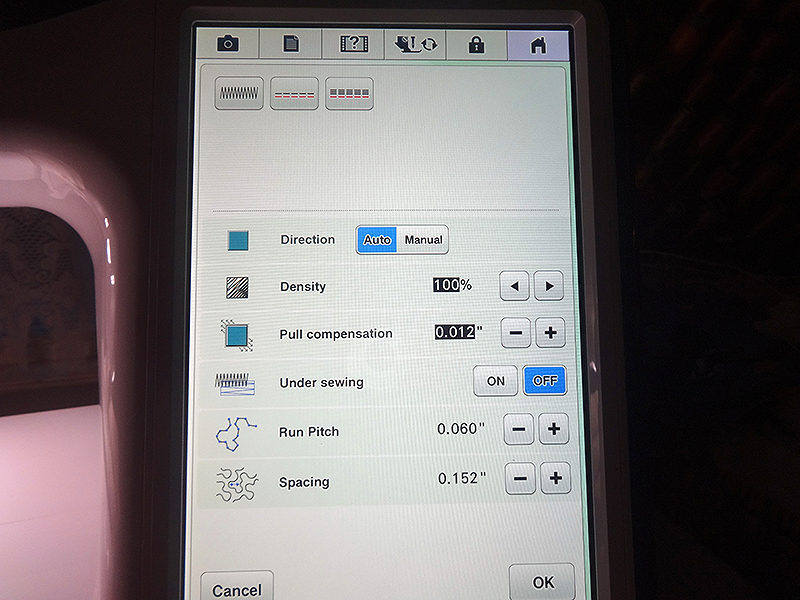
- Chose the Run Pitch (stitch length) and Spacing of the Stippling. Leave the defaults or make other selections. Because the designs are relatively small compared to the size of the block, I chose a shorter stitch length and closer spacing, as shown in the orange boxes. Make your selection and press OK. Then “Please wait a while,” while the information loads.
- See the stipple pattern surround the design but does not stitch over it. Tap SET.
ALERT!!! Before you tap SET, note the size in the upper corner. It should read 6.80 x 6.80”. Apparently, I forgot to hit OK when I resized it. The design would have been stitched in the wrong size. I had to go back to Scan.
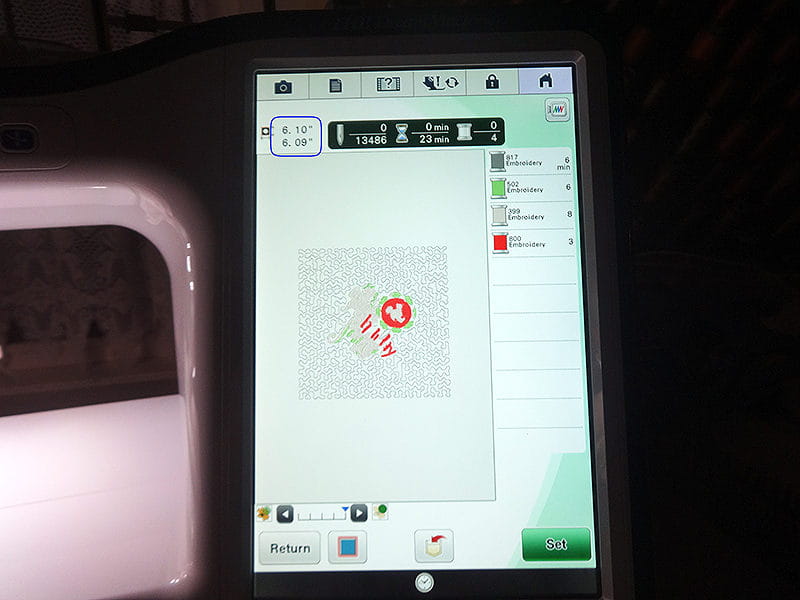
- A message will inform you, “Converted to the embroidery pattern, and My Design Center will be exited. OK to continue to embroidery edit screen?” Sure. Tap OK.
NOTE: Are you concerned that the Holiday Fun design you have already embroidered is included in this design? Worry not. We will just scroll through all colors except the stippling stitched. How great is that!
- Tap on Embroidery at the bottom of the screen, because at last the time has come to embroider.
NOTE: The large Disney designs were stippled with a silvery white thread. The small designs were stippled alternately in gold and green.
- Now you know how to add stippling to an embroidered design. Repeat this process for the remaining quilt blocks.
Scrap Sashing and Construction
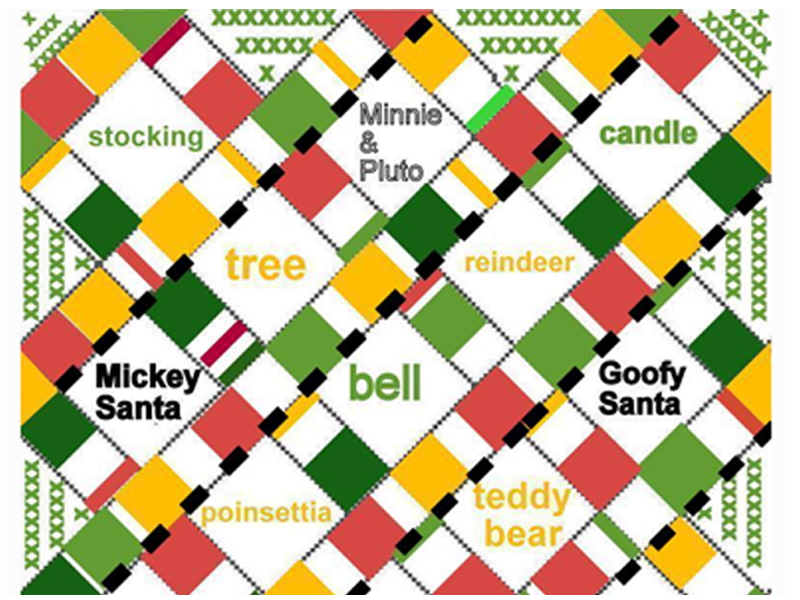
[caption id="attachment_7925" align="aligncenter" width="800"]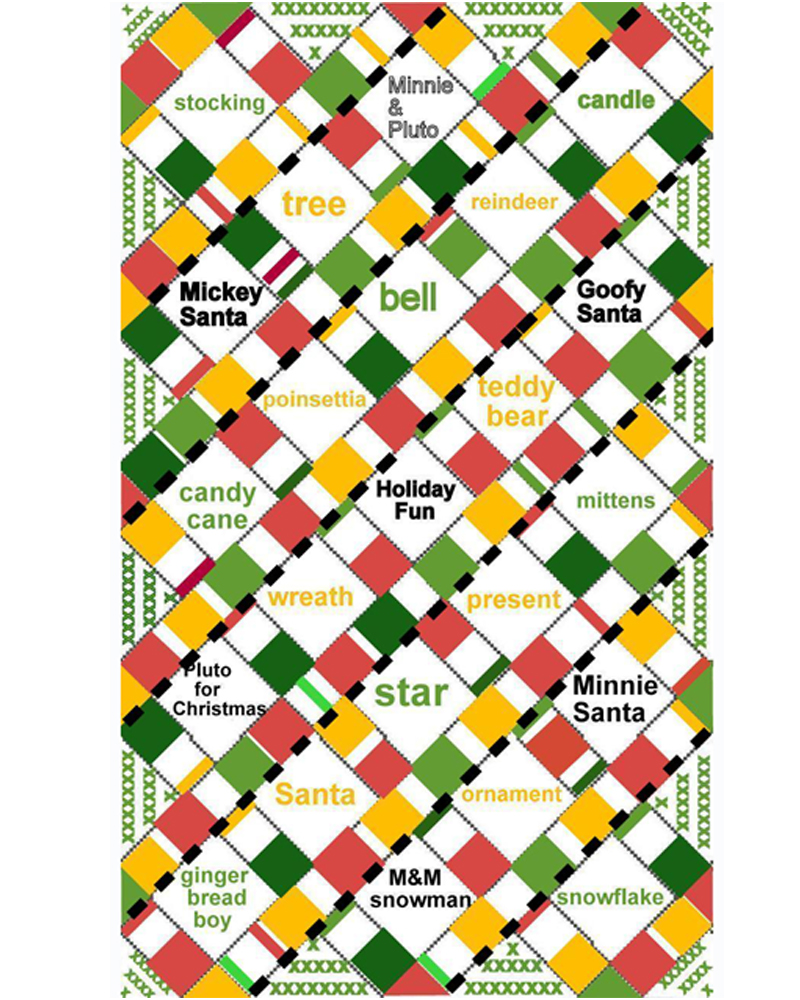 Diagram 1[/caption]
Overview
- Please try not to laugh at my pitiful attempt at graphics. Or just go ahead and chuckle. You know I’m not bragging when I say that I do much nicer work in front of my sewing machine than I do in front of my computer. This illustration/diagram may be ugly but it has the essential information. Let me explain.
- The green xxx’s indicate green gingham. Those 7 ¼” squares will be trimmed into triangles near the end of the quilt top’s construction.
- The color of the name of each embroidered block indicates the color of the stippling.
- The rows are constructed first by joining the blocks. To the first and last embroidered block add another scrappy sashing. These blocks already have batting but there is none below the added sashing or the gingham square which will be joined. So before adding the green gingham, join a batting scrap to the existing batting in the row. This will rest beneath the trimmed
- Each row begins with a green gingham block, vertical sashing, embroidered block, vertical sashing, embroidered block, etc. ending with a gingham block. The diagram shows triangles at the end of each row, but you begin with a square and later cut it to the triangular shape.
- After each row is constructed, the horizontal sashing is joined at the bottom of the row. Three inches of sashing must be joined to each of the gingham squares. Two rows differ from this pattern.
Row #1: The stocking block in row #1 has vertical sashing joined to each side as well as to the top. Make certain that the top sashing extends 3” beyond the embroidered stocking block. Then a 7 ¼” green gingham square is seamed to each of the three sides. Lastly, a row of horizontal sashing is joined to the bottom. Always extend the horizontal scrap sashing 3” inches beyond the block.
Row #7: The snowflake block has sashing joined to each side as well as the bottom. Remember, that sashing must extend 3”. Then 3 gingham squares are added, one to each side as well one to the bottom of the block.
Enough with the chit chat. Let’s get started
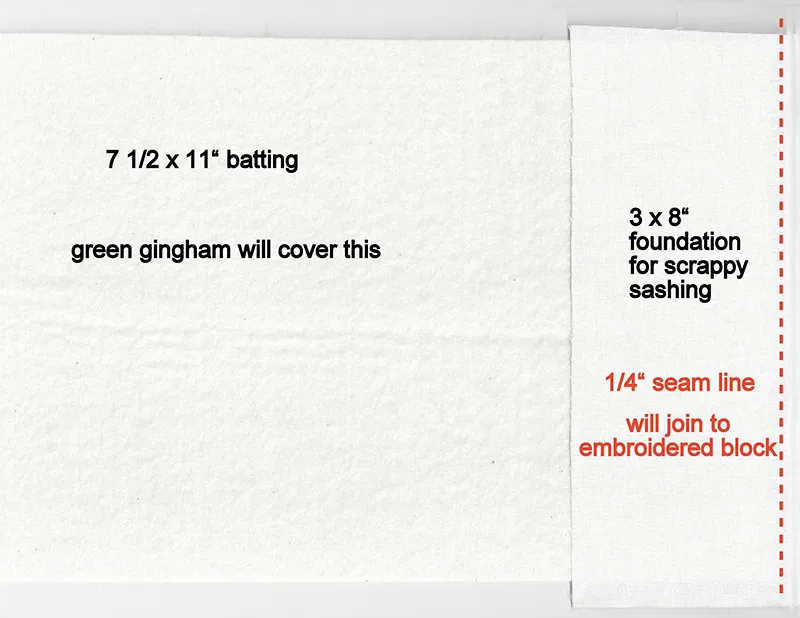
- Begin with the 3 x 8” rectangles of foundation fabric. I used scraps from trimming the embroidered blocks or you could use other scraps for these small pieces.
- Place two Christmas scraps right side together near the center of the rectangle. Stitch along one side. This is the perfect place to use up those almost empty bobbins. Color doesn’t matter.

- Finger press the seam open.
- Continue in this manner, working from the center on each side until rectangle is covered. Vary the width of the scraps. Use wider scraps for the ends of the rectangle, allowing them to extend a bit beyond the foundation fabric.
NOTE: Take care to avoid having a seam less than 3/4” from the drawn line where another piece will be joined.
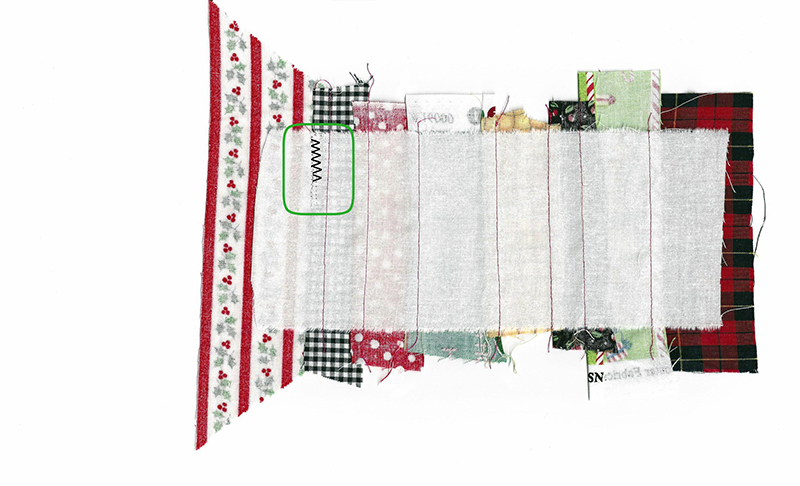
- While trimming away some of the black gingham, the foundation fabric was cut. Not to worry—I just zig zagged it back together and carried on.
- Trim the rectangle to the width of the foundation piece, 3”. Leave excess at ends. This extra length allows you to move the sashing to the right or left, whichever direction leaves you with a wider end piece.
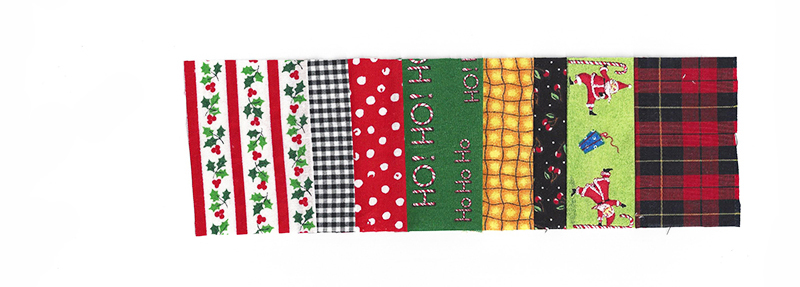
- Join border to block with ¼” seam. The border should begin at the top point of the diamond/square and be joined on the right side of the block. TIP: I found it helpful to draw a line a scant ¼” above the top of the stippling. The raw edge of the sashing was then placed along that line and stitched.
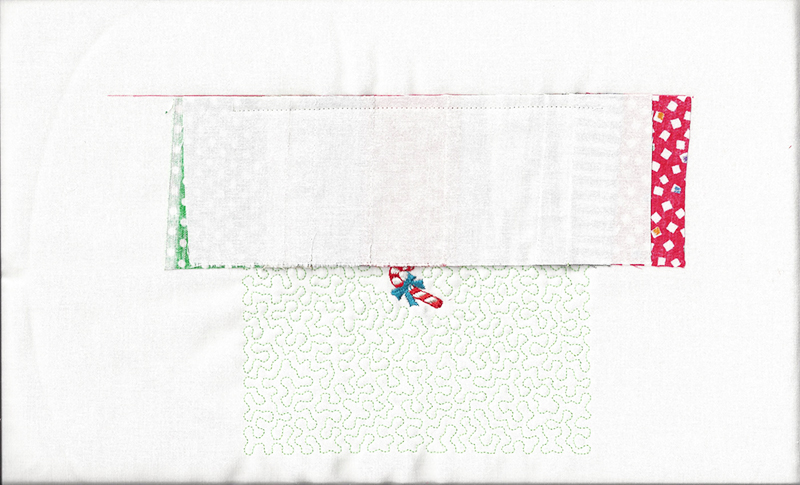
- Press sashing to right side.
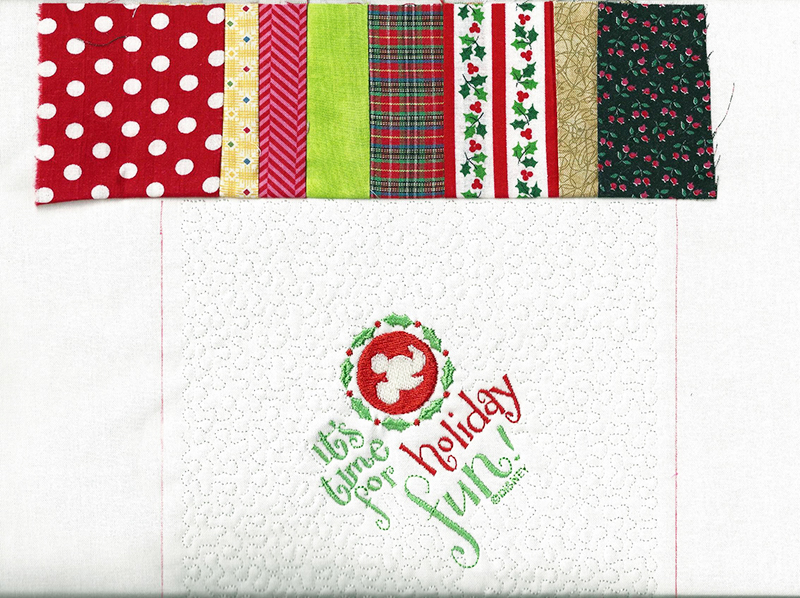
- Notice the yellow cutting line goes through a wide scrap at the end of the sashing piece.
- Trim 3 sides of block ¼” from stippling as shown with the yellow line. Then trim away excess fabric and batting above the scrappy sashing which was accurately cut at 3”. The finished block should be 7 ¼” x 9 ¼”.
- Trim batting close to stippling. Trim batting ¼” from sashing pieces. This reduces bulk at the seams.
- Repeat with each of the remaining 22 blocks.
- Seam existing blocks together according to the diagram above. For example, row 2 will begin with Mickey Santa stippled/ sashing/Christmas tree/sashing/Minnie Pluto/sashing. More will be added to them shortly.
NOTE: As the blocks and sashing are joined, double check to be sure that the blocks measure 6 ¾” wide and the sashing is 2 ½” wide.
- Prepare to add sashing and gingham block to the beginning of the row. Since the batting does not extend beyond the embroidered block, place the 3 x 8” sashing foundation fabric rectangle ¼” away from a 7 x 11 batting scrap.
- Stitch Christmas scraps to foundation piece. Trim even with embroidered block.
- Join gingham to newly made vertical sashing. Press.
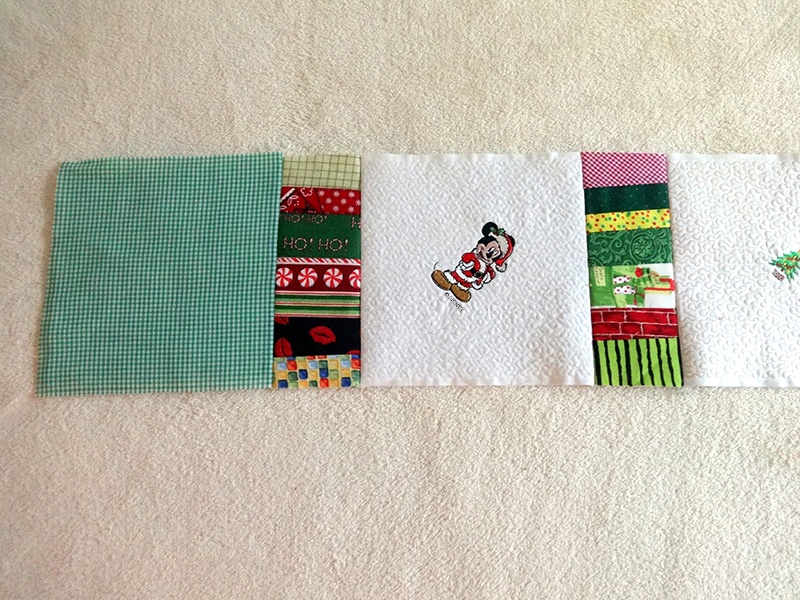
- Prepare to add gingham block to end of each row.
- The blue X’s on the partial diagram show where batting must be added. Add batting and additional sashing in this manner to the remainder of the blocks. Join the gingham to the sashing. This completes the row.
- Prepare to join gingham square to the top of the stocking block in row #1 and at the bottom of the snowflake block in row #7. First add batting by butting a piece of batting to the existing piece and join them with a triple zig zag stitch.

- The horizontal sashing has been added but you’re not there yet so please disregard that.
- When constructed it will look like this:

Note: Measure amt of sashing needed for each row. Insert into Diagram 1.
- Construct long 3” wide border foundation pieces for sashing. Use scraps left over from trimming blocks to size. Foundation fabric scraps were simply overlapped and stitched flat.
- Cut batting to 2 1/4” and pin in place down the center of the foundation fabric. This eliminates catching batting in the seams. Batting scraps were cut to size, butted together and joined with three-step zig zag to reach the needed length.

- Trim scrap edges on long sashing piece to 3” as was done when trimming 3 x 8” border pieces.
- Seam sashing to bottom edge of each row, extending an inch beyond each gingham block. Ideally the end scrap is wide.
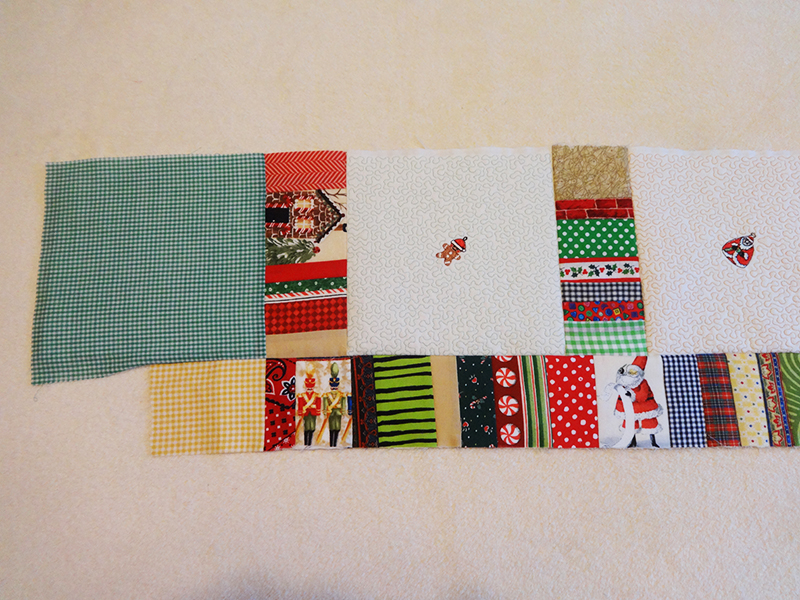
- The gingham and the border are folded under here for explanation. Later they will but cut away to make a straight edge for binding. But not now.

- Join rows together in pairs. Again, corners are folded for easy visualization of how this will go together.

- Square up quilt by rotary cutting the edges ¼” beyond the points of the gingham.
- Measure the quilt top and cut backing 2” longer and 2” wider than that measurement.
- Starch and press backing.
Making Quilt Sandwich.
- Place the quilt top face down on a flat surface.
- Treat back of quilt with basting spray.
- Center backing on top of the backing or
- Pin liberally or baste by hand.
- Use the walking foot or MuVit to stitch any machine quilting as desired. Ideally, stitch along each side of vertical and horizontal sashing. At the very least, stitch in the ditch along one side of each row of horizontal sashing and one side of each vertical sashing.
Binding
- Cut larger scrap pieces 2 ¼” ” parallel to the selvage for the scrappy binding.
NOTE: This is preferable because the lengthwise grain does not stretch as much as the crosswise grain. A variety of lengths from 4-10” gives a pleasing look.
- Seam scrap pieces together. Press seams open.
- Measure the length of the quilt at the center both vertically and horizontally. 66” x 40” Add 1” to each measurement and that is the yardage required for the binding.
- Press binding in half lengthwise and pin one thickness to the BACK of one long side, matching raw edges at beginning of seam and at side. That leaves 1” for any necessary fudging. In a perfect world, the binding will be a perfect fit. But that’s not where I live, so I always add a little extra.
- Stitch binding to back with 3/8” seam.
NOTE: If the binding is too short, fudge it by easing in the quilt as the binding is joined. Use a part of the extra inch if necessary.
- Cut away any excess side binding,making it even with the raw edge of the quilt bottom.
- Repeat on the opposite side.
- Fold bindings to right side of quilt and pin in place.
- Stitch binding to quilt with a decorative stitch such as 7-021, w 6.0 L 5.0.

- Pin binding to wrong side of top. Fold under the extra ½”at either end and pin in place.
- Stitch binding to top and bottom as done on sides.
- Make a label for the back with your name, date, and any pertinent information. This is important for both memory making and marking that it’s yours in case it were lost.
- The Disney embroidery patterns offered on this website are for personal non-commercial use only.


