Quick Tip – Twin Needle Stitchery
Brother Sews Ambassador
Sewing with a twin needle, two complimentary colors of embroidery thread, and a few common decorative stitches is an easy way to embellish so many sewing projects. When my husband saw my stitch sample, he envisioned it as a placemat. In fact, that would be a terrific way to make use of a twin needle stitchery sampler!
This tip sheet focuses on using the twin needle to sew stitches with a decorative element. All of the stitches are part of the utility stitch menu, but I think you’ll agree they are in fact quite decorative!
Threading for a twin needle varies with different machines. You’ll need to consult your machine manual for detailed threading instructions. Keep in mind the fact that you cannot and should not use the automatic needle threader or the auto cut feature on your machine. Always thread the needles manually and use scissors to cut threads when using any twin needle. I used the twin needle included with many Brother machines to sew all the stitches displayed here. Figure #1 shows the needle and the package.
[caption id="attachment_25812" align="aligncenter" width="800"]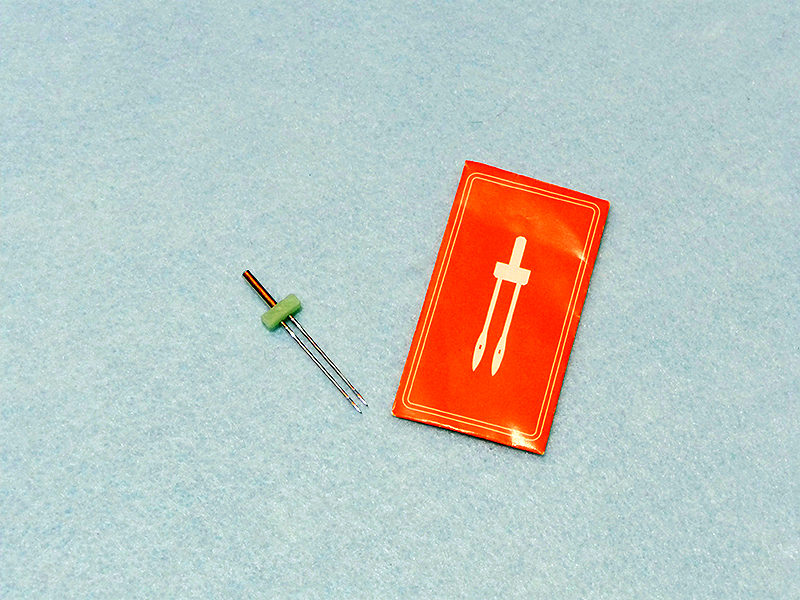 Figure #1[/caption]
Note that the part code for a replacement needle is X57521-021. This size needle is 2.0/75. The 2.0 means there are 2 millimeters between the needle tips and the 75 indicates a size 11 needle. To solve what may be a mystery to you, 75 is the European system number and 11 is the American system number. This size needle is suitable for light to medium weight fabrics.
If you have a machine with a twin needle key, the machine is expecting that this is the size needle you are using. Selecting this key lets the machine do the thinking for you, protecting you from selecting a stitch or stitch width that is inappropriate for the 2mm twin needle. Take a look at your sewing machine to see if this is an option. If your machine does not include this feature, you’ll want to use the hand wheel to walk through each stitch before sewing. If your needle comes too close to the edge of the throat plate, stop and try a narrower stitch width or choose another stitch. Note that it’s best to select stitches that are open and not too dense. Figure #2 shows this key activated on the Brother Luminaire.
[caption id="attachment_25813" align="aligncenter" width="800"]
Figure #1[/caption]
Note that the part code for a replacement needle is X57521-021. This size needle is 2.0/75. The 2.0 means there are 2 millimeters between the needle tips and the 75 indicates a size 11 needle. To solve what may be a mystery to you, 75 is the European system number and 11 is the American system number. This size needle is suitable for light to medium weight fabrics.
If you have a machine with a twin needle key, the machine is expecting that this is the size needle you are using. Selecting this key lets the machine do the thinking for you, protecting you from selecting a stitch or stitch width that is inappropriate for the 2mm twin needle. Take a look at your sewing machine to see if this is an option. If your machine does not include this feature, you’ll want to use the hand wheel to walk through each stitch before sewing. If your needle comes too close to the edge of the throat plate, stop and try a narrower stitch width or choose another stitch. Note that it’s best to select stitches that are open and not too dense. Figure #2 shows this key activated on the Brother Luminaire.
[caption id="attachment_25813" align="aligncenter" width="800"] Figure #2[/caption]
To make this little sample, I started with a medium weight cotton fabric backed with fusible stabilizer. I selected menu #2, and then menu #3 and stitched out most all of the allowable stitches in a row. I had to squeeze in one extra motif along the first edge, but otherwise they are in order. See Figure #3. This makes it easy for me to reference my favorites so I can use them again without testing.
[caption id="attachment_25814" align="aligncenter" width="800"]
Figure #2[/caption]
To make this little sample, I started with a medium weight cotton fabric backed with fusible stabilizer. I selected menu #2, and then menu #3 and stitched out most all of the allowable stitches in a row. I had to squeeze in one extra motif along the first edge, but otherwise they are in order. See Figure #3. This makes it easy for me to reference my favorites so I can use them again without testing.
[caption id="attachment_25814" align="aligncenter" width="800"]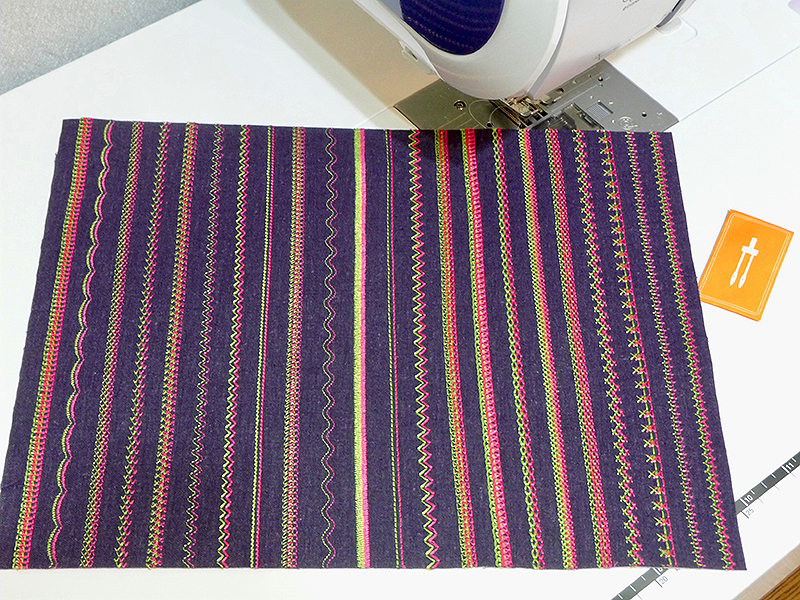 Figure #3[/caption]
I hope this sample inspires you to pull out that twin needle, thread up your machine, and make a pretty sampler. Even if you don’t make anything with the piece, I think you’ll have fun playing with your sewing machine. Enjoy!
CLICK HERE FOR PDF!
Figure #3[/caption]
I hope this sample inspires you to pull out that twin needle, thread up your machine, and make a pretty sampler. Even if you don’t make anything with the piece, I think you’ll have fun playing with your sewing machine. Enjoy!
CLICK HERE FOR PDF!
Tags
Sewing Machines
When inspiration strikes, Brother has you covered! The products in this stylish project are available for purchase so you can click, shop, and get to sewing!

Related Projects
Stay Connected
* Required fields