Accessory Spotlight: Recipe for T shirts
Brother Sews Ambassador
T-shirt embroidery is an ever-popular topic! In fact, one of my August Stitching Sewcial posts features an embroidered T-shirt along with some links to additional T-shirt embroidery tips. I remembered yet another feature after my shirt was finished so I thought it would be helpful to share it with you. This tutorial features the Brother BES4 Dream Edition
Lettering and Customization program. The software version shown in these instructions includes SABES4UG1
Power Pack 1, and SABES4UG3
Power Pack 3. Store this tutorial in your embroidery help file so you can make use of it when it’s time to embroider on T-shirts. The two samples you see in the above photo use lettering and designs built-in to the software. Each one was stitched on T-shirt knit backed with medium weight fusible cut-away stabilizer. In addition, I floated a layer of medium weight tear away under the hoop and finally added a layer of water-soluble film on top. Everything but the cut-away fusible was removed after stitching. Look closely at the photo and you may notice that the lettering on the left sample is slightly more pronounced. Choosing a “recipe” in the BES software automatically adjusted the stitches to fill in nicely on the fabric. This option gives you the opportunity to fine tune your design to suit the fabric. I recommend stitching a sample of each one, then decide what looks best for your design and your fabric. Tip: Use fabric remnants or save an old T-shirt to use for testing designs; be sure to chose one that has a fabric similar in weight and texture to your actual garment project. Note: You can also use recipes for designs that are merged into the software. Open software. Select New Page and click the “B” Pacesetter icon. Click on Merge and locate your design from your file locations. You will need to check the Convert to outlines box if you want to use the recipe feature. See Figure #1. [caption id="attachment_25566" align="aligncenter" width="800"]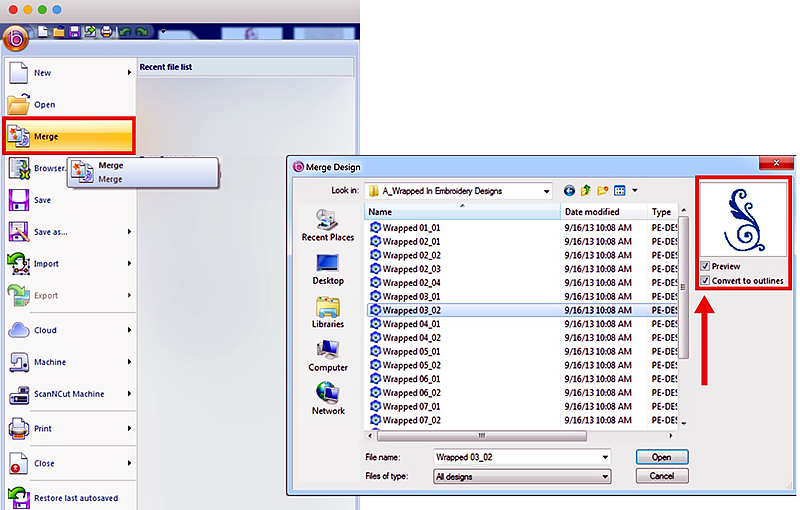 Figure #1[/caption]
It’s possible for some stitches to change in character when using this feature so be sure to preview realistic (3D) stitches on screen. Use the stitch simulator to preview stitches as they will sew out on your project. See Figure #2.
[caption id="attachment_25568" align="aligncenter" width="800"]
Figure #1[/caption]
It’s possible for some stitches to change in character when using this feature so be sure to preview realistic (3D) stitches on screen. Use the stitch simulator to preview stitches as they will sew out on your project. See Figure #2.
[caption id="attachment_25568" align="aligncenter" width="800"]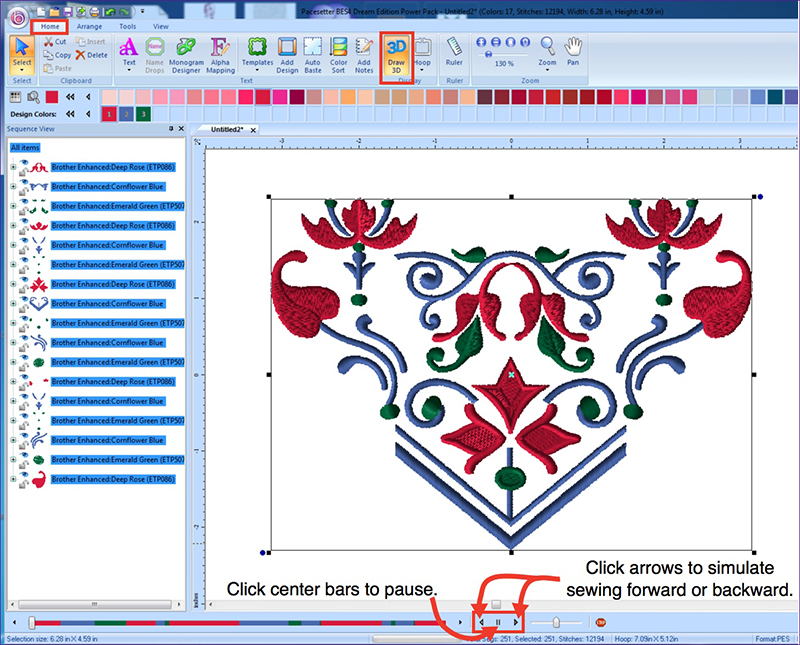 Figure #2[/caption]
Now let me show you how to use the software to select a recipe for a T-shirt knit. The process is the same if you merge in a design and select convert to outlines as described above, or if you start with a design or lettering built -in to the software.
Open the software and click to create a new design from the welcome screen. See Figure #3a.
[caption id="attachment_25569" align="aligncenter" width="800"]
Figure #2[/caption]
Now let me show you how to use the software to select a recipe for a T-shirt knit. The process is the same if you merge in a design and select convert to outlines as described above, or if you start with a design or lettering built -in to the software.
Open the software and click to create a new design from the welcome screen. See Figure #3a.
[caption id="attachment_25569" align="aligncenter" width="800"]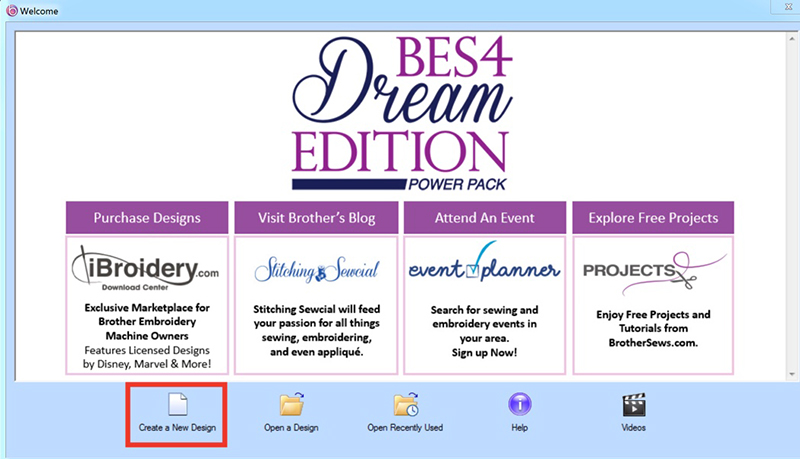 Figure #3a[/caption]
Begin building your design in the workspace. I used a template from Power Pack3 and modified the design by changing the lettering and eliminating the floral elements of the design. First, choose the hoop from the drop-down arrow, and then select the template option to choose a pre-made design combination. See Figure #3b and Figure #3c.
[caption id="attachment_25570" align="aligncenter" width="800"]
Figure #3a[/caption]
Begin building your design in the workspace. I used a template from Power Pack3 and modified the design by changing the lettering and eliminating the floral elements of the design. First, choose the hoop from the drop-down arrow, and then select the template option to choose a pre-made design combination. See Figure #3b and Figure #3c.
[caption id="attachment_25570" align="aligncenter" width="800"]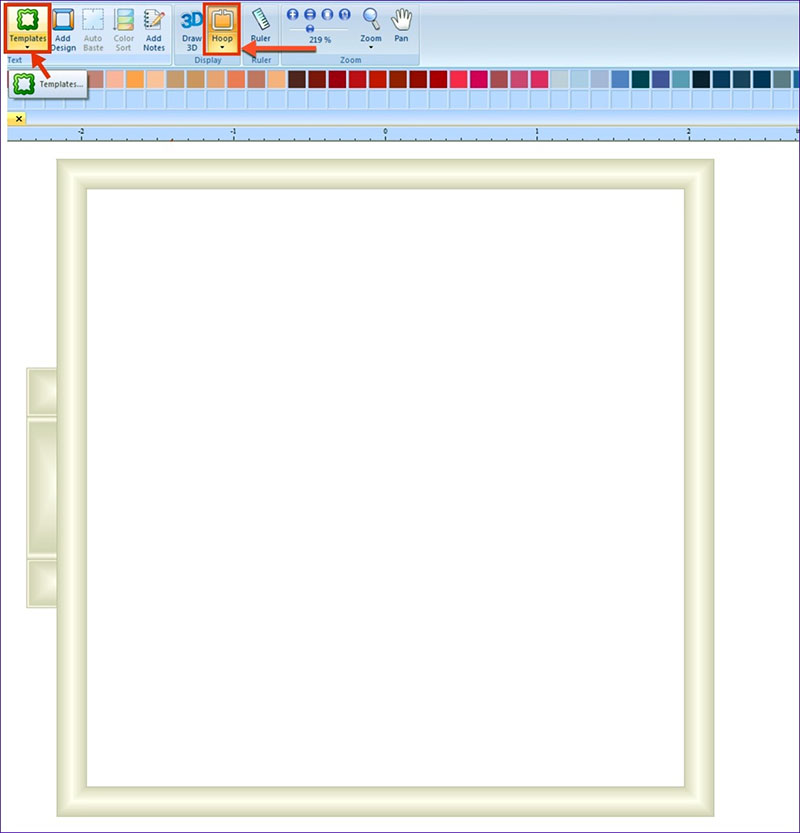 Figure #3b[/caption]
[caption id="attachment_25571" align="aligncenter" width="800"]
Figure #3b[/caption]
[caption id="attachment_25571" align="aligncenter" width="800"]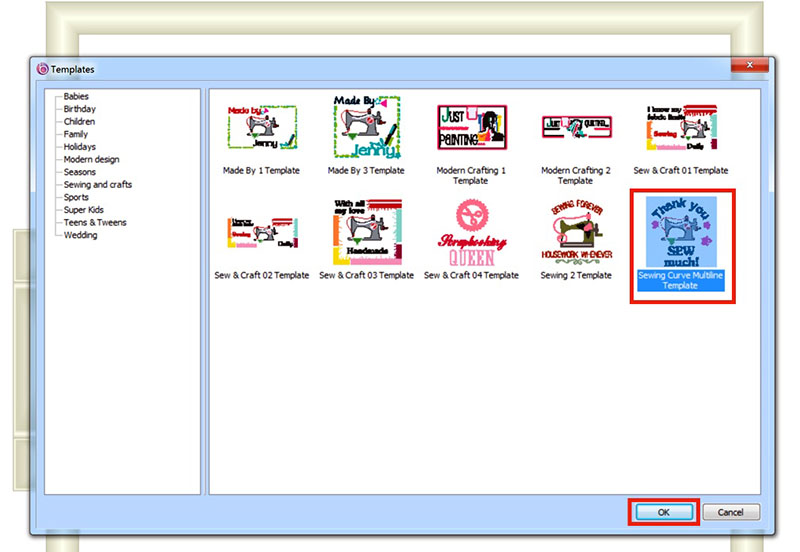 Figure #3c[/caption]
In the text window, double click inside each lettering box and then change or delete words. I deleted the flowers and changed colors in the design, once I said OK and brought it into the workspace. You can do this by selecting individual segments in the Sequence view. See my steps in Figure #3d, Figure #3e, and Figure #3f.
[caption id="attachment_25572" align="aligncenter" width="800"]
Figure #3c[/caption]
In the text window, double click inside each lettering box and then change or delete words. I deleted the flowers and changed colors in the design, once I said OK and brought it into the workspace. You can do this by selecting individual segments in the Sequence view. See my steps in Figure #3d, Figure #3e, and Figure #3f.
[caption id="attachment_25572" align="aligncenter" width="800"]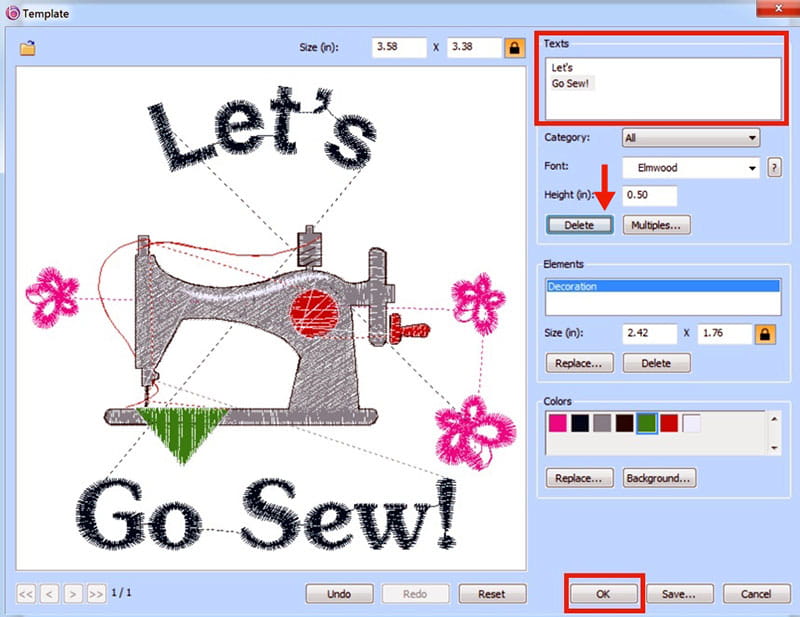 Figure #3d[/caption]
[caption id="attachment_25573" align="aligncenter" width="800"]
Figure #3d[/caption]
[caption id="attachment_25573" align="aligncenter" width="800"]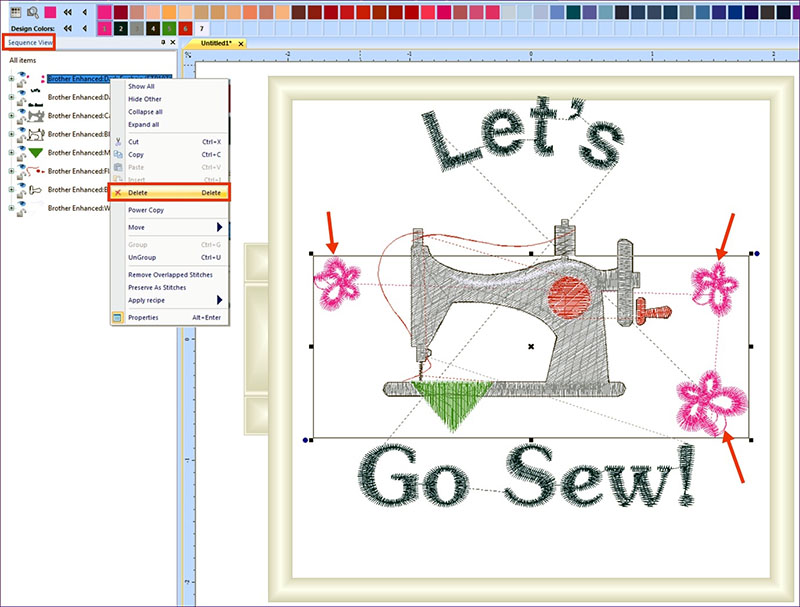 Figure #3e[/caption]
[caption id="attachment_25574" align="aligncenter" width="800"]
Figure #3e[/caption]
[caption id="attachment_25574" align="aligncenter" width="800"]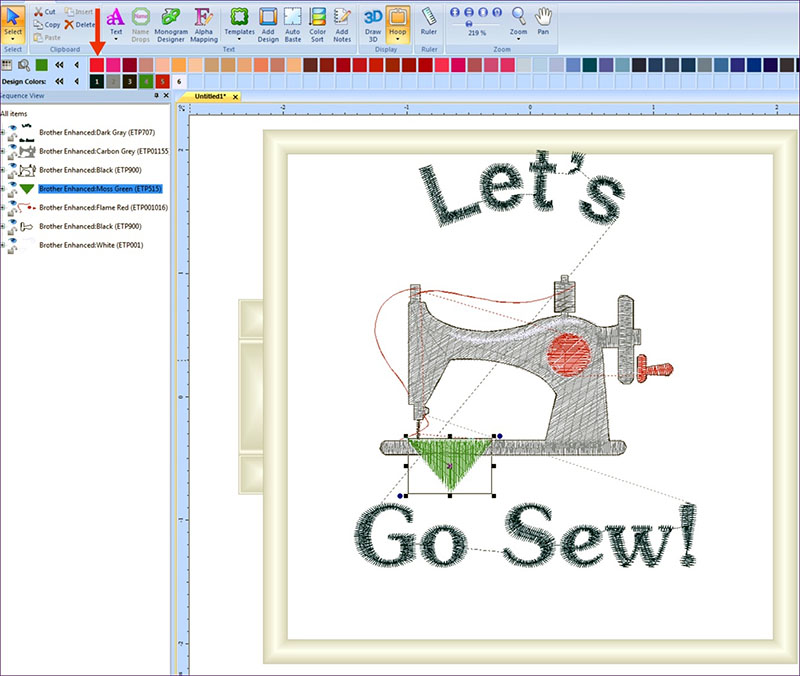 Figure #3f[/caption]
Now it’s time to add the recipe feature. Begin by clicking the Select tool, then click on the drop-down arrow and Select All to select the entire design. Click on Arrange and Center the design. See Figure #4a.
[caption id="attachment_25575" align="aligncenter" width="800"]
Figure #3f[/caption]
Now it’s time to add the recipe feature. Begin by clicking the Select tool, then click on the drop-down arrow and Select All to select the entire design. Click on Arrange and Center the design. See Figure #4a.
[caption id="attachment_25575" align="aligncenter" width="800"]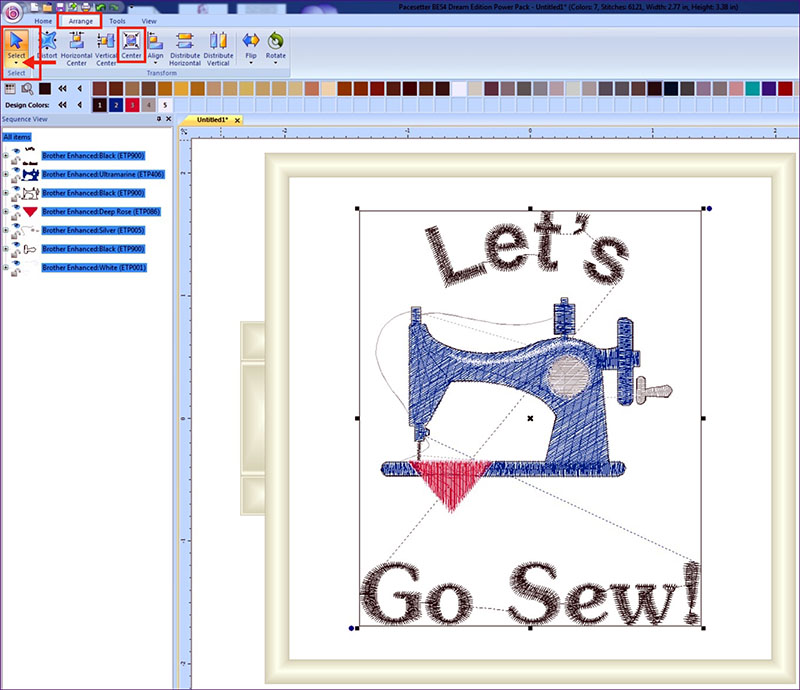 Figure #4a[/caption]
Next, right click on the selected design to bring up a pop-up menu with the option to apply the recipe. Click on Apply Recipe. Slide your cursor to highlight “T-shirt” and then click to apply. See Figure #4b.
[caption id="attachment_25576" align="aligncenter" width="800"]
Figure #4a[/caption]
Next, right click on the selected design to bring up a pop-up menu with the option to apply the recipe. Click on Apply Recipe. Slide your cursor to highlight “T-shirt” and then click to apply. See Figure #4b.
[caption id="attachment_25576" align="aligncenter" width="800"]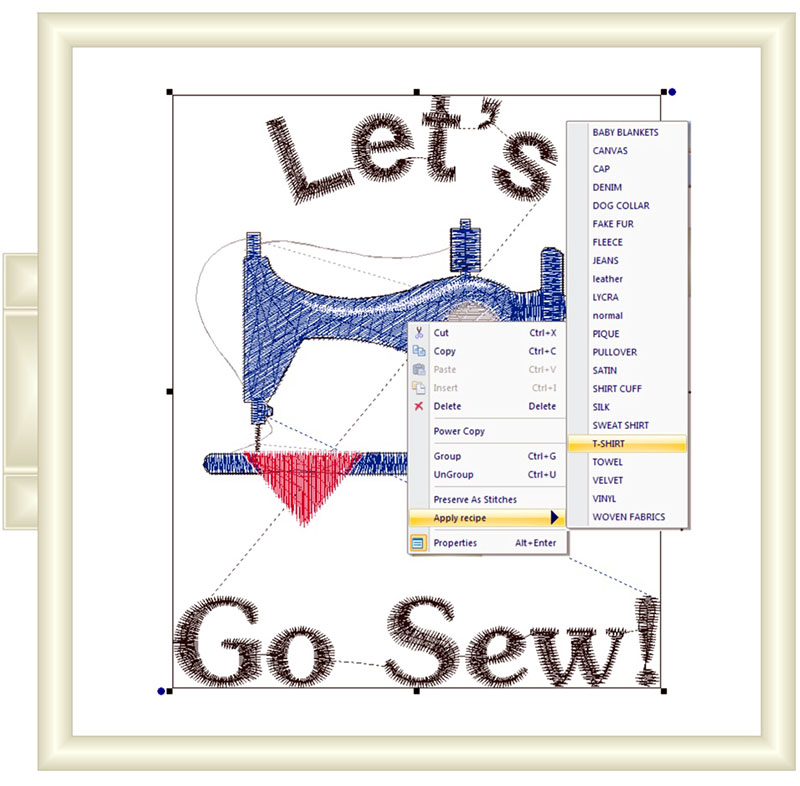 Figure #4b[/caption]
If you look at a comparison of “before” the recipe and “after,” you’ll see that the stitch count changed, and the lettering is fuller. The software adjusted the stitches and applied settings for T-shirt knit fabric. Take a look for yourself in Figure #5 below.
[caption id="attachment_25577" align="aligncenter" width="800"]
Figure #4b[/caption]
If you look at a comparison of “before” the recipe and “after,” you’ll see that the stitch count changed, and the lettering is fuller. The software adjusted the stitches and applied settings for T-shirt knit fabric. Take a look for yourself in Figure #5 below.
[caption id="attachment_25577" align="aligncenter" width="800"]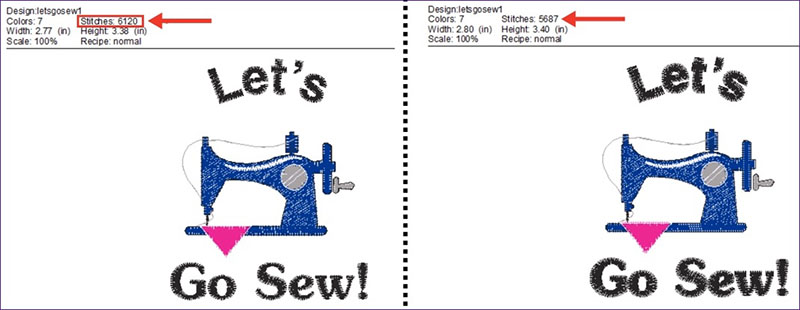 Figure #5[/caption]
I hope you enjoyed learning how to use the recipe option. Sewing is all about using our tools and accessories to the fullest. I encourage you to try this feature!
CLICK HERE FOR PDF
Figure #5[/caption]
I hope you enjoyed learning how to use the recipe option. Sewing is all about using our tools and accessories to the fullest. I encourage you to try this feature!
CLICK HERE FOR PDF
T-shirt embroidery is an ever-popular topic! In fact, one of my August Stitching Sewcial posts features an embroidered T-shirt along with some links to additional T-shirt embroidery tips. I remembered yet another feature after my shirt was finished so I thought it would be helpful to share it with you. This tutorial features the Brother BES4 Dream Edition
Lettering and Customization program. The software version shown in these instructions includes SABES4UG1
Power Pack 1, and SABES4UG3
Power Pack 3. Store this tutorial in your embroidery help file so you can make use of it when it’s time to embroider on T-shirts. The two samples you see in the above photo use lettering and designs built-in to the software. Each one was stitched on T-shirt knit backed with medium weight fusible cut-away stabilizer. In addition, I floated a layer of medium weight tear away under the hoop and finally added a layer of water-soluble film on top. Everything but the cut-away fusible was removed after stitching. Look closely at the photo and you may notice that the lettering on the left sample is slightly more pronounced. Choosing a “recipe” in the BES software automatically adjusted the stitches to fill in nicely on the fabric. This option gives you the opportunity to fine tune your design to suit the fabric. I recommend stitching a sample of each one, then decide what looks best for your design and your fabric. Tip: Use fabric remnants or save an old T-shirt to use for testing designs; be sure to chose one that has a fabric similar in weight and texture to your actual garment project. Note: You can also use recipes for designs that are merged into the software. Open software. Select New Page and click the “B” Pacesetter icon. Click on Merge and locate your design from your file locations. You will need to check the Convert to outlines box if you want to use the recipe feature. See Figure #1. [caption id="attachment_25566" align="aligncenter" width="800"]
Figure #1[/caption]
It’s possible for some stitches to change in character when using this feature so be sure to preview realistic (3D) stitches on screen. Use the stitch simulator to preview stitches as they will sew out on your project. See Figure #2.
[caption id="attachment_25568" align="aligncenter" width="800"] Figure #2[/caption]
Now let me show you how to use the software to select a recipe for a T-shirt knit. The process is the same if you merge in a design and select convert to outlines as described above, or if you start with a design or lettering built -in to the software.
Open the software and click to create a new design from the welcome screen. See Figure #3a.
[caption id="attachment_25569" align="aligncenter" width="800"] Figure #3a[/caption]
Begin building your design in the workspace. I used a template from Power Pack3 and modified the design by changing the lettering and eliminating the floral elements of the design. First, choose the hoop from the drop-down arrow, and then select the template option to choose a pre-made design combination. See Figure #3b and Figure #3c.
[caption id="attachment_25570" align="aligncenter" width="800"] Figure #3b[/caption]
[caption id="attachment_25571" align="aligncenter" width="800"] Figure #3c[/caption]
In the text window, double click inside each lettering box and then change or delete words. I deleted the flowers and changed colors in the design, once I said OK and brought it into the workspace. You can do this by selecting individual segments in the Sequence view. See my steps in Figure #3d, Figure #3e, and Figure #3f.
[caption id="attachment_25572" align="aligncenter" width="800"] Figure #3d[/caption]
[caption id="attachment_25573" align="aligncenter" width="800"] Figure #3e[/caption]
[caption id="attachment_25574" align="aligncenter" width="800"] Figure #3f[/caption]
Now it’s time to add the recipe feature. Begin by clicking the Select tool, then click on the drop-down arrow and Select All to select the entire design. Click on Arrange and Center the design. See Figure #4a.
[caption id="attachment_25575" align="aligncenter" width="800"] Figure #4a[/caption]
Next, right click on the selected design to bring up a pop-up menu with the option to apply the recipe. Click on Apply Recipe. Slide your cursor to highlight “T-shirt” and then click to apply. See Figure #4b.
[caption id="attachment_25576" align="aligncenter" width="800"] Figure #4b[/caption]
If you look at a comparison of “before” the recipe and “after,” you’ll see that the stitch count changed, and the lettering is fuller. The software adjusted the stitches and applied settings for T-shirt knit fabric. Take a look for yourself in Figure #5 below.
[caption id="attachment_25577" align="aligncenter" width="800"] Figure #5[/caption]
I hope you enjoyed learning how to use the recipe option. Sewing is all about using our tools and accessories to the fullest. I encourage you to try this feature!
CLICK HERE FOR PDFTags
Shop this Project
Have you ever seen a project (like this one) and said, 'I want to try that?' Well, Brother has you covered! The products in this fun project are available for purchase, so you can click, shop, and get to embroidery!

Embroidery Sewing Machines
Related Projects
Stay Connected
* Required fields