Quilt Along with Brother
-Brother Sews Blogger
March is national quilting month, and we would like for you to join us in creating. We have created a block in the Advanced Quilt Design Software, and Brother Sews Ambassador, Angela Wolf, Emily Thompson and Brother Educators, Jerry Granata and Kim Montagnese will be joining me to challenge you to make the block with us. Come follow along on the Brother Sews Facebook on March 15th.
You can then use it in any manner that you like. Put multiples together to make a quilt, add it to garment embellishment, create a puzzle with felt for a child, wherever your creativity takes you, You can get to the quilt block files by clicking on the link at the bottom of this blog post, If you have the Advance Quilt Design Software, you can open the .brf file and make the block any size you wish. It is saved as a quilt, so all that is necessary is to change the block size for the quilt. You can also create your own quilt layout with other blocks there if you want. Let’s go have some fun!
Supplies needed:
• 5 coordination fabrics – the amount of fabric for each color is in the pdf file. The amounts are for a single block. If you are making more blocks multiply the number of blocks by the amount of fabric needed for one block.
• J foot or ¼ inch foot
• Sewing thread and bobbin
• Printed templates to cut fabric or ScanNCut DX machine
• If using the ScanNCut DX machine, Fabric Mat and Thin Fabric Auto Blade are preferred
• Starch
• 75/11 Needle
• Any Brother Sewing machine for piecing
To begin, we will have a Live show March 15th to show how to create the block in Advanced Quilt Design Software and if you have it, you can follow along with the block creation. If you don’t have Advanced Quilt Design Software yet, we have you covered for this activity. Follow the link provided to find all that you need to follow along with us. We will also show how to cut out the pieces with a ScanNCut DX, but never fear…..if you don’t have a ScanNCut DX machine, you can cut the pieces using the provided templates.
After this show, Angela and I will each make something out of our block(s). I am guessing you can imagine what hers will include- can anyone say garment incorporation???? I on the other hand will probably incorporate mine into a project. I can’t wait to see the finished project myself. I am betting Emily’s will probably have something to do with children’s attire and you guys know Jerry….we never know what is up his sleeve, the sewing/quilting magician that he is. I can’t wait to see their creations along with yours.
So to start off, in this blog, we will outline the basic block construction for you. Don’t worry, we will do it live as well.
If you are using a digital cutting machine, be sure to prepare your fabric with a heavy starch. Get your fabric mat out and your fabric blade because you will use those to cut. All seam allowances have been added to the cut pieces for us whether you are using a digital cutting machine or the templates. If you are cutting using the templates, be sure to cut along the dashed lines.
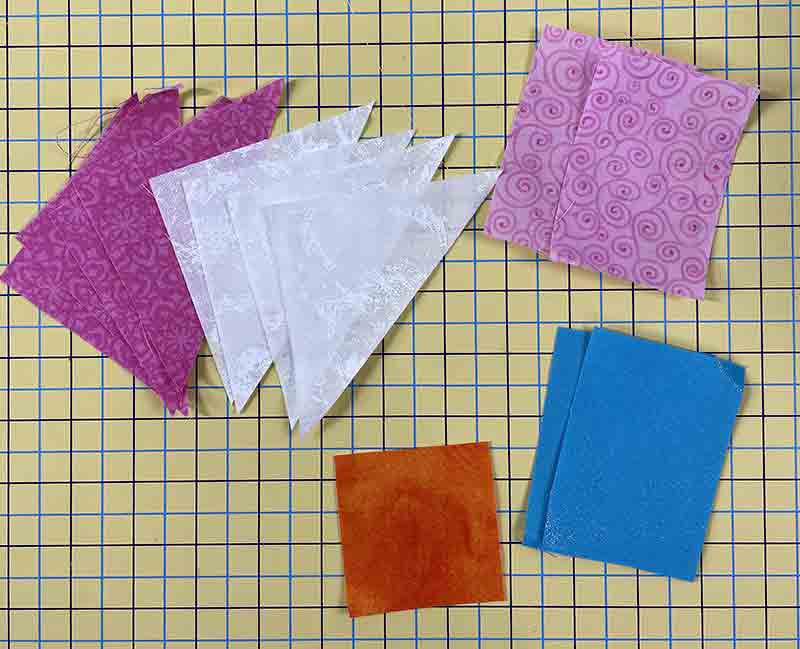
Once you have your fabric prepared, cut out the individual colors. For this block, we used a white, light pink, a darker pink, an orange and a blue. You can change the color scheme to your taste. This one is made to look a bit like a flower.
This is what our basic block looks like in the software.

For each block you create, you will need 4 dark pink triangles, 4 white triangles, 2 light pink rectangles, 2 blue rectangles and 1 orange square cut to the dimensions in the pdf file or using the fcm files.
Tip: The triangular pieces will be the same size for both colors, so if you are sending the file to the ScanNCut DX machine, you can just open one of those files on the ScanNCut DX machine and cut both colors from the same file. The same is true for the rectangular pieces.
Tip: Heavily starch your fabric if you plan to use the ScanNCut DX machine to cut.
So go cut out your pieces and once that is done, we can start piecing our block.
Tip: Be sure to cut along the grain of the fabric (the threads that weave it vertical and horizontal)!

1. Set up your machine for a ¼ inch stitch. On the Luminaire – choose the Q menu and then select Stith Q-02. This is setup for ¼ inch piecing with the J foot.
2. If you don’t have a Luminaire, choose your straight stitch middle position. Change the L/R shift to +5.50mm and your stitch length to 2.0 mm. This will give you the same stitch as the Q-02 stitch on the Luminaire. Below is a screenshot of the Luminaire stitch. If using the ¼ inch foot, on the Luminaire Q menu, choose stitch Q-01. If you don’t have a Luminaire, choose your straight stitch middle (you must use center/middle needle position with the ¼ inch foot) and change the stitch length to 2.0mm. I prefer the J foot method because the foot is longer, it maintains contact with the feed dogs longer and it grips the fabric with a longer foot than the ¼ inch foot, however, many others prefer the ¼ inch foot or ¼ inch foot with the guide If you are new to quilting, you may prefer the ¼ inch foot with the guide as it helps you keep the edges of your fabric in the correct position for sewing. Setup for the ¼ inch foot with the guide is the same as with the ¼ inch foot. Choose your favorite one or try both to see which you like best!

3. Place a white triangle and a pink triangle RST and stitch using a ¼ inch seam along the long side of the triangle.

4. Repeat for the rest of the triangular pieces.
5. Press seams to the dark fabric and then trim off the corners.

6. The sides of the blocks are sewn in the same way. One side is simply rotated to face inward after it is pieced.
7. For each side of the block, attach one of the blue pieces along the long side to the pink side of one of the ½ square triangles. The white triangle should be facing the outside.

8. Attach another ½ square triangle to the bottom of the blue with the dark pink side attached. The white triangle should be facing the outside.

9. Press the seams to the blue rectangle and set aside. Repeat for other side.

10. Attach a light pink rectangle - short side to the orange square.

11.Attach the other light pink rectangle to the bottom of the orange square in the same manner. Press seams towards the orange fabric. This will allow for nesting seams with the 2 side pieces.

12. Take the left side piece (the piece with the pink facing the right) and place it right sides together with the center orange and pink piece. Nest the seams together and then Sew.

13. Take the right side piece and place it face down onto the other side of the pink and orange strip. Nest the seams together and then sew together.

14. Press the seams that you just sewed open.

Congratulations, your block is finished. Repeat for any additional blocks you wish to create.

We can’t wait to see what you create with your blocks! Be sure to share your photos and tag Brother Sews with your creations using the hashtags #brothersews #brothercraftsusa.
I’m off to turn my blocks into a project. See you Virtually soon!
Let’s go create something fun!


