How to Sew a Handkerchief
-Brother Sews Blogger

You should always have a hanky on hand!
The handkerchief was introduced as a fashion accessory in the sixteenth century. Throughout history, the handkerchief has been used for a variety of purposes, from fashion to keeping noses from running. A handkerchief is typically a square of fabric hemmed on all four sides made from various types of materials. Handkerchiefs are a functional as well as classic accessory.
A DIY handkerchief is a wonderful project for beginners or advanced sewers! They are easy to make and require very little time. They make a perfect gift that’s fashionable and functional at the same time. Find out how to make your own custom handkerchief below
Selecting Fabric
Fabrics such as 100% lightweight cotton make the best handkerchiefs. Lightweight linen, cotton voile and cotton batiste are also good choices. If the handkerchief is going to be used as a fashion accessory, silk, chiffon, light muslin and satin can be used.
Size
The size can vary when making handkerchiefs. 12”x12” is generally the average size. Men’s handkerchiefs are usually larger than women’s.
When cutting the handkerchief, determine your desired finished size and add 1” to allow a ¼” double hem on all four sides
Preparation for Sewing Handkerchief
-Prewash fabric and dry
-Replace old needle with a new needle (Size 80/12)
-Make sure you remove the lint in and around the bobbin case and needle plate
-Remove standard needle plate and presser foot and replace with the straight needle plate and straight stitch presser foot

Supplies
-Brother Sewing Machine
-Straight Stitch Needle Plate
-Straight Stitch Foot
-Cutting Mat
-Rotary Cutter
-Optional: Dressmaker Shears - if rotary cutter and mat are not available
-½ yard lightweight cotton, such as batiste or voile, or fine linen
-Four 3” squares of Lightweight Tearaway Stabilizer
-Sewing thread to coordinate with fabric; bobbin wound with matching thread
-Seam Gauge
-Sewing Pins
-Iron

Directions
1. Cut a 13” square using a cutting mat and rotary cutter, or a good pair of Dressmaker shears from the lightweight cotton
Note: This measurement will yield a 12” x 12” handkerchief. Adjust your cut size as necessary for your desired finished size.

2. Along all four edges, fold back the raw edge ¼” using a seam gauge. Press well


3. Fold back another ¼” on all sides creating a double fold. Press well. Pin all four sides to keep the double hem in place

4. Remove pins in the corner and unfold the double hem on all four corners. The creased lines from the double hems should be seen. Fold the point of the corner so that it lines up with the ½” crease line and pin in place. Press

5. Draw a horizontal line below the ¼” creased intersecting lines

6. Cut on the marked line

7. Fold the trimmed corner to the ½” creased intersecting lines

8. Fold the double hem and carefully form the mitered corner. Press well. Pin. Repeat steps to create the miter in each corner

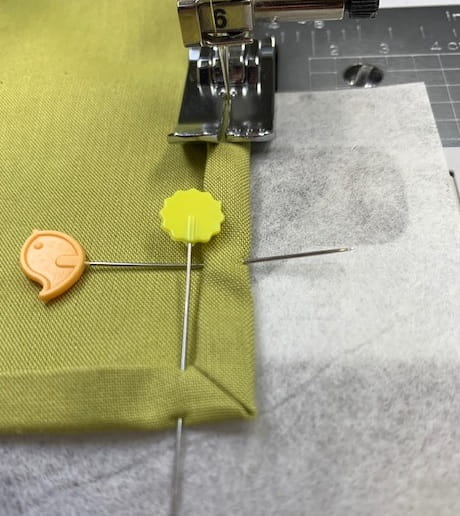
9. Place one 3” square of lightweight tearaway stabilizer under the first corner. Begin sewing the hem close to the folded edge.
Stabilizer is optional. It provides traction when starting at the corner and can easily be removed when stitching is complete.
Tip: The straight stitch presser foot and straight stitch needle plate are perfect for doing small hems around small items. They prevent the fabric from being pulled down into the hole in the plate.

10. Continue sewing the hem until you come approximately 2” from the next corner. Place another 3” square of lightweight tearaway stabilizer under the fabric. Continue to sew until you reach the center of the miter on the second corner. Leave the needle in the fabric and raise the presser foot. Pivot the fabric 90°and continue stitching the next side. Repeat steps for the remaining two sides.

Congratulations! You have just completed your beautiful handkerchief! Be sure to wear it with pride.


