The Little Black Clutch
This little black clutch is the perfect accessory for holiday outfits, special occasions and makes a great gift. I used the Brother NS1750D machine to personalize the clutch with a glittering machine embroidered monogram and designer style decorative stitches, all built in to the machine. Your friends will want one too so why not make a few as gifts?
Materials and Supplies
- Brother NS1750D Sewing and Embroidery Machine
- SA5815
Brother adhesive backed tear-away stabilizer for embroidery. - SA5818
Brother heavy weight tear-away stabilizer for decorative stitching. - Brother Embroidery thread, Bobbin thread, & Embroidery needle for embroidering.
Note: This project features Brother Light Silver metallic - MT997. - Basic sewing notions including sewing thread to match fabric and a wash out marker or chalk suitable for marking on the purse fabric. A press cloth is recommended for pressing heat sensitive fabrics.
- Sewing machine needle appropriate for sewing fabric.
Fabrics and notions for making purse:
- One black 9-inch all purpose metal zipper.
- Purse fabric: Featured monogrammed purse is made from a medium weight faux suede fabric with a knitted backing. This fabric has a slight nap so it’s important to mark the top edge of each piece and sew pieces with top edges matching.
- Lining: Choose a lining with a little bit of body – selecting a sold color or a fun print to add interest to the inside of your purse.
- Interfacing: Use firm fusible interfacing compatible with your selected fabric. I used a firm fusible designed for interfacing crisp shirt collars. Test interfacing on a scrap piece of fabric if you are unsure of compatibility.
- Optional – Charm or tassel and a suitable ring for attaching to zipper pull-tab.
Cut the following pieces from fabric listed above:
- Purse Piece A – Front flap and back side of purse – Cut one piece of fashion fabric measuring 11-inches wide X 13-inches long.
- Purse Piece B – Underside of front flap and front side of purse – Cut one piece of fashion fabric measuring 11-inches wide X 13-inches long.
- End pieces for covering zipper tape at each end – Cut two strips of fashion fabric measuring 1 ¼-inch wide X 2-inches long.
- Purse lining - Cut two pieces of lining measuring 11-inches wide X 13-inches long.
- Interfacing for purse pieces A and B– Cut two pieces measuring 10-inches wide X 12 ½-inches long.
Here are the basic steps for creating purse:
- Decorate front flap area of purse.
- Sew zipper for opening at the top edge of purse.
- Add lining, and then sew bottom and side seams to finish.
Instructions for Decorating Purse Flap
- Following manufacturer’s directions, apply interfacing to each of purse pieces A and B, having the interfacing centered on the wrong side and even with the top edge. This will help to stabilize zipper area with other areas uncovered to eliminate the bulk of stabilizer from the seam allowance along sides and bottom. See Figure #1.
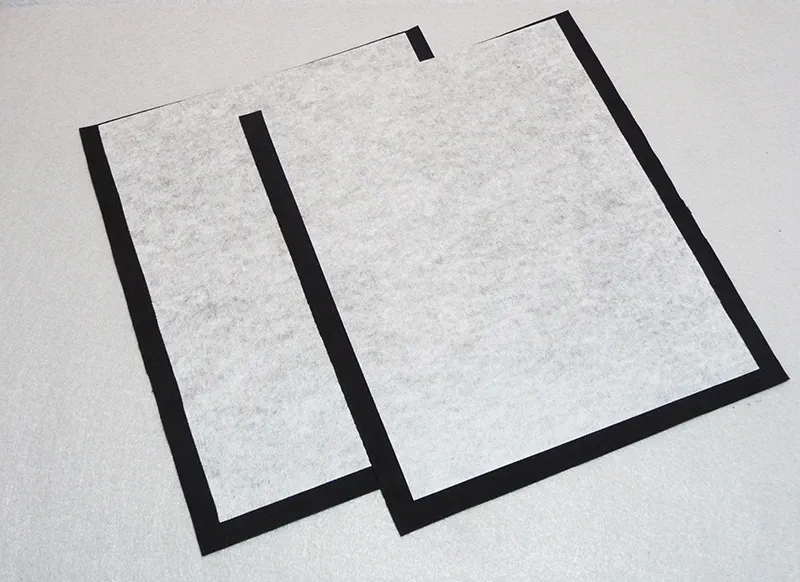 Figure #1[/caption]
- Select Purse Piece A. In preparation for decorating the front flap, mark lines at the top edge of the piece as shown in Figure #2.
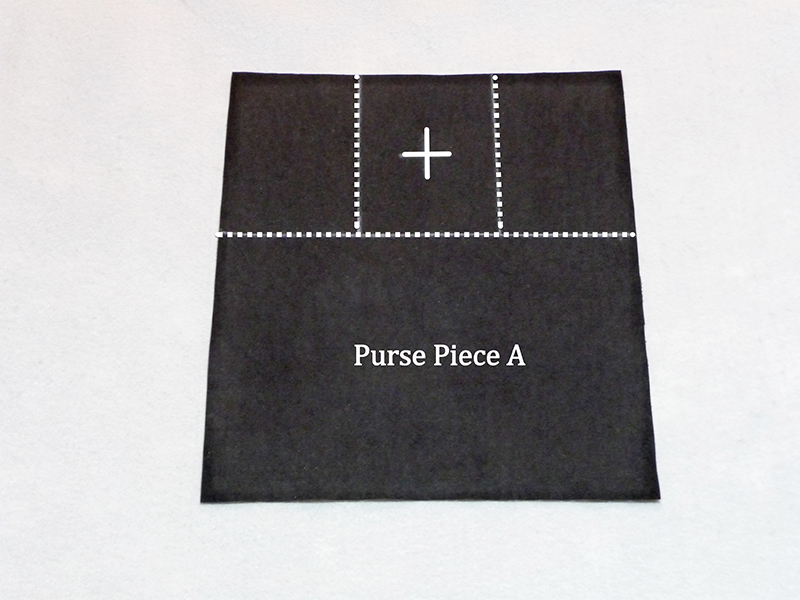 Figure #2[/caption]
- Mark one long line measuring 5 ½-inches from the top edge. Mark two short lines measuring 3 ¾-inches from each side edge. Mark center between the short lines for embroidering monogram.
- Set up machine for embroidery, threading with your choice of embroidery thread or metallic thread in the needle, and bobbin thread in the bobbin. Select a monogram from the built in menu. See Figure #3.
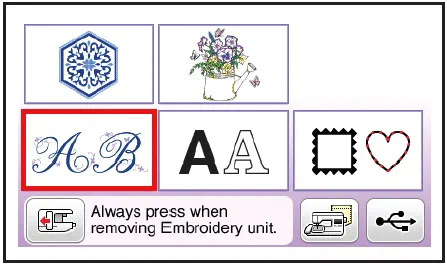 Figure #3[/caption]
- Hoop adhesive tear away in the 4-inch hoop. See steps in Figure #4.
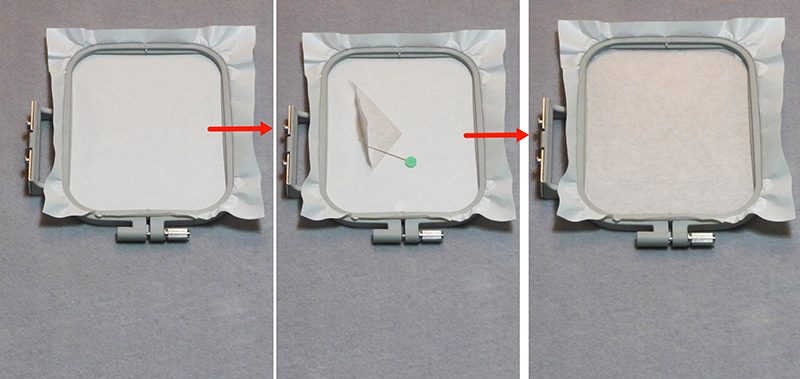 Figure #4[/caption]
- Hoop stabilizer with shiny side of paper facing up. Lightly score paper layer with a pin, forming an X across the paper. Lift the paper up with a pin and remove from entire surface, leaving sticky adhesive exposed.
Tips for using adhesive backed stabilizer: If adhesive backed tear-away is new to you, you’ll find the steps for preparing this stabilizer shown in Figure #4. This hooping method is ideal for stitching close to fabric edges when there isn’t enough fabric to entirely fill the hoop. Note that your fabric still needs to be well stabilized. Sticky stabilizer is removable and simply functions to temporarily hold fabric in the hoop. In this project the purse fabric is interfaced so this type of tear away can be used without additional layers of stabilizer. Occasionally a small amount of the adhesive will build up on the needle. You can easily remove the residue by carefully wiping needle clean with prepared alcohol swabs.
- Embroider monogram on the flap, attaching fabric so the initial is centered in the middle section of the marked flap. Note: Stitch monogram with the bottom of the letter facing the top edge of purse piece. See Figure #5a and #5b.
[caption id="attachment_10071" align="aligncenter" width="800"]
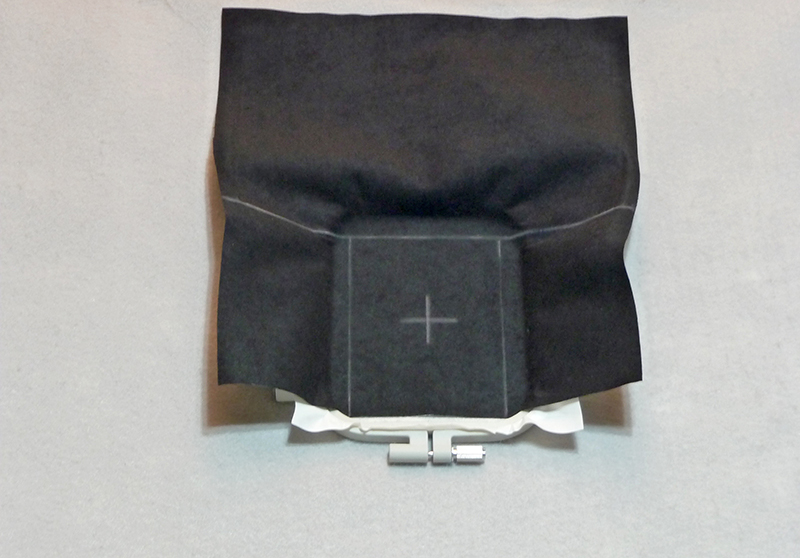 Figure #5a[/caption]
[caption id="attachment_10072" align="aligncenter" width="800"]
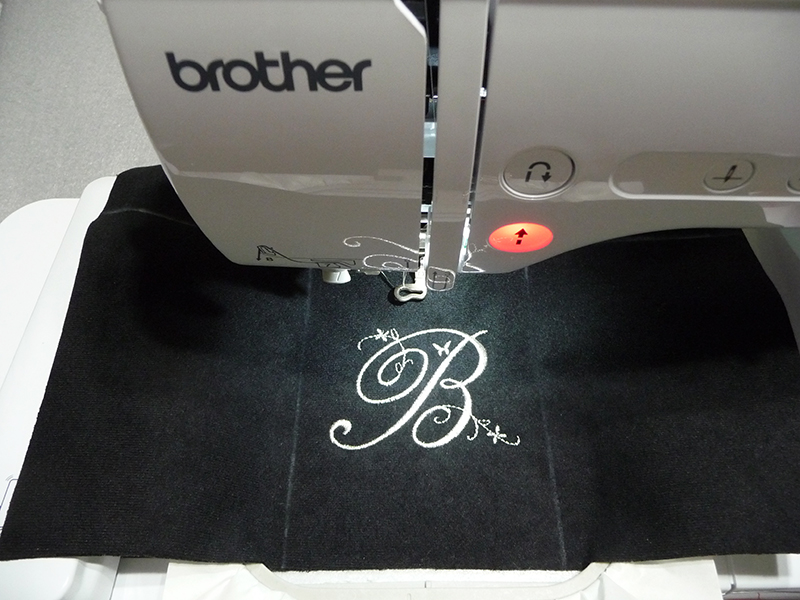 Figure #5b[/caption]
Tips for stitching the monogram: Monogram sizes will vary. It’s important to make sure the monogram is centered, and spaced so there is a distance of at least 1-inch between the bottom of the monogram and the top edge of piece A. Take advantage of the tools in Edit mode, allowing you to move the orientation of the center point, and adjust the position of the monogram so that it lines up with your center marking. In addition, you can make use of the trial function before stitching to be sure you have the necessary distance described above.
Figure #5b[/caption]
Tips for stitching the monogram: Monogram sizes will vary. It’s important to make sure the monogram is centered, and spaced so there is a distance of at least 1-inch between the bottom of the monogram and the top edge of piece A. Take advantage of the tools in Edit mode, allowing you to move the orientation of the center point, and adjust the position of the monogram so that it lines up with your center marking. In addition, you can make use of the trial function before stitching to be sure you have the necessary distance described above.- Carefully remove excess adhesive tear away when finished embroidering. Leave embroidery needle and threads in the machine. Set up for sewing with decorative stitches using presser foot ”N.”
- Place a layer of tear away under the flap area. Sew a row of decorative stitches along the longest marked line, guiding edge of presser foot along the line. See Figure #6a.
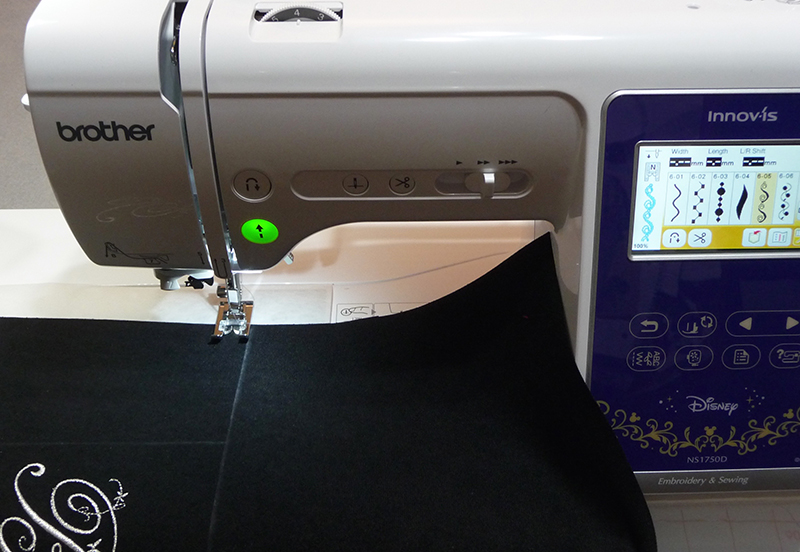 Figure #6a[/caption]
- Sew decorative stitches along the two short lines, beginning at the edge of the long line, with stitches centered on the markings. Remove stabilizer and markings, and press lightly. See Figure #6b.
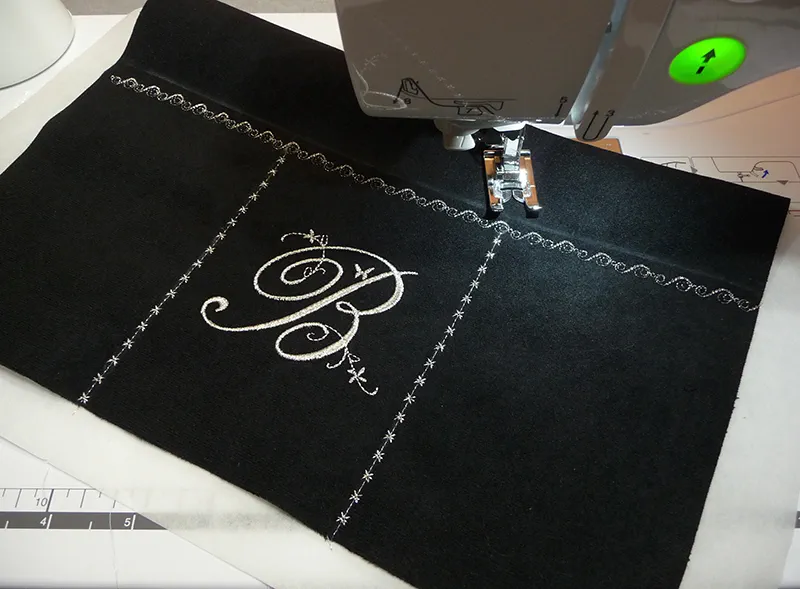 Figure #6b[/caption]
Tip for decorative stitching: To ensure the best results, practice stitches on a remnant of fabric prepared with both interfacing and stabilizer. Be sure to use tie off feature and the back to beginning key when beginning each short line of stitching. Purse flap features stitch No. 6-05 for the long line and stitch No. 5-15 for the two short lines, both stitches are built-in to the Brother NS1750D Sewing and Embroidery Machine.
Figure #6b[/caption]
Tip for decorative stitching: To ensure the best results, practice stitches on a remnant of fabric prepared with both interfacing and stabilizer. Be sure to use tie off feature and the back to beginning key when beginning each short line of stitching. Purse flap features stitch No. 6-05 for the long line and stitch No. 5-15 for the two short lines, both stitches are built-in to the Brother NS1750D Sewing and Embroidery Machine.Instructions for Sewing Zipper
- With wrong sides together, fold and press short ends of each of the small pieces cut to cover zipper ends. Gather all of your pieces for the purse, including the zipper. See Figure #7.
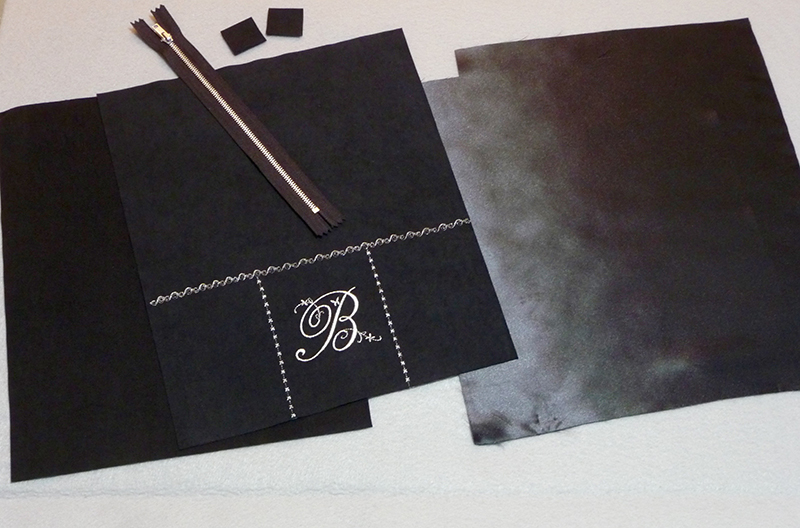 Figure #7[/caption]
- Set up machine for sewing with standard thread and a needle suitable for the fabric. With right side of zipper facing up, place one of the folded end pieces across each end of the zipper, with folded edge covering the stop at the bottom end, and just reaching the teeth at the pull-tab end. Take care to pinch the tape together when stitching each end. Machine-baste close to each end of zipper tape to temporarily hold pieces in place. See Figure #8a and #8b.
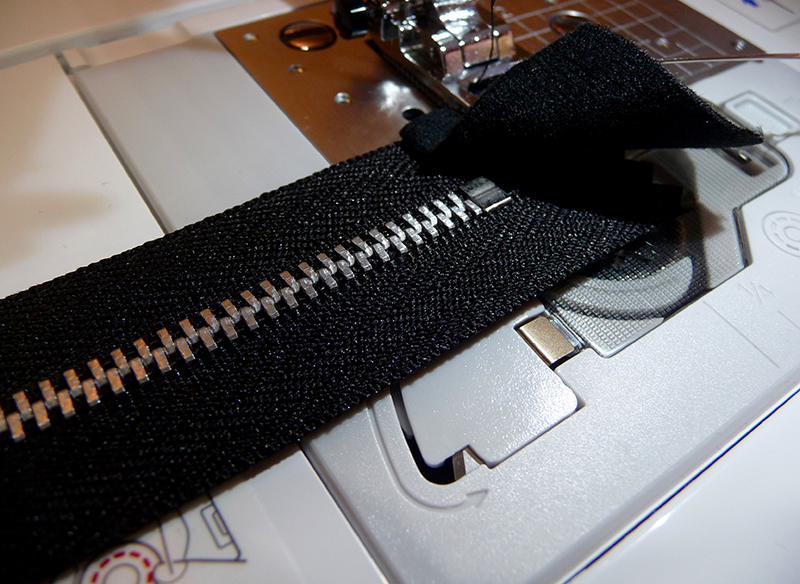 Figure #8a[/caption][caption id="attachment_10077" align="aligncenter" width="800"]
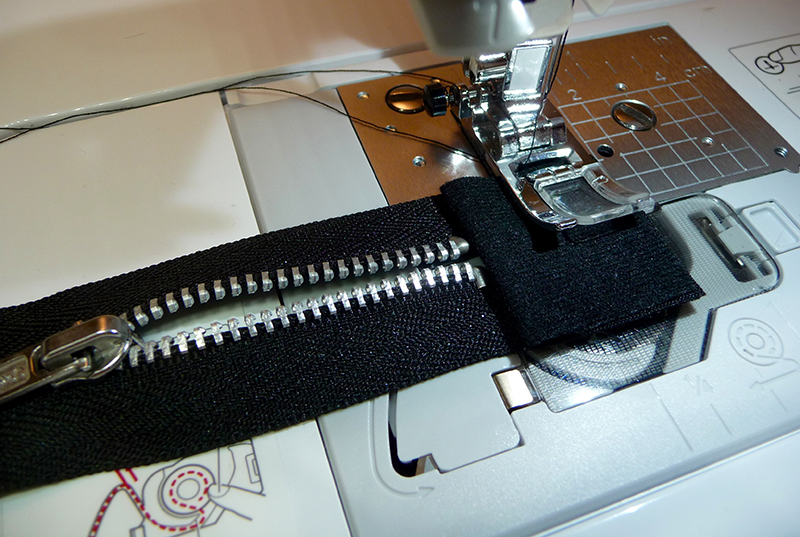 Figure #8b[/caption]
- Trim raw edges of these small pieces so they are even with zipper tape.
- Select a center needle straight stitch. Snap left side of zipper foot onto machine. Unzip zipper half way and place along top edge of decorated flap, with right sides facing. Pin in place, centering zipper from end to end and positioning the pull-tab of zipper so it is on the left. See Figure #9.
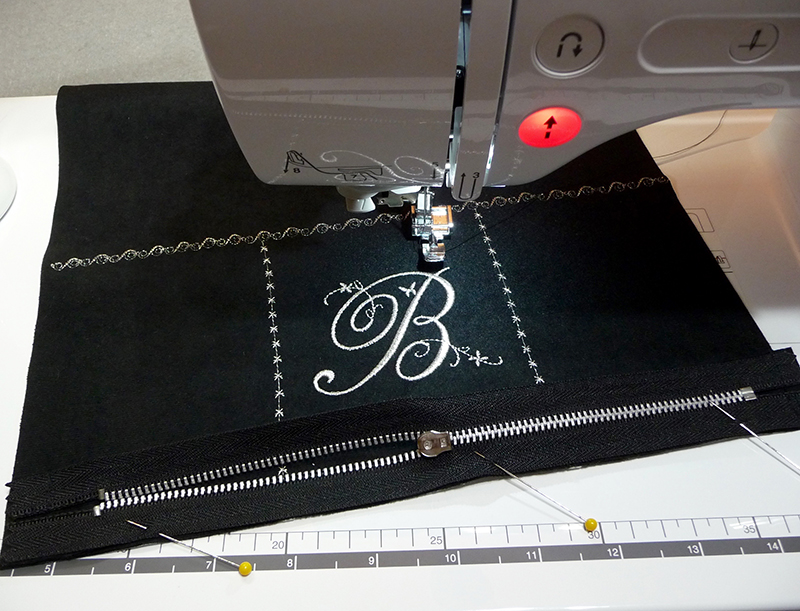 Figure #9[/caption]
- Sew along zipper tape using zipper foot, stitching approximately 1/4-inch from the tape edge. Note: When you reach the slider, pause stitching, raise the presser foot, and then maneuver to close the zipper and continue along the remaining edge of the tape. You may need to raise both the presser foot and the needle. See Figure #10.
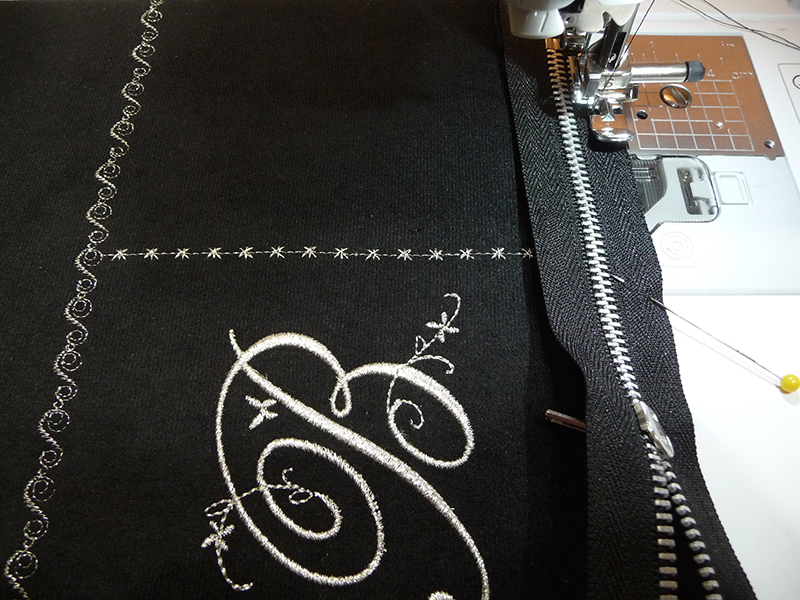 Figure #10[/caption]
- Pin and then sew opposite side of zipper tape to the top edge in the same manner as the first. See Figure #11.
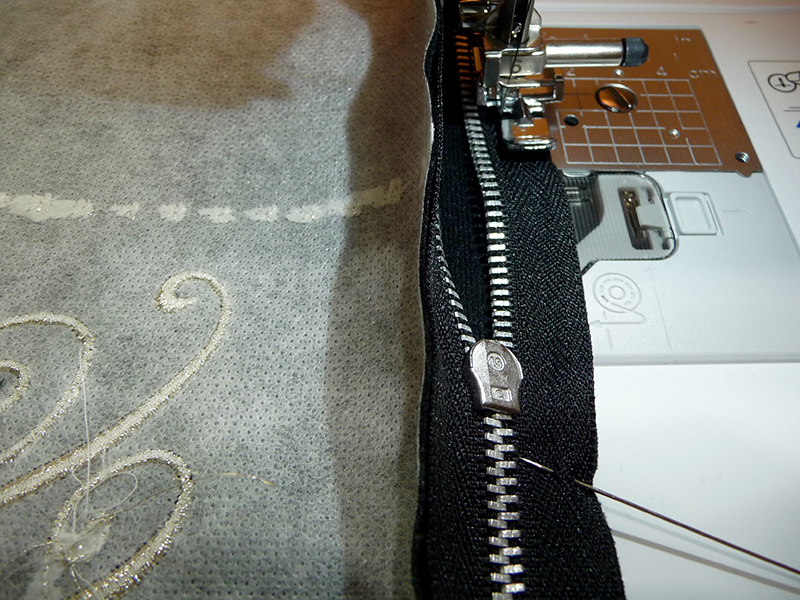 Figure #11[/caption]
- Zipper should look like this from the right side of the purse. See Figure #12.
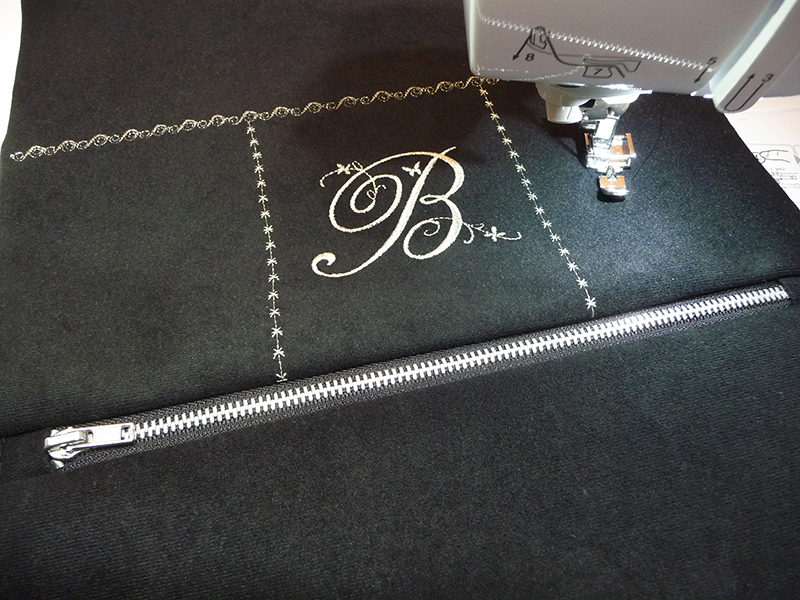 Figure #12[/caption]
- Next, pin a matching piece of lining along one edge of the purse pieces with right sides together and zipper tape sandwiched in between. See Figure #13.
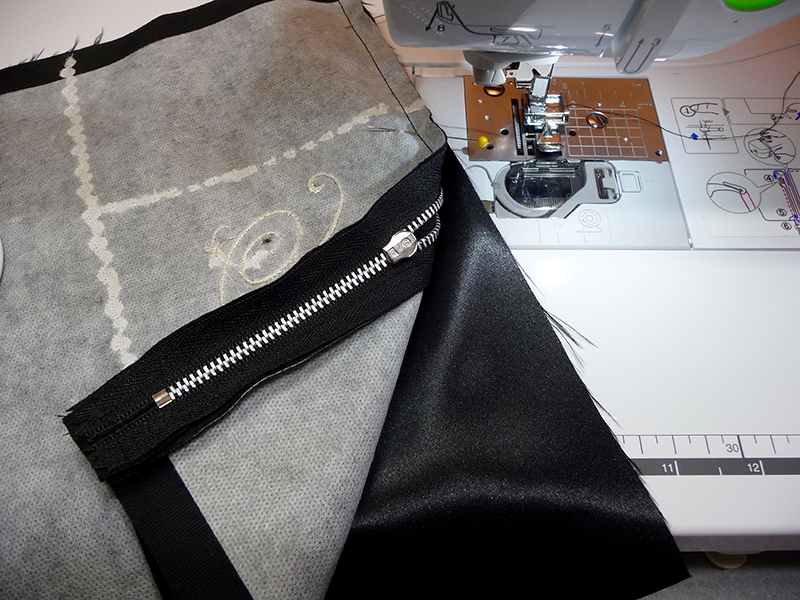 Figure #13[/caption]
- Sew the three layers together, sewing from the purse fabric side so you can follow your previous stitching.
- Repeat Step 4 to sew lining on the opposite side.
Tip for stitching lining: You will want to start sewing with the zipper half open as you did before, and then you will need to pause stitching and reach between the layers to maneuver the zipper closed.- Open out all layers, smoothing them to lay flat. Press each side carefully, gently pressing the purse fabric and the lining layer away from the zipper teeth. See Figure #14a and #14b.
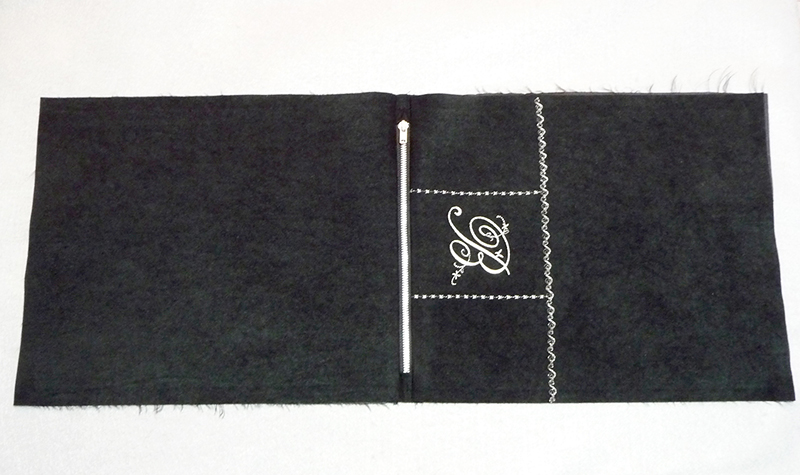 Figure #14a[/caption]
[caption id="attachment_10084" align="aligncenter" width="800"]
 Figure #14b[/caption]
Optional: Topstitch along sides of zipper from the right side.
Figure #14b[/caption]
Optional: Topstitch along sides of zipper from the right side.Instructions for Finishing Purse
- All raw edges of purse should be even at this point. Trim any uneven layers if necessary. Change to standard presser foot. Place short ends of purse pieces right sides together, and then sew bottom seam bottom closed using a ½-inch seam allowance. See Figure #15a and #15b.
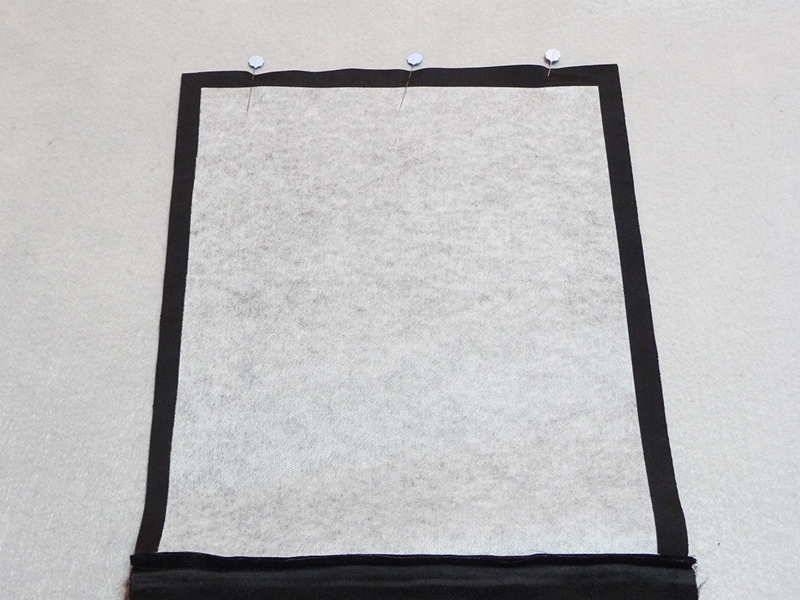 Figure #15a[/caption]
[caption id="attachment_10086" align="aligncenter" width="800"]
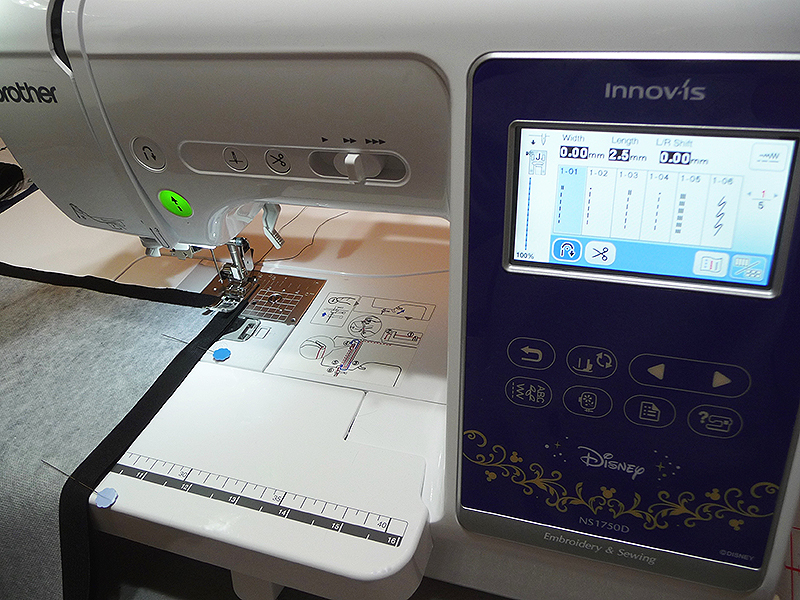 Figure #15b[/caption]
- Place short ends of lining pieces right sides together and pin. Mark off an area measuring 4 to 5-inches long in the middle of the seam to leave open for turning, and then sew the rest of the bottom using a ½-inch seam allowance. See Figure #16.
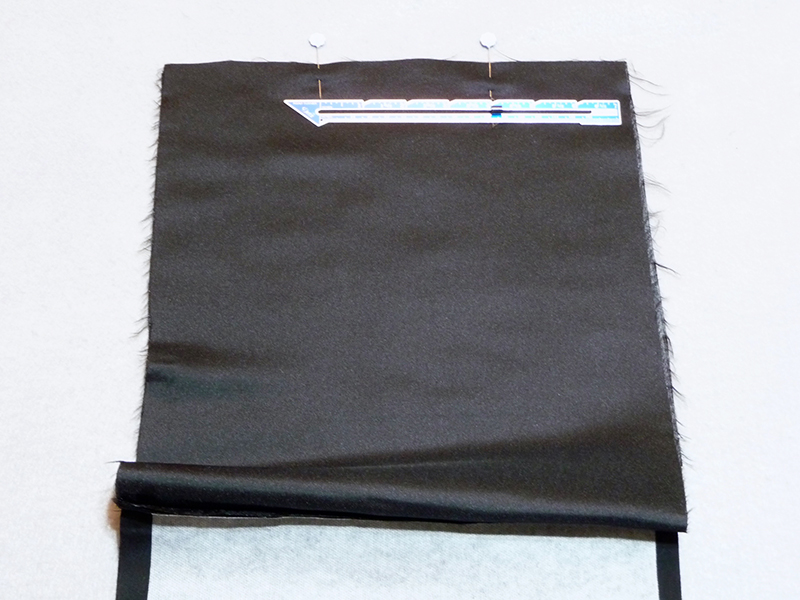 Figure #16[/caption]
- Next, open zipper half way. Your purse is almost finished and it’s time to sew the side seams. Begin by laying the entire long piece out flat, with right sides of lining pieces and right sides of purse pieces facing each other. Working from the wrong side, pinch the zipper teeth together, and then push the seam allowances formed from sewing zipper toward the lining on each side of the purse. Pin these layers together on each side of the purse. Sew each side seam, taking care to backstitch at each end, beginning at one bottom edge and sewing all the way to the other. Be sure you are stitching without getting near zipper teeth. See Figure #17.
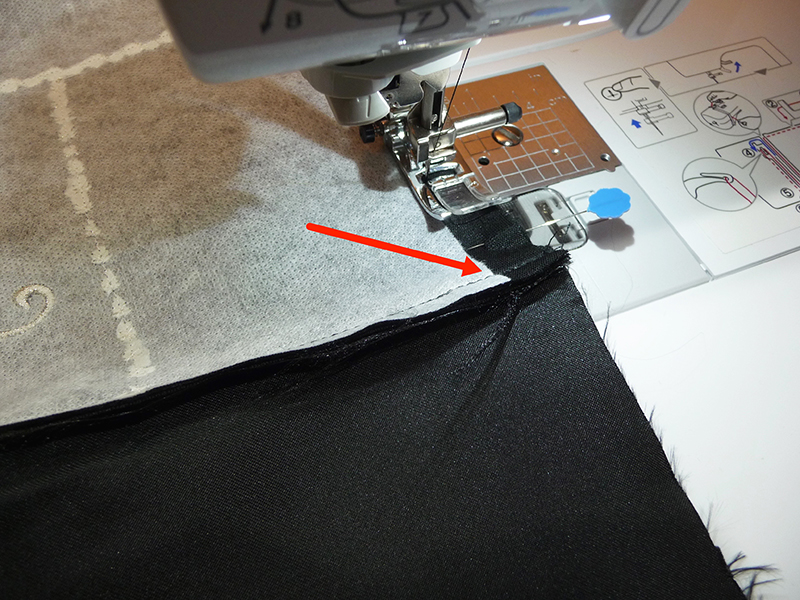 Figure #17[/caption]
- Lightly press the seams flat. Carefully trim bulky areas near the zipper and diagonally clip excess away at each corner of the bottom seams. Gently turn purse right side out by reaching through the bottom opening in the lining, and through the open zipper. Smooth piece so that the right sides of both the purse and the lining are facing out. Stitch the small opening of the lining closed by folding in the ½-inch seam allowance and sewing close to the folded edge using a straight stitch. See stitching line in Figure #18.
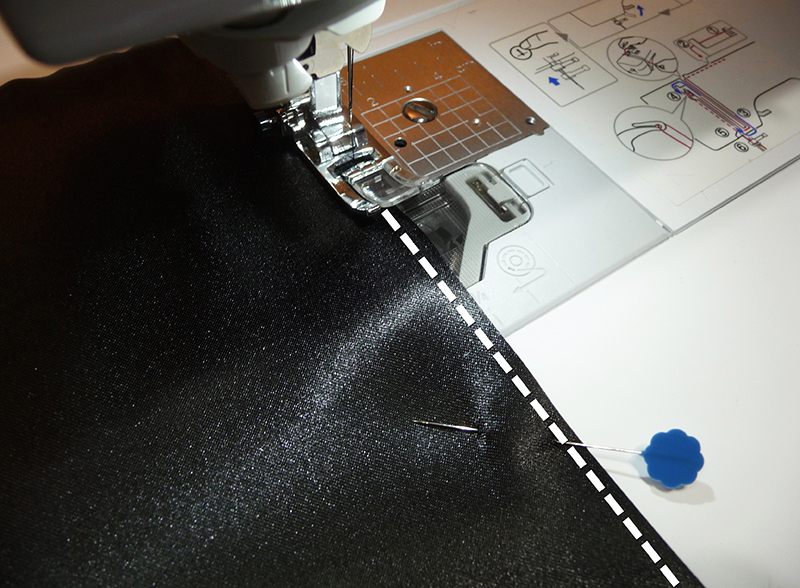 Figure #18[/caption]
- Tuck the lining neatly into the purse and give it a final light press. You are finished! Fold the purse along the decorative stitching line. Enjoy!
Options and Ideas:
Use your imagination when creating these purses. There are many different ways to decorate plain fabric and of course there are a wide variety of other fabrics you can choose from. Medium weight fabrics will work best for this style. Here are some ideas and a few examples to get you started: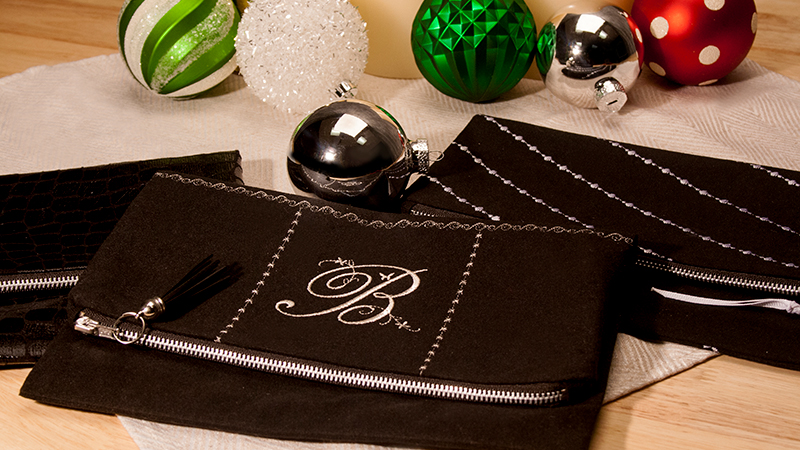
- Make it Monogrammed! Use the basic step-by-step instructions presented here for a monogrammed purse flap. Consider using a contrast fabric applied as an appliqué for the featured monogram. See instructions for “Using a frame pattern to make an appliqué,” included in the manual for the machine. Stitch the monogram first and then add your chosen monogram on top of the appliqué.
- Go Faux! Consider using a medium weight novelty faux leather as the featured fabric and leave the purse plain.
- Dazzle with Decorative Stitches! The machine featured here is packed with designer style decorative stitches. You can even design your own decorative stitches using the exclusive My Custom Stitch™ feature built in to the machine.
- If you are using basic black fabric and making multiples as gifts, consider sewing these in assembly line fashion. Simply complete each similar task on each set of purse pieces and you’ll be surprised how quickly you can finish several purses at one time!
- Add ribbon ties, decorative tassels, or charms to the zipper tab for a fun custom touch!

