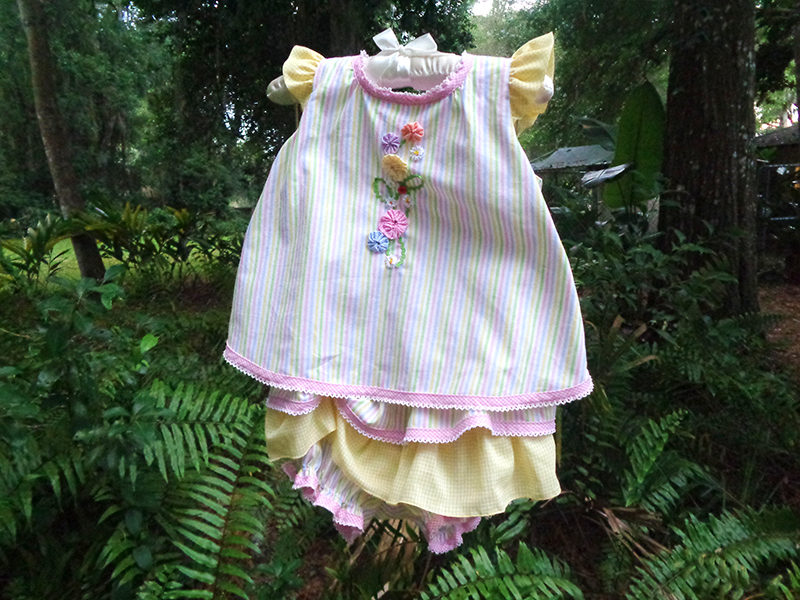
Tutorial: Fun Summer Yo Yo Frock
[caption id="attachment_20173" align="aligncenter" width="800"]
 This back closure is so cute![/caption]
With THE Dream Machine,
This back closure is so cute![/caption]
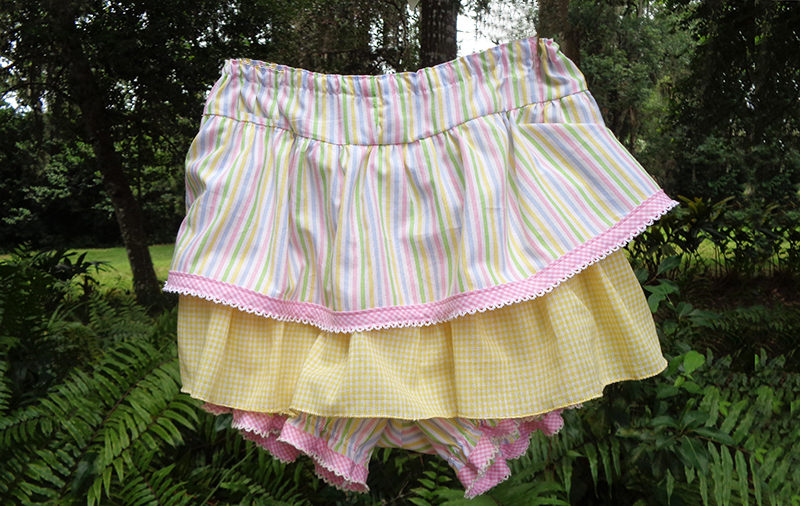
With THE Dream Machine,this sweet summer concoction is a breeze to make for a special little one. Who knew you could quickly and easily make yo-yos any size with your embroidery or sewing machine? Make those tedious, classic rounds in your 4x4 frame with just a little hand work. Or make them easily on your Brother sewing machine. This cute wrap around apron dress and ruffled bloomers are the perfect summer outfit for your little one. Learn an easy, neat, lightweight substitute casing technique for legs or sleeves using your Brother Open Toe Foot.
Requirements
- THE Dream Machine
w 4x4 frame or other Brother sewing machine without embroidery capability - Open Toe Foot (SA147),
Edge stitch Foot with Stitch in the Ditch Foot (SA191)
or Edge Joining Foot (SA184) - 1.5 yds. stripe fabric 44” wide for dress and bloomers—Less if you are using commercially made double fold, instead of self-made bias
- 1.25 yds. contrasting yellow gingham fabric for dress and bloomers
- two dozen yellow seed beads
Notions
- fine line water soluble marker
- water soluble stabilizer (wss)
- gingham for yo-yos
- 3/4 yd. lime green baby rick rack
- 1 yd. white baby rick rack
- fray block
- elastic: 24” of 1/8’” for leg casing, 25” of ¼” for waist casing
- buttons: two 5/8” pink buttons, 1 tiny ladybug
- 4.5 yds gingham picot double-fold bias
- Hand-sewing needle, white quilting or other sturdy thread for yo-yo’s and rick rack flowers
- two 2” scraps of fusible interfacing
Downloads:
- yo-yo design template, machine embroidery yo-yo files, yo-yo templates for sewing machine yo-yo’s
- yoyo design template
- 2 yo-yo machine embroidery and text files: 1 approximately lg. dime size,
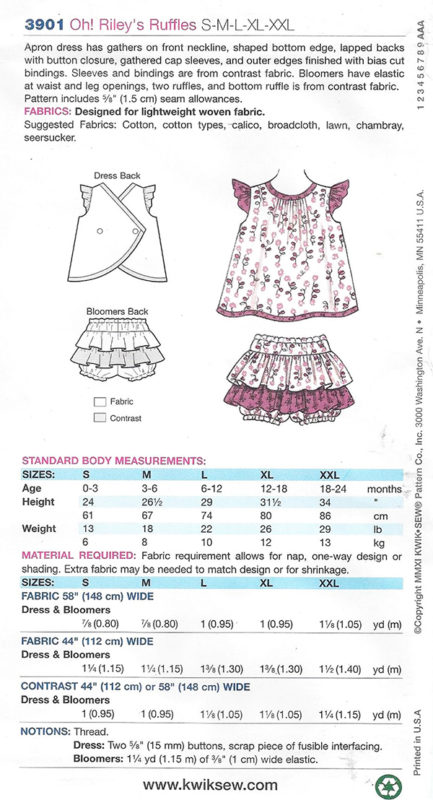
and 1 approximately lg. quarter size - Kwik Sew Pattern 3901
Disclaimer: Kwik Sew Patter #3901 is a product of the McCall Pattern Company and Brother International Corporation makes no representations or warranties regarding these products.
Directions for Top
Seam allowances are 5/8” unless indicated otherwise. The pattern calls for gathers along the center front. However, the yo-yo design is best displayed flat. Consequently, the gathers will be moved to either side of a flat 2 ½” area in the center front.- Trace dress front pattern piece on folded stabilizer with heavy marking pen. Open stabilizer and finish tracing the complete front.
- Mark center front and a line 1 ¼” on each side of center front. This marks an area 2 ½” wide down the center.
- Trace the front facing pattern piece in the same manner, rendering a pattern for the correctly sized dress front with gathers repositioned. Put this pattern piece aside.
- Trace the dress front pattern piece onto striped fabric. Mark center front and the 2 ½” area.
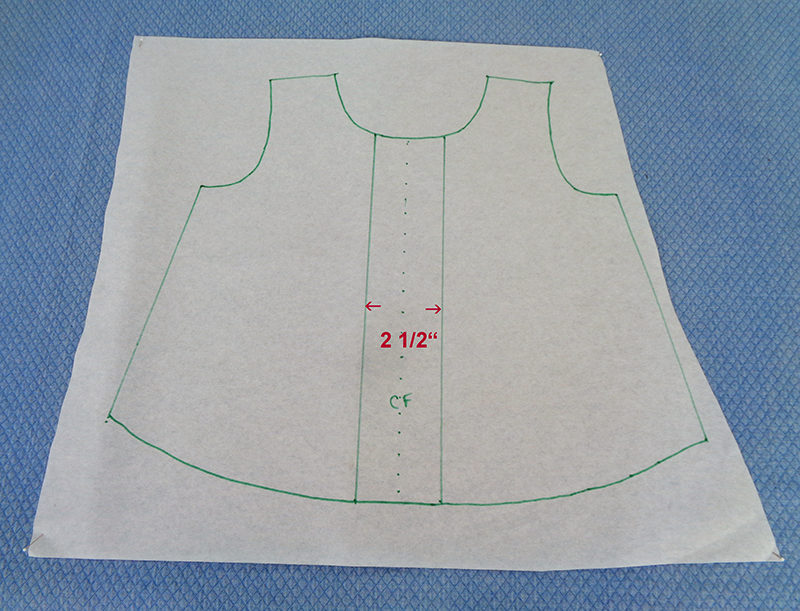
- Trace the pattern and markings onto the fabric. Mark 5/8” neckline seam allowance so yo-yo design does not encroach on it.
- Reposition the gathered area equally on either side of the center 2 ½” area to fit your chosen size.
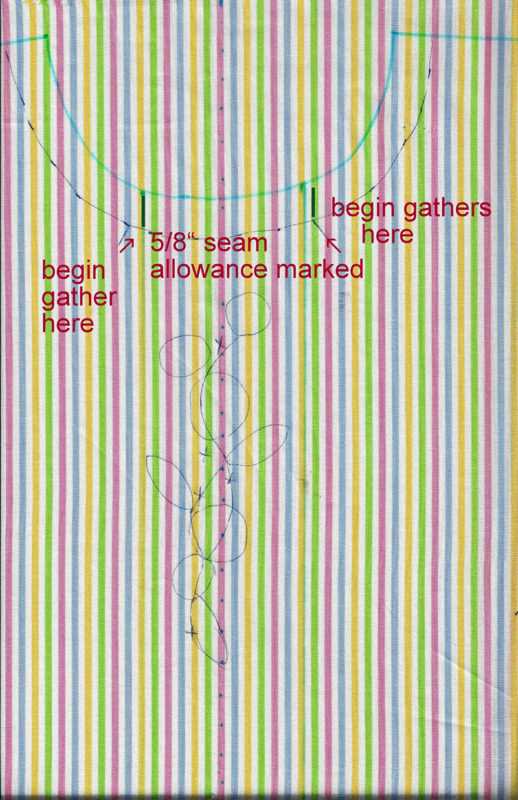
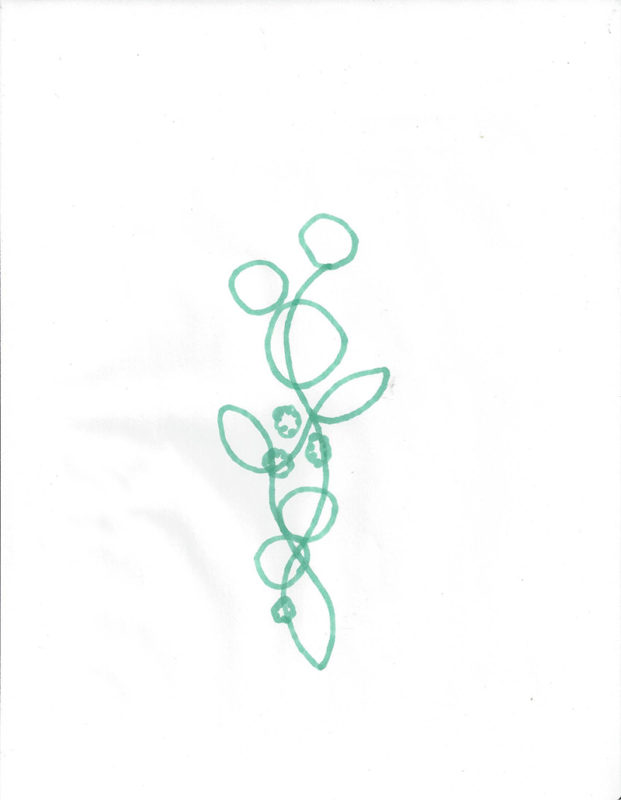
Applying Rick Rack Vine and Leaves
- Pin 3” strip of paper stabilizer under marked 2 ½” center area under design.
- Attach open toe foot and thread needle with monofilament thread.
- Straight stitch the rick rack along the path of the vine.
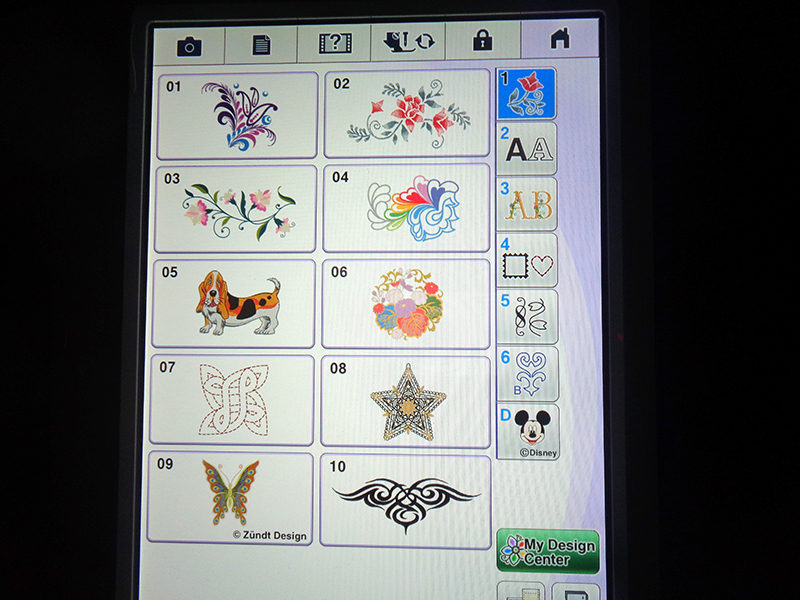
Making Yo-Yos on the Embroidery Machine
- Load the two yo-yo files into your machine. The files include two sizes, one like a quarter and one like a dime. The yo-yo sizes can be varied slightly by how tightly the yo-yos are drawn up.
- Select the quarter size design.
- Hoop fabric right side up with water soluble stabilizer on top in 4x4 frame.
- Attach frame. Stitch the quarter size yo-yo design.
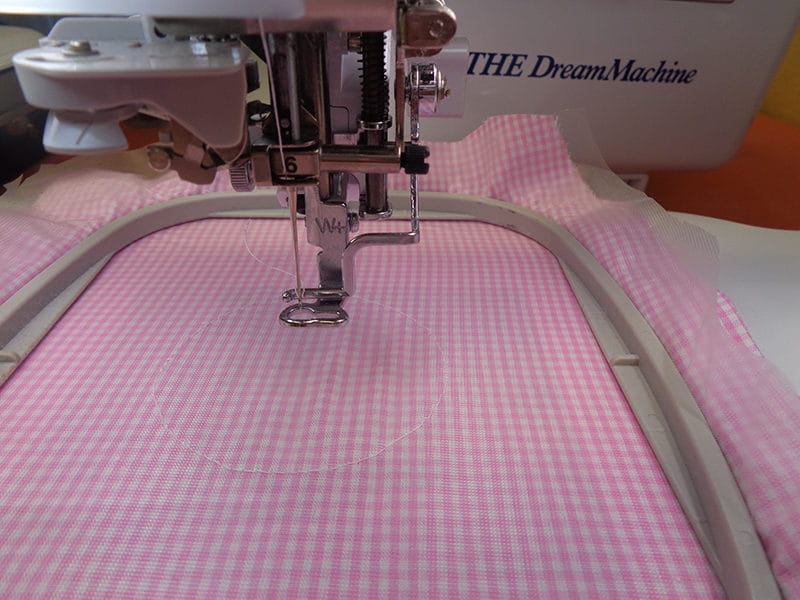
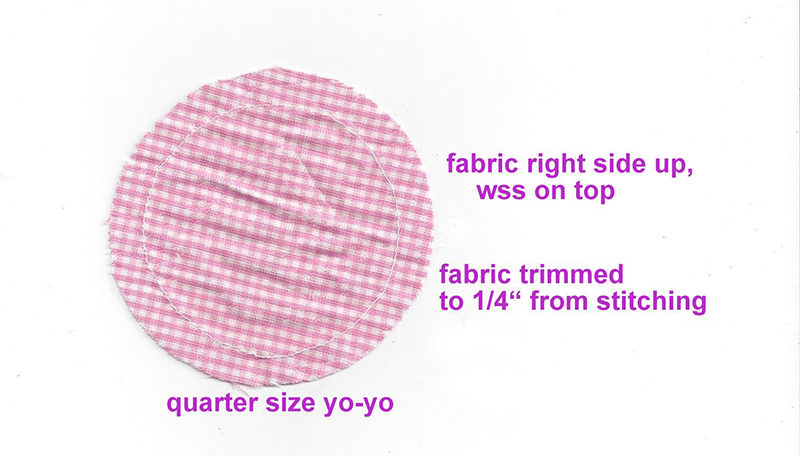
- Remove from frame and trim approximately ¼” from stitching line.
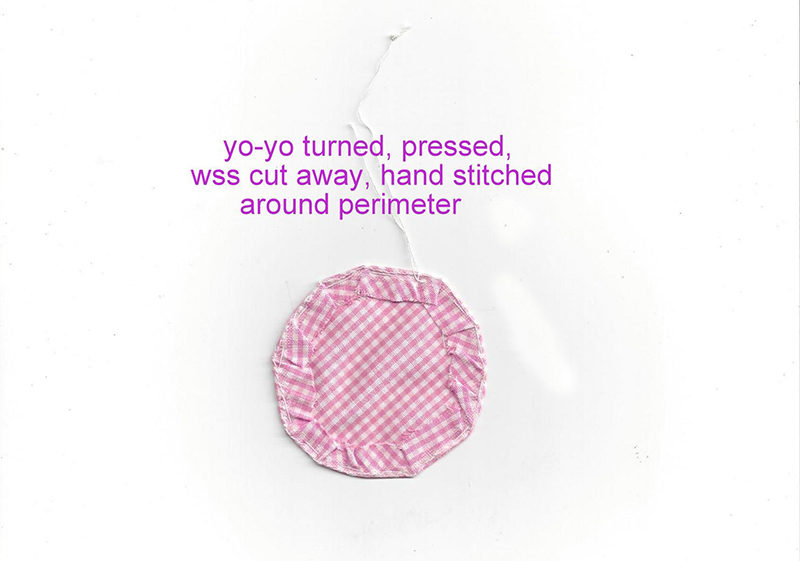
- Make a slit in the wss and gently turn the circle right side out, like turning a pillow.
- Use a point turner, your thumbnail or another tool to smooth out the edges. Press with fabric side up.
- Carefully cut away as much wss as possible. Thread a knotted 15-18” length of quilting or other sturdy thread in hand-sewing needle. Beginning at the inside of the circle and leaving a generous tail, take even stitches around the perimeter, close to the edge, approximately ¼”-3/8” apart. End last stitch on inside of circle.
- Pull both thread-ends together, drawing the circle into a yo-yo. Use your thumbnail to tuck the raw edges to the inside. Knot the two ends together, but leave thread ends long. Later they will be useful.

- Manipulate yo-yo so drawn-up center is centered.
- Repeat with different fabrics for second quarter size yo-yo. Set yo-yos aside.
- Attach 4x4 from and open quarter size yo-yo file. Follow same procedure as with dime size yo-yos.
Note: To make yo-yos of different sizes, open the shapes menu on the opening screen.
- Select the single straight stitch circle #10.
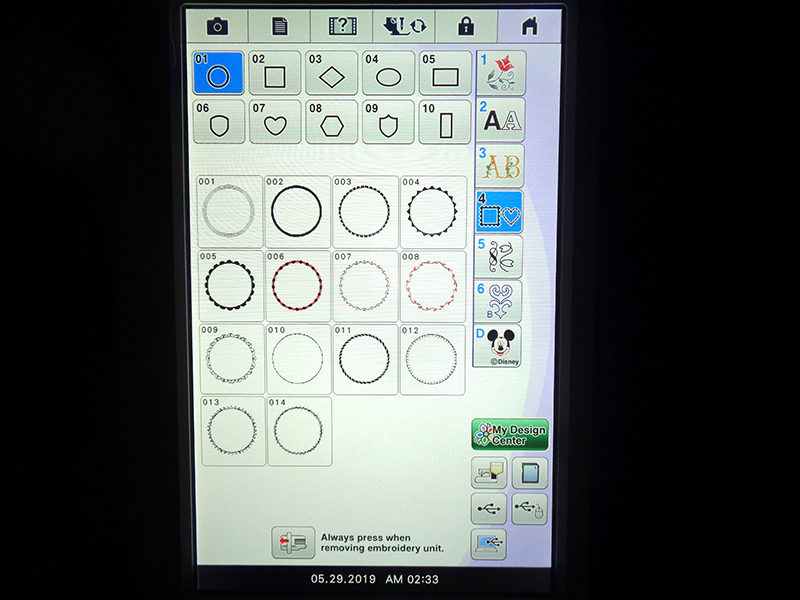
- Open embroidery screen offers option to resize.
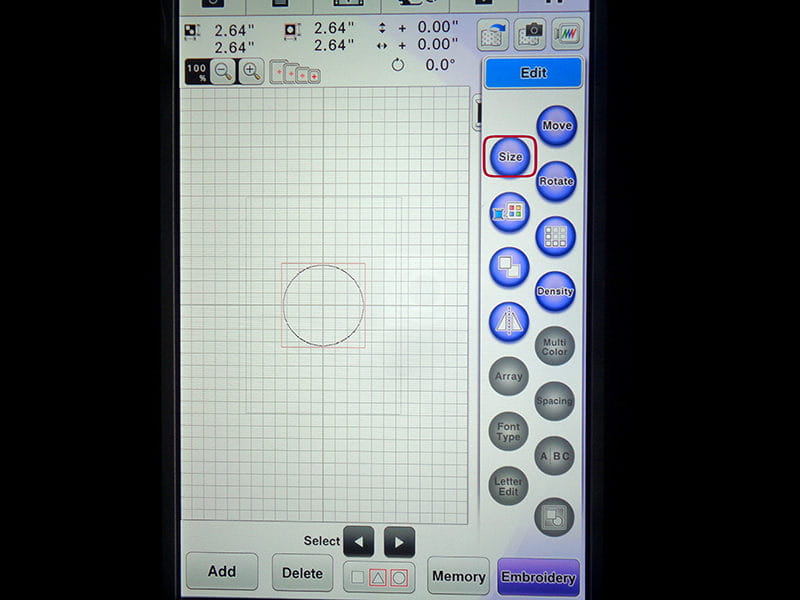
- Make the circle your desired size, save it and proceed as with the downloadable files.
Making Yo-Yos by Sewing Machine
- Make yo-yos with sewing machine. The files include two sizes, one like a quarter and one like a dime. The yo-yo sizes can be varied slightly by how tightly the yo-yos are drawn up.
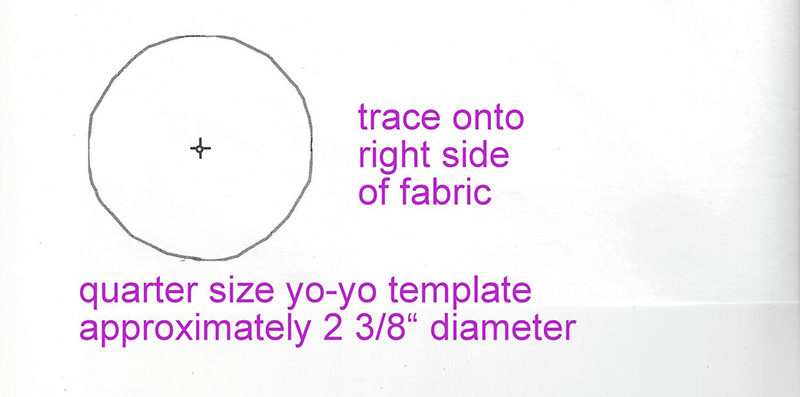
- Trace the quarter size circle (approx. 2 3/8”) template onto the right side of the fabric.
- Place wss over marked side and place tissue paper weight stabilizer under fabric to prevent puckering. Pin around the perimeter.
- Stitch directly on the marked line around the circle.
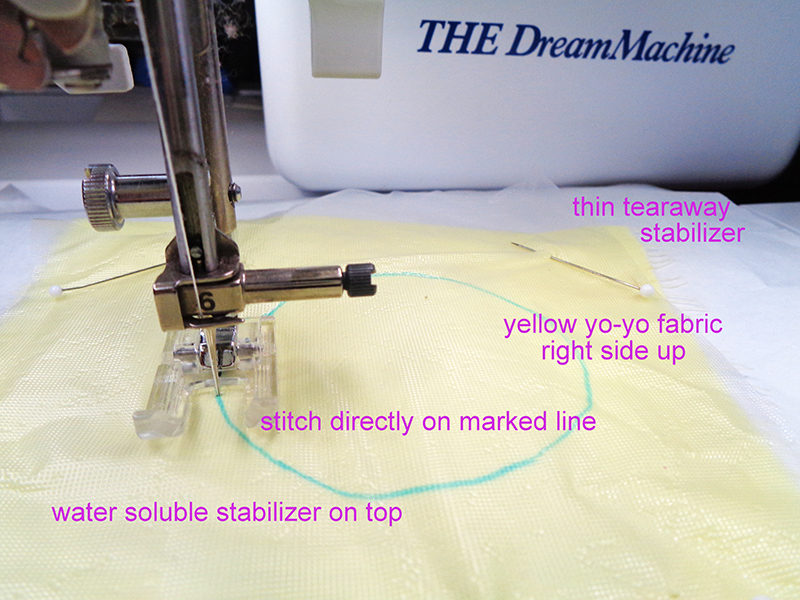
- Remove the tearaway stabilizer and cut excess fabric ¼” from stitching line.
- Follow steps 12-16 above.
- Trace the dime size circle (1 ¾” diameter)) in the same manner and make those yo-yos.

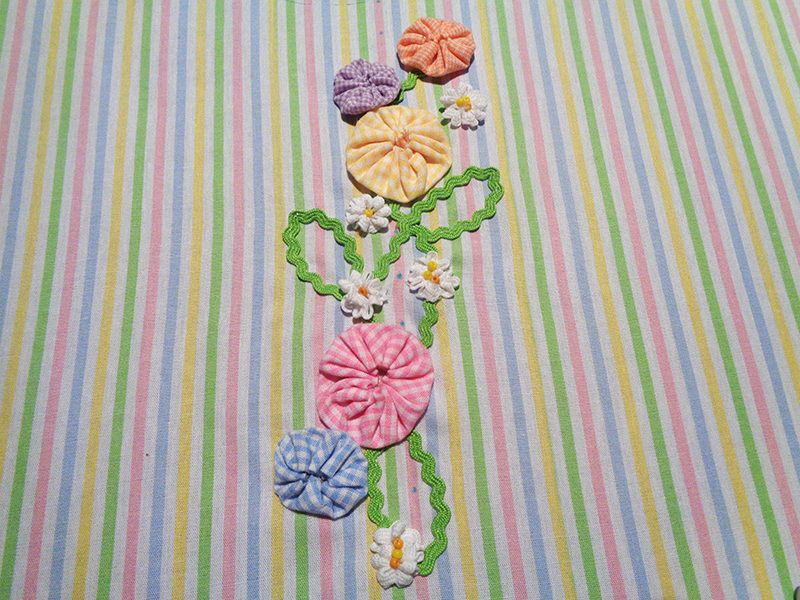
Creating Yo-Yo Design
- Straight stitch baby rick rack with open toe foot along design lines.
- Attach yo-yos. Take those long yo-yo tails to the back and knot.
Note: I found it helpful to place drawn design in a hand embroidery hoop. This helped prevent puckering as the yo-yo’s and then the rick rack flowers were attached to the dress front.
- Cut one short. Use the other to attach yo-yo, stitching through the center and catching several of the lower folds of the yo-yos. making it securely attached to the dress front.
Making Rick Rack Flowers
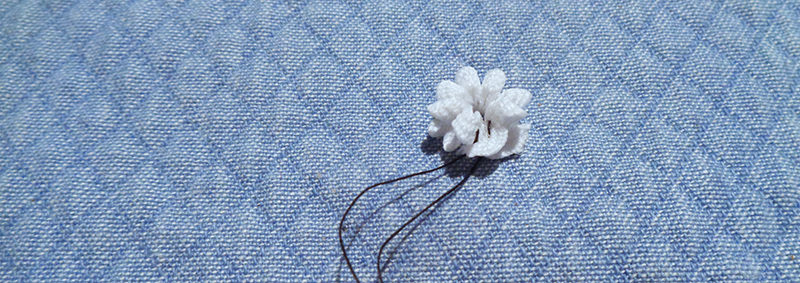
I’ve seen these made perfectly with bay rick rack, but I surely don’t have the knack. Still, even with their imperfections, I think the white flowers add a nice texture a break from all the pastels. So, here’s how I went about it. Cut one end of rick rack and apply fray block. Allow to dry. Thread needle with knotted, sturdy polyester thread.- Begin by inserting needle DOWN into the very top of the first peak and then bring it up under the next peak, over and under. Continue for 2-3”, still leaving rick rack uncut. Bring needle up through the last peak.

- Pull both ends of thread to draw up rick rack. Take care to prevent rick rack from twisting.
- Decide if you are satisfied with the result or if you need more or fewer petals. When you have enough, end with your needle going UP into the last peak.
Note: This shows 14 peaks—too many. In the end, 5 peaks were removed.
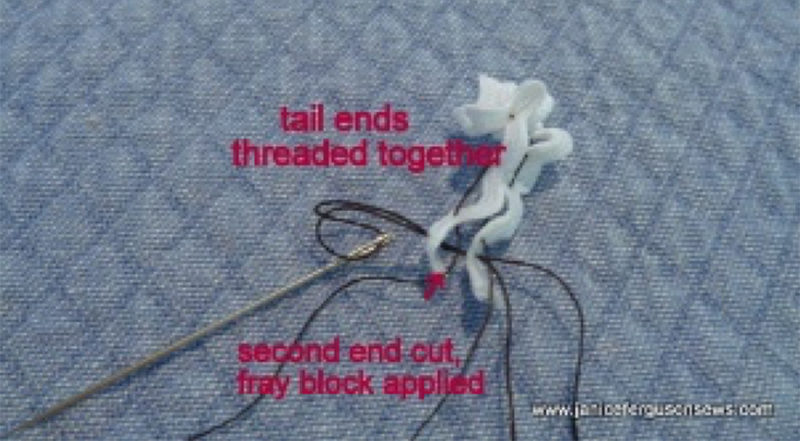
- Cut rick rack and apply fray block to cut end. Allow to dry.
- Draw up rick rack, taking care again to prevent rick rack from twisting. Bring threaded needle down near bottom of first “valley” and back up through the last alley. This joins the rick rack into the circle needed to create the flower.
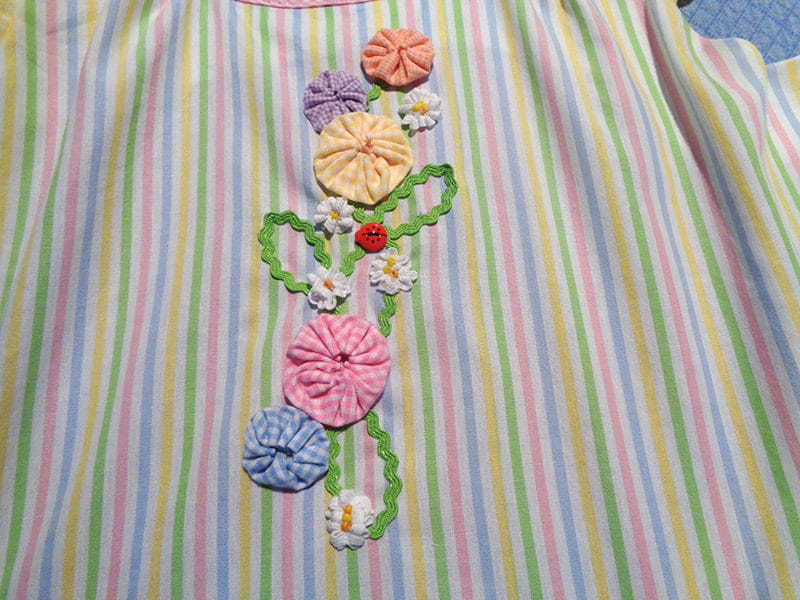
- Knot tightly, leaving a long thread tail. Snip off shorter tail and use longer tail to tuck ends under flower. Securely attach yo-yo to dress front over marked X’s.
- Thread a beading or very fine hand-sewing needle with fine cotton or monofilament thread. It must be fine enough to go through the seed bead while threaded. Stitch 1-3 yellow seed beads in the center of each flower.
Note: You could add the ladybug button now, but I just plain forgot.
Constructing Dress
- Cut out the dress front and back from striped fabric and the facings. I chose to cut the facings from white fabric as the stripes shadowed through.
Note: With fabric like this woven stripe, without a right or wrong side, it is helpful to use painter’s tape on the chosen right side of the fabric as you cut it out.
- Apply scrap pieces of fusible interfacing where indicated on pattern.
- Clean finish raw bottom edge of facings with serger or overcast stitch.
- Cut the “sleeves” from yellow gingham.
- Fold sleeves on fold lines, wrong sides and raw edges together. Gather, along curved edge as per pattern instructions.
- Seam the dress front to each back at the shoulder. Do the same with the facing. Trim seams and press open.
- Join the sleeves to the bodice.
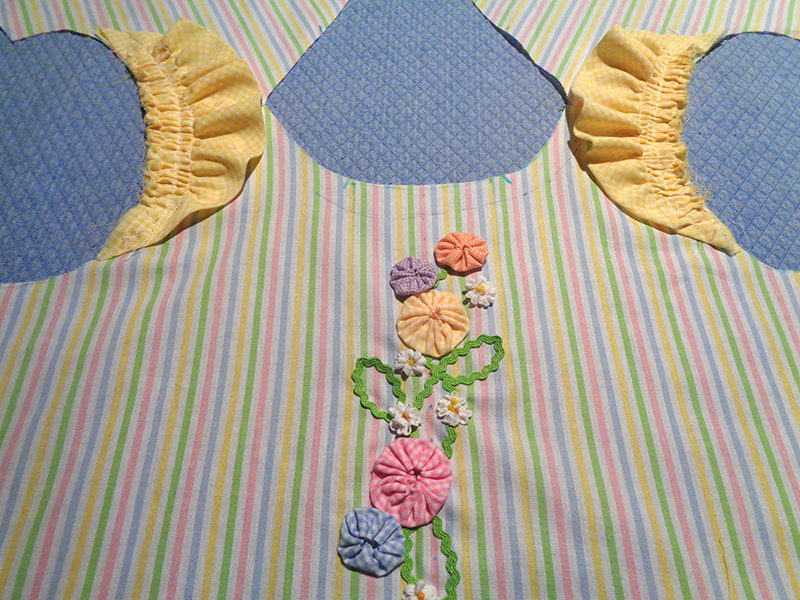
- Run gathering threads on each side of the yo-yo embellishment area. Begin ¼” from that area ending ¾” from the shoulder seam.
- Pin facing to the dress, right sides together at the armholes, over the sleeves. Match shoulder seams and notches, keeping underarm edges even. Stitch armholes, trim and clip seam allowances.
- Turn facing to wrong side and press.
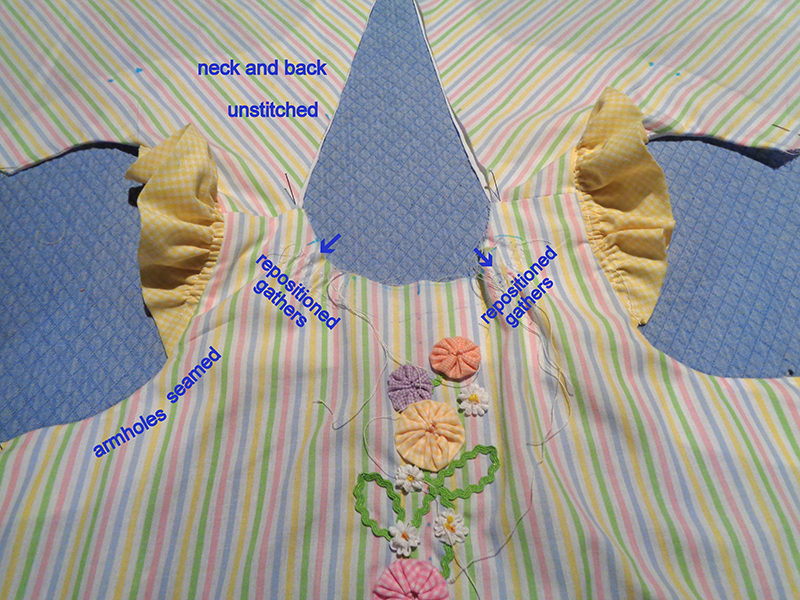
- Pin facing to dress, wrong sides together at back edges and neckline. Draw up gathers evenly on each side until the neckline matches the cutout front facing. Clip curves.
- Sew from hemline, across neckline and back down opposite side to hemline.
- Stitch side seams, beginning with facing and sewing to hemline.
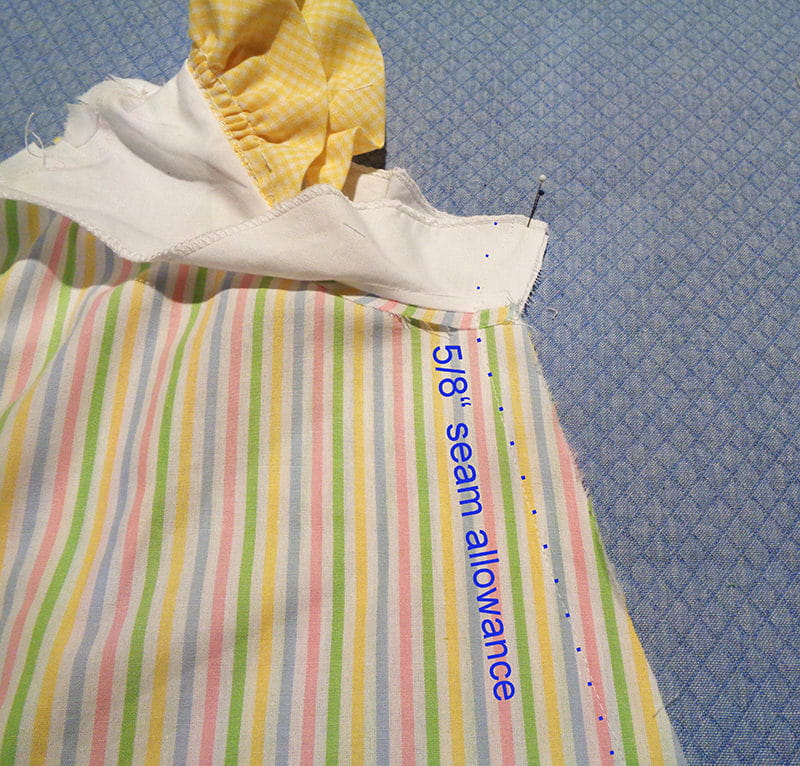
- Clean finish side seams with serger, zig zag or overcast. The Brother Side Cutter foot,
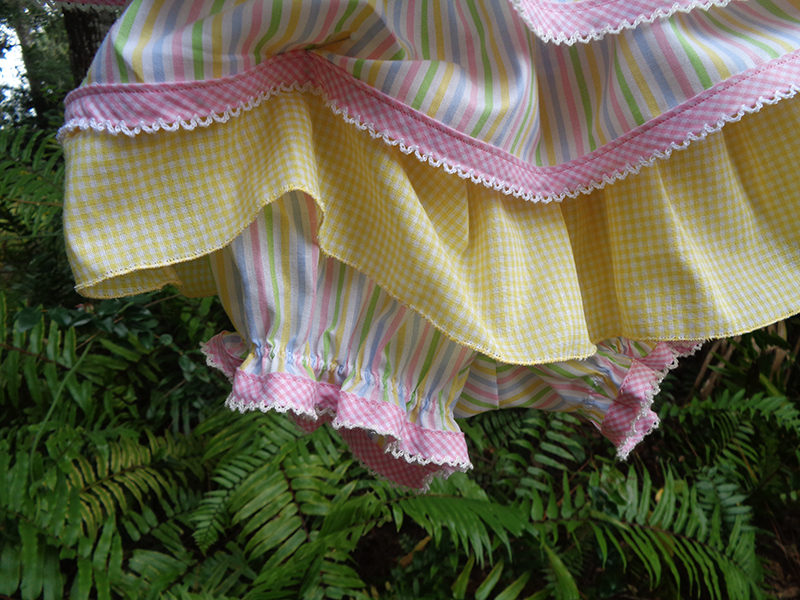
is a wonderful tool for quick jobs like this. It is like a mini serger and works beautifully. - Apply bias binding to hemline. The picot edged gingham bias used here will accommodate only a 3/8” fabric inserted. Reduce seam allowance from 5/8” to 3/8”.
- Trim the bias even with the edge of the back. Fold the facing to the inside and include it in the binding. The hemline and other edges to be bound were trimmed to that width.
- Apply binding to the remaining raw edges, along the back, around the neckline and then back down to the hemline.
- Press facing along striped seamlines. At underarm seam, stitch in the ditch with Stitch in the Ditch Foot (SA191)
or Edge Joining Foot (SA184)
This will secure the facing in place. Use of monofilament thread makes this stitching invisible. - Stitch buttonholes where indicated. Sew 5/8” buttons in place.
- Sew tiny ladybug button somewhere along the vine.
Constructing Bloomers
Note: It is helpful to mark each cut-out fabric piece with the pattern piece number. Use a washaway or heat erasable marker. Also mark the top or bottom where indicated. So many of the pieces look very much alike and proper direction in placement is important.
- Cut out pattern pieces as directed.
- Follow instructions carefully but take care to reduce the size of the seam allowance on the striped ruffle. This allows accommodation of the picot bias.
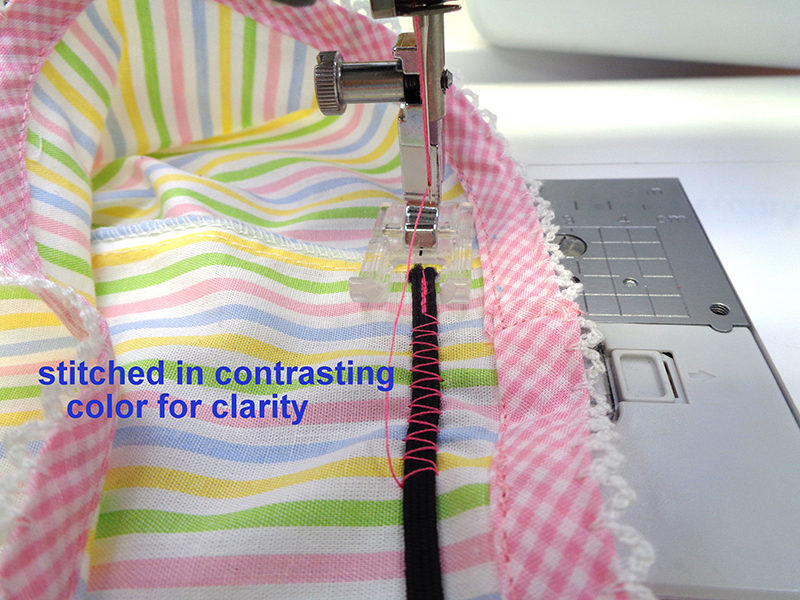
Optional: Reduce the yellow gingham ruffle hem allowance to ¼”. Use a roll-and-whip technique to the edge rather than the folded over hem. This is simply a zig zag (L. 1.5 W 4.0”) with fine needle (#60-70) and fine thread (DMC 50/2, Mettler 60/2 or Madeira Cotona 80/2). This rolls the edge of the fabric, rendering a clean, light finish without the bulk of the 5/8” folded over hem.Try this technique for the leg opening after seaming. a. Bind the raw edge with gingham picot bias. b. Attach open toe foot and place it so the edge of the foot touches the picot bias. c. Straight stitch 1/4 - 1/2" through the 1/8" elastic, MARKED, not cut, to the required measurement as indicated in the pattern. For the XXL, the length is 10.5”. d. Reverse, and straight stitch again for ½”. Leave needle in elastic. e. Select zig zag stitch 1-09 from the utility menu, pg. 1, with settings of L. 2.0 and W 4.5. f. Hold elastic up between the toes of the foot—not under the foot—and zig zag over the elastic.
 g. About half way along the hemline, pull elastic up so the marked length will reach to the opposite end of the leg opening.
h. ½” from the end of the leg opening, repeat the straight stitch as at the beginning.
i. Finally, cut the secured elastic and close the seam. Stretch the leg opening to distribute the elastic evenly. Repeat on second leg opening.
g. About half way along the hemline, pull elastic up so the marked length will reach to the opposite end of the leg opening.
h. ½” from the end of the leg opening, repeat the straight stitch as at the beginning.
i. Finally, cut the secured elastic and close the seam. Stretch the leg opening to distribute the elastic evenly. Repeat on second leg opening.
 Now the summer yo-yo frock is complete. Wouldn’t this be sweet on your special little one?
Related Projects
Stay Connected
* Required fields