Accessory Spotlight: Candlewicking Foot
The Brother Candlewicking foot, SA193
was designed to coordinate with unique candlewicking stitches included with select Brother machine models. These prominent stitches are best sewn with a special foot. The wide, open toe and deep groove in the bottom of the candlewicking presser foot helps the foot move smoothly over the thick stitches. See the top and bottom side of the foot in Figure #1.
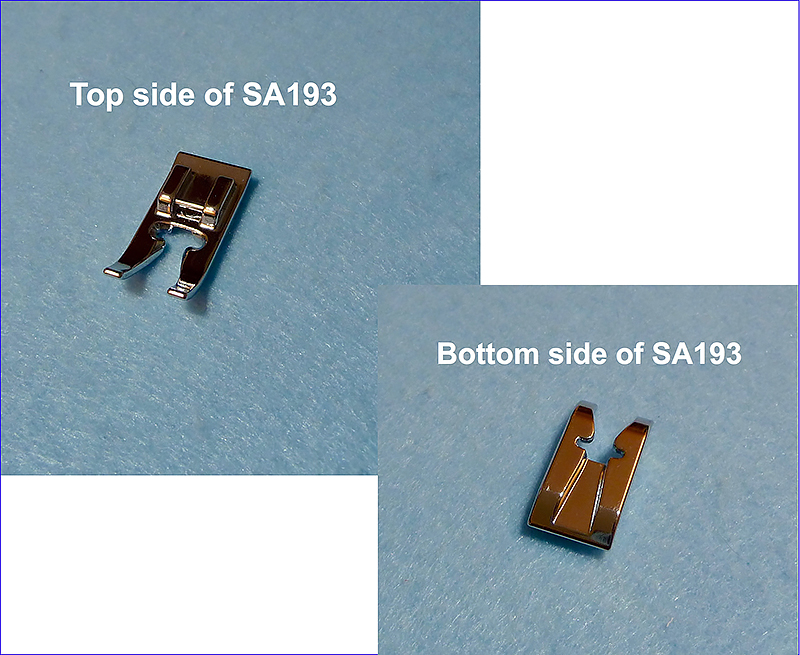 Figure #1
Below you’ll see what candlewicking stitches look like. You’ll find them in many different Brother machine models. Check your machine menu to see if any of these stitches are included in your decorative stitch menu. I like to think that these stitches resemble stars, flower buds, pearls, or even snowflakes! These raised stitches come in different sizes and configurations. See Figure #2 for an example of candlewicking stitches built-in to the Brother XP1 Luminaire.
Figure #1
Below you’ll see what candlewicking stitches look like. You’ll find them in many different Brother machine models. Check your machine menu to see if any of these stitches are included in your decorative stitch menu. I like to think that these stitches resemble stars, flower buds, pearls, or even snowflakes! These raised stitches come in different sizes and configurations. See Figure #2 for an example of candlewicking stitches built-in to the Brother XP1 Luminaire.
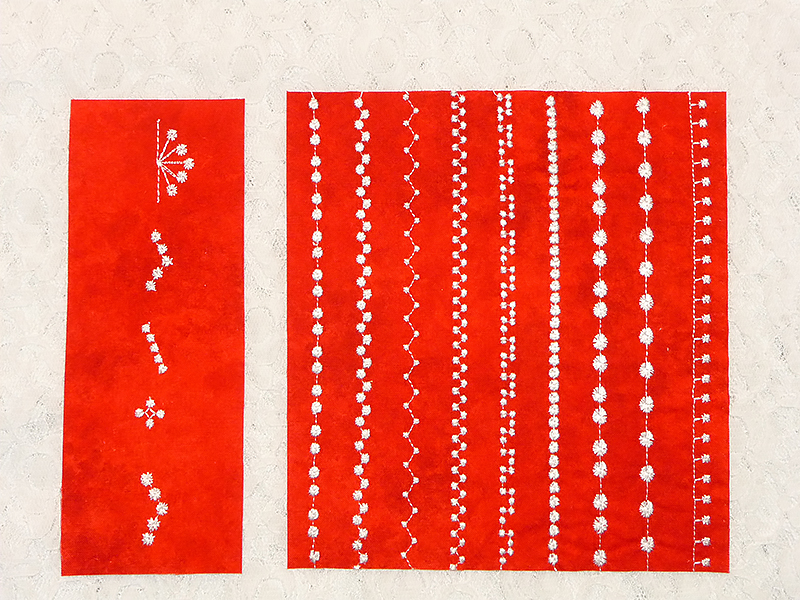 Figure #2
On the left is an example of Multi-Motion stitches that have been stitched in a single pattern. On the right is an example of 5mm to 7mm wide stitches sewn in a row.
See Figure #3 for an example of candlewicking stitches built-in to the Brother XJ1 Stellaire.
Figure #2
On the left is an example of Multi-Motion stitches that have been stitched in a single pattern. On the right is an example of 5mm to 7mm wide stitches sewn in a row.
See Figure #3 for an example of candlewicking stitches built-in to the Brother XJ1 Stellaire.
. 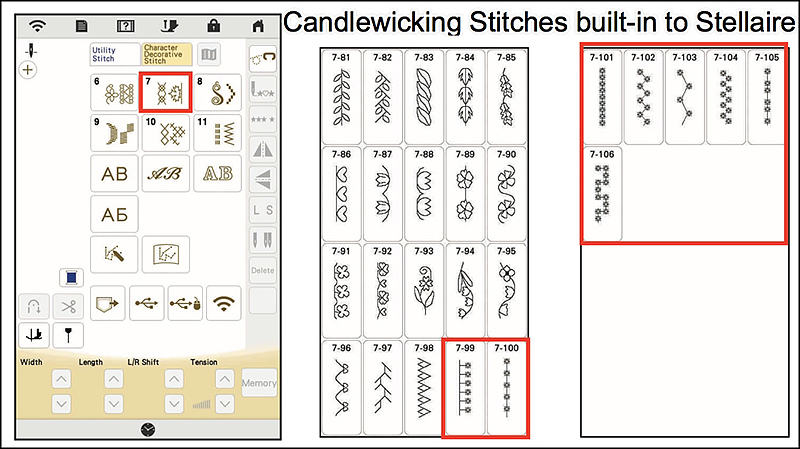 Figure #3[/caption]
If you don’t have candlewicking stitches in your menu, there is another option for Brother machines with the exclusive My Custom Stitch feature. You can create your own custom candlewicking stitch on any Brother machine with this capability. Let me show you how to create a delicate candlewicking stitch and then use it to sew a snowflake pattern on a block of fabric.
Begin by selecting the My Custom Stitch icon to design a custom stitch. This icon looks like a pencil with lines and dotted points. See Figure #4a.
[caption id="attachment_26493" align="aligncenter" width="800"]
Figure #3[/caption]
If you don’t have candlewicking stitches in your menu, there is another option for Brother machines with the exclusive My Custom Stitch feature. You can create your own custom candlewicking stitch on any Brother machine with this capability. Let me show you how to create a delicate candlewicking stitch and then use it to sew a snowflake pattern on a block of fabric.
Begin by selecting the My Custom Stitch icon to design a custom stitch. This icon looks like a pencil with lines and dotted points. See Figure #4a.
[caption id="attachment_26493" align="aligncenter" width="800"]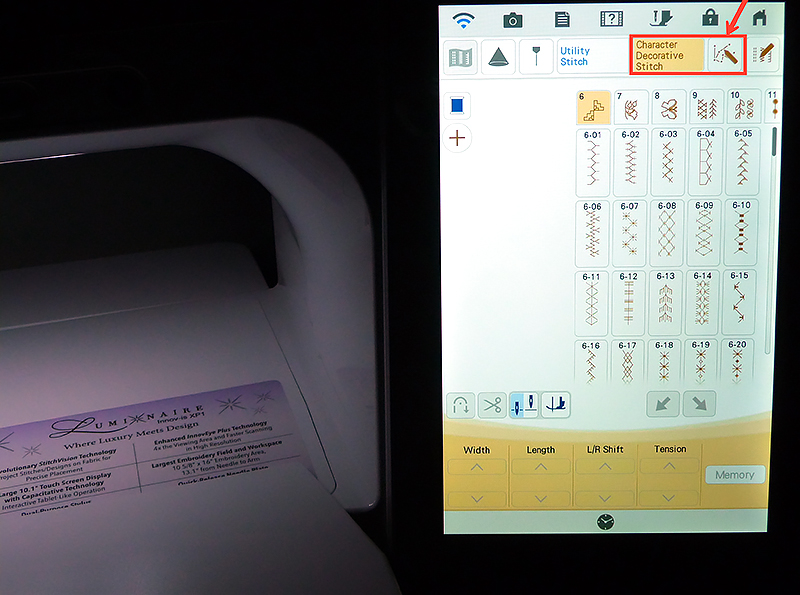 Figure #4a[/caption]
This key may look slightly different on various machines. Check your manual if you need help finding the key for My Custom Stitch.
The My Custom Stitch design screen varies on different machine models, but the process for creating a custom stitch is virtually the same. To form a stitch, you enter the vertical (arrows up and down) and horizontal (arrows side to side) coordinates to create a stitch. Use the arrow keys surrounding the SET button to change the numbers to match the vertical and horizontal number given in the chart for a specific stitch. See My Custom Stitch Design Screen in Figure #4b.
Figure #4a[/caption]
This key may look slightly different on various machines. Check your manual if you need help finding the key for My Custom Stitch.
The My Custom Stitch design screen varies on different machine models, but the process for creating a custom stitch is virtually the same. To form a stitch, you enter the vertical (arrows up and down) and horizontal (arrows side to side) coordinates to create a stitch. Use the arrow keys surrounding the SET button to change the numbers to match the vertical and horizontal number given in the chart for a specific stitch. See My Custom Stitch Design Screen in Figure #4b.
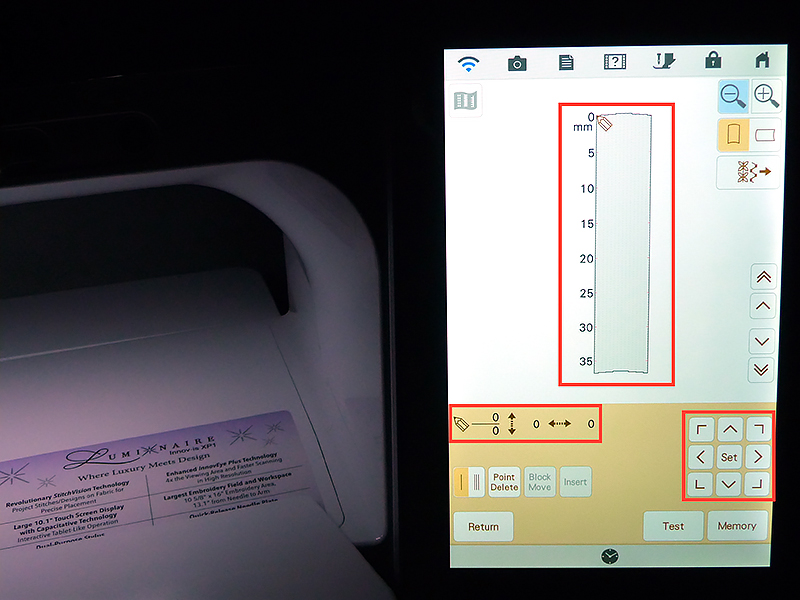 Figure #4b[/caption]
Remember, each time you enter a set of coordinates you need to touch SET in order to set the stitches. When you get to the end of the sequence, you will have formed one full stitch pattern. When finished, touch Test and try out the stitch. To save the stitch, touch the memory pocket and save to your desired location.
If you have never created a stitch using My Custom Stitch feature, know that it will take a little practice to master. You can play around with the design process just to get a feel for it before you create a “real” stitch. You may also want to look at a previous blog post where I showed how to create a simple Blanket Stitch using this process. Here is the link: http://blog.brothersews.com/sewing/my-custom-stitch-feature/
Figure #4b[/caption]
Remember, each time you enter a set of coordinates you need to touch SET in order to set the stitches. When you get to the end of the sequence, you will have formed one full stitch pattern. When finished, touch Test and try out the stitch. To save the stitch, touch the memory pocket and save to your desired location.
If you have never created a stitch using My Custom Stitch feature, know that it will take a little practice to master. You can play around with the design process just to get a feel for it before you create a “real” stitch. You may also want to look at a previous blog post where I showed how to create a simple Blanket Stitch using this process. Here is the link: http://blog.brothersews.com/sewing/my-custom-stitch-feature/
Are you ready to create a custom candlewicking stitch? Begin by copying or printing the chart shown below in Figure #5.
 Figure #5
Sit in front of the machine and program the vertical and horizontal coordinates to create the stitch, concentrating on one set of numbers at a time. There are 19 steps needed to form the custom candlewicking stitch featured in these instructions. Looking at the chart, you’ll see that the horizontal number does not always change. Follow the chart, checking off each step as you go. Tip: It’s easy to delete points and start over if you make an error. Be sure to test the stitch pattern when you finish.
For reference, Figure #6a shows the first set of stitch coordinates and Figure #6b shows the last set of stitch coordinates. Look at the chart and you’ll see that these match the numbered steps.
Figure #5
Sit in front of the machine and program the vertical and horizontal coordinates to create the stitch, concentrating on one set of numbers at a time. There are 19 steps needed to form the custom candlewicking stitch featured in these instructions. Looking at the chart, you’ll see that the horizontal number does not always change. Follow the chart, checking off each step as you go. Tip: It’s easy to delete points and start over if you make an error. Be sure to test the stitch pattern when you finish.
For reference, Figure #6a shows the first set of stitch coordinates and Figure #6b shows the last set of stitch coordinates. Look at the chart and you’ll see that these match the numbered steps.
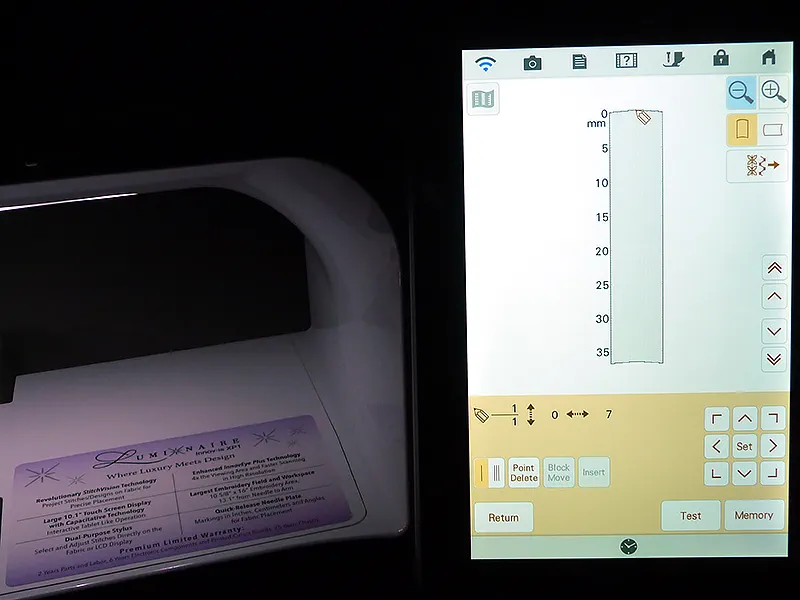 Figure #6a
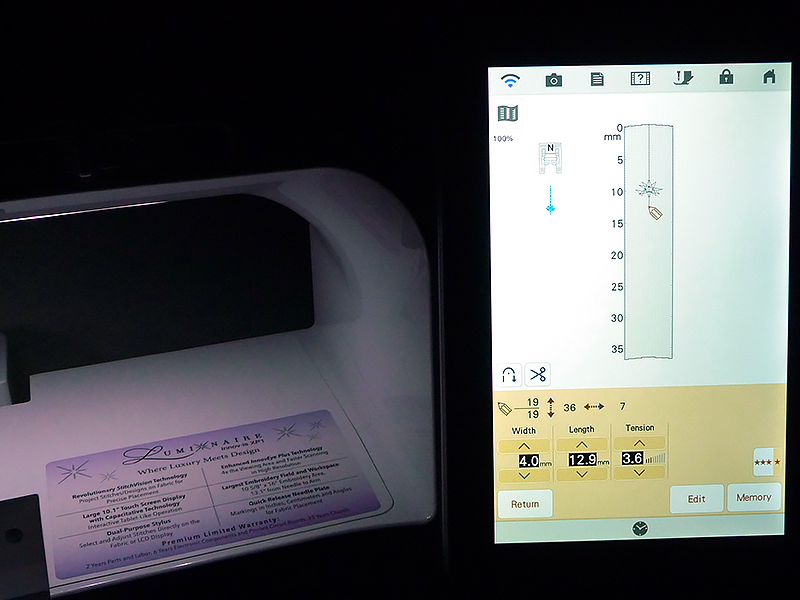 Figure #6b
Figure #7 shows the completed stitch selected to sew as a continuous row.
Figure #6b
Figure #7 shows the completed stitch selected to sew as a continuous row.
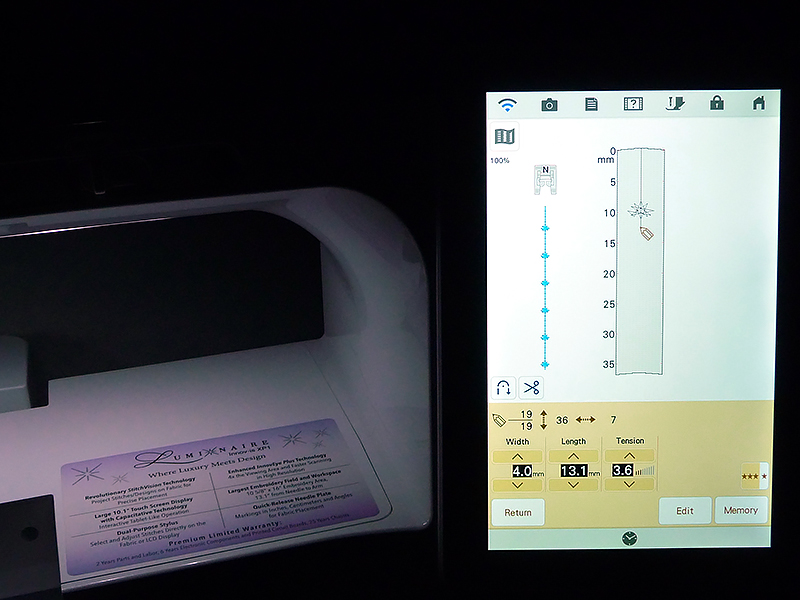 Figure #7
Create a pretty snowflake block using this stitch as follows:
Figure #7
Create a pretty snowflake block using this stitch as follows:
- Mark lines on fabric as shown in the enhanced photo in Figure #8.
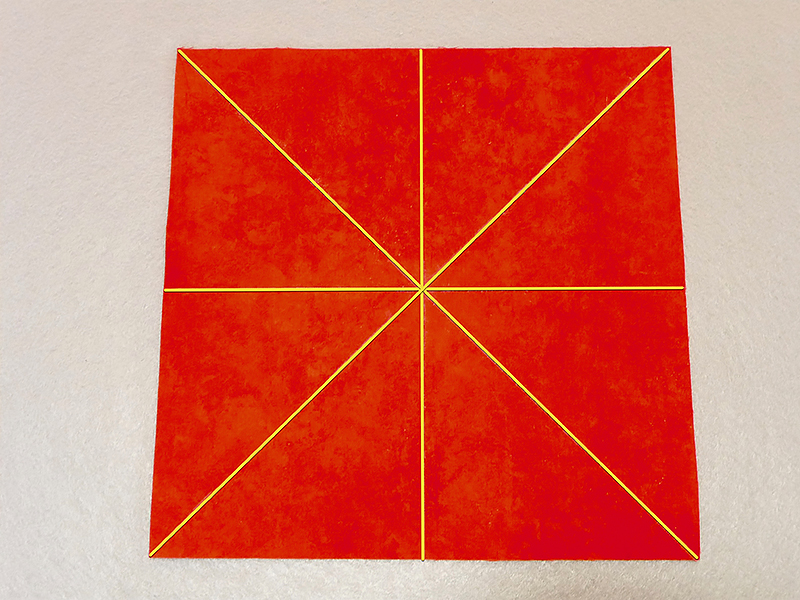 Figure #8
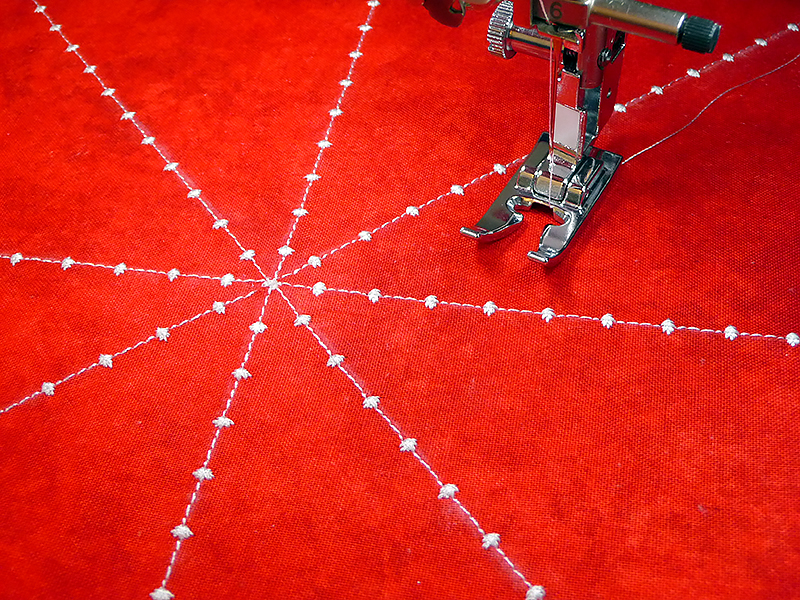
- Beginning at the center, sew along each marked line, tying off stitches at the beginning of each line. Tip: Use the guideline marker feature to help line up your stitching if you have this option. See Figure #9.
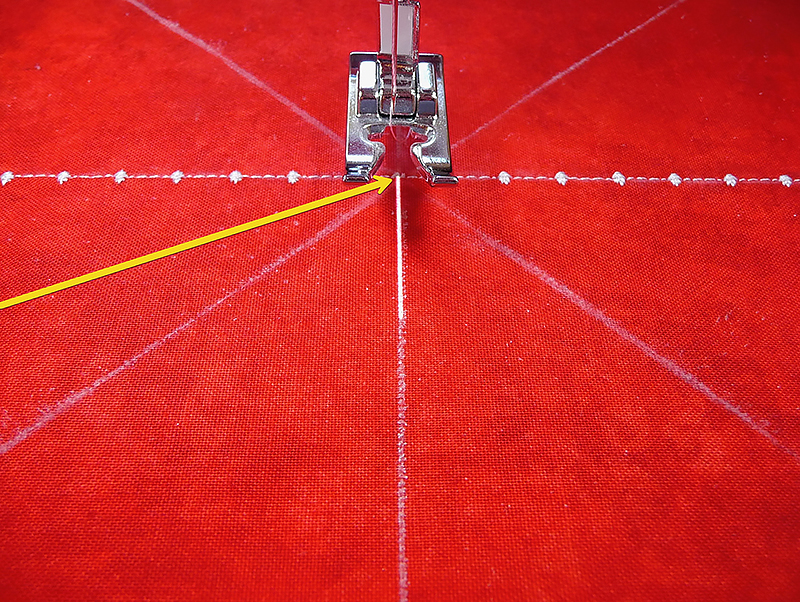 Figure #9
Stitching all crisscrossed lines creates a pretty snowflake block! Use this idea to decorate quilt blocks, trivets, coasters, table runners, pillows, and more! See finished block in Figure #10.
Figure #9
Stitching all crisscrossed lines creates a pretty snowflake block! Use this idea to decorate quilt blocks, trivets, coasters, table runners, pillows, and more! See finished block in Figure #10.
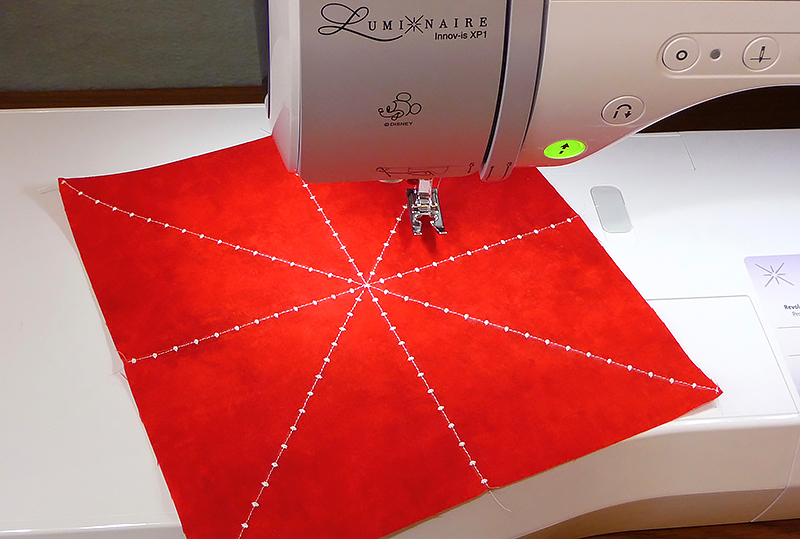 Figure #10
Here are some tips to remember when sewing candlewicking stitches with the candlewicking foot:
Figure #10
Here are some tips to remember when sewing candlewicking stitches with the candlewicking foot:
- Stabilize fabric well. This is a bulky, dense stitch. Stabilizing options include adding fusible interfacing, batting, or tear-away stabilizer to your fabric to keep it smooth. For another alternative, consider stiffening fabric with liquid stabilizer.
- Always test a piece of the same fabric with the exact stabilizers you plan to use and then adjust as necessary.
- Sew slowly. There is a lot of movement in this stitch.
- Stitches may look odd on screen. Test it out on fabric to get a true picture of the stitch.
- Use the following link to see the manual for the candlewicking foot and watch a Brothersews video demonstrating this foot in action: https://support.brother.com/g/b/faqend.aspx?c=us&lang=en&prod=hf_nx650qeus&faqid=faqh00100004_000
 CLICK HERE FOR PDF!
Tags
Shop this Project
When inspiration strikes, Brother has you covered! The products in this stylish project are available for purchase so you can click, shop, and get to sewing!
Related Projects
Stay Connected
* Required fields