Accessory Spotlight: Embroidery Template with Snowman Marker
Brother Sews Ambassador
There are many different ways to achieve perfect placement for embroidery projects. One of my favorite tried and true methods involves using templates printed from PE-DESIGN software
with the special Snowman embroidery positioning marker added to the center point of the design. Since a template represents the actual life-size image of a design, I can easily print one or more to preview the design, placing it on the fabric at the precise location for embroidery. The option to print the Snowman marker makes the template even more useful. The unique Snowman positioning marker combined with Brother InnovEye technology on select Brother models makes my embroidery life easier, faster, and more fun. Note: I used the Brother Luminaire
to create the samples shown in this tutorial.
Let me show you how I printed this specialized template and used it on my recent embroidered chair cushion cover
project. 1. Begin with your design opened in the PE-DESIGN software. Note that I am using PE-DESIGN version 11.
If you have a different software version and the Snowman is an option for printing in your software, you’ll see the choice for printing in the print setup window. Your machine must also have the capability to scan and detect the snowman to use the method shown here: Modify your design as desired, changing colors, mirror imaging the motif, etc. You want your design to look exactly as you want it to appear on your project. Be sure to save the design with a new name and transfer it to the machine in its modified state. You can also choose to mirror image the design right at the machine, so it matches your printed template. I printed two templates for placement. One template shows the design exactly as it was downloaded from iBroidery.com. The second template is a horizontally mirrored copy. See Figure #1. [caption id="attachment_26267" align="aligncenter" width="800"]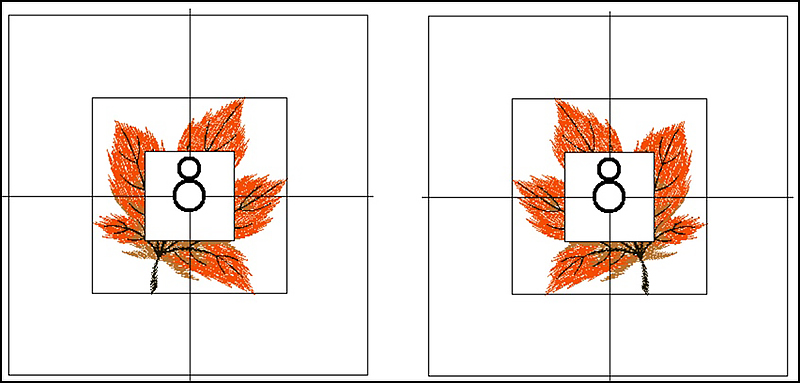 Figure #1[/caption]
2. Here are the steps for printing a template with the Snowman and stitching the design using Brother InnovEye technology:
Click on the PE Design icon and select Print Setup. See Figure #2.
[caption id="attachment_26268" align="aligncenter" width="800"]
Figure #1[/caption]
2. Here are the steps for printing a template with the Snowman and stitching the design using Brother InnovEye technology:
Click on the PE Design icon and select Print Setup. See Figure #2.
[caption id="attachment_26268" align="aligncenter" width="800"]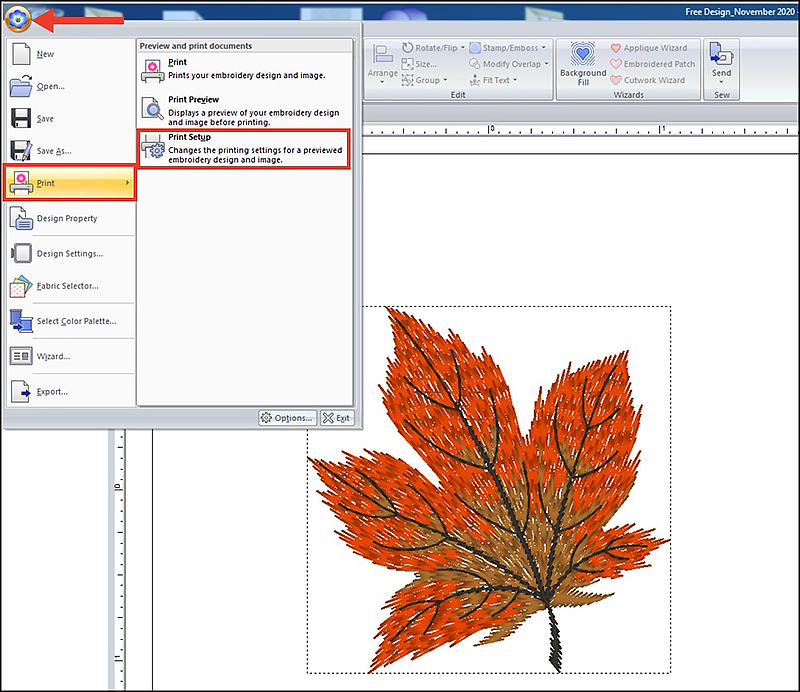 Figure #2[/caption]
Choose the settings shown below, printing the template at actual size, normal stitch image, and checking the box for print sewing area box and center axis. Be sure to select the Snowman Marker option. Select Print Preview. See Figure #3.
[caption id="attachment_26346" align="aligncenter" width="800"]
Figure #2[/caption]
Choose the settings shown below, printing the template at actual size, normal stitch image, and checking the box for print sewing area box and center axis. Be sure to select the Snowman Marker option. Select Print Preview. See Figure #3.
[caption id="attachment_26346" align="aligncenter" width="800"]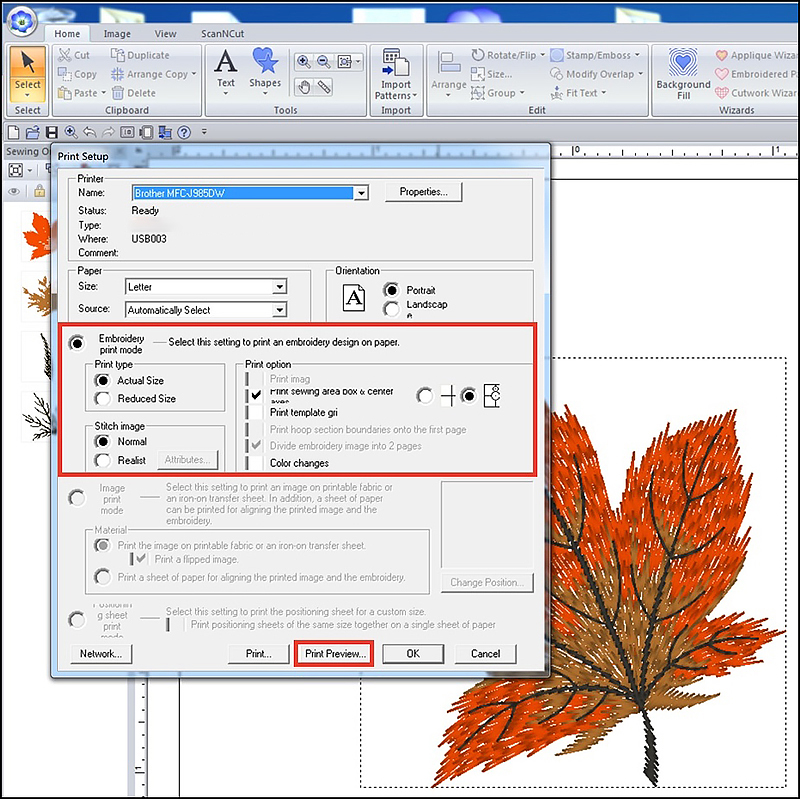 Figure #3[/caption]
Make sure your printer is connected and ready to go, then select print. See Figure #4.
[caption id="attachment_26270" align="aligncenter" width="800"]
Figure #3[/caption]
Make sure your printer is connected and ready to go, then select print. See Figure #4.
[caption id="attachment_26270" align="aligncenter" width="800"]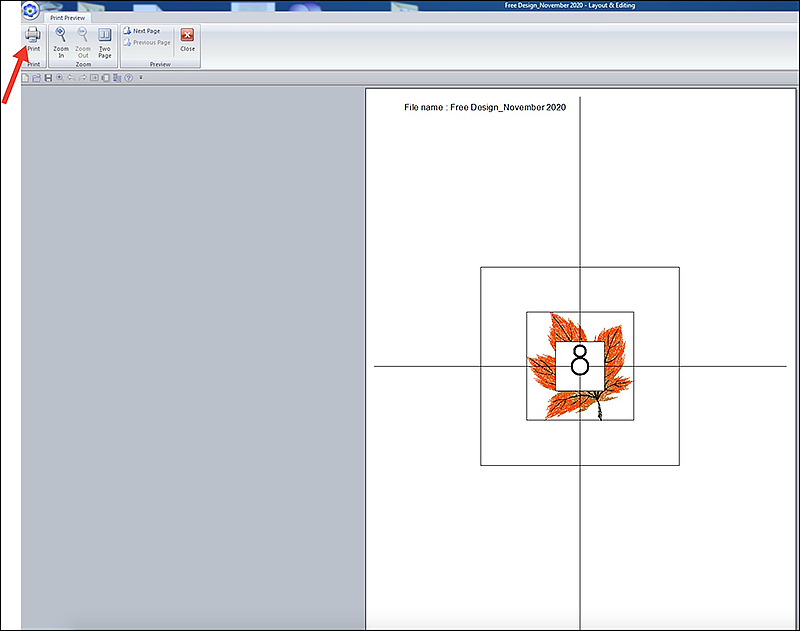 Figure #4[/caption]
I usually print the first page with just the template, eliminating the color change information. See Figure #5. Printer settings and options vary but I usually print the template with the grey scale option on my color printer.
[caption id="attachment_26343" align="aligncenter" width="800"]
Figure #4[/caption]
I usually print the first page with just the template, eliminating the color change information. See Figure #5. Printer settings and options vary but I usually print the template with the grey scale option on my color printer.
[caption id="attachment_26343" align="aligncenter" width="800"] Figure #5[/caption]
3. Use low tack tape to secure the paper template to fabric, placing it in the exact position you want the design to stitch. Hoop the piece in the approximate center of the hoop. Note that your hooping does not need to be perfect. The machine will adjust for any tilted or uneven hooping and target the design to match the precise position on the template. See Figure #6.
[caption id="attachment_26272" align="aligncenter" width="800"]
Figure #5[/caption]
3. Use low tack tape to secure the paper template to fabric, placing it in the exact position you want the design to stitch. Hoop the piece in the approximate center of the hoop. Note that your hooping does not need to be perfect. The machine will adjust for any tilted or uneven hooping and target the design to match the precise position on the template. See Figure #6.
[caption id="attachment_26272" align="aligncenter" width="800"]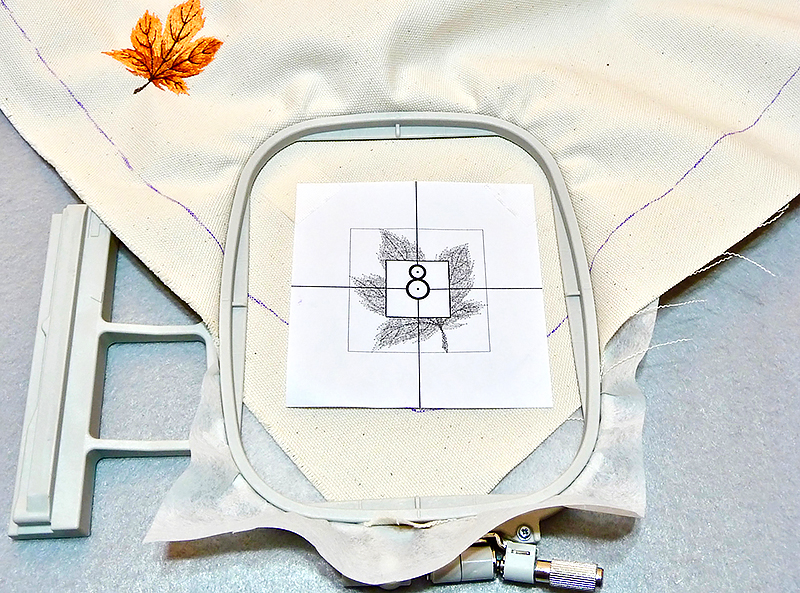 Figure #6[/caption]
4. Place hoop on machine, set the design and then continue to embroidery screen. See Figure #7.
[caption id="attachment_26273" align="aligncenter" width="800"]
Figure #6[/caption]
4. Place hoop on machine, set the design and then continue to embroidery screen. See Figure #7.
[caption id="attachment_26273" align="aligncenter" width="800"]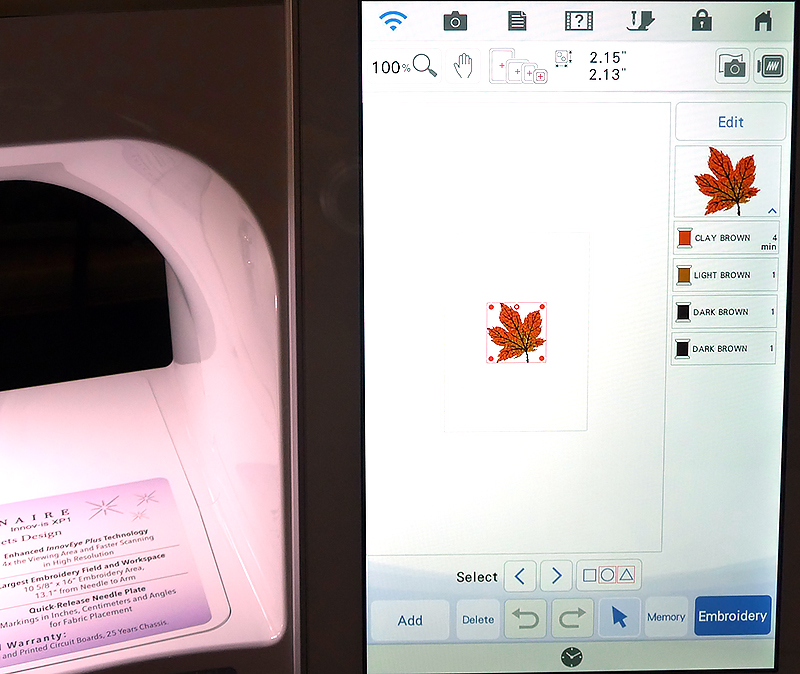 Figure #7[/caption]
Touch Layout and then touch the Snowman icon. You want to make sure you don’t rotate the design or move it. The machine needs to work with the design in its original position. Touch OK. See Figure #8.
[caption id="attachment_26274" align="aligncenter" width="800"]
Figure #7[/caption]
Touch Layout and then touch the Snowman icon. You want to make sure you don’t rotate the design or move it. The machine needs to work with the design in its original position. Touch OK. See Figure #8.
[caption id="attachment_26274" align="aligncenter" width="800"]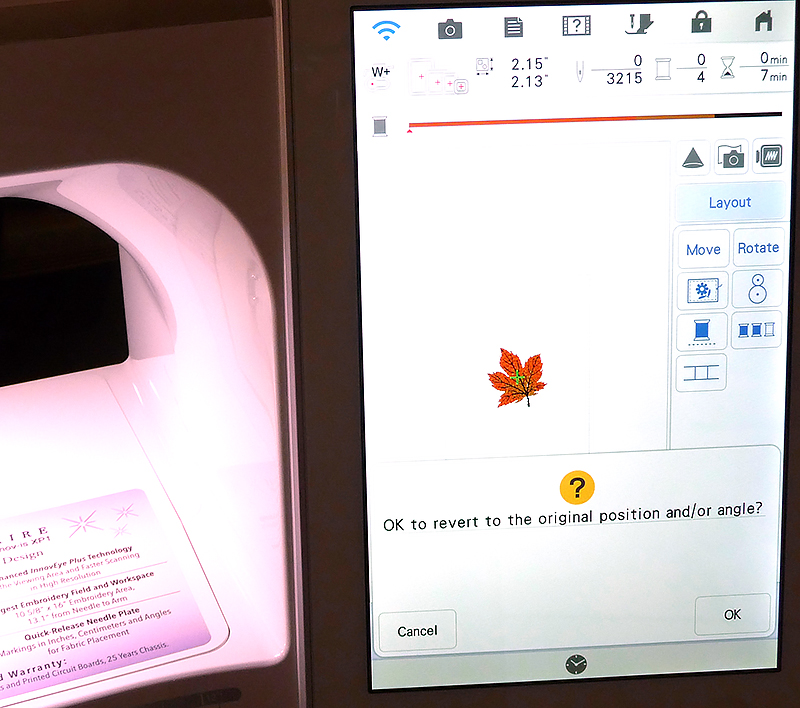 Figure #8[/caption]
There are multiple options for scanning. In this example I want to scan from the default center position. Touch Scan. See Figure #9.
[caption id="attachment_26275" align="aligncenter" width="800"]
Figure #8[/caption]
There are multiple options for scanning. In this example I want to scan from the default center position. Touch Scan. See Figure #9.
[caption id="attachment_26275" align="aligncenter" width="800"]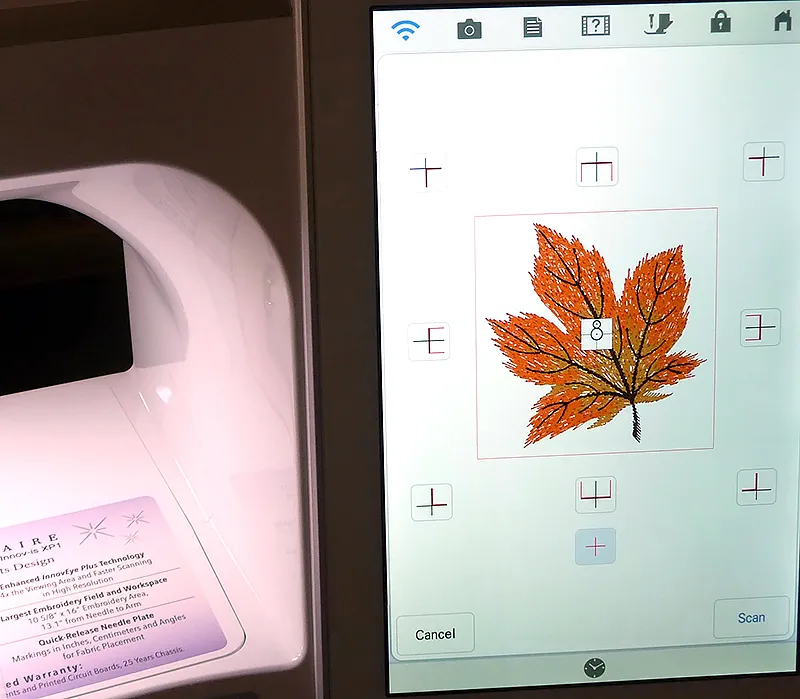 Figure #9[/caption]
The machine will scan the template and move the hoop until the needle points to the direct center. Then the machine will kindly ask you to remove the marker. Touch the image of the embroidery arm to make it easier to remove the template and then press OK to stitch the design. See Figure #10.
[caption id="attachment_26307" align="aligncenter" width="800"]
Figure #9[/caption]
The machine will scan the template and move the hoop until the needle points to the direct center. Then the machine will kindly ask you to remove the marker. Touch the image of the embroidery arm to make it easier to remove the template and then press OK to stitch the design. See Figure #10.
[caption id="attachment_26307" align="aligncenter" width="800"]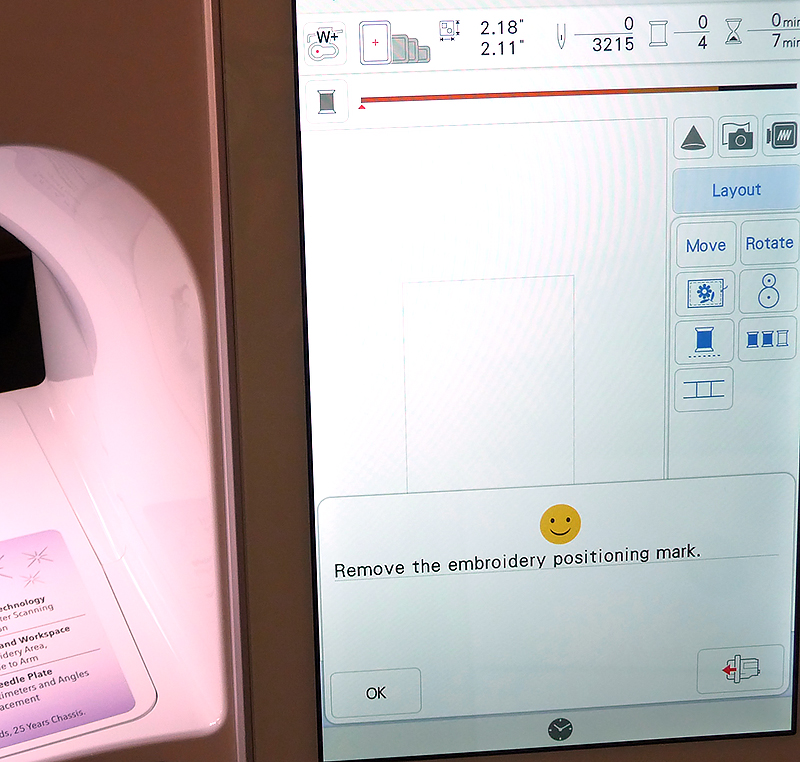 Figure #10[/caption]
5. In Figure #11 you’ll see how I used the projector on the Luminaire to show how accurate the placement is when you use the Snowman marker and Brother InnovEye technology. Look how the color image of the design is right on top of the image on the template. Templates combined with the Snowman Marker help you embroider designs accurately and easily, for beautiful finished projects!
[caption id="attachment_26279" align="aligncenter" width="800"]
Figure #10[/caption]
5. In Figure #11 you’ll see how I used the projector on the Luminaire to show how accurate the placement is when you use the Snowman marker and Brother InnovEye technology. Look how the color image of the design is right on top of the image on the template. Templates combined with the Snowman Marker help you embroider designs accurately and easily, for beautiful finished projects!
[caption id="attachment_26279" align="aligncenter" width="800"] Figure #11[/caption]
CLICK HERE FOR PDF!
Figure #11[/caption]
CLICK HERE FOR PDF!
There are many different ways to achieve perfect placement for embroidery projects. One of my favorite tried and true methods involves using templates printed from PE-DESIGN software
with the special Snowman embroidery positioning marker added to the center point of the design. Since a template represents the actual life-size image of a design, I can easily print one or more to preview the design, placing it on the fabric at the precise location for embroidery. The option to print the Snowman marker makes the template even more useful. The unique Snowman positioning marker combined with Brother InnovEye technology on select Brother models makes my embroidery life easier, faster, and more fun. Note: I used the Brother Luminaire
to create the samples shown in this tutorial.
Let me show you how I printed this specialized template and used it on my recent embroidered chair cushion cover
project. 1. Begin with your design opened in the PE-DESIGN software. Note that I am using PE-DESIGN version 11.
If you have a different software version and the Snowman is an option for printing in your software, you’ll see the choice for printing in the print setup window. Your machine must also have the capability to scan and detect the snowman to use the method shown here: Modify your design as desired, changing colors, mirror imaging the motif, etc. You want your design to look exactly as you want it to appear on your project. Be sure to save the design with a new name and transfer it to the machine in its modified state. You can also choose to mirror image the design right at the machine, so it matches your printed template. I printed two templates for placement. One template shows the design exactly as it was downloaded from iBroidery.com. The second template is a horizontally mirrored copy. See Figure #1. [caption id="attachment_26267" align="aligncenter" width="800"]
Figure #1[/caption]
2. Here are the steps for printing a template with the Snowman and stitching the design using Brother InnovEye technology:
Click on the PE Design icon and select Print Setup. See Figure #2.
[caption id="attachment_26268" align="aligncenter" width="800"] Figure #2[/caption]
Choose the settings shown below, printing the template at actual size, normal stitch image, and checking the box for print sewing area box and center axis. Be sure to select the Snowman Marker option. Select Print Preview. See Figure #3.
[caption id="attachment_26346" align="aligncenter" width="800"] Figure #3[/caption]
Make sure your printer is connected and ready to go, then select print. See Figure #4.
[caption id="attachment_26270" align="aligncenter" width="800"] Figure #4[/caption]
I usually print the first page with just the template, eliminating the color change information. See Figure #5. Printer settings and options vary but I usually print the template with the grey scale option on my color printer.
[caption id="attachment_26343" align="aligncenter" width="800"] Figure #5[/caption]
3. Use low tack tape to secure the paper template to fabric, placing it in the exact position you want the design to stitch. Hoop the piece in the approximate center of the hoop. Note that your hooping does not need to be perfect. The machine will adjust for any tilted or uneven hooping and target the design to match the precise position on the template. See Figure #6.
[caption id="attachment_26272" align="aligncenter" width="800"] Figure #6[/caption]
4. Place hoop on machine, set the design and then continue to embroidery screen. See Figure #7.
[caption id="attachment_26273" align="aligncenter" width="800"] Figure #7[/caption]
Touch Layout and then touch the Snowman icon. You want to make sure you don’t rotate the design or move it. The machine needs to work with the design in its original position. Touch OK. See Figure #8.
[caption id="attachment_26274" align="aligncenter" width="800"] Figure #8[/caption]
There are multiple options for scanning. In this example I want to scan from the default center position. Touch Scan. See Figure #9.
[caption id="attachment_26275" align="aligncenter" width="800"] Figure #9[/caption]
The machine will scan the template and move the hoop until the needle points to the direct center. Then the machine will kindly ask you to remove the marker. Touch the image of the embroidery arm to make it easier to remove the template and then press OK to stitch the design. See Figure #10.
[caption id="attachment_26307" align="aligncenter" width="800"] Figure #10[/caption]
5. In Figure #11 you’ll see how I used the projector on the Luminaire to show how accurate the placement is when you use the Snowman marker and Brother InnovEye technology. Look how the color image of the design is right on top of the image on the template. Templates combined with the Snowman Marker help you embroider designs accurately and easily, for beautiful finished projects!
[caption id="attachment_26279" align="aligncenter" width="800"] Figure #11[/caption]
CLICK HERE FOR PDF!Tags
Shop this Project
No sewing machine? No problem. We’ve got a range of easy-to-use, feature-rich machines so you can creat this project – and many more!

Embroidery Sewing Machines
Related Projects
Stay Connected
* Required fields