How to Appliqué on a Multi Needle Embroidery Machine
Transform an Appliqué In The Hoop Design To A Multi-Needle Embroidery Machine
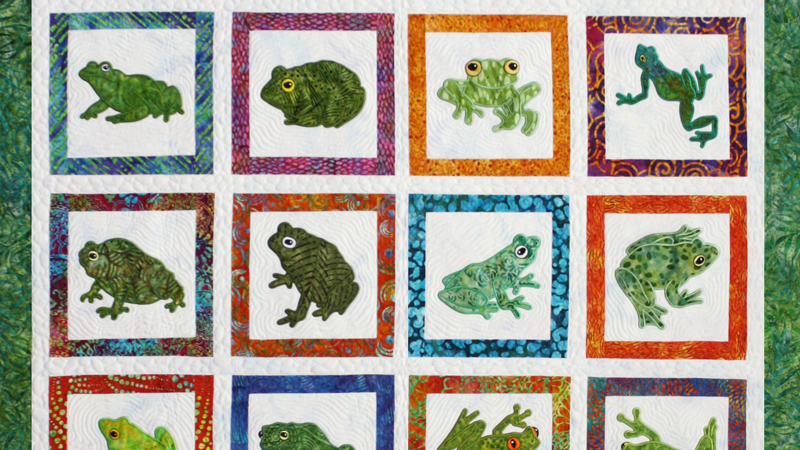
In this article I will tell you how to transform a one fabric appliqué design for a single needle embroidery machine to a Multi-Needle Embroidery Machine. The benefit of stitching out an appliqué design on a multi-needle is that the threads are already set to go: No manual thread changes! No stopping between thread colors to a different thread spool. This approach can be used to transform any Appliqué in the Hoop design for Single Needle to the Multi-Needle embroidery machine. I'll be using my American Frog appliqué design from my appliqué embroidery pattern Knee Deep in Frogs
here to illustrate the steps of transformation.
Understanding the basics
On a single needle embroidery machine, for each thread color the embroidery machine automatically stops to allow you to change thread colors, as needed. For appliqué, the thread colors represent the Placement, Tack Down, Trim and Cover stitch steps as well as other embroidery design elements. The Placement, Tack Down, Trim, and Cover stitches are usually the same color of thread, however for a single needle machine they are represented as 4 different thread colors. This causes the single needle embroidery machine to stop between the Placement Stitches and Tack Down Stitches to place the appliqué fabric on top of the Placement Stitches. There is also a stop after the Tack Down Stitch to TRIM the excess appliqué fabric prior to the Cover Stitch. A multi-needle embroidery machine has the thread spools already loaded so that the embroidery design is stitched out without stopping, changing automatically from one color thread to another based on the parameters of the design, until it is finished. What needs to be modified Using the American Frog appliqué as an example, two changes are needed prior to stitching out on a multi-needle machine.- The Stitch Order items need to be aligned to the appropriate thread color.
- Two manual stops need to be inserted to stop the machine;
- To place the appliqué fabric on top of the Placement Stitches
- To TRIM the appliqué fabric after the Tack Down Stitch and prior to the Cover Stitch
Making Changes on the Brother PR1000 Multi-Needle Machine
Below are screen shots from Brother PR1000depicting the steps and actions needed to convert the appliqué design for the multi-needle machine. Once these steps are completed, and the design saved, it can be stitched out as many times as desired.
Steps
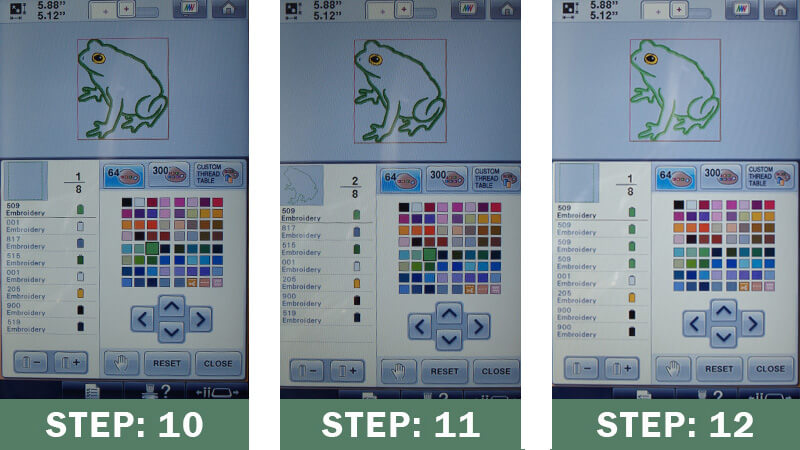
- Click on End Edit Button
- Click on the Basting icon/button (the one with flower on it)
- The Basting icon/button is highlighted; Click on Sewing button
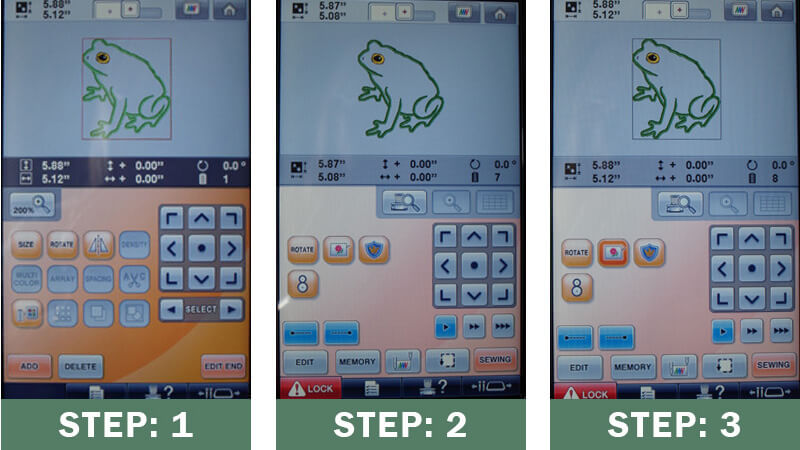
- Click on the Close button at the bottom of the screen.
- Referring to the Stitch Order list above, this represents the initial color assignment of the original appliqué embroidery file. Click on the Return button.
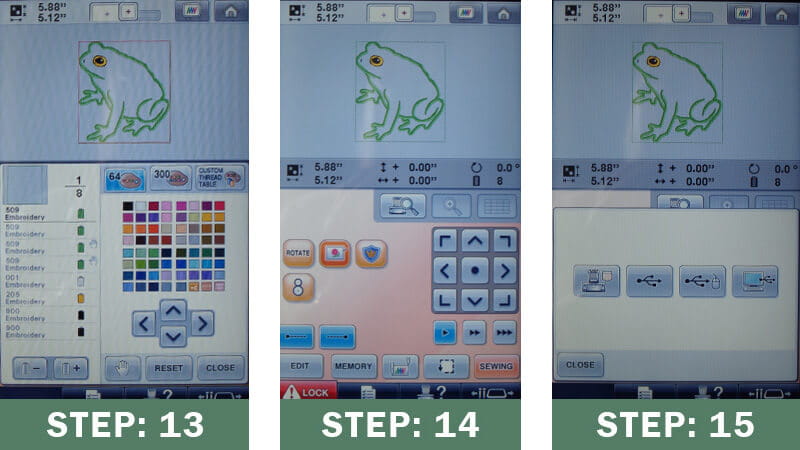
- Click on the OK button
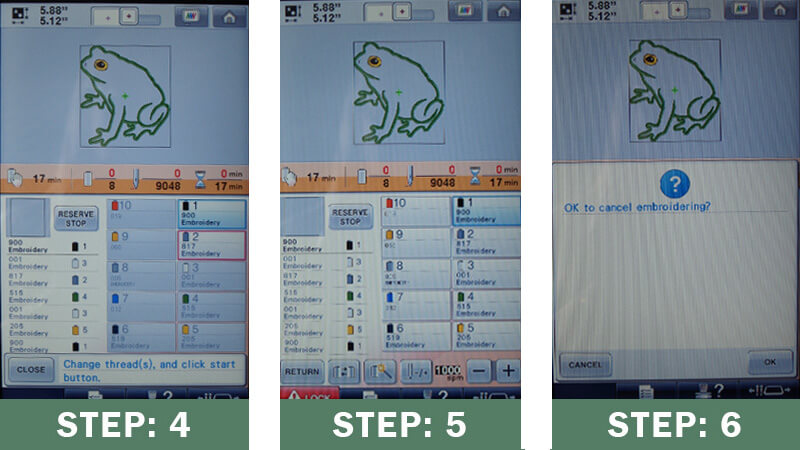
- Click on the Edit button.
- Click on the icon in the last row/first position which displays a thread spool and a chart of colors.
- This screen assigns thread colors to the Stitch Order items. Note: Stitch Order 1 is selected and the current color is 900 Black
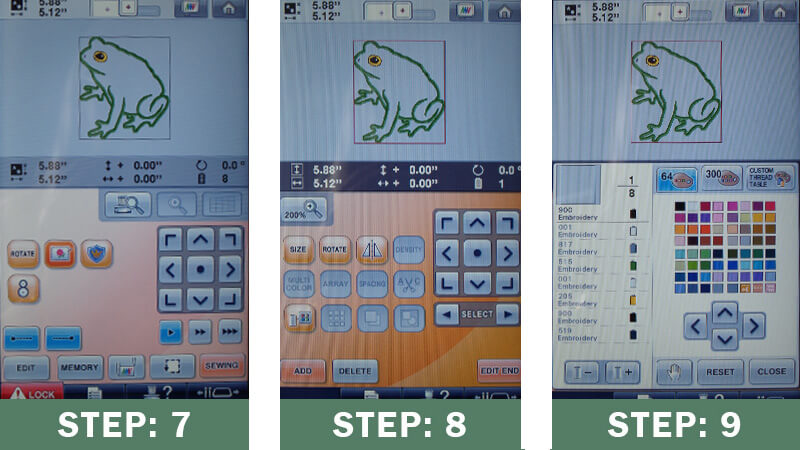
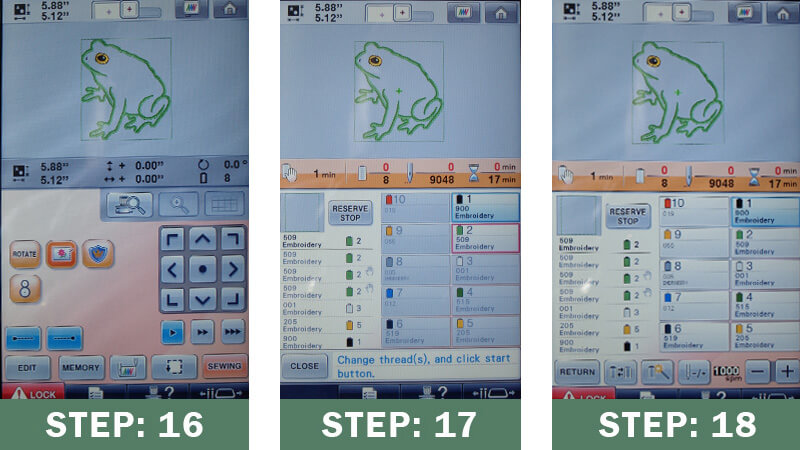
- To change Stitch Order 1 to Green, select a Green from the color chart. Note the Green Color I'll be selecting to change to is in 5th row, 2nd position
- Click on the Thread icon with + sign to move to Stitch Order 2. Select the same Green used for Stitch Order 1. Repeat for Stitch Order 3 and 4.
- The final results of changing the Stitch Order items is shown above and aligns to the chart.
- Click on the + to move to position 3, then click on the Hand icon. This will create a stop in the stitching to place the appliqué fabric on top of the Placement Stitches. Repeat this process to add the Hand for position 4. This will create a stop in the stitching after the Tack Down stitches to allowing you time to remove the hoop and TRIM the excess appliqué fabric. Click on the Close button
- Click on the Memory button
- Click on whichever icon you need to save the changes made to the initially loaded design in your original location.
- Click on the Sewing button
- Click on the End Edit button
- Place the 4 thread spools (Green, White, Yellow, Black) into the corresponding positions shown in the chart on the right hand side of the screen, in this case in positions 1, 2, 3 and 5.
 Your design is now set up and ready to go!
Editor's Note: We'd love to see the appliqués you create using Anna's method of transforming them on a multi-needle embroidery machine! Be sure to share your photos with us on social media by tagging us at @BrotherSews and #StitchingSewcial on Facebook
, Instagram
and Twitter
!
and Twitter
!
Knee Deep in Frogs is a product of Anna’s Awesome Appliqué Designs, and Brother International Corporation makes no representations or warranties regarding such products.
Related Projects
Stay Connected
* Required fields