Sea and Sand Beach Dress Tutorial
-Brother Sews Blogger
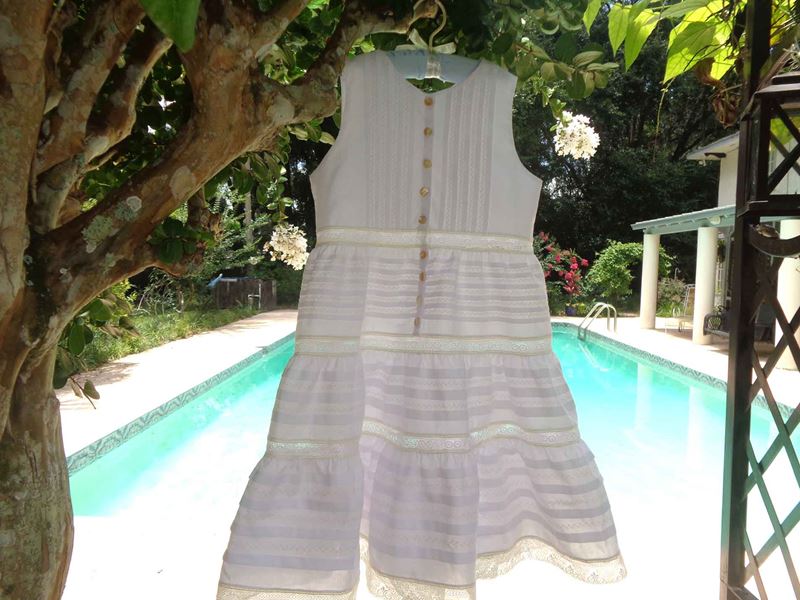
Your child will love this lightweight, airy DIY beach dress. This breezy style captures the fun and relaxation of a day at the beach. White batiste and lace contrast with miles ivory feather stitches, entredeux and ivory pearl buttons for a one-of-a-kind DIY dress pattern. These colors will remind your child - and you - of the cool white waves and golden sand of a perfect day at the beach. Your Brother Dream Machine or other Brother Sewing Machine can effortlessly make the perfect tucks and feather stitches and join the lace and entredeux as if stitched by hand. This dress is a modification of legendary Lezette Thomason’s Beach Portrait Dress.
REQUIREMENTS
Pattern: Children’s Corner “Louise”

-Fabric: 3 yds. white batiste
-Trim: lace: 7 7/8 yds. white 3/4” lace insertion, 3 yds. 1 ¾” lace edging, 18 ¼ yds. ivory entredeux
-Notions: 9 ecru ½” MOP buttons, ¼ - ½” plastic snap, thread: 80 wt for lace/entredeux attachment, 60 wt. for construction and tucks, 30 wt. ecru cotton for featherstitching, Brother water soluble stabilizer (WSS) SA540 for use under featherstitching, heat or fine-line water erasable marker
-feet: open toe
-SA185 1/4" Piecing Foot with Guide
-SA184 Edge Joining Foot
-SA147 Open Toe Foot
-Standard 7 mm Multipurpose J foot
Techniques: tucks, featherstitching, pattern modification, entredeux to flat fabric, entredeux to gathered fabric, entredeux to lace, 1/4” seam allowance for bodice, ½” for skirt tiers
NOTE: All measurements for yokes and skirt tiers are for size 8. Finished length is 32” from the highest shoulder point depending on lace width. Smaller sizes require adjustments for fewer tucks, closer placement, more narrow feather stitching, etc. to fit the front yoke. Skirt tier lengths would also require adjustment. This is largely a measure-as-you go dress.
Getting Ready
Fabric and lace preparation: prewash and press fabric. Starch and press lace.
Pattern preparation
1. Copy front and back yokes, JUST TO CENTER FRONT AND CENTER BACK LINES. The FRONT will be cut on the fold. Leave an extra inch beyond center of front yoke pattern piece.
2. Trim ¼” from FRONT yoke armhole starting at shoulder and tapering down 4” to beginning of curve. Next trim neckline, tapering from ¼” at shoulder to ½“ at center front.
3. Add ¾” to FRONT yoke at center, which is ½” for the button/ buttonhole lap and ¼” seam allowance.

4. Trim ¼” from BACK yoke armhole starting at shoulder and tapering down 4” to beginning of curve. Next trim BACK yoke neckline, tapering from ¼” at shoulder to 1” at center back.

5. Place pattern on fold of pattern transfer paper. Trace around to create a full-size back yoke pattern piece. Do a better job on the neck curve than I did.
Yoke Construction
FRONT YOKE
DO NOT CUT OUT YOKES AND LININGS (fabric with pattern pieces) UNTIL DIRECTED TO DO SO.
6. Tear 2 strips width of 44” fabric (WOF) and 2” deeper than length of front yoke pattern piece. For example, size 8 yoke is 12” from shoulder to waist. Thus two 14” strips of fabric should be torn. There will be left over.
7. Cut two pieces from this strip to the width of the front tucked yoke (remember ¾” was added to center front) plus 4”. This will accommodate the tucks and give a margin for error. For size 8 the two front yoke pieces should be 16” x 14” (WOF).
8. Mark each front yoke according to diagram below.
-a. First line will be ¾” from the raw edge. This identifies the area for the button and buttonhole lap.
-b. Second line will be 1 ½”from the first. This will be the first tuck.
-c. Third line will be 1 ¼” from the second line and 4th, 5th and 6th will each be 1 ¼” from the previous line. There will be lines for a total of 5 tucks.

NOTE: It is helpful to identify the fronts as left and right. Mark the top corner at the lap with a thread tail or a small brass safety pin.
-d. Cut two pieces from this strip for the lining. Cut to the width of the front yoke including the added ¾” + another 2”, centering the excess along each side. For size 8, the two front yoke lining pieces should be cut XXXX. Set the lining pieces aside.
9. Attach ¼” foot, finger press first tuck and stitch from top on right side of tuck (the side that will be facing up when pressed).
10. Press tucks away from lap area
11. Attach open toe foot. Thread needle with ecru 30 wt. cotton thread. Select feather stitch 2-11, w 4.5. L 4.0, tension 3.6.

12. Place same dress fabric on Brother WSS for stitch rehearsal. Adjust length and tension to your preference. The width can only be reduced in order to fit between the tucks comfortably. Save preferred settings in machine memory.
13. Secure Brother WSS under tucked fabric and work feather stitch from top of piece. The open toe foot straddles the tucks almost perfectly. NOTE: this is important because it is more pleasing visually for the feathers on each yoke to point the same direction. The safety pin or other maker prevents a feather two-way street down the bodice or wasted time picking out a row or two of wrong way stitches. I know!

14. Finish both front yokes with 5 tucks and 4 rows of feather stitching.
15. Cut away excess WSS from tucked, feather stitched pieces. Soak to remove remaining stabilizer. Air dry, starch and press.

16. NOW IT’S TIME to cut out front yokes from traced, altered front pattern piece. Place tucked, feather stitched fabric carefully, taking care to cut a right and left front with safety pin indicator at top. Cut out two front yoke lining pieces. Set aside.
BACK YOKE
NOTE: The BACK yoke may be left plain by simply cutting two yokes n the fold from the traced, altered pattern. Or it may be tucked and feather stitched like the front. Instructions below are for the tucked BACK yoke.
17. NOW IT’S TIME cut 2 BACK yoke pieces. Tear 2 strips width of 44” fabric (WOF) x 14”. That is 2” deeper than the 12”length of BACK yoke pattern.
18. Cut a 23” piece for size 8. Begin marking 5” from raw edge, then every 1 ¼” until 13 tuck lines have been marked.
19. Stitch thirteen ¼” tucks as before, using ¼” foot. Secure Brother WSS under the tucked piece.
20. Work feather stitch between tucks as before (see step #11).
21. Place traced, altered full size pattern piece over tucked, featherstitched BACK yoke to check proximity to side seam. Center pattern piece and cut out.
22. Cut a second BACK yoke from flat batiste using traced, altered full size pattern. on the fold.
Yoke Assembly
23. Place tucked FRONT yokes to tucked BACK yoke, right sides together. Pin carefully then stitch at shoulders with ¼” seam. Press seams open.

24. Place flat FRONT yoke linings to flat BACK yoke linings in same manner, joining at shoulders, pressing seams open.
25. Stack tucked yokes on flat yoke linings, matching shoulder seams and all raw edges. Pin in place and seam around neckline. This joins the yokes and linings to one piece.
26. Turn front yokes to right side. Mark an erasable line ¾” from front raw edge and another ¼” from raw edge. Baste both layers together along these lines.
27. Fold and press in ¼” then ½” for the lap. Press and then baste in place.

28. Turn wrong side out. Seam armscyes leaving side seams open. Pull front yoke through shoulder seam to turn.
29. Turn to right side, press. Join lining to lining at side seams, then tucked front to tucked back at side seams. Press.
30. Hand whip lap to yoke on each side. Remove basting stitches.
31. Pin laps one on top of the other, as they will be when finished. Measure the finished circumference at the waist/lower edge.
Yoke Fancyband
32. Measure lower edge of bodice. Size 8 measures 29”. Cut 2 pieces of entredeux to that length plus 3”=32”. Stitch lace insertion to entredeux. Join another piece of entredeux to lower edge of lace insertion. Leave fabric edge of entredeux in place for joining to first tier.
33. Join fancyband to waist/lower edge of bodice, remembering the ½” seam allowance. Fold ends under the lap.
34. Hand whip laps in place enclosing ends of fancyband. Remove basting threads. Yoke finishes at 12” from highest point at shoulder to raw edge of entredeux (with ½” fabric edge).

~~~~~~~~~~~~~~~~~~~~~~~~~~~~~~~~~~~
SKIRT TIERS—note ½” seam allowances allowed at the top and bottom of each tier
The skirt is made up of three tiers of varied widths, each 1.5 X wider/fuller than the one above. Each is separated by a fancyband of lace and entredeux. The first tier has 6 tucks and includes a lap/placket. The second and third tiers are embellished with rows of tucks and featherstitching. The third tier also has tucks and featherstitching. The hemline is edged with ivory entredeux and white lace edging. Tiers are cut to exact length on crosswise of grain but width is generous to accommodate the tucks. This is fun! Remember that these measurements are for size 8 with a finished shoulder to hem length of 32”.
First tier consists of six ¼” tucks, each separated with a row of feather stitches.
35. Cut/tear batiste 43 x 12”. Mark 1 ¾” from top edge for first tuck and 1 ¼” for each of the next 5 tucks. Stitch tucks. Press down.
36. Place Brother WSS under batiste, work feather stitches between rows.
37. Remove excess WSS. Soak then air dry, starch, press tucks toward hemline. Cut excess 1 ¼’ below bottom pressed tuck, the same distance as that above the first tuck. This tier should measure 6.5” by 43”. Add a lap to each end of first tier.
38. Cut a 2 x 13”” strip of batiste for the laps on the first tier. Press this strip in half, then press each raw edge to the center crease. Fold together and press again, rendering a ½” folded piece. Cut the strip in half, leaving 6 ½” for each lap.
39. Place the raw edge along the raw edge of the tucked piece, right sides together. Stitch on the first fold, wrap the remaining piece around the tucked tier, fold the other edge under, matching the lap on the front yokes. Baste in place.
40. Add a ½” placket to each short end of the tucked piece. Lap right placket over left and baste in place. Repeat on opposite end. Hand whip lap/plackets in place. Remove basting threads.
NOTE: It is easiest to make buttonholes in the bodice and first tier at this time. With ½” buttons, 5 in the bodice and 4 in the first tier fit nicely.
41. Create a fancyband as on the bodice: entredeux- lace-entredeux. Join fancyband to bottom of tier 1.

Second tier is a 65” x “12” tube consisting of three ½” tucks with a row of feather stitching between each tuck. Both the tucks and the featherstitching are larger than those on the 1st tier and the bodice.
42. Cut batiste 12”wide and piece to make a length 66”. French seam batiste to create a tube for the second tier.
43. Mark 1 3/4’’ from raw edge for the first tuck, 2 ¼” between the first, second and third tucks. Each tuck is ½”. Mark 2 ¼” for bottom edge of 2nd tier.
44. Stitch tucks. NOTE: Reduce bulk at the French seam. When approaching where tier was pieced, precisely where the fold of the tuck will be, as indicated by the marked line, cut to the seam line and press one side of the seam to the right and the other to the left. Fold the tuck with the seam in place and proceed to sew. Reverse the flip on the next tuck.

45. Press the tucked piece. Starch and press again from the front and back. Place strips of Brother WSS between the tucks.
46. Select stitch 2-11 for the feather stitch as before. Like the larger tucks, the feather stitch settings are larger, W 5.0, L 4.5, tension 3.6. Stitch with ivory 30 wt. cotton thread. NOTE: It is pleasing to work one row of feather stitch to the east and the other to the west. Or not. Whatever you like.

47. Cut away excess WSS. Soak to remove remaining then air dry. Press. Cut away excess batiste to 1 ¼” below last pressed tuck.
48. Create a fancyband as before with entredeux-lace-entredeux. Join to tier 2.

Third tier is a 98” tube including four ½” tucks with a row of feather stitches between each tuck.
49. Cut batiste 12” seamed to a length of 98”. Sew into a tube.
50. Mark first tuck 1 ¾“ from top raw edge. Mark second, third and fourth tucks 2 ½” below. Sew tucks.
51. Place Brother WSS under tucked piece. With ecru thread, work feather stitch #2-11, w 6.5, L 5.0, tension 3.6, between tucks.
52. Join entredeux to raw edge, overlapping 2 holes. Attach lace edging to entredeux.

SKIRT CONSTRUCTION
53. Gather the top of first tier to fit entredeux on yoke fancyband. Attach using heirloom techniques. Leave laps/plackets open.
54. Gather top of second tier to fit first tier fancyband entredeux. In same manner, gather and join third tier to second tier entredeux.
FINISHING DETAILS
55. Sew a plastic snap to the lace in the yoke fancyband,
56. Sew ivory mother of pearl buttons to yoke and second tier.
Now pack up your towels and sandals and head for the beach!

Tags
Shop this Project
No sewing machine? No problem! Any products mentioned in this project are available to buy here so you can stay stitching.

Related Projects
Stay Connected
* Required fields