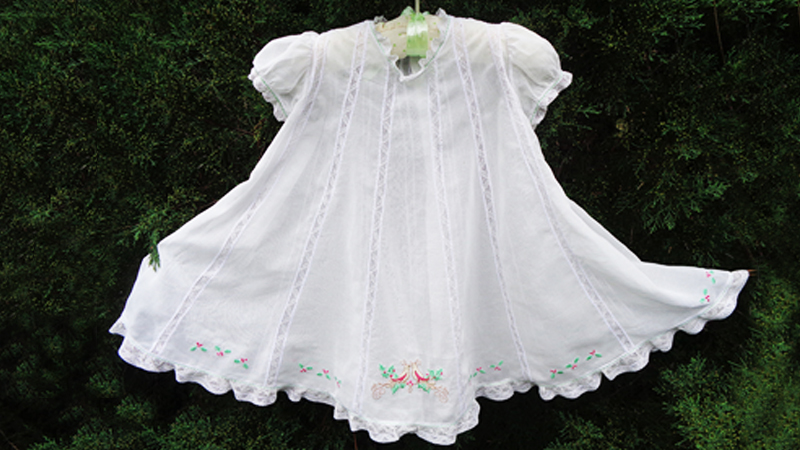
Beautiful Holiday Heirloom Dress
Create some Christmas magic for a precious little one with THE Dream Machine by Brother.
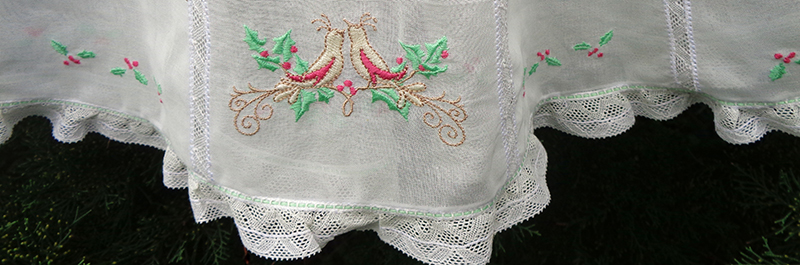
It Is up to the task and worthy of the fine fabric and lace required to make a classic heirloom dress. The holiday birds perched amidst the holly set the mood for halls decked with holly. Antique lace at the neck, sleeve and hemline is joined with entredeux woven with green floss. Every technique from basic construction to pin stitch to embroidery is executed flawlessly, even on delicate, sheer Swiss voile. Put on some Christmas music and Dream about the upcoming holidays while you spend time creating this small beauty.
Requirements for size 24 months
- Brother
embroidery/sewing machine, 4x4 frame. Feet: embroidery, open toe, J multipurpose - Designs: iBroidery.com:
General Designs > Holidays > Holly Border #200910024

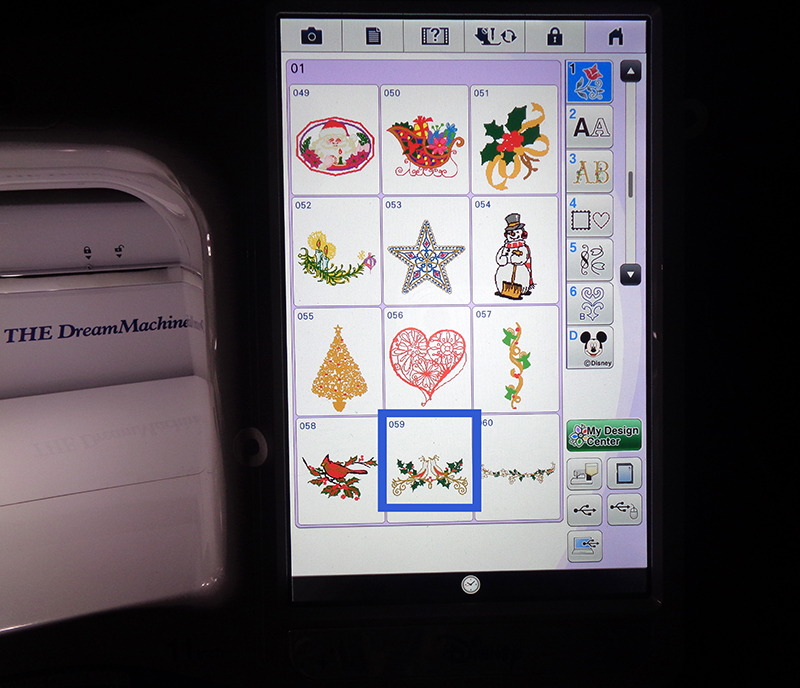
Note: The Christmas Birds are built-in design #59 on THE Dream Machine 1 and THE Dream Machine 2.
Other Brother sewing/embroidery machines with a 4x4 frame and pin stitch capability can make / recreate this garment by substituting another Christmas design for the doves in the center panel.
Other Brother sewing/embroidery machines with a 4x4 frame and pin stitch capability can make / recreate this garment by substituting another Christmas design for the doves in the center panel.
Supplies
- Fabric: Swiss voile, cotton batiste, lawn, handkerchief linen, or dimity---1 ¼ yd x 60 wide or 1 1/8 yd. 45”
- Trims: Lace edging 8 yds. 1/4" wide, Optional: Lace insertion--3 yds. 1/4" -3/8" wide entredeux
- Notions: Buttons: 4 mother of pearl ¼”, needles: #60 or 65 for lace work and construction, #110 sharp needle for pin stitch (a wing needle is not a good choice for such narrow lace)
- Threads: 80/2 Madeira Cotona or 50/2 DMC cotton for lace work, 50/2 DMC cotton for embroidery and construction
- Brother
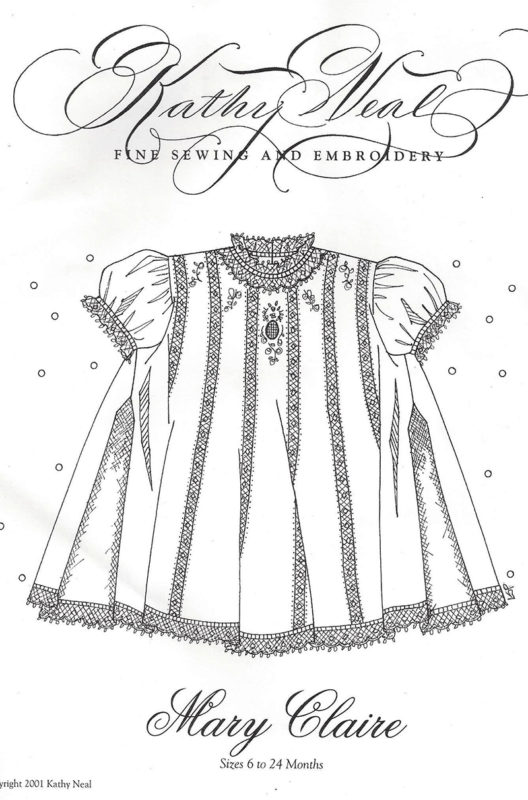
lightweight, water soluble stabilizer, 3” wide tissue paper-like tearaway stabilizer. - Pattern: “Mary Claire” by Kathy Neal. Disclaimer: Featured pattern is Mary Claire by Kathy Neal and Brother International Corporation makes no representations or warranties regarding such products.
Suggestion:
The goods for this garment are all an ivory/champagne color, causing a number of challenges. Because there are so many shades of “champagne,” finding fabric, ¼” lace insertion, lace edging, entredeux and fine thread of matching color made for quite a scavenger hunt. A white or ecru dress would have been just as lovely and offered more options.Instructions
First Note: The following instructions differ from those in the pattern and reflect my personal preferences. This diagram from the printed instructions shows the basic layout of the panels put together, except for the second side panel #4, the last to be joined. Second Note: The slope of the neckline on each panel as it is joined to the next one.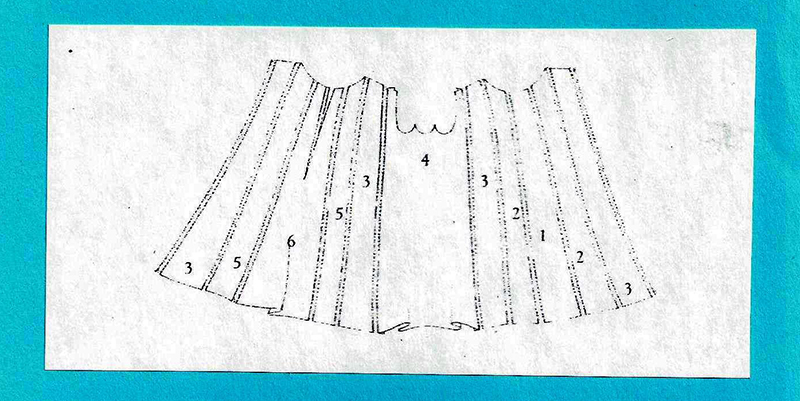
Dress Body
1. Prewash fabric and lace gently by hand. Air dry, starch and press. 2. Cut out pattern in chosen size according to the layout guide. Transfer all markings. Mark pattern piece number on each. For those pattern pieces with multiple cuts, mark each with pattern piece number and right or left, front or back. Painters tape works well for this. Note: The pleats in side panel #4 are stitched after all the lace is inserted and pin stitched. It is helpful to mark the armscye and then stay stitch it on the cutting line. Then rough cut it above the stitched marks until time for the sleeves to be inserted. With all the handling and bias, care must be taken to avoid stretching the panel, as well as all the bias-cut pieces. However, the side panels are at greatest risk. 3. Insert placket into center back panel #6. 4. Seam all panels together with seam allowance of ¼”, stitch length 3.5. Press seams to right side.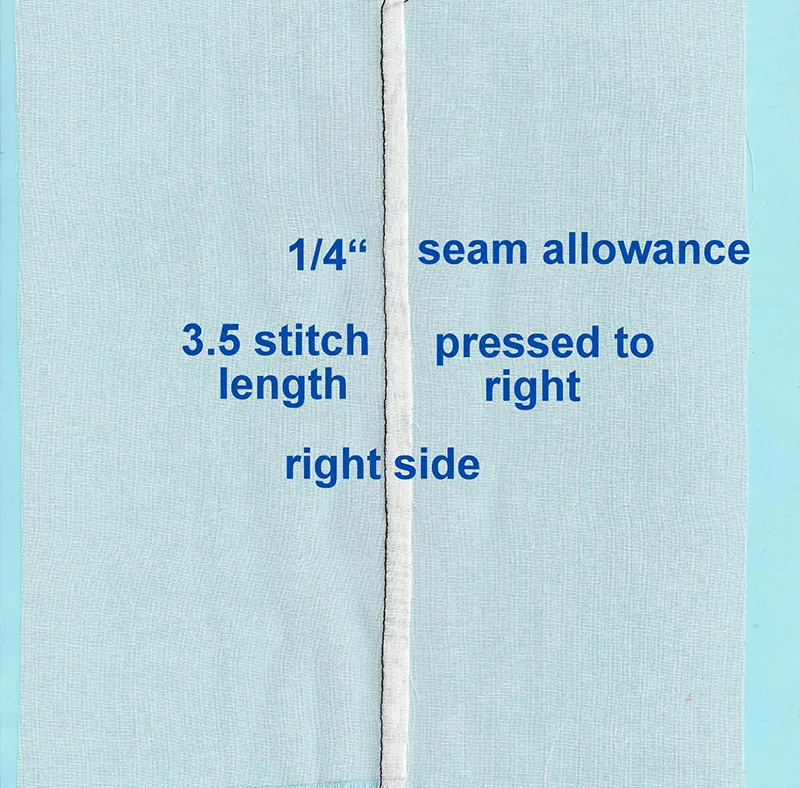 5. Stay stitch around neckline to prevent stretching.
6. Join shoulder seams with ¼” French seam.
Note: Take care to note that the seams at the shoulder are pressed in the same direction. Press shoulder seams toward back.
5. Stay stitch around neckline to prevent stretching.
6. Join shoulder seams with ¼” French seam.
Note: Take care to note that the seams at the shoulder are pressed in the same direction. Press shoulder seams toward back.
Lace Insertion
Pin stitch lace over each seam between panels 7. Place lace insertion over the seam line of those which do not go over the shoulder. 8. Pin a continuous length of lace for those which do go over the shoulder. Work from the back hemline, over the shoulder seams and down to the front hemline. Again, center the lace over the seam line. 9. Straight stitch in the left header with fine thread, fine needle, stitch length 2.0. Stitching is through only lace and one layer of fabric. It may be necessary to take a tiny tuck in the outer edge of the lace, toward the armscye. Note: The open toe foot gives best visibility for this step.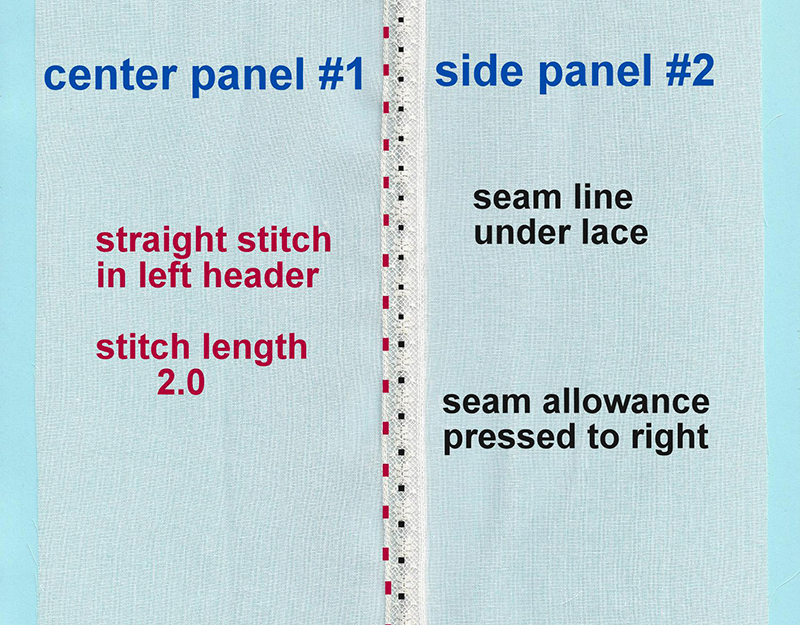 10. Seam allowance is then pressed to the left and the right header is stitched in place with stitch length 2.0.
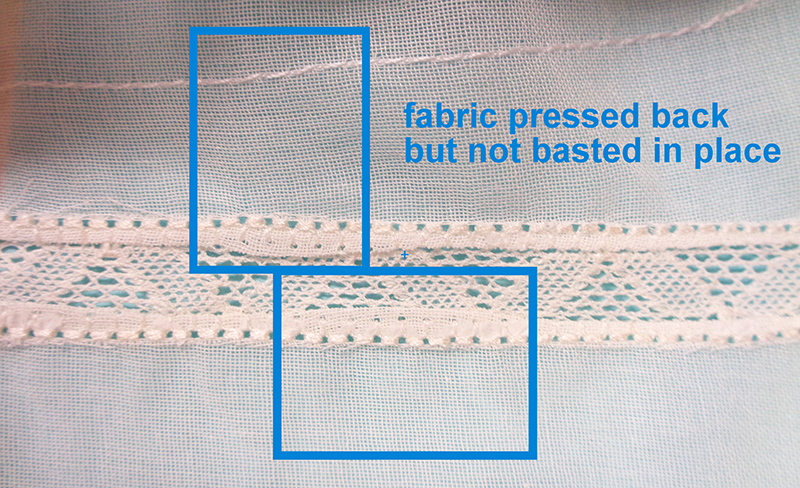
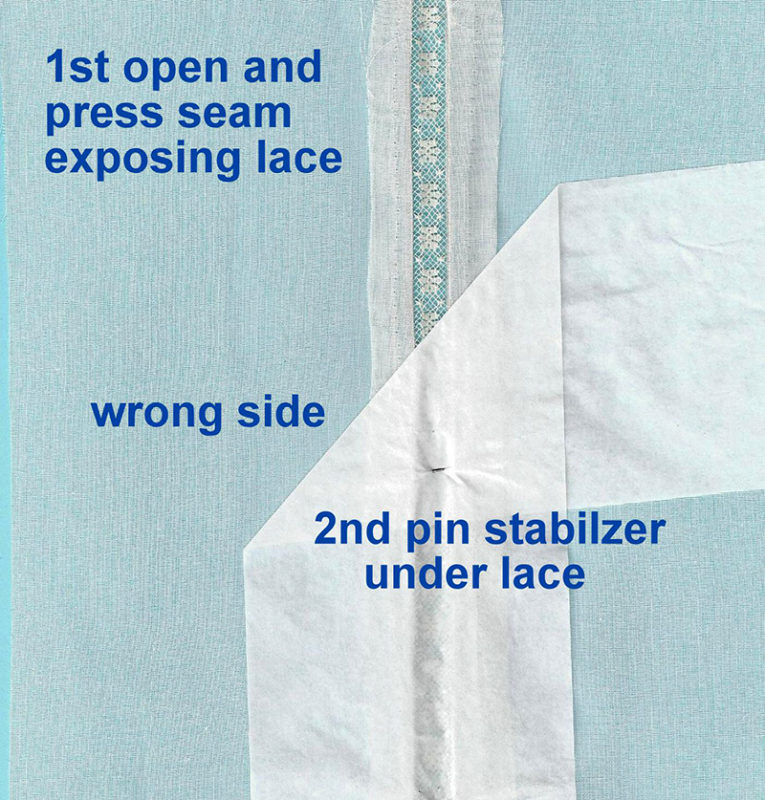
11. Open seam behind lace. Press seam allowance away from lace. It is helpful to baste the seam allowance away from the lace. This keeps it from scooting toward the lace. Note: This was discovered after a few panels had been pressed but not basted before pin stitching.
10. Seam allowance is then pressed to the left and the right header is stitched in place with stitch length 2.0.
11. Open seam behind lace. Press seam allowance away from lace. It is helpful to baste the seam allowance away from the lace. This keeps it from scooting toward the lace. Note: This was discovered after a few panels had been pressed but not basted before pin stitching.
 12. Pin a strip of light weight tissue-paper like stabilizer behind the lace.
Note: A wider ecru lace has been used for better visibility in the following images.
12. Pin a strip of light weight tissue-paper like stabilizer behind the lace.
Note: A wider ecru lace has been used for better visibility in the following images.
 13. Prepare to pin stitch by:
a) Attaching the open toe foot if not already affixed.
b) Inserting #110 needle.
c) Threading needle and bobbin with very fine thread.
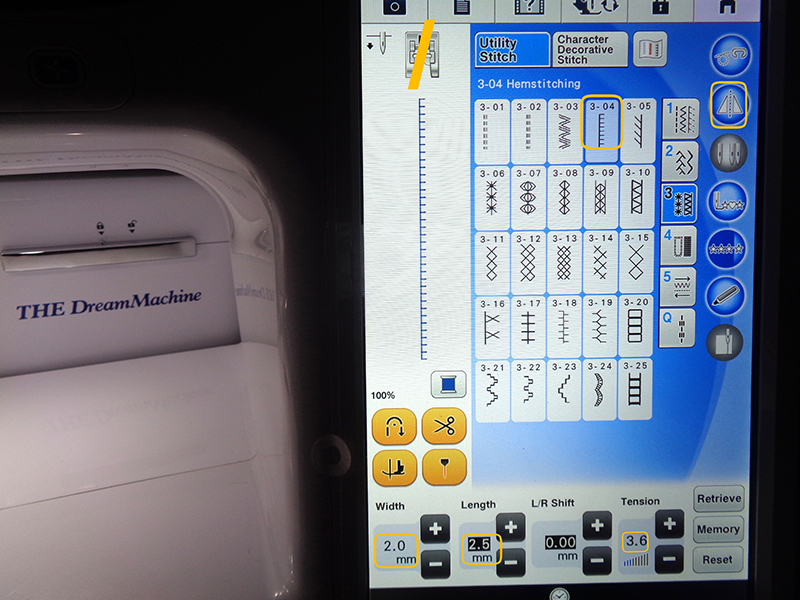
d) Selecting stitch #304 in menu #3 from the utility stitch menu.
e) Using a folded fabric scrap joined to lace and a piece of stabilizer for stitch rehearsal to determine best setting for your selected fabric and lace: suggested settings: W 2.0, L 2.5, tension 3.6, open toe foot.
13. Prepare to pin stitch by:
a) Attaching the open toe foot if not already affixed.
b) Inserting #110 needle.
c) Threading needle and bobbin with very fine thread.
d) Selecting stitch #304 in menu #3 from the utility stitch menu.
e) Using a folded fabric scrap joined to lace and a piece of stabilizer for stitch rehearsal to determine best setting for your selected fabric and lace: suggested settings: W 2.0, L 2.5, tension 3.6, open toe foot.
 Note: Take care to use the mirror image key as needed.
14. Pin stitch lace over opened, basted seam with stabilizer pinned below.
Note: Take care to use the mirror image key as needed.
14. Pin stitch lace over opened, basted seam with stabilizer pinned below.
 15. Trim away excess fabric beyond pinstitch.
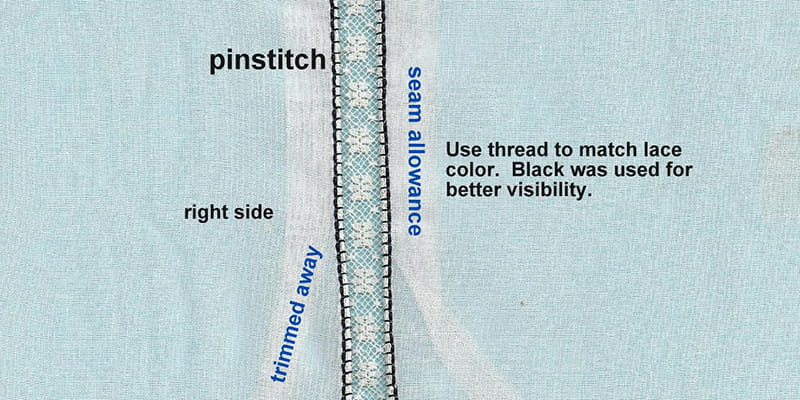 At this point all panels are joined, placket is inserted in center back, lace is inserted, and pin stitched. The underarm pleat in panel #4 is still unstitched which allows for more ease when finishing the neckline next.
Neckline
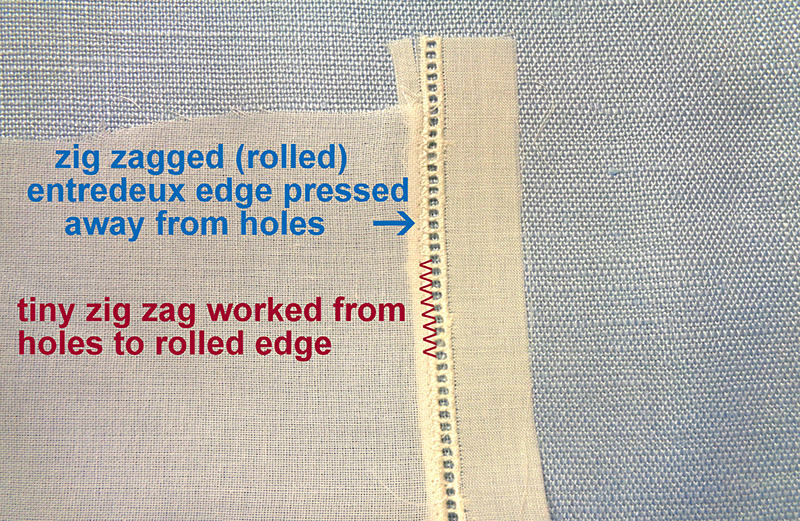
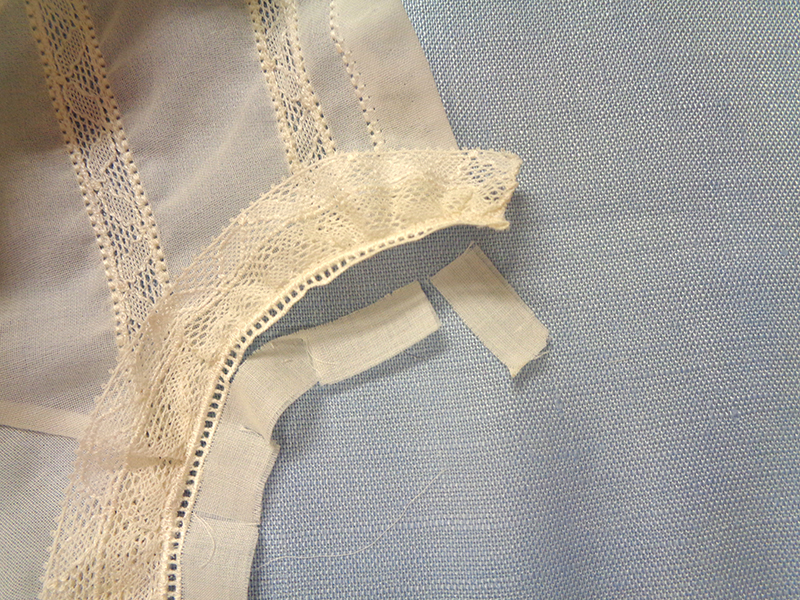
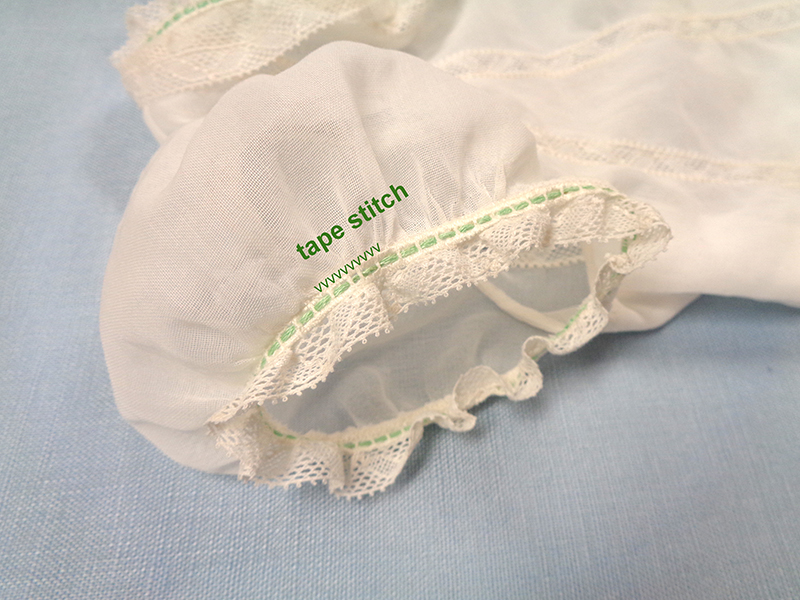
16. Straight stitch very, very close to the edge of the neckline with #60 needle and fine thread. Take care not to stretch the bias edges. Placing stabilizer under the neckline is helpful. 17. Cut a length of entredeux 1” longer than the length of the neck edge. This allows for a ½” tail at each end of neck edge. a) Trim one edge of entredeux to scant ¼”. b) Place trimmed right side of entredeux to right side of fabric, extending it ½” beyond the edge of fabric. c) Stitch in the ditch of the entredeux to the opposite end of the fabric, again extending it ½”. d) Zig zag into the ditch and off the edge, wrapping the raw edge in the zig zag, W. 2.5 (or as needed) L 1.0. This will clean finish the edge, called “rolled and whipped” in heirloom terms.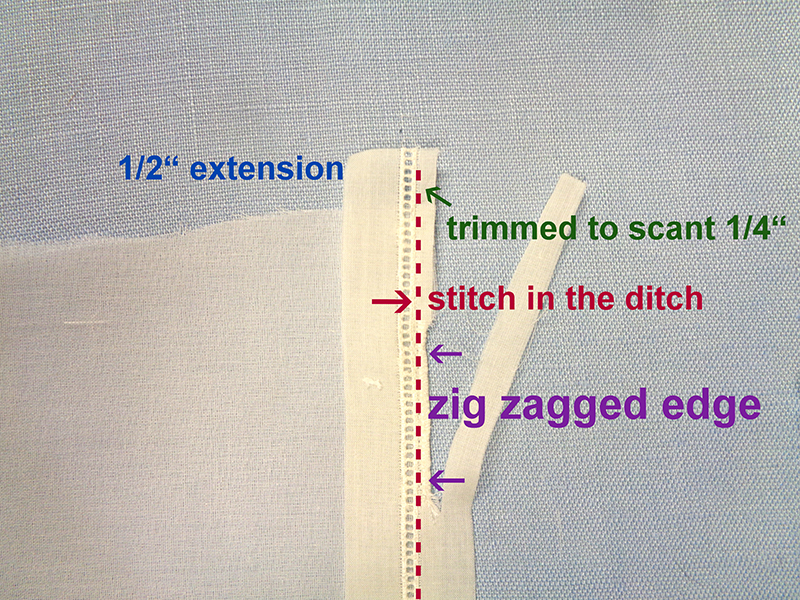 e) Hold the tiny seam allowance away from entredeux. Stitch tiny zig zag into entredeux holes and then into held seam allowance, forcing entredeux to stand up away from dress fabric. Machine settings will vary depending on the size of the entredeux. For the rather large entredeux used on this garment, the settings were w 2.5 L 1.0. This is sometimes called the tape stitch, as it looks almost as if tape had been applied to hold the allowance in place.
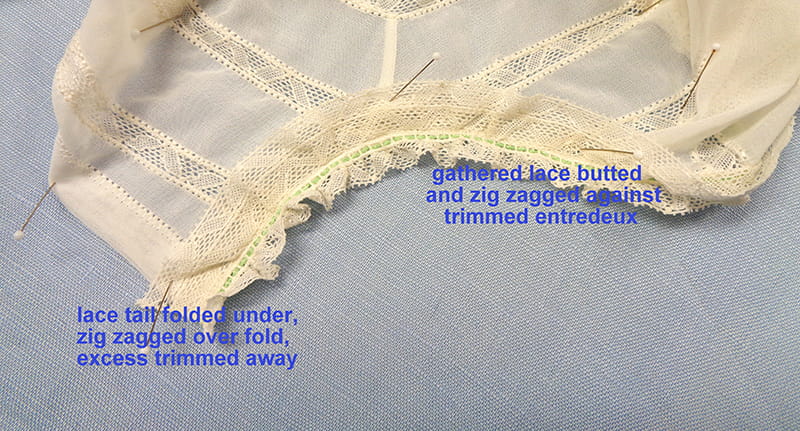
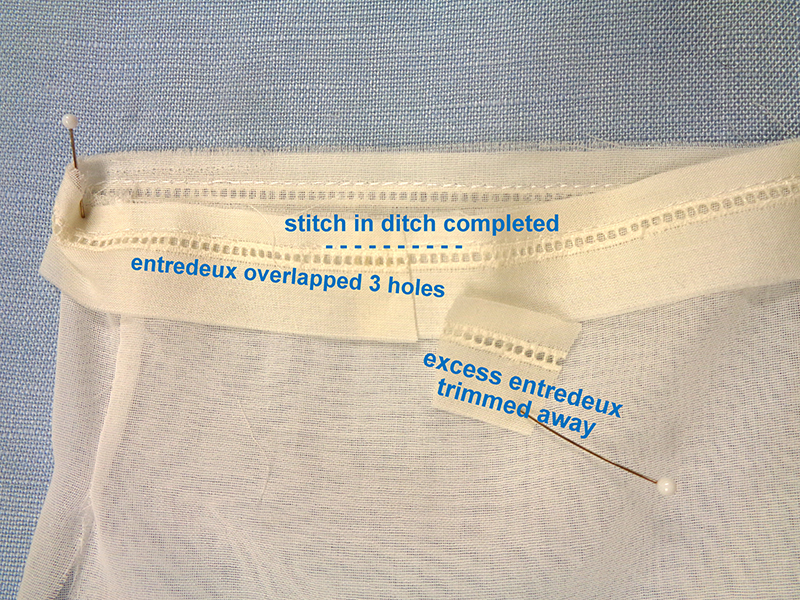
 18. Fold the entredeux tail under, lining up the holes. Zigzag "tape” into 2-3 holes to secure them. Trim away excess entredeux.
19. Option: Join gathered lace edging to lower edge of entredeux toward bodice. Note: This was done originally as shown above and in the pattern. It was later removed because I just preferred the edging above the entredeux. The finished garment shows this change.
20. Trim away upper entredeux seam allowance.
18. Fold the entredeux tail under, lining up the holes. Zigzag "tape” into 2-3 holes to secure them. Trim away excess entredeux.
19. Option: Join gathered lace edging to lower edge of entredeux toward bodice. Note: This was done originally as shown above and in the pattern. It was later removed because I just preferred the edging above the entredeux. The finished garment shows this change.
20. Trim away upper entredeux seam allowance.
 21. Cut a length of lace edging 1.5 times the length of the neck edge + 2”. As with the other neckline lace, gather slightly, extend a tail ½” before the entredeux and zig zag the lace to the upper edge of the entredeux. Finish upper lace edges as was done on the lower edges.
 22. Optional: Weave 3-6 strands of embroidery floss through entredeux holes.
Sleeves
Panel 4 Pleat Construction At this point, the panel is already inserted into the sides of the dress. For instructional purposes, the mage below shows panel #4 flat, not joined to dress body. Stitching of the pleat in the panel is shown more clearly this way than if it were inserted. 23. Stitch pleats in panel #4, matching points and the dotted stitching lines. Press the tuck into a box pleat, using the press lines. Press pleat with crease against seam.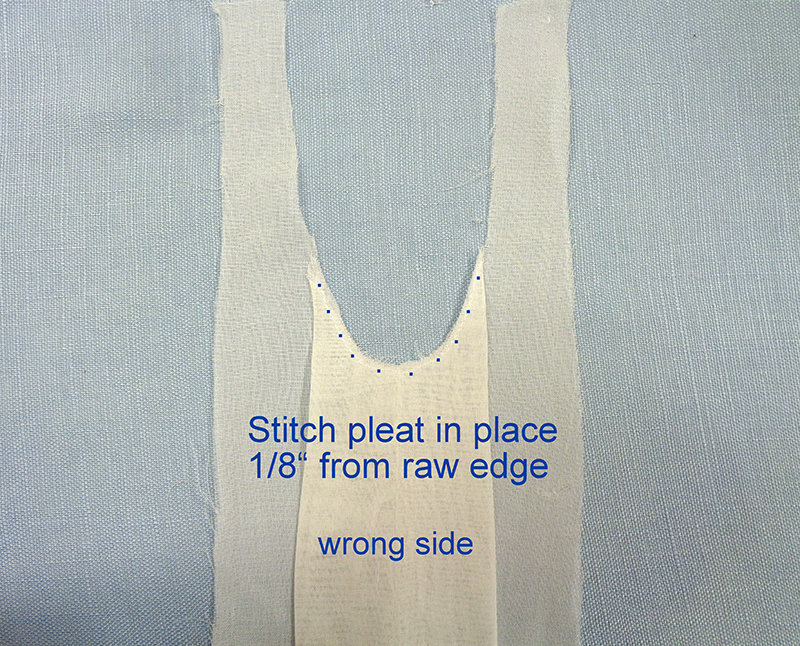 24. Stitch the top of the pleat to the armhole with shortened stitch, 1/8” from raw edge.
Gathering the Sleeve Edge
 25. Run three gathering rows L. 3.0 along the top edge of each sleeve between the notches. Do the same on the bottom edge. beginning and ending 1” from the underarm seamline. Place both middle gathering threads at the ¼” seam line.
26. French seam the underarm.
27. Draw up gathering threads rendering the circular opening 8”.
25. Run three gathering rows L. 3.0 along the top edge of each sleeve between the notches. Do the same on the bottom edge. beginning and ending 1” from the underarm seamline. Place both middle gathering threads at the ¼” seam line.
26. French seam the underarm.
27. Draw up gathering threads rendering the circular opening 8”.
Joining Trim to Sleeve Edge
28. Cut a length of entredeux to the measurement of the armhole binding pattern piece for the chosen size. For 24 months, the length is 8 ½”. 29. Join the entredeux into a circle with ¼” seam allowance so that it measures 8”. This is best done by overlapping the entredeux tail 2-3 holes over the cut end. See images #19 and 20 in hemline instructions. Trim away excess entredeux. 30. Trim away fabric edge from the untrimmed side of entredeux. 31. Cut a 14” length of lace edging. Pull the top gathering thread and distribute gathers evenly to match the length of the entredeux, leaving a ½” tail at either end. 32. Butt gathered lace to clean edge of entredeux and zig zag from each hole into lace. 33. Trim second edge of entredeux to scant ¼”. As previously done, place right sides of the entredeux to the right side of the gathered sleeve, stitch in the ditch, clean finish the edge with a zig zag, work "tape" stitch from the entredeux holes into the gathered sleeve.Inserting Sleeve
34. Mark center of sleeve top. Pin to shoulder seam and pin sleeve seam to underarm pleat seam. 35. Pull up gathers to fit armscye. Gently unpin to release sleeve from armscye. 36. Insert sleeves with ¼” French seam. 37. Work tiny "tape” stitch from sleeve into French seam, holding seam toward sleeve. See image XXXXXXHemline
38. Trim the panels to an even length. It is likely that there is some slight variation in length, due to the bias cut. 39. Measure the perimeter of the hem and cut a length of entredeux that length + 2”. Trim one edge to a scant ¼”. 40. Place the trimmed edge of the entredeux to the raw edge of the hemline. Straight stitch in the ditch L 3.0. 41. Stop stitching ½” before stitching in the ditch began, leaving a 1” entredeux tail. Images #19 and 20 are a mock-up of the technique. It shows a circle much smaller than the hem.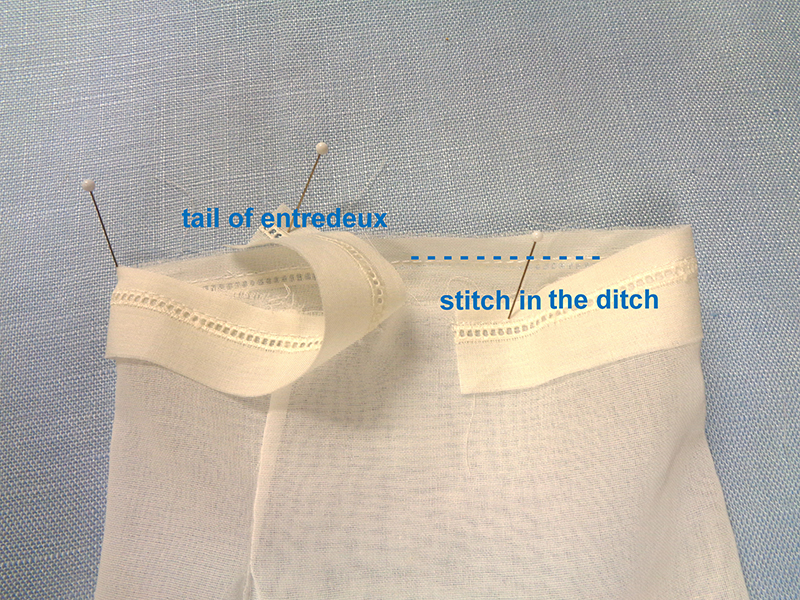 42. Overlap 2-3 holes. Complete stitching in the ditch up to the overlapped holes. Trim away the excess.
 43. Zig zag into the ditch and off the raw edge as was done at the neckline, creating a rolled and whipped finish. Press rolled edge toward skirt.
44. Work "tape” stitch to keep the entredeux lying flat and not kicking up toward the skirt.
45. Slightly gather lace edging. Join entredeux with zig zag into holes, beginning a few inches away from center back.
43. Zig zag into the ditch and off the raw edge as was done at the neckline, creating a rolled and whipped finish. Press rolled edge toward skirt.
44. Work "tape” stitch to keep the entredeux lying flat and not kicking up toward the skirt.
45. Slightly gather lace edging. Join entredeux with zig zag into holes, beginning a few inches away from center back.
 46. When hemline is complete join ends as before with tail overlapping beginning lace. Fold edge under and stitch tiny zig zag over pattern. Trim away excess lace.
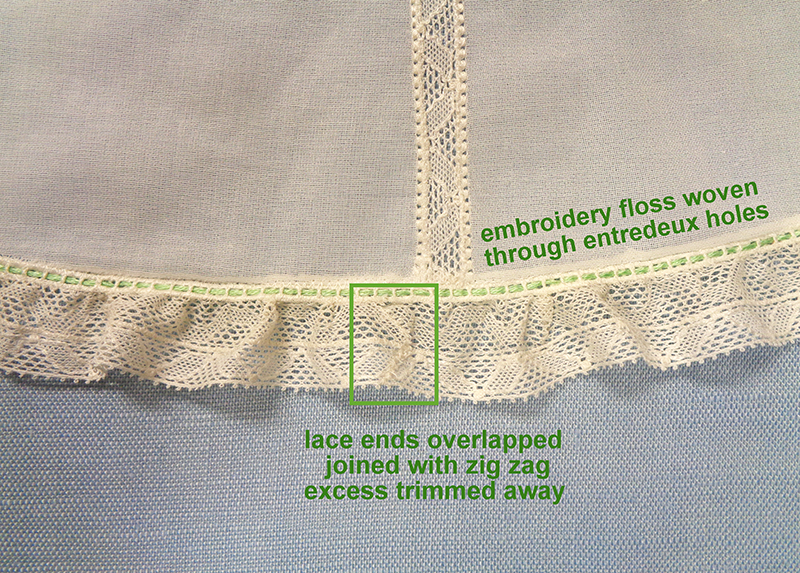 47. Optional: Weave 3-6 strands of floss through entredeux holes.
Back Closure
48. Add buttons and button holes, beauty pins or snaps to close the back.Embroidery
Note: All embroidery on batiste, voile or other fine fabric will require two layers of Brother water soluble stabilizer. The design of Christmas doves and holly chosen for the center panel is a built-in design on both THE Dream Machine 1 and 2. Instructions below detail reducing the size so that it will fit nicely near the hem of the size 24 months. Smaller dress sizes may require more design reduction or selection of another design. Carefully compare the design size to the width of the center panel at the distance from the hem where you choose to place the design. • The iBroidery.com holly design was reduced from 4 to 3 clusters in software.Center Panel Embroidery
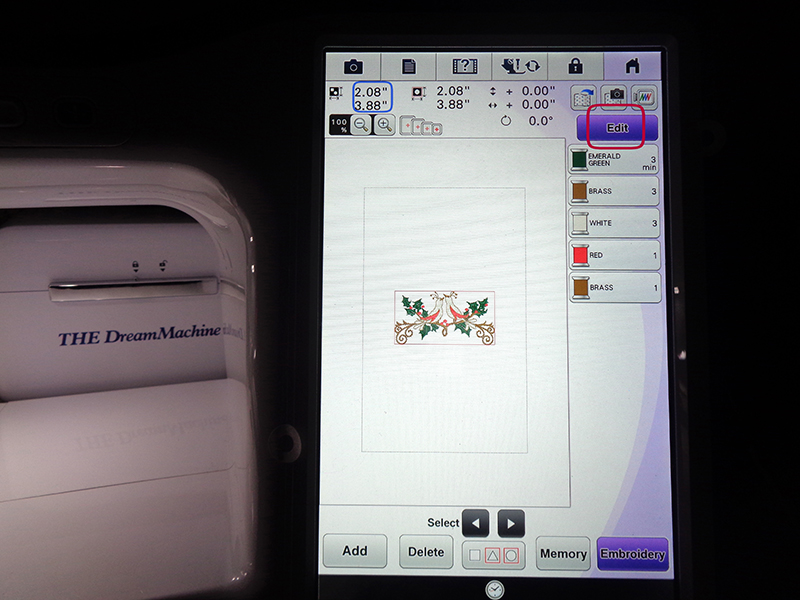
49. Open design #59 in menu 1.
50. Notice the default size is 2.08 x 3.88. As the width of the center panel is 4.5” I preferred that the design not be so crowded and chose to reduce the size in the edit menu.
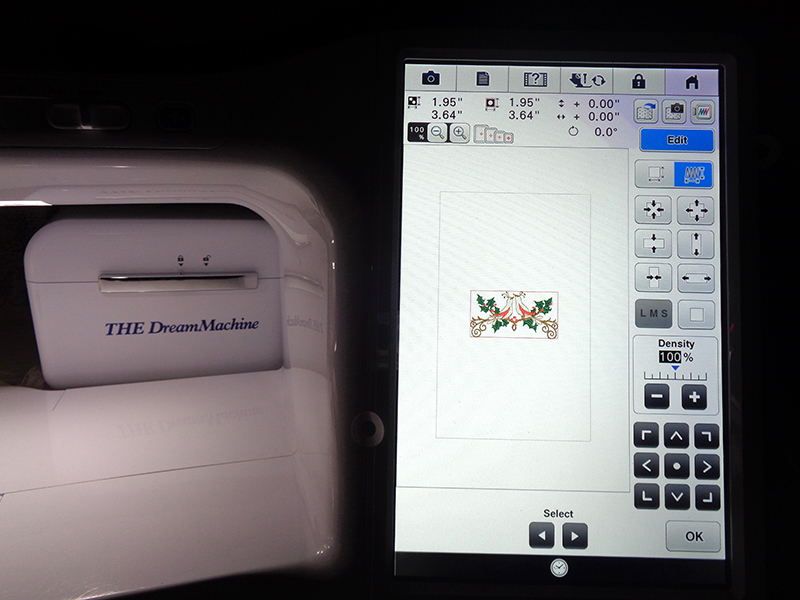
 51. Select Edit and in this screen the size was reduced to 1.95 x 3.64”.
 52. Hoop TWO LAYERS of Brother water soluble stabilizer and center panel in 4x4 frame. Embroider design. The design in the pictured garment was centered 2” above the entredeux.
53. Load edited holly design into machine. Hoop TWO LAYERS of Brother water soluble stabilizer in 4x4 frame and embroidery holly design at desired height. Embroider holly design in each panel. Note: The camera function is enormously helpful in placing the designs.
The dress is done! I hope you learned a tip or two and are pleased with it.
52. Hoop TWO LAYERS of Brother water soluble stabilizer and center panel in 4x4 frame. Embroider design. The design in the pictured garment was centered 2” above the entredeux.
53. Load edited holly design into machine. Hoop TWO LAYERS of Brother water soluble stabilizer in 4x4 frame and embroidery holly design at desired height. Embroider holly design in each panel. Note: The camera function is enormously helpful in placing the designs.
The dress is done! I hope you learned a tip or two and are pleased with it.

Related Projects
Stay Connected
* Required fields