Foot of the Month: Felted Flower for Hat Trim
This felted flower can make a plain hat look pretty! This month we are using the special Brother Felting Attachment to quickly create a gorgeous, three-dimensional piece, adding a trendy look to a pre-purchased hat.
Materials and Supplies:
- Brother XV8550D Dream Machine2
is the featured machine for this project along with the SA280 Brother Needle Felting Attachment
for the XV/V series machines - Hand needle and thread for sewing leaves to flower
- Pin to secure trim to hat
Note: A curved quilter's safety pin works well for this.
- SA145 Brother Clear View Foot
for decorative stitching on top of felted flower - Brother Polyester Embroidery Threads
for decorative stitching - Wool or synthetic felt for flower base, one color for flower base plus green for leaves
- Wool roving in various colors
- Accents such as buttons, beads, or pearls to decorate flower
- Pre-purchased hat
- Template for flower shape - I used a cookie cutter
- Removable marker or chalk.
Important Note: Please read all instructions included with attachment before beginning this project.
Tips For Those Who are Felting For the First Time: Felting is done with special barbed needles. These needles have notches that push or embed fibers such as roving and yarn into a base fabric such as wool felt. Wool roving is commonly used as the fiber for this technique. What is roving? Essentially, it is a bundle of fluffy fiber produced during the process of making spun yarn, commonly made from animal hair such as wool fleece from sheep. There are in fact many different fibers and many different base fabrics you can use for felting, with a myriad of different and delightful effects! Working with felt and roving is an easy way to get started. Relax and have fun with this technique. Felting by machine takes very little practice and you will quickly develop a rhythm as you go.
Instructions for Creating Flower Trim:
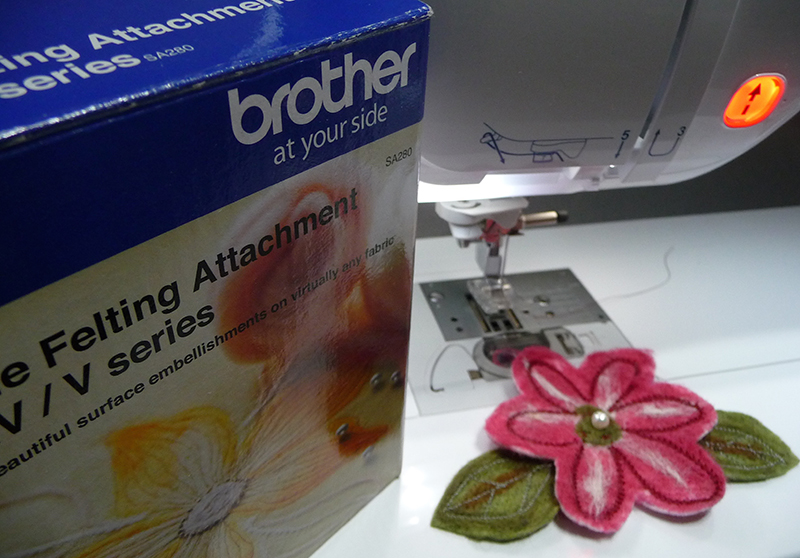
- Assemble your supplies. See Figure #1.
 Figure #1
- Set up the felting attachment following specifics in the included instructions.
- Draw a flower shape on the felt for flower base. You don't need to be concerned with a perfect shape. When finished you can carefully trim the shape and round off the petals.
- Begin by pulling off a small bit of fiber and placing it within the shape for felting. See Figure #2.
 Figure #2[/caption]
- Felt fiber into base by running it back and forth under needles. I like to run the machine at a medium speed and slowly move the fabric base backward and forward. Always make sure to move fabric gently to avoid bending or breaking the needles. Fibers should be thoroughly embedded in the base. See Figure #3.
 Figure #3[/caption]
Additional Tips for Felting: Sewing speed is limited automatically once the proper stitch is selected but it's perfectly fine to sew at a slower pace by turning the speed slider down. It may be necessary to change height for free motion as necessary to accommodate varying thicknesses. You'll find this adjustment in the settings. See below:

- Continue to add fiber to fill the flower area. I like to start with small amounts and add as needed. You can choose to completely cover your base fabric or leave some of it peeking through. You're the designer, you decide! Don't be concerned about "coloring inside the lines." When fibers are thoroughly embedded into the felt base it is easy to trim your shape at the end. See Figure #4.
 Figure #4[/caption]
- Continue to add roving to fill shape, using various colors for accents and shading. Feel free to roll small, flat balls of roving or twist small strands by rubbing them between your fingers. See Figure #5a and Figure #5b.
 Figure #5a[/caption]
[caption id="attachment_12510" align="aligncenter" width="800"]
Figure #5a[/caption]
[caption id="attachment_12510" align="aligncenter" width="800"] Figure #5b[/caption]
- Draw leaf shapes on the green felt and then felt roving to form stems and outside edge of leaves. I chose to leave some of the base area open so the green felt color would show through. See process below:


- When finished trim around outer edges of leaves.
- You may want to make a small felted test piece consisting of a partial flower before proceeding to set up for decorative stitching.
- When finished with felting re-set machine for sewing.
- Use complimentary decorative thread and select decorative stitches to accent flower and leaves with decorative stitches. Experiment with different stitches using different lengths and widths if you like.

- See Figure #6a through Figure #6c for examples.
 Figure #6a[/caption]
[caption id="attachment_12512" align="aligncenter" width="425"]
Figure #6a[/caption]
[caption id="attachment_12512" align="aligncenter" width="425"] Figure #6b[/caption]
[caption id="attachment_12513" align="aligncenter" width="325"]
Figure #6b[/caption]
[caption id="attachment_12513" align="aligncenter" width="325"] Figure #6c[/caption]
- Trim flower into a pleasing shape. Attach leaves to flower with small hand stitches, taking care that the stitches do not show on the right side. See Figure #7.
 Figure #7[/caption]
- Hand-sew bead, button, or pearl to trim center of flower.
- Pin felted flower to side of hat. Prepare for compliments as you wear your stylish new accessory out and about!
Related Projects
Stay Connected
* Required fields