Free Design: Custom Cozy for Coffee Cup
Cooler weather in the fall season brings thoughts of fall flavored lattes, soothing moments with a hot cup of tea, and enjoyment of super-hot coffee to warm both body and soul. Why settle for an ordinary brown wrapper on your cup when you can make a custom cozy to wrap around a re-useable cup. After seeing how easy it is to make one for yourself, you’ll want to consider this as a great gift item too! Gather your supplies and let’s go sew!
Materials and Supplies:
- Brother
sewing and embroidery machine with 4-inch hoop capability. Note: This project features a combination design stitched in a 4-inch hoop. - Brother
Embroidery Thread, Bobbin Thread, and size 11 embroidery needle for embroidering. - SA5815
Brother adhesive backed stabilizer. - SA5810
Brother medium weight tear-away stabilizer. - SA145
Brother Clearview foot, optional but recommended for a clear view when topstitching along edges. - Button Sewing foot, optional. Note: This foot is included with many Brother machines.
- Brother Free Design of the Month.
- Basic sewing notions including thread and a small seam gauge.
- Cutting mat with prominent lines for help with lining up embroidery design in hoop.
- 3-inch piece of round cord elastic.
- One button measuring ½-inch in diameter.
- Pre-purchased Coffee Cup/Beverage Tumbler.
- Paper, tape, and pencil for making custom pattern.
Wool blend felt or synthetic craft felt:
- Color #1: One piece for top piece and one for lining, cut to fit custom pattern created in Step 1.
- Color #2: One 2 ½-inch square piece for heart shaped appliqué.
- Note: Wool blend felt is preferred for this project. It has a rich look and is a bit thicker than craft felt.
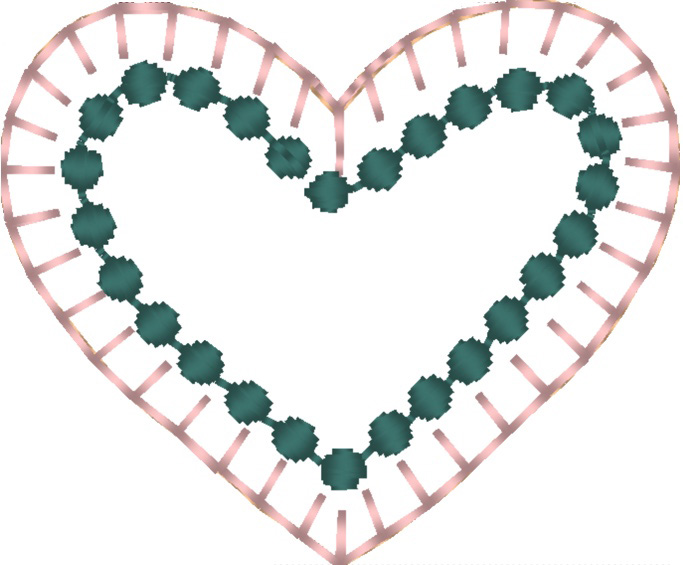
Brother Free Design_October_2019_Applique Heart.pes
- 1.71” Wide X 1.43” High
Steps to Create Pillow Panel
1. Create custom pattern for cup as follows:- Wrap paper tightly around cup and tape in place. See Figure #1a.
 Figure #1a[/caption]
- Fold paper at top and bottom of cup so it’s snug against top and bottom of cup. Mark top and bottom edges by rubbing with a pencil. See Figure #1b.
 Figure #1b[/caption]
- Using a seam gauge, measure evenly from the top and bottom edge, marking lines on paper to create desired size for the wrap. See Figure #1c.
 Figure #1c[/caption]
Note: In this example the wrap measures approximately 3-inches high, similar to wraps found in coffee shops.
- Slip paper off cup, press flat, and cut open along one folded edge. See Figure #1d.
 Figure #1d[/caption]
- Cut along lines marked for wrap. See Figure #1e.
 Figure #1e[/caption]
Note: Since entire cup area is marked you can choose to make a wrap that is larger if desired. This may require additional buttons and button loops to keep the wrap secured.
2. To allow for the thickness of the fabric, add ½-inch to each short edge of the pattern piece. Depending on your fabric you may need to trim some of this away before finishing the wrap. Use completed pattern to cut two matching pieces of felt, one for embroidered top piece and one for lining.
3. Transfer embroidery design to your machine. Create a design combination using the lettering from your built-in menu of fonts. Combination design featured in this example measures approximately 3 ¾-inches wide X 2 ¼-inches high. See example below:
 4. Select one piece of felt and fold in half to find the center of the whole piece. Next, mark the center of the halfway point between the first center mark and the short edge of the piece. This is where you want to align the center of your embroidery design combination. Hoop adhesive backed stabilizer, tear away the protective paper, and align center marking with center of hoop. Tip: To position a small piece like this in the center of the hoop, start by transferring the center marking to the wrong side of the fabric. Place the hoop over a gridded mat and line up the center markings on the hoop with the grid lines on the mat. See enhanced photo in Figure #2.
[caption id="attachment_21533" align="aligncenter" width="800"]
4. Select one piece of felt and fold in half to find the center of the whole piece. Next, mark the center of the halfway point between the first center mark and the short edge of the piece. This is where you want to align the center of your embroidery design combination. Hoop adhesive backed stabilizer, tear away the protective paper, and align center marking with center of hoop. Tip: To position a small piece like this in the center of the hoop, start by transferring the center marking to the wrong side of the fabric. Place the hoop over a gridded mat and line up the center markings on the hoop with the grid lines on the mat. See enhanced photo in Figure #2.
[caption id="attachment_21533" align="aligncenter" width="800"] Figure #2[/caption]
- Fold back fabric piece to expose the center marking. Next, align marking with center gridline showing through the stabilizer. See enhanced photo in Figure #3.
 Figure #3[/caption]
- Carefully secure fabric to stabilizer. Note how it is centered in the hoop. See Figure #4.
 Figure #4[/caption]
- After attaching hoop to machine you can make any necessary adjustments using your machine’s arrow keys to adjust the position of the design.
See steps for stitching appliqué below:
- Stitch outline and then place appliqué piece on top.

- Stitch next outline and then trim excess outside the line.

- Stitch finishing stitches.
 6. Remove fabric from hoop. Gently tear away stabilizer.
7. Set up sewing machine for sewing with a straight stitch. Select plain piece cut for lining. Trim away 1/8-inch from each short edge, making this piece slightly smaller than the top piece. Layer and then pin the two pieces together with wrong sides facing, easing the top layer to fit the lining. Fold elastic into a loop and slip into the short edge closest to embroidery, having loop extend 5/8-inch from the edge. See Figure #5.
[caption id="attachment_21536" align="aligncenter" width="800"]
6. Remove fabric from hoop. Gently tear away stabilizer.
7. Set up sewing machine for sewing with a straight stitch. Select plain piece cut for lining. Trim away 1/8-inch from each short edge, making this piece slightly smaller than the top piece. Layer and then pin the two pieces together with wrong sides facing, easing the top layer to fit the lining. Fold elastic into a loop and slip into the short edge closest to embroidery, having loop extend 5/8-inch from the edge. See Figure #5.
[caption id="attachment_21536" align="aligncenter" width="800"] Figure #5[/caption]
- Do a trial fit by wrapping the pinned piece around the cup to see if it fits. The two short edges should meet together without overlapping. Trim if necessary.
 Figure #6[/caption]
9. Wrap piece around cup and mark position for button opposite the elastic loop. See Figure #7.
[caption id="attachment_21538" align="aligncenter" width="800"]
Figure #6[/caption]
9. Wrap piece around cup and mark position for button opposite the elastic loop. See Figure #7.
[caption id="attachment_21538" align="aligncenter" width="800"] Figure #7[/caption]
- Securely sew button on by machine or by hand, taking care to create a small thread shank so button will easily go through loop. Note: You can add this shank by sliding the lever forward on the buttonhole foot. See arrow indicating lever in photo below:
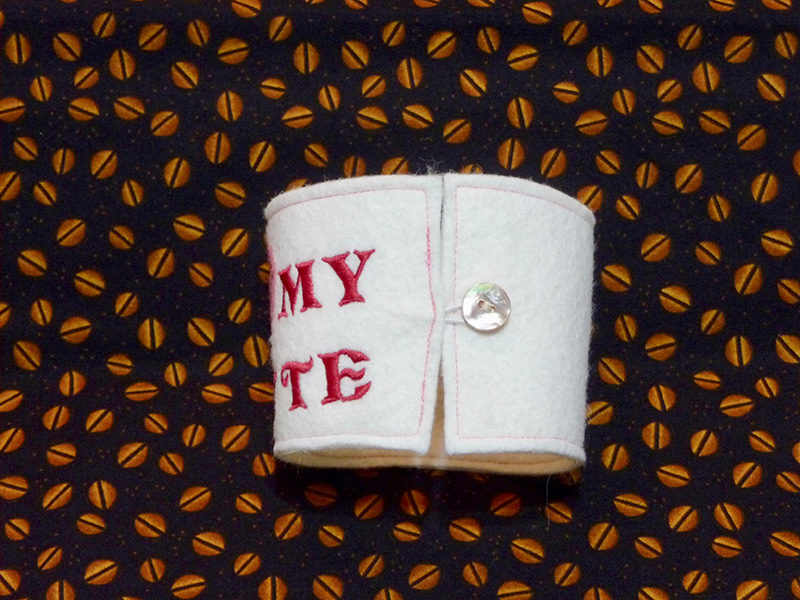
 You are finished! Enjoy!

Tip: Thoroughly dampen the piece and wrap around cup. Let dry and wrap will mold to the shape of the cup.

Related Projects
Stay Connected
* Required fields