Free Design: Monogrammed Hand Warmers
~Brother Sews Ambassador Cold hands, warm heart: you’ve probably heard that saying countless times. This project is designed to be a cure for those cold hands. Use your Brother sewing and embroidery machine and the Brother free design of the month to make monogrammed hand warmers from soft, no-fray fleece. It’s easy to make a hand warmer pattern for yourself or someone else, add custom embroidery, and stitch a pair of soft hand warmers. These keep your fingers free to perform tasks and help you stay warm, comfortable, and stylish at the same time. Are you ready? Let’s go sew!
Materials and Supplies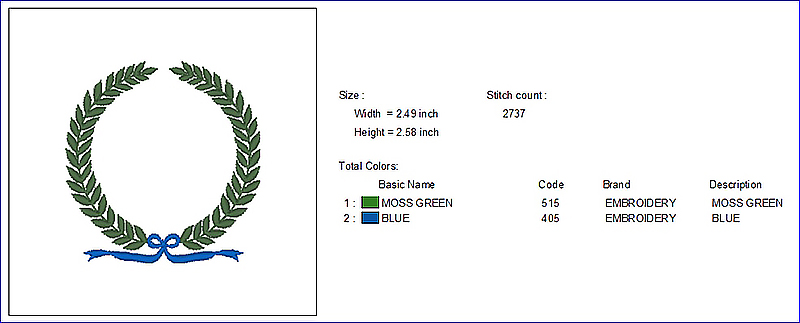 Figure #1a
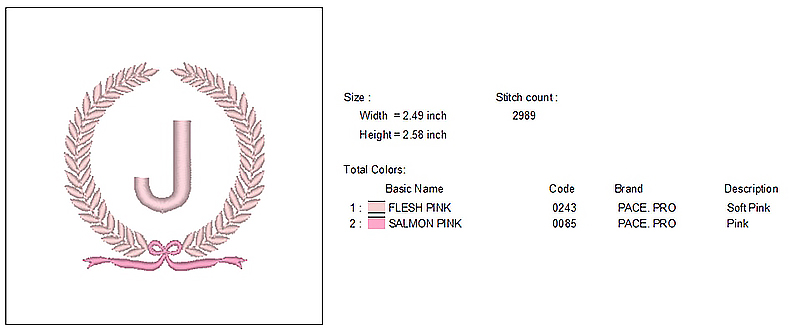 Figure #1b
Please read through all the instructions before beginning this project. Basic steps for creating monogrammed hand warmers:
1. Create pattern as follows: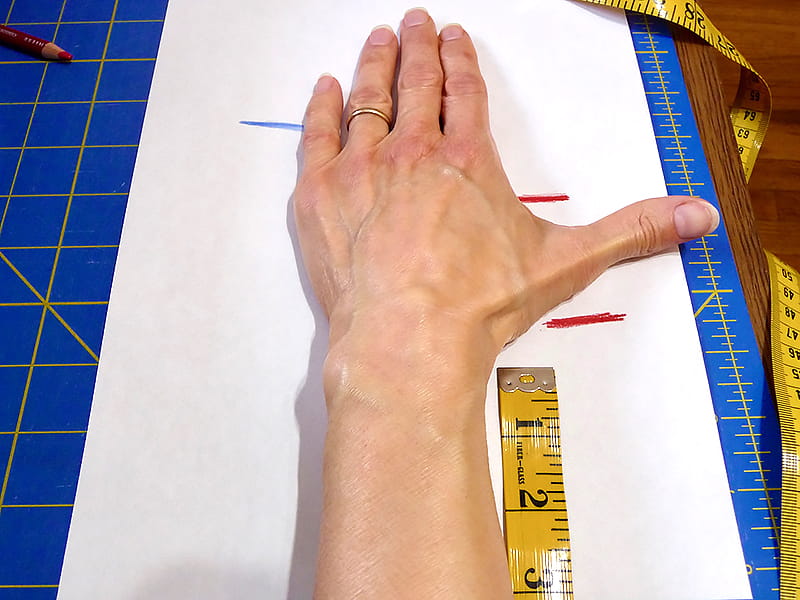 Figure #2
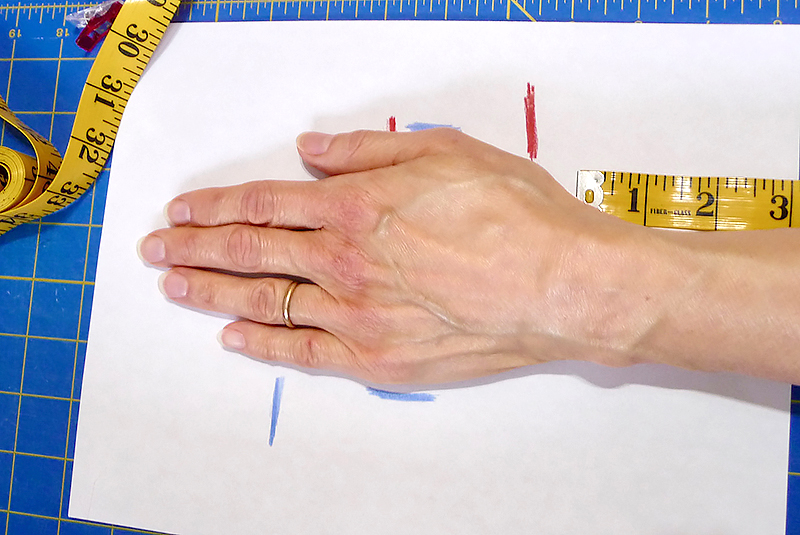 Figure #3
Tip: Spread fingers slightly if you want a looser fit for the finger openings stitched in step #8.
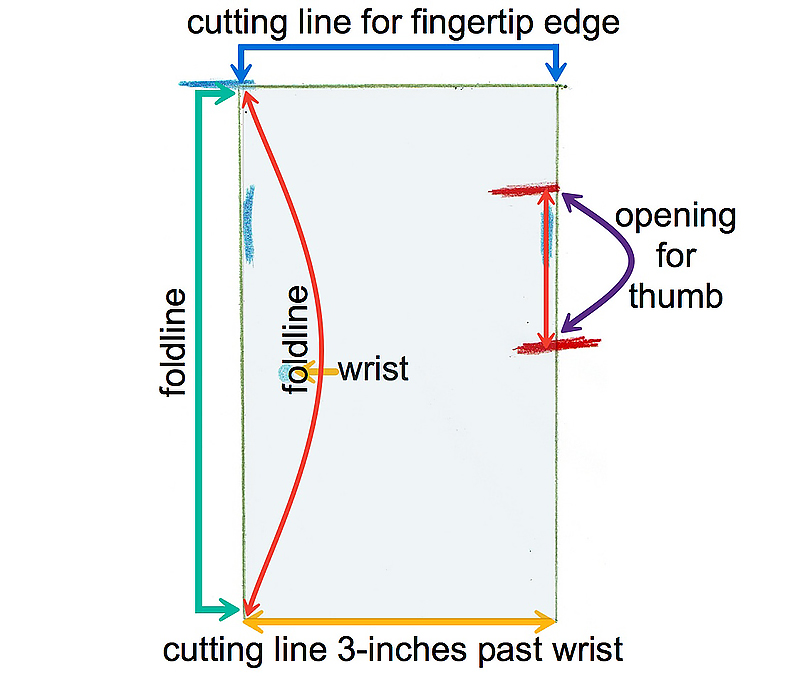 Figure #4
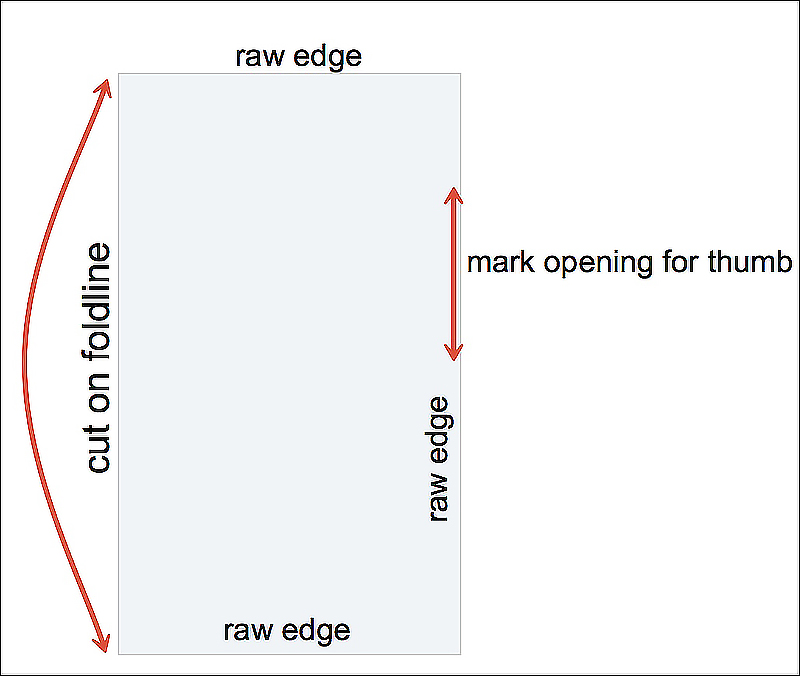 Figure #5
2. Use the pattern to cut two hand warmers, one for the left hand and one for the right, cutting pieces so the width corresponds with the stretchy grain of the fabric. Tip: Fleece stretches most along crosswise grain and less along the lengthwise grain. If you have trouble finding the right side versus the wrong side, pull the fabric along the selvedge edge and you’ll find that fleece curls to the right side. Mark openings for opposing thumbs on each piece. See Figure #6a and #6b.
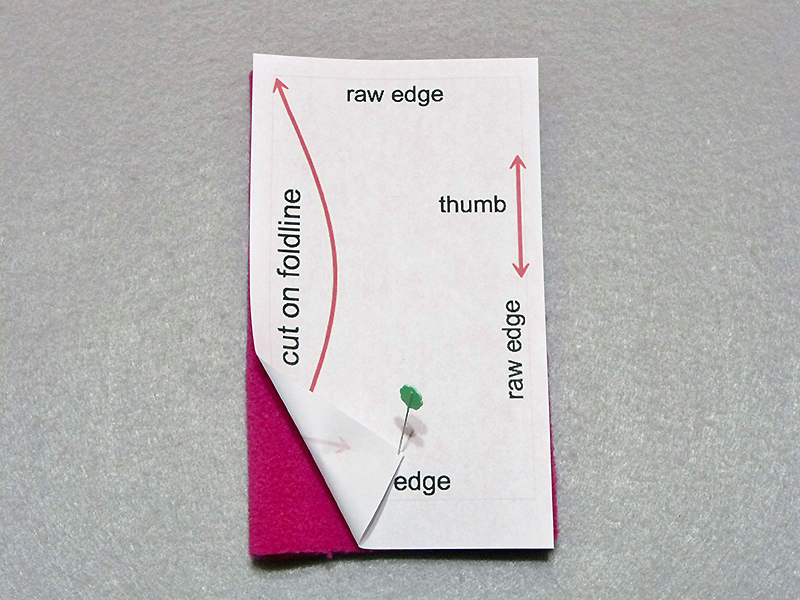 Figure #6a
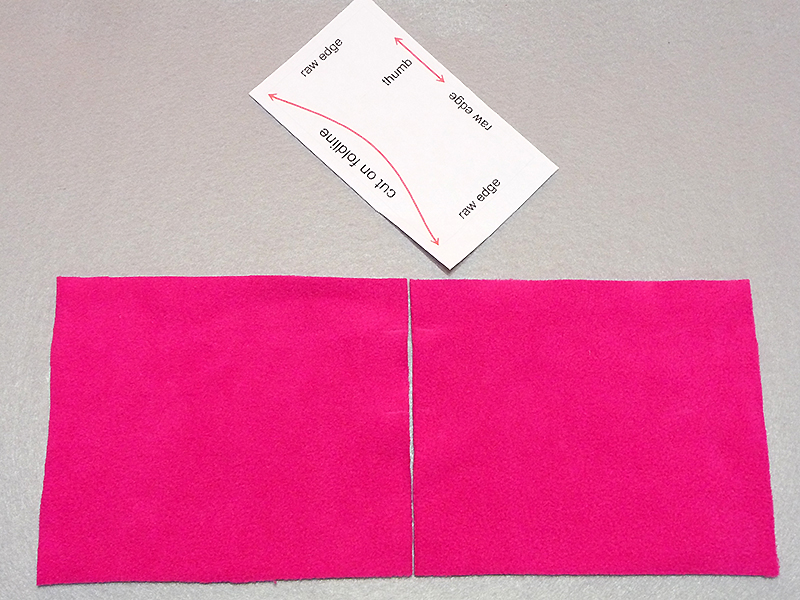 Figure #6b
3. Hoop adhesive stabilizer, score paper, and tear away to expose adhesive surface. Mark the first piece for embroidery, making the center marking for design placement 2-inches from the top edge and 2 ¼-inches from the raw edge at the wrist. See enhanced photo in Figure #7.
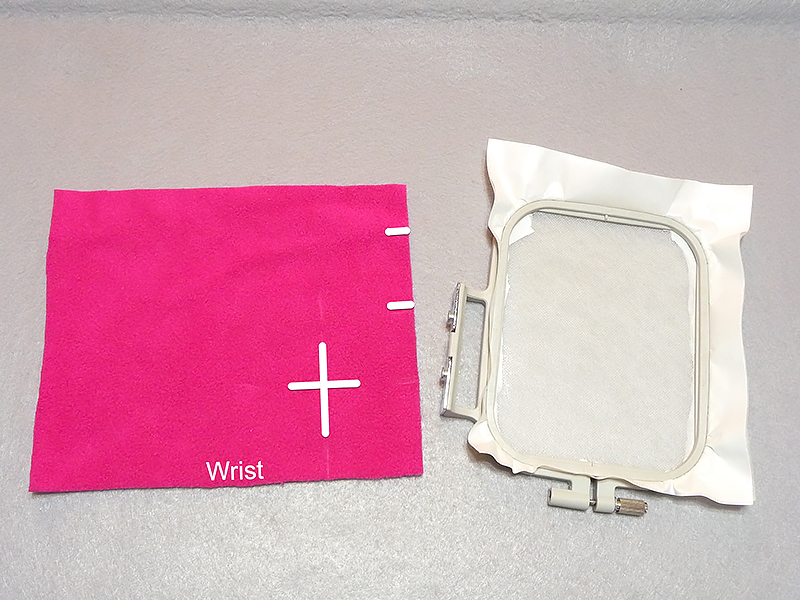 Figure #7
4. Transfer design to machine. Create a combination design by adding an initial to the frame. Secure fabric in the hoop with the straight, raw edge of the fabric along the straight edge of the inner ring of the hoop and the marking near the center of the hoop. Use the arrow keys in edit mode to fine tune the position until the needle points directly to the center mark. See Figure #8.
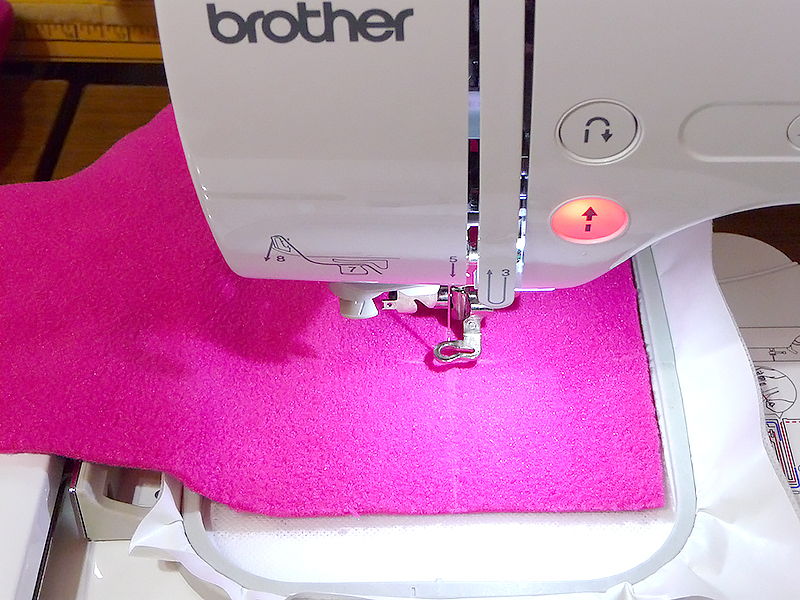 Figure #8
5. Place a piece of the adhesive backed stabilizer over the marked area to help keep stitches on top of the texture of the fleece. Embroider the design using desired colors, taking care to make sure the top layer of water-soluble stays flat during stitching. Tip: Be sure to stay with the machine while it is stitching. Use a wooden stick or bamboo skewer to hold the stabilizer down if necessary, keeping your fingers away from the stitching. See Figure #9.
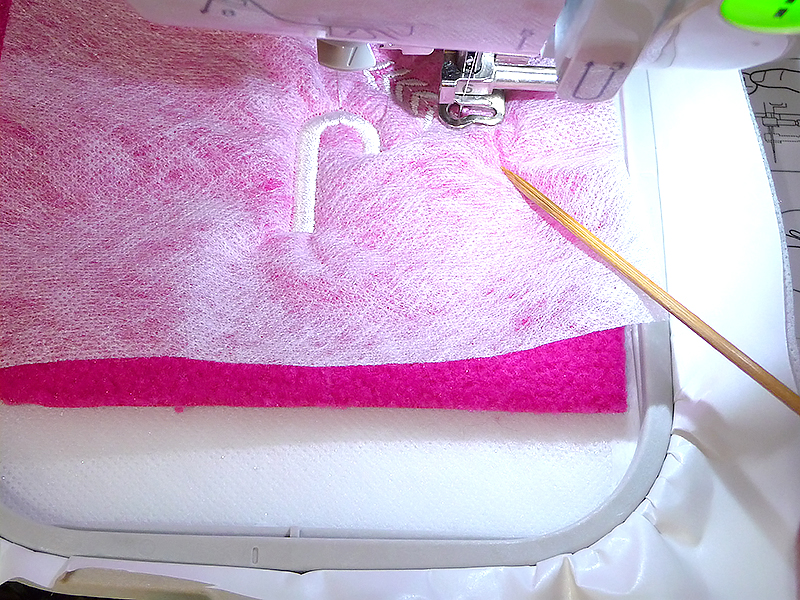 Figure #9
Embroider the opposite hand warmer, taking care to create a matched set with each embroidery design stitched close to edge marked for the thumb opening. See Figure #10.
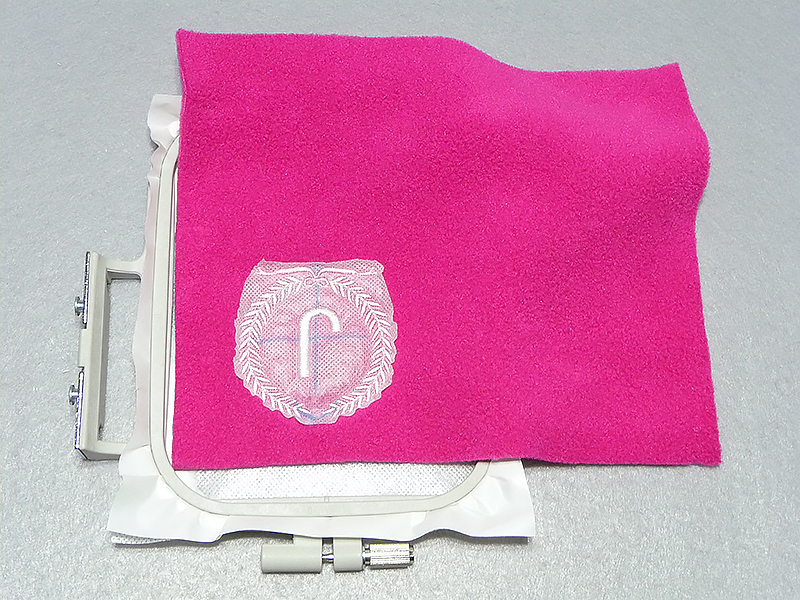 Figure #10
Tip: If you have the Brother BES Dream Edition software with Power Pack One
, you’ll want to read the tutorial at the end of these instructions where I show how to add nap control to embroider a design on fleece while keeping the pile of the fabric from coming up around the stitches. 6. Carefully cut away excess stabilizer. You can wash out all the excess now, or after finishing all stitching. 7. Referring to your pattern, place pins at the thumb openings and then pin fit and try on one hand warmer. Open fingers slightly and use pins to mark a stitching spot between each finger. See Figure #11a and Figure #11b.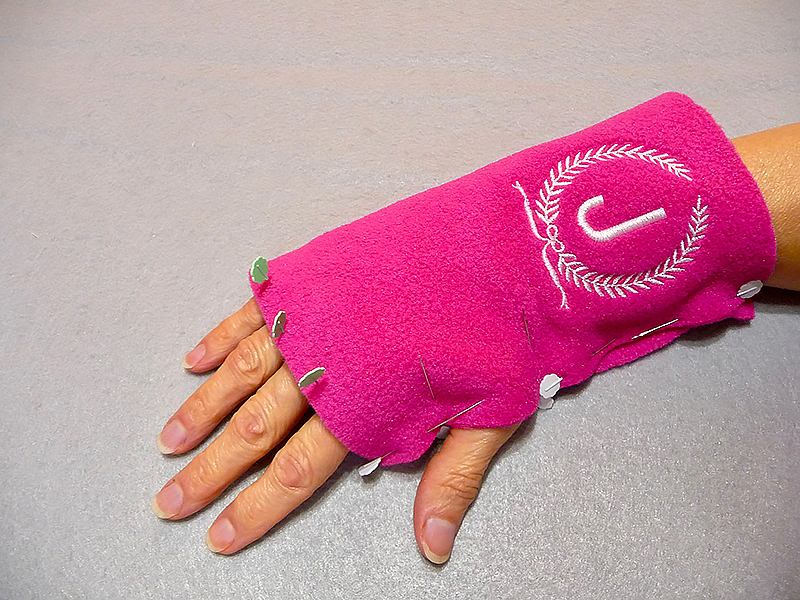 Figure #11a
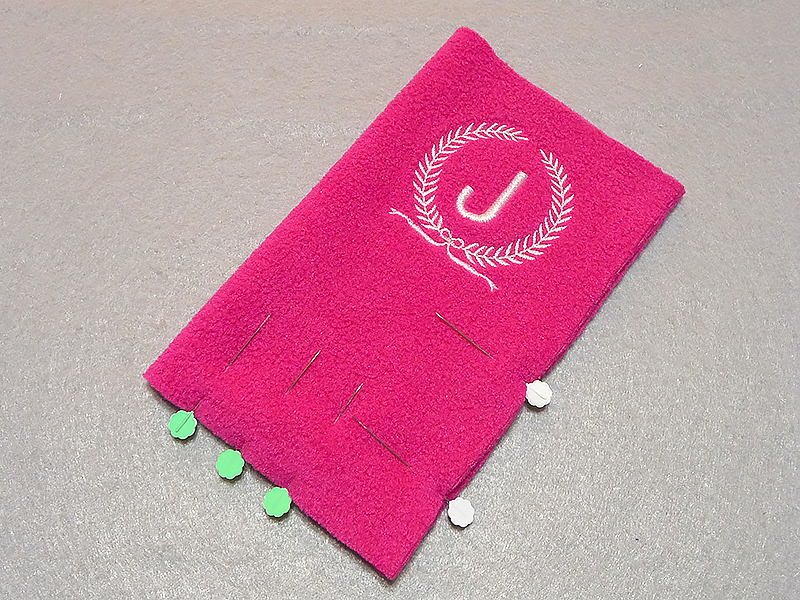 Figure #11b
8. Set up machine for sewing. Select a zig zag stitch set for width: 7.0 and length: 3.0. Place wrong sides together with raw edges matching and stitch the seam on the outside, back stitching at each start and ending point, and leaving the thumb area unstitched. Note: Be sure to fully catch the fabric in the stitch to make a closed seam. To sew, I lined up the raw edge with the inside edge of presser foot “A.” See Figure #12.
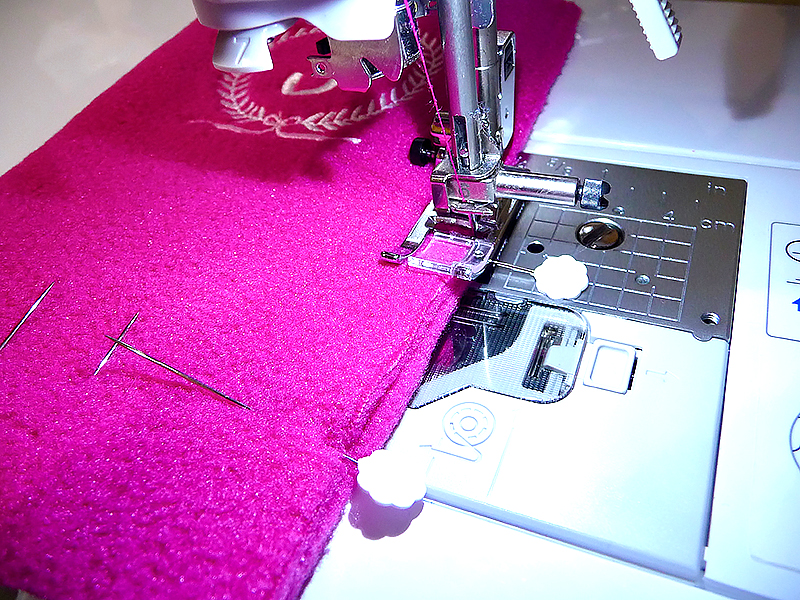 Figure #12
9. Use a narrow zig zag, width: 4.0 and length: 3.0, to sew a ½-inch long tacking stitch at each marked spot for fingers. See Figure #13.
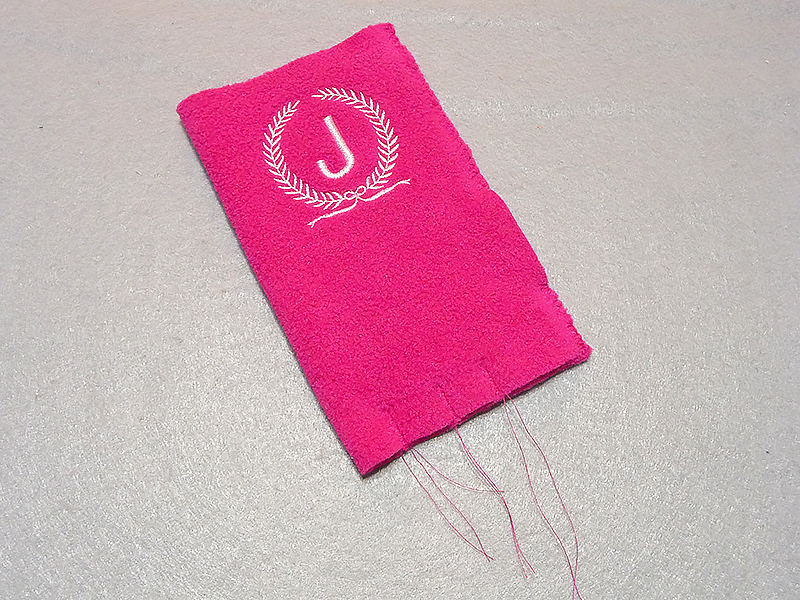 Figure #13
10. Repeat all sewing steps for the second hand warmer. Wash out stabilizer if you haven’t already done so. You are finished! Enjoy! See photo below for finished fleece hand warmers:
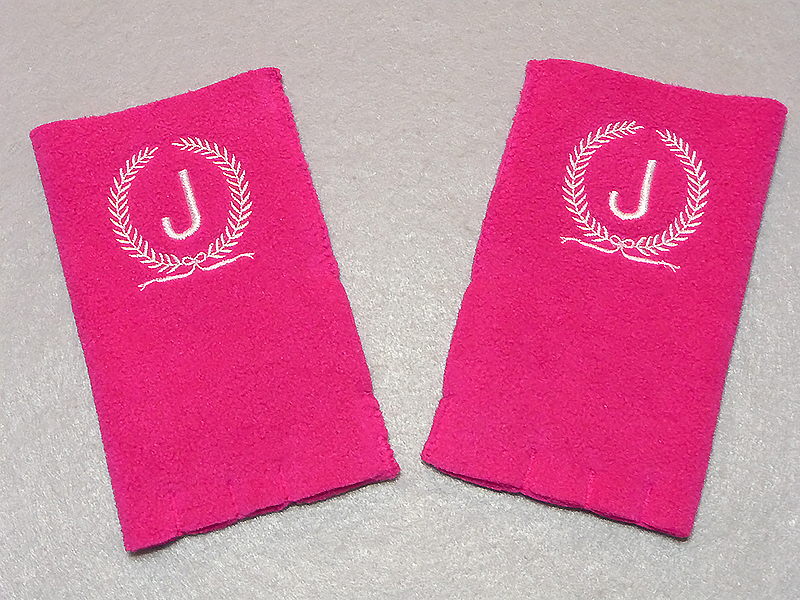 Figure #14
BES Nap Control Tutorial: Open monogram frame design in BES software. Add letter in center, resizing to slightly over 1-inch high. Tip: When using nap control your font choices are broader. Without nap control you need a solid letter in a block format. See Figure #BES1.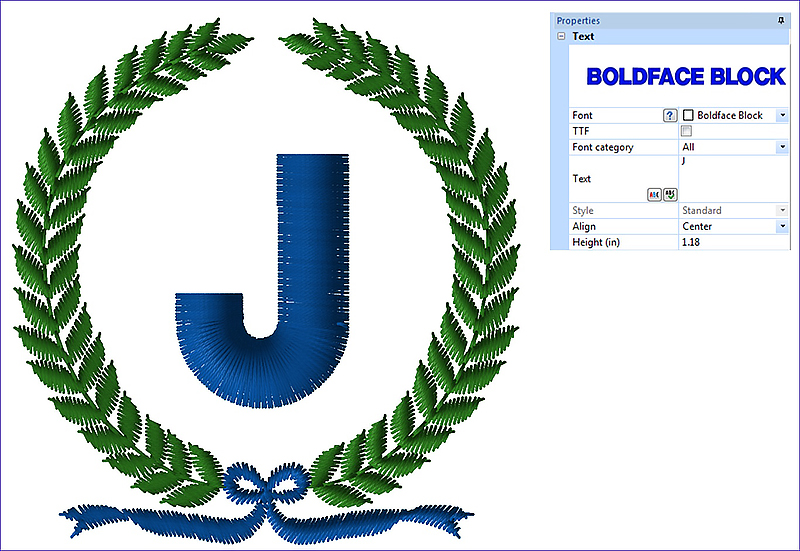 #BES1
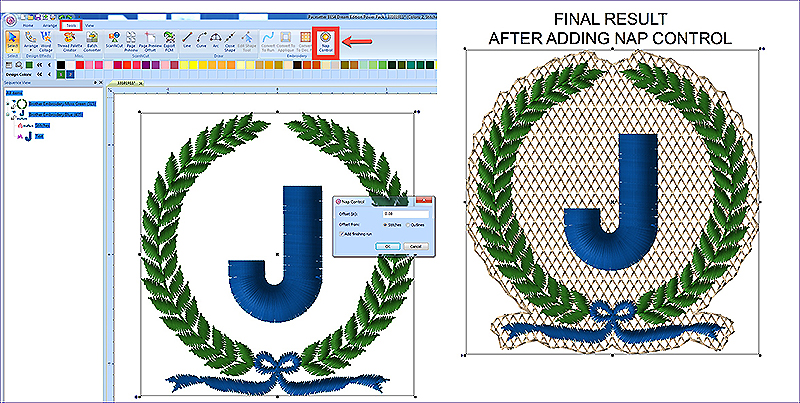
Click Select - Select all. Next, click on the Tools tab from the top menu and click on the Nap control icon. Check the box to add a Finishing Run to outline and neatly finish tack down stitches for nap control. Note: These stitches travel across the background area of the design, tamping down the nap so added design elements have a smooth base to lay on top of. With Nap control, pile or nap does not come up around your design. See Figure #BES2.
 #BES2
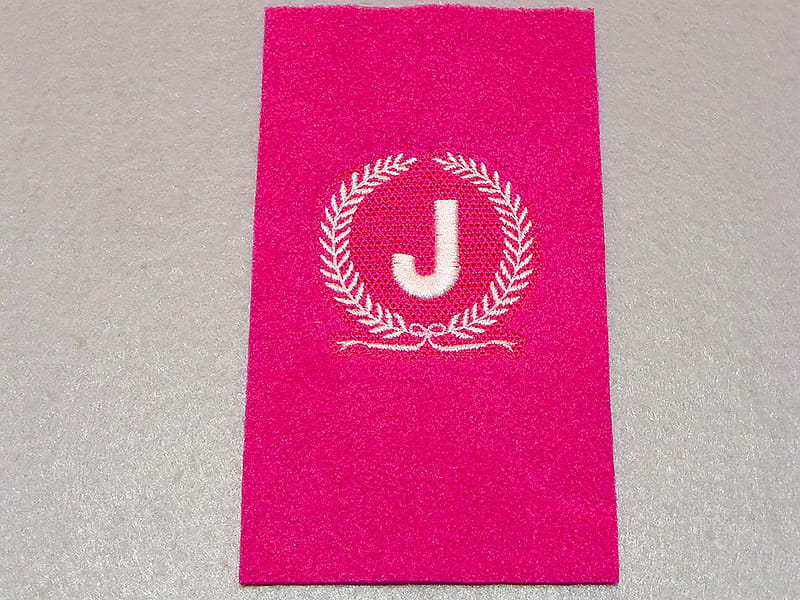
Transfer the design to your machine and embroider as described in the instructions. Wash away the stabilizer and notice the difference the nap control makes! See Figure #BES3.
 #BES3
Tip: Use the software to print a template of your design for easy placement.
Options and ideas:
Materials and Supplies
- Brother Sewing and Embroidery Machine
Note: Machine featured in this project is the Brother NS 1750D. You can use any machine with a 4 X 4-inch hoop to embroider this design. - Brother
Embroidery Threads and Bobbin Thread for embroidering. - SA5906
: Brother Adhesive Backed Water-Soluble Stabilizer for holding fleece fabric in the hoop. - SA540
: Brother Fibrous Water-Soluble Stabilizer for topping on fleece and decorative edging. - Basic notions, including a movable marker or chalk, and thread to match fleece fabric.
- Paper, plus blue, red, and green colored pencils for making the hand warmer pattern.
- Medium-weight fleece yardage or remnants for making one set of hand warmers. Note: Create the pattern in step one to determine fabric measurements.
- Brother Free Design of the month: Free Design January
See Figure #1a for size and original thread color information. See Figure #1b for completed design with modified colors.
 Figure #1a
 Figure #1b
Please read through all the instructions before beginning this project. Basic steps for creating monogrammed hand warmers:
- Create a custom pattern for your hands and cut fleece for each hand warmer.
- Embroider monogram frame with initial along top edge.
- Finish raw edges if desired.
- Sew seam, leaving opening for thumb hole.
1. Create pattern as follows:
- Place hand on paper with wrist 3-inches from the edge.
- Use the blue colored pencil to mark a line to show the center point of the pinkie finger. Open out your thumb and use a red pencil to mark a line above and below the thumb, indicating an open space for the thumb hole. See Figure #2.
 Figure #2
- With fingers closed, use blue colored pencil to mark the width of your hand at the widest point on each side. See Figure #3.
 Figure #3
Tip: Spread fingers slightly if you want a looser fit for the finger openings stitched in step #8.
- Remove hand. To complete the pattern, use the green pencil to draw a rectangle, starting at the lower edge of the paper where your wrist was positioned, using the blue line for your pinkie finger as the top edge and the two blue lines at the side for the width of the rectangle. Note the marked opening for the thumb hole. See Figure #4.
 Figure #4
- See complete pattern with notations for cutting and layout on fabric below in Figure #5.
 Figure #5
2. Use the pattern to cut two hand warmers, one for the left hand and one for the right, cutting pieces so the width corresponds with the stretchy grain of the fabric. Tip: Fleece stretches most along crosswise grain and less along the lengthwise grain. If you have trouble finding the right side versus the wrong side, pull the fabric along the selvedge edge and you’ll find that fleece curls to the right side. Mark openings for opposing thumbs on each piece. See Figure #6a and #6b.
 Figure #6a
 Figure #6b
3. Hoop adhesive stabilizer, score paper, and tear away to expose adhesive surface. Mark the first piece for embroidery, making the center marking for design placement 2-inches from the top edge and 2 ¼-inches from the raw edge at the wrist. See enhanced photo in Figure #7.
 Figure #7
4. Transfer design to machine. Create a combination design by adding an initial to the frame. Secure fabric in the hoop with the straight, raw edge of the fabric along the straight edge of the inner ring of the hoop and the marking near the center of the hoop. Use the arrow keys in edit mode to fine tune the position until the needle points directly to the center mark. See Figure #8.
 Figure #8
5. Place a piece of the adhesive backed stabilizer over the marked area to help keep stitches on top of the texture of the fleece. Embroider the design using desired colors, taking care to make sure the top layer of water-soluble stays flat during stitching. Tip: Be sure to stay with the machine while it is stitching. Use a wooden stick or bamboo skewer to hold the stabilizer down if necessary, keeping your fingers away from the stitching. See Figure #9.
 Figure #9
Embroider the opposite hand warmer, taking care to create a matched set with each embroidery design stitched close to edge marked for the thumb opening. See Figure #10.
 Figure #10
Tip: If you have the Brother BES Dream Edition software with Power Pack One
Figure #10
Tip: If you have the Brother BES Dream Edition software with Power Pack One, you’ll want to read the tutorial at the end of these instructions where I show how to add nap control to embroider a design on fleece while keeping the pile of the fabric from coming up around the stitches. 6. Carefully cut away excess stabilizer. You can wash out all the excess now, or after finishing all stitching. 7. Referring to your pattern, place pins at the thumb openings and then pin fit and try on one hand warmer. Open fingers slightly and use pins to mark a stitching spot between each finger. See Figure #11a and Figure #11b.
 Figure #11a
 Figure #11b
8. Set up machine for sewing. Select a zig zag stitch set for width: 7.0 and length: 3.0. Place wrong sides together with raw edges matching and stitch the seam on the outside, back stitching at each start and ending point, and leaving the thumb area unstitched. Note: Be sure to fully catch the fabric in the stitch to make a closed seam. To sew, I lined up the raw edge with the inside edge of presser foot “A.” See Figure #12.
 Figure #12
9. Use a narrow zig zag, width: 4.0 and length: 3.0, to sew a ½-inch long tacking stitch at each marked spot for fingers. See Figure #13.
 Figure #13
10. Repeat all sewing steps for the second hand warmer. Wash out stabilizer if you haven’t already done so. You are finished! Enjoy! See photo below for finished fleece hand warmers:
 Figure #14
BES Nap Control Tutorial: Open monogram frame design in BES software. Add letter in center, resizing to slightly over 1-inch high. Tip: When using nap control your font choices are broader. Without nap control you need a solid letter in a block format. See Figure #BES1.
 #BES1
Click Select - Select all. Next, click on the Tools tab from the top menu and click on the Nap control icon. Check the box to add a Finishing Run to outline and neatly finish tack down stitches for nap control. Note: These stitches travel across the background area of the design, tamping down the nap so added design elements have a smooth base to lay on top of. With Nap control, pile or nap does not come up around your design. See Figure #BES2.
 #BES2
Transfer the design to your machine and embroider as described in the instructions. Wash away the stabilizer and notice the difference the nap control makes! See Figure #BES3.
 #BES3
Tip: Use the software to print a template of your design for easy placement.
Options and ideas:
- Lengthen hand warmers as desired.
- Skip the stitching for finger holes if you want extra movement and a looser fit for your hand warmers.
- Add elastic to the wrist edges if you want a tighter fit in that area.
- Add stretch binding to wrist if you prefer a more finished look.


