Make Your Own Winter Beanie
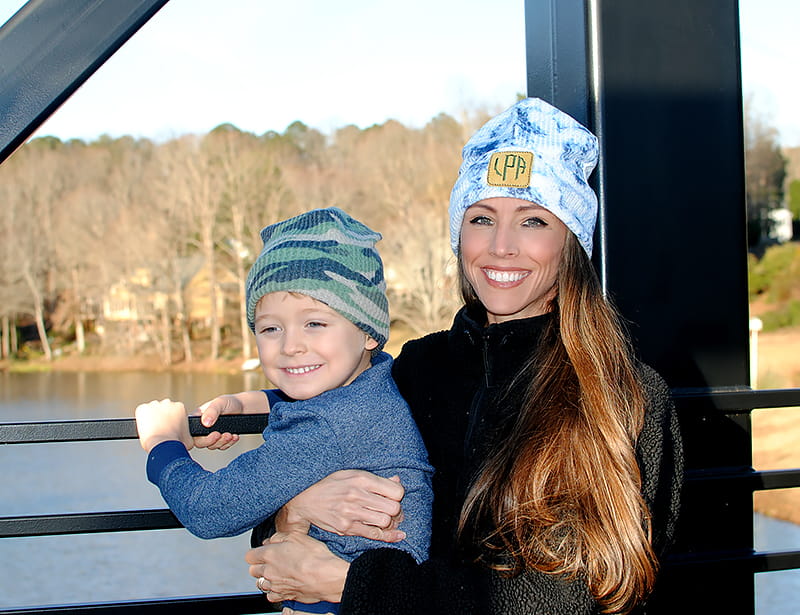
~Brother Crafts Ambassador As we approach the heart of the winter season, I wanted to make some cozy beanies for the family. We spend a lot of time outdoors regardless of the weather, so these hats will be useful for all of us. The beanie pattern is a rectangle with 4 even peaks along the top. You may need to adjust the size for your head, so be sure to make a sample hat first. You can make these gorgeous beanies in all types of stretchy materials, from knits to fleece. Get the details below.
Pattern: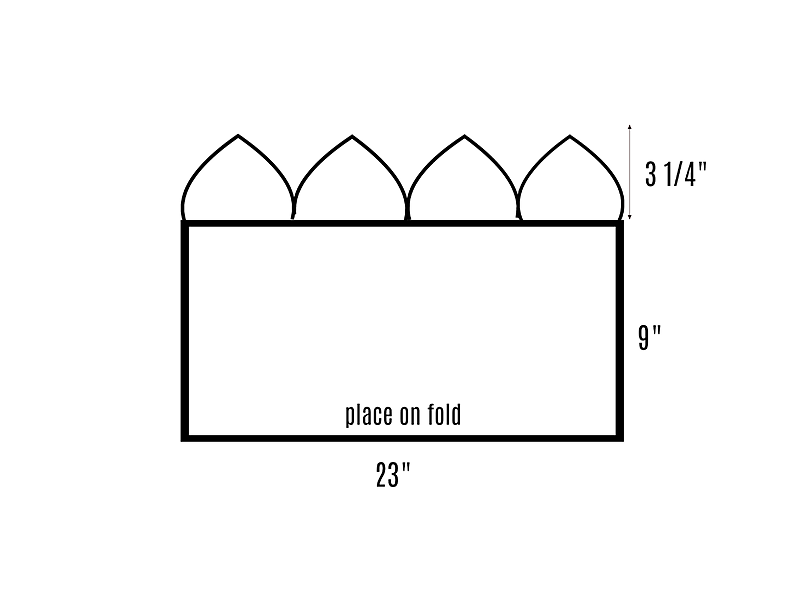 Step 1:
 Begin by creating your pattern.
This pattern is for an adult and meant to have a loose and slouchy fit. Begin with a rectangle measuring 23” wide by 9” then add four even peaks on the top that measure 3 ¼” high and about 5.75” wide. I created a triangle and then curved the side edges using my curved ruler. Edit the size of the pattern for children. My son’s hat (he’s 5) was 19” x 7.5” with a 3 ¼” peaks.
Tip: Make a sample hat with similar material before cutting into the main fabric you plan to use.This will help ou to make sure the pattern fits well to your head. You may find you want it smaller, shorter, or larger, etc. You can customize your beanie based on what you need!
Step 2:
Begin by creating your pattern.
This pattern is for an adult and meant to have a loose and slouchy fit. Begin with a rectangle measuring 23” wide by 9” then add four even peaks on the top that measure 3 ¼” high and about 5.75” wide. I created a triangle and then curved the side edges using my curved ruler. Edit the size of the pattern for children. My son’s hat (he’s 5) was 19” x 7.5” with a 3 ¼” peaks.
Tip: Make a sample hat with similar material before cutting into the main fabric you plan to use.This will help ou to make sure the pattern fits well to your head. You may find you want it smaller, shorter, or larger, etc. You can customize your beanie based on what you need!
Step 2:
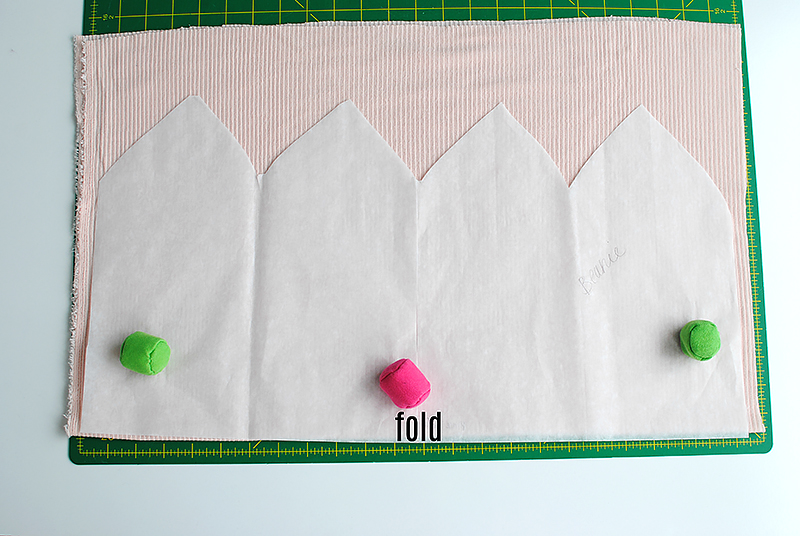 Place the pattern on the fold of fabric (you will cut two layers of this together) and cut. Make sure the material stretches horizontally.
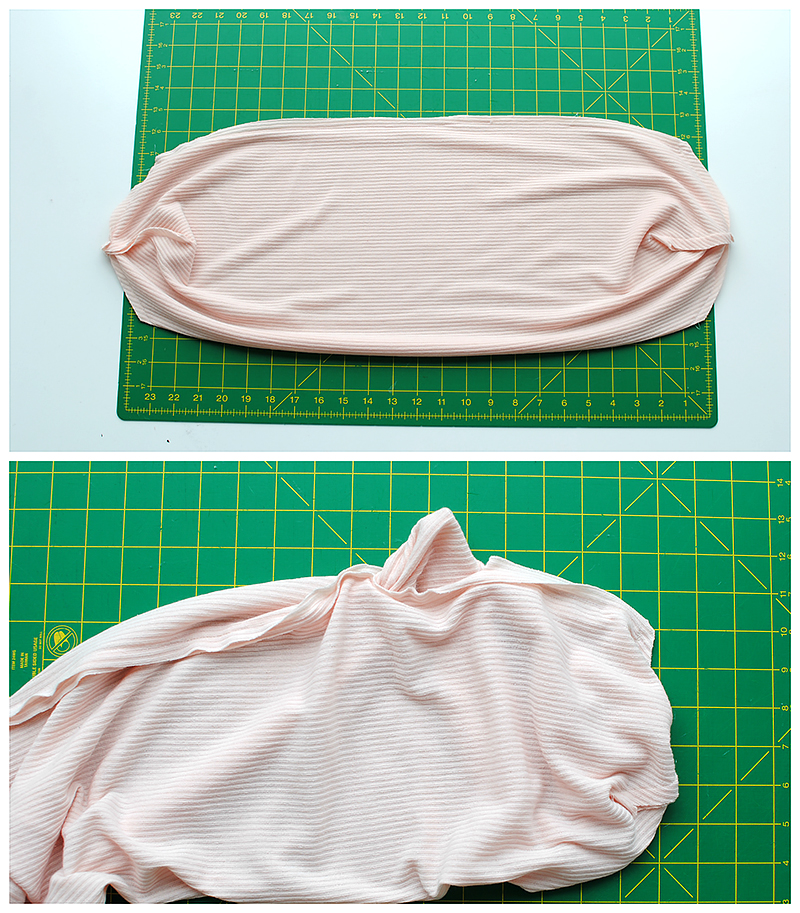
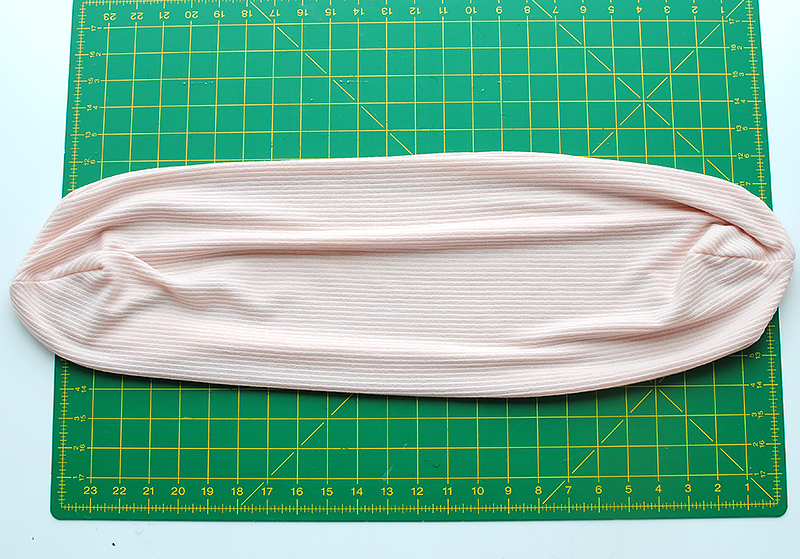
Step 3:
Place the pattern on the fold of fabric (you will cut two layers of this together) and cut. Make sure the material stretches horizontally.
Step 3:
 Your beanie will look like this when folded out.
Tip: If you want to create a reversible hat with two different sides, you can cut along the fold and cut the other side with the alternate material.
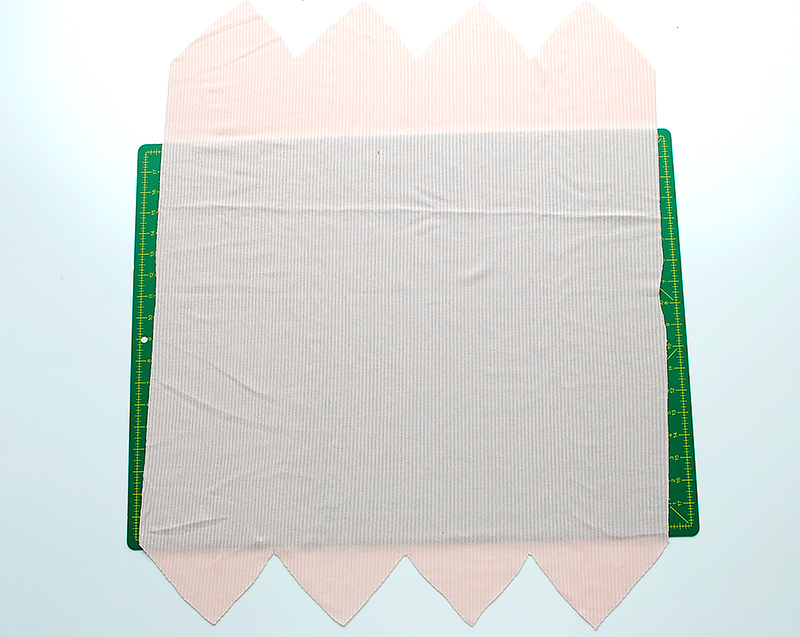
Step 4:
Your beanie will look like this when folded out.
Tip: If you want to create a reversible hat with two different sides, you can cut along the fold and cut the other side with the alternate material.
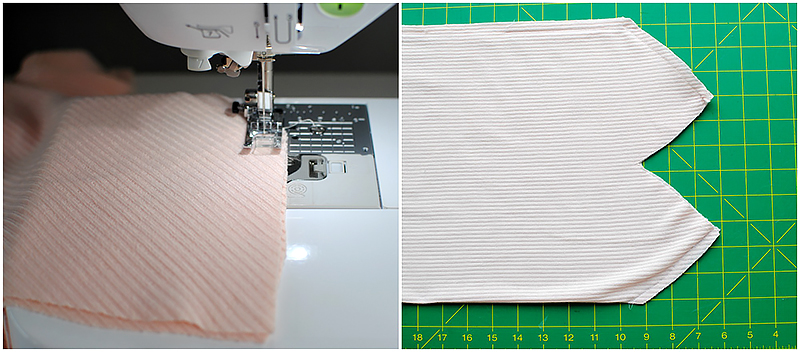
Step 4:
 Fold the right side together, matching the long sides, and stitch with a zig zag stitch. Leave a 3” opening on the side.
Step 5:
Fold the right side together, matching the long sides, and stitch with a zig zag stitch. Leave a 3” opening on the side.
Step 5:
 Stitch the side peaks on both sides (bottom and top) with 1/4” seam allowance (I used a straight stitch).
Step 6:
Stitch the side peaks on both sides (bottom and top) with 1/4” seam allowance (I used a straight stitch).
Step 6:
 Fold the peak that wasn’t sewn together so that it matches all the seams in the center. This will create a dome. Pin and stitch the curve on the bottom and top sides).
Step 7:
Fold the peak that wasn’t sewn together so that it matches all the seams in the center. This will create a dome. Pin and stitch the curve on the bottom and top sides).
Step 7:
 Flip right side out through the opening.
Step 8:
Flip right side out through the opening.
Step 8:
 It should look like this when flipped out. Fold one side in to create the beanie hat. Try the beanie on to make sure it fits. If it needs some adjustments flip the hat back through the opening and sew in a bit more until you are happy with the fit.
Step 9:
It should look like this when flipped out. Fold one side in to create the beanie hat. Try the beanie on to make sure it fits. If it needs some adjustments flip the hat back through the opening and sew in a bit more until you are happy with the fit.
Step 9:
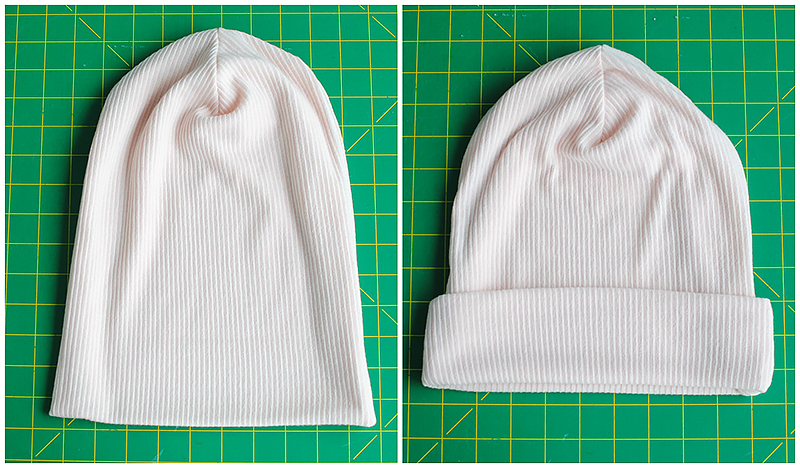 Once it fits to your liking, topstitch the opening. Fold up 2-3”.
Step 10/11:
Once it fits to your liking, topstitch the opening. Fold up 2-3”.
Step 10/11:
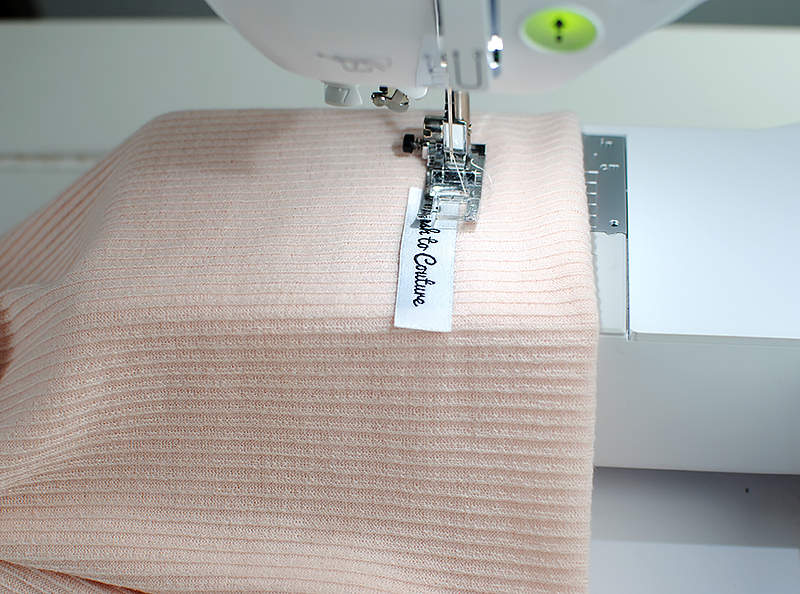 Add a tag or embroidered applique to the front by topstitching into place. Make sure it’s facing the proper way since you flip the bottom edge upward.
Add other fun details like faux fur pompoms, patches, machine embroidery, or tags to customize them. The end result will be a hat that is unique, comfortable, and cozy!
Add a tag or embroidered applique to the front by topstitching into place. Make sure it’s facing the proper way since you flip the bottom edge upward.
Add other fun details like faux fur pompoms, patches, machine embroidery, or tags to customize them. The end result will be a hat that is unique, comfortable, and cozy!

 CLICK HERE FOR PDF!
Pattern:
Step 1:
Begin by creating your pattern.
This pattern is for an adult and meant to have a loose and slouchy fit. Begin with a rectangle measuring 23” wide by 9” then add four even peaks on the top that measure 3 ¼” high and about 5.75” wide. I created a triangle and then curved the side edges using my curved ruler. Edit the size of the pattern for children. My son’s hat (he’s 5) was 19” x 7.5” with a 3 ¼” peaks.
Tip: Make a sample hat with similar material before cutting into the main fabric you plan to use.This will help ou to make sure the pattern fits well to your head. You may find you want it smaller, shorter, or larger, etc. You can customize your beanie based on what you need!
Step 2:
Place the pattern on the fold of fabric (you will cut two layers of this together) and cut. Make sure the material stretches horizontally.
Step 3:
Your beanie will look like this when folded out.
Tip: If you want to create a reversible hat with two different sides, you can cut along the fold and cut the other side with the alternate material.
Step 4:
Fold the right side together, matching the long sides, and stitch with a zig zag stitch. Leave a 3” opening on the side.
Step 5:
Stitch the side peaks on both sides (bottom and top) with 1/4” seam allowance (I used a straight stitch).
Step 6:
Fold the peak that wasn’t sewn together so that it matches all the seams in the center. This will create a dome. Pin and stitch the curve on the bottom and top sides).
Step 7:
Flip right side out through the opening.
Step 8:
It should look like this when flipped out. Fold one side in to create the beanie hat. Try the beanie on to make sure it fits. If it needs some adjustments flip the hat back through the opening and sew in a bit more until you are happy with the fit.
Step 9:
Once it fits to your liking, topstitch the opening. Fold up 2-3”.
Step 10/11:
Add a tag or embroidered applique to the front by topstitching into place. Make sure it’s facing the proper way since you flip the bottom edge upward.
Add other fun details like faux fur pompoms, patches, machine embroidery, or tags to customize them. The end result will be a hat that is unique, comfortable, and cozy!
CLICK HERE FOR PDF!Tags
Shop this Project
When inspiration strikes, Brother has you covered! The products in this stylish project are available for purchase so you can click, shop, and get to sewing!

Related Projects
Stay Connected
* Required fields