How To Turn A Canning Jar Into A DIY Mother’s Day Bouquet
Mother’s Day is the perfect time to get creative and give a truly unique, heartfelt gift. What could be more thoughtful than a custom-embroidered flowerpot paired with fresh blooms?
You can create something extraordinary using an everyday canning jar with just a few steps. Add a touch of flair with embroidered lace butterfly accents and a custom greeting, and you'll have a one-of-a-kind gift that will brighten anyone’s day. This project is designed for embroidery lovers and DIY enthusiasts who want to combine their creativity with embroidery techniques. In this embroidery tutorial, you'll learn techniques like sewing covers, free-standing embroidery, and using fun materials like tulle and fusible fleece. Let's get started!

Here’s what you’ll need to get started
Materials:
- Brother sewing and embroidery machine with 4-inch or larger hoop capability (I used the Brother NS17500D sewing and embroidery machine for this project.)
- SA580 medium-weight tear-away stabilizer
- SA541 water-soluble fibrous stabilizer
- Basic embroidery threads and embroidery needles
- You’ll need two layers of netting cut to fill the hoop you choose. One butterfly design will fit in the 4-inch hoop. You can stitch multiple butterflies in a larger hoop if you wish.
- Two 14.5” x 9” printed cotton fabric pieces for the cover (inside and outside)
- Two 5.5-inch circles of printed cotton fabric, cut using included pdf pattern
- Two rectangles of fusible fleece, measuring 13.5 inches wide x 8 inches long, for backing inside and outside cover pieces
- Two 4.5-inch circles of fusible fleece, cut using the included pdf pattern
- Curved-tip scissors for trimming
- Basic sewing notions, including good quality thread for sewing the cover
- Large needle with dull point, or small safety pin
- Circular patterns are included in the pdf files FD_5_22_5.5_Circle and FD_5_22_4.5_Circle.
- One 8-inch piece of white craft felt
- One yard of 1/4-inch wide satin ribbon
- Wide-mouth quart-size canning jar
- Wood chopstick or small dowl rod
- Fabric glue
- Butterfly Appliqué from iBroidery. See Figure #1 below
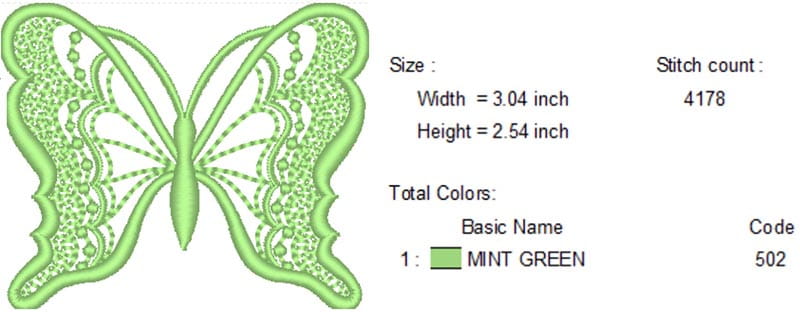 Figure #1
5 steps to make a custom jar bouquet with embroidered butterfly accents
1. Embroider lace butterfly accents
Hoop two layers of netting with a water-soluble stabilizer underneath. Embroider the butterfly design (you can fit one butterfly into a 4-inch hoop or more in larger hoops). Remove the hoop, trim excess netting, and wash out stabilizer with warm water. Lay your butterflies flat to dry, then lightly press them with a low-temperature iron.
Embroidery Tip: Leave a small edge of netting around the butterfly design; it vanishes on fabric, adding a floating effect to your butterflies.
Repeat these steps to create a total of four butterflies. See Figure #2a, #2b, and #2c.
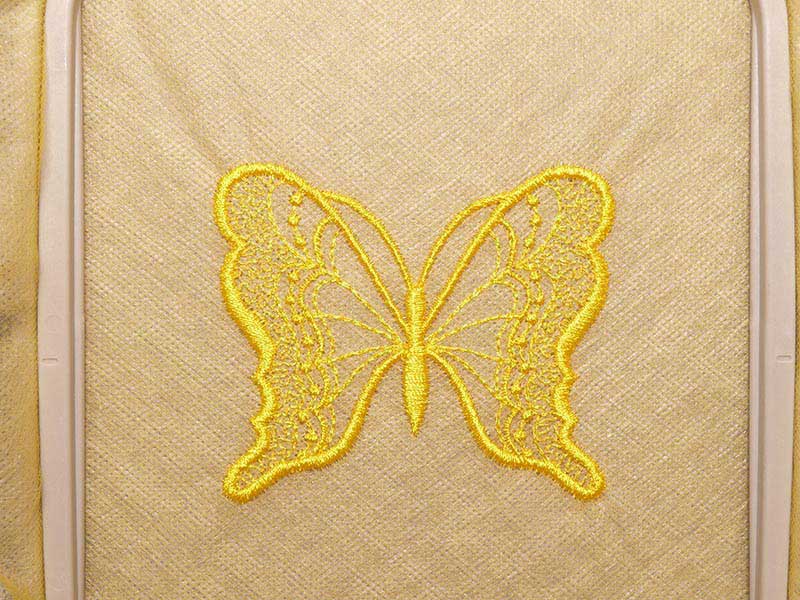 Figure #2a
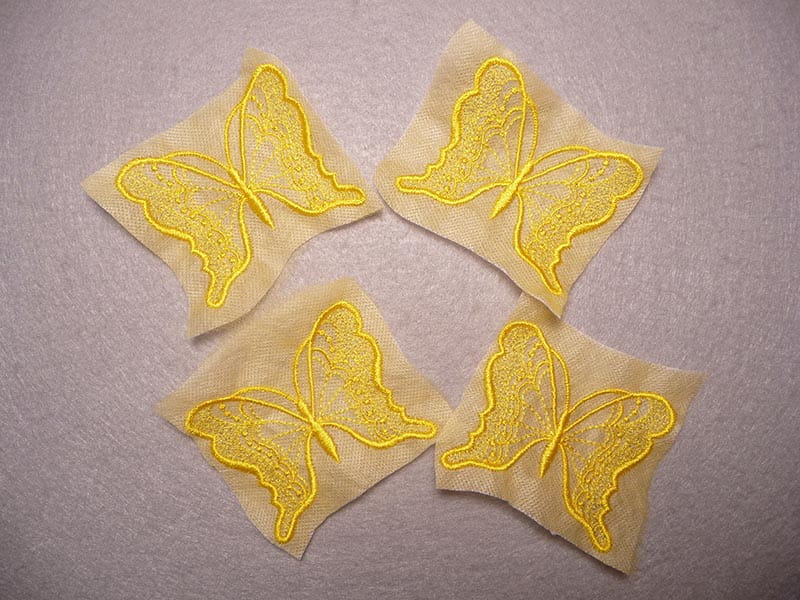 Figure #2b
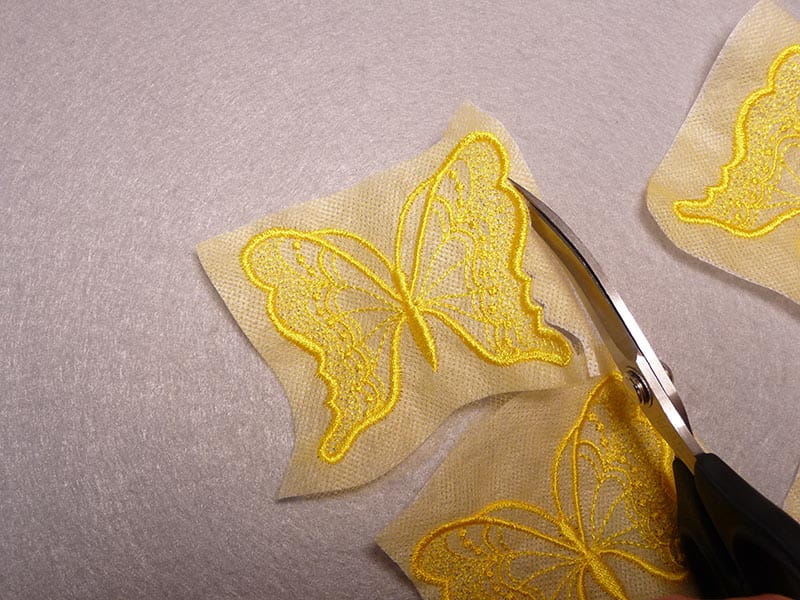 Figure #2c
2. Create your custom greeting
To personalize your bouquet, create an embroidered greeting using frame patterns and fonts built-in on your embroidery machine. For our example, we created a combination design with a scalloped oval, a second oval in a straight stitch, and a greeting in the center. See Figure #3 for the recommended sizes below.
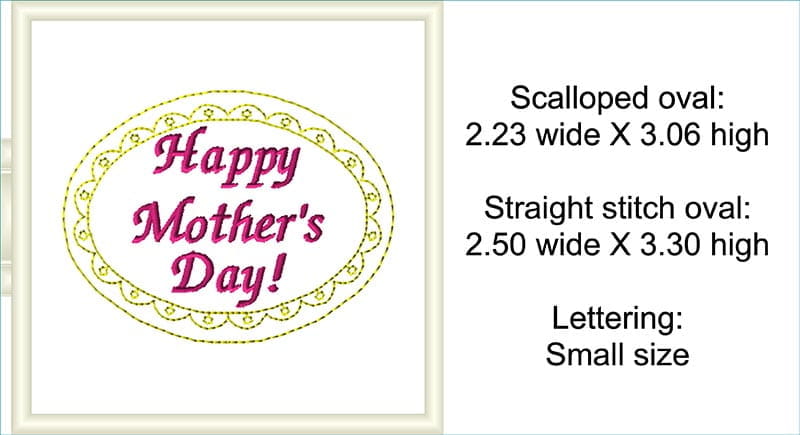 Figure #3
Hoop craft felt with tear-away stabilizer and embroider your design. Once completed, remove the stabilizer and trim the felt close to the outer stitching line.
Cut a matching oval piece of plain felt to use as a backing. Mark the position for two ½-inch long buttonholes in the center of the plain felt oval. Gather oval pieces together with your chopstick and prepare to finish greeting. See Figure #4.
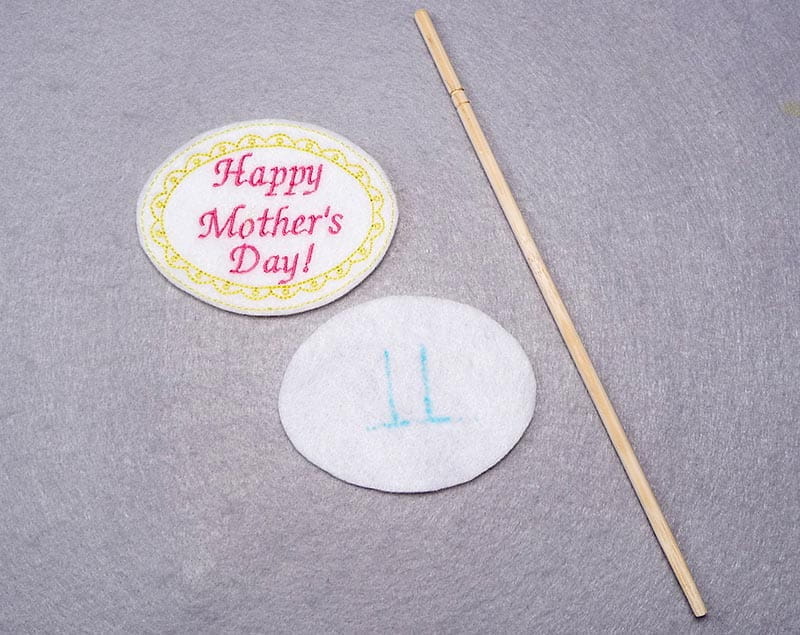 Figure #4
Set up the sewing and embroidery machine for buttonhole sewing. Open out the buttonhole foot approximately ½-inch or long enough to accommodate the size of your stick. See Figure #5a, #5b, and #5c.
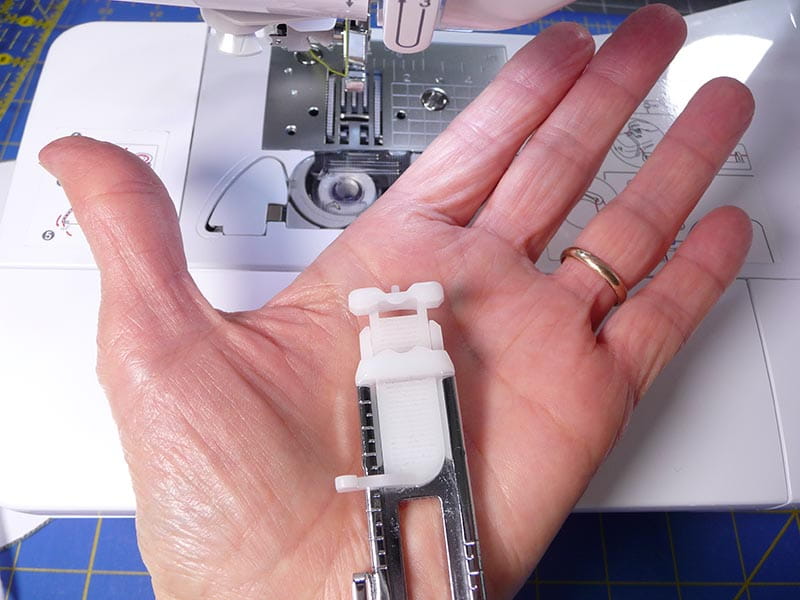 Figure #5a
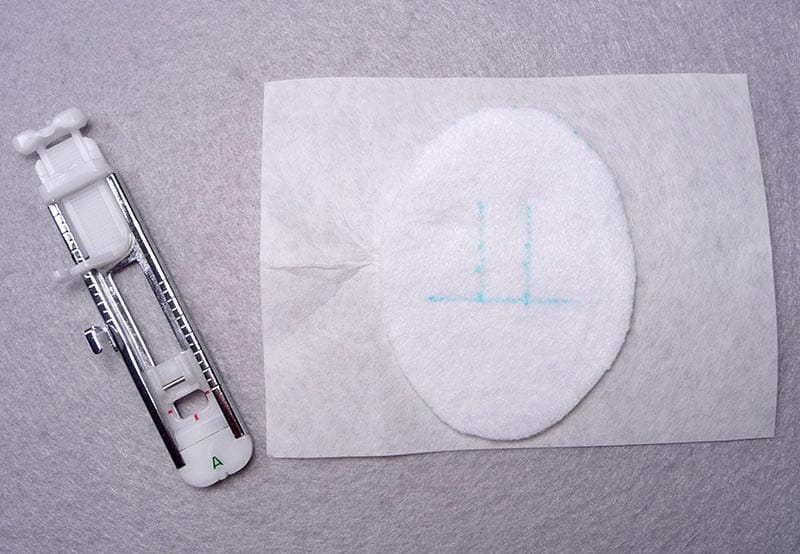 Figure #5b
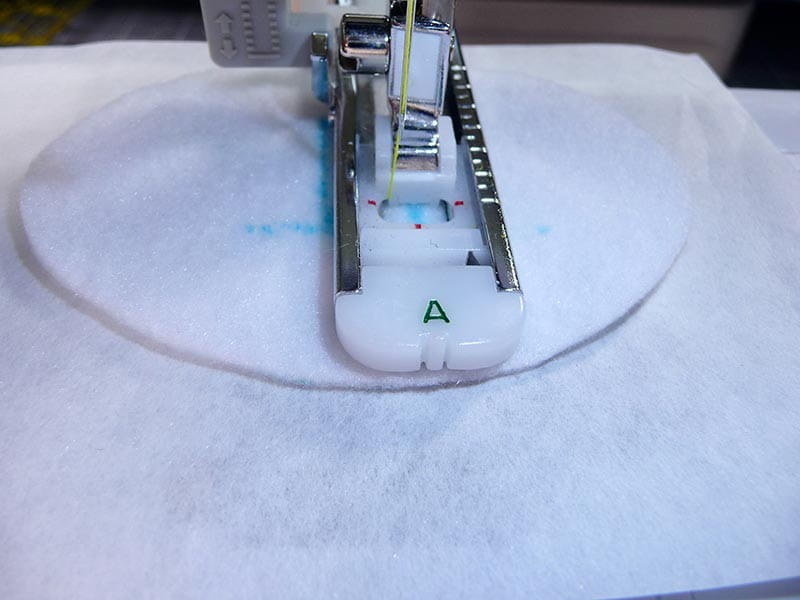 Figure #5c
Place a piece of tear-away stabilizer under the felt. Stitch two horizontal buttonholes in the center of the felt oval, one of each of the marked lines.
Cut the buttonholes open. Remove the stabilizer and markings.
Apply glue on the backside of the embroidered oval around the outer edge, keeping the center free from any glue. Place the oval with the buttonholes right side up on top of the embroidered piece, aligning the edges. Press down firmly to secure the layers together. Be sure the glue is dry before handling. Slip the stick through the buttonholes. See Figure #6a and #6b.
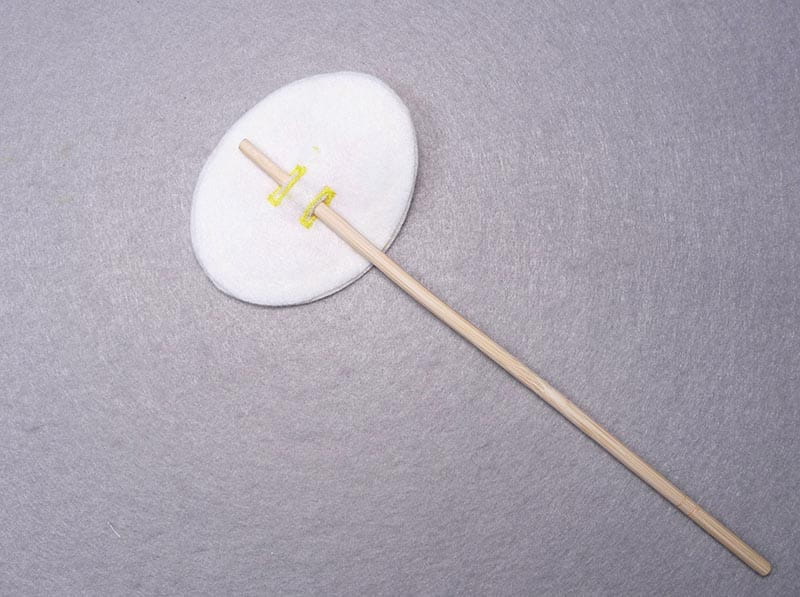 Figure #6a
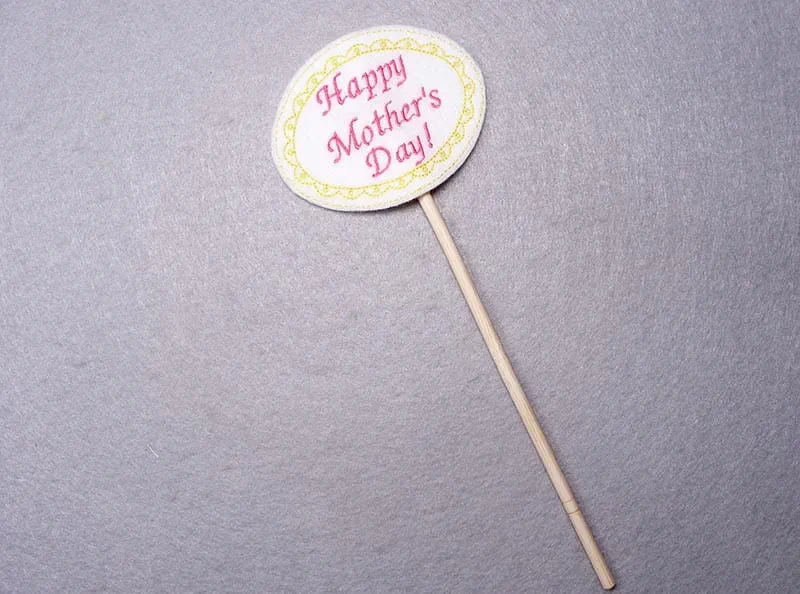 Figure #6b
3. Construct the canning jar cover
Next, start constructing the canning jar cover by gathering your cut pieces together. See Figure #7.
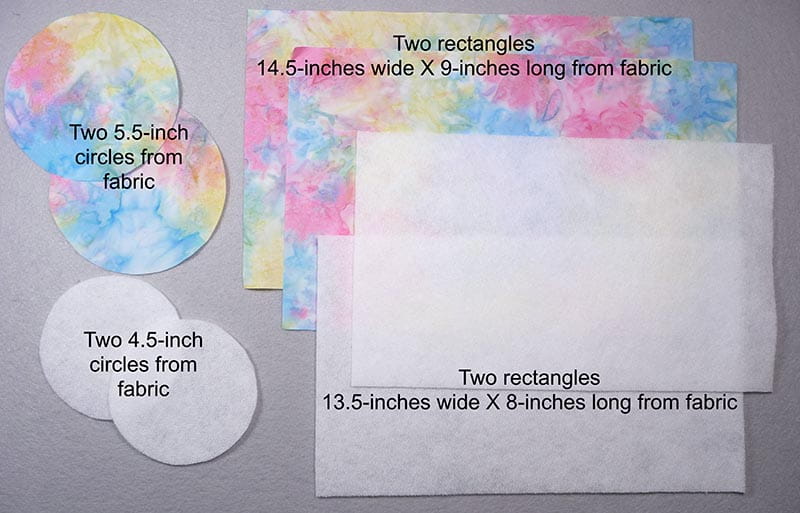 Figure #7
Center the fusible fleece pieces on the wrong side of each corresponding fabric piece and apply, following manufacturer’s instructions. Note: The fusible fleece is cut one inch smaller than the matching fabric piece, so the ½-inch seam allowance stays free from extra bulk.
Staystitch a scant ½-inch in from the edge at the bottom of each rectangular piece. Pin the short ends of each rectangular piece together to create a tube. Sew together with a ½-inch seam allowance. These tubular pieces will become the inside and outside of the cover. Prepare to sew the circle to the bottom of the cover by clipping up to, but not through, the staystitching, spacing clips about 1 inch apart. See Figure #8.
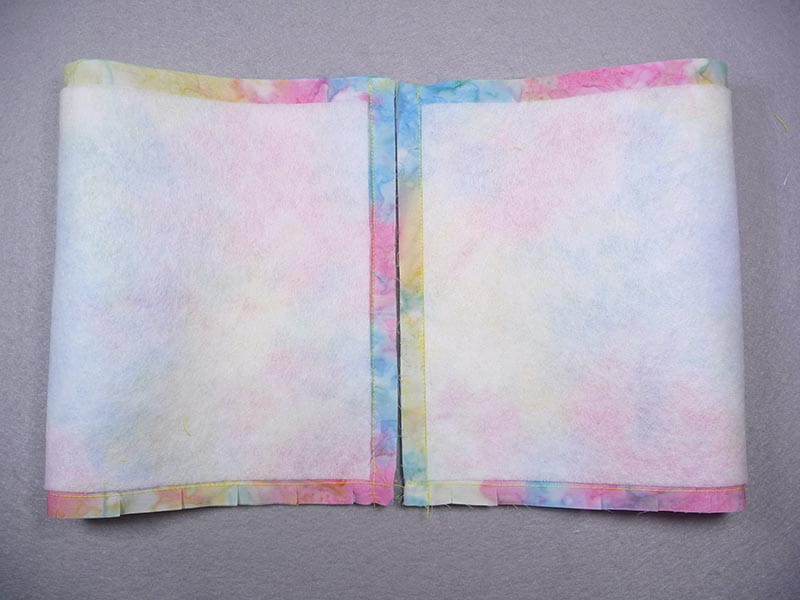 Figure #8
Press the center back seams open. Quarter each circle and tube, marking points with pins as shown. See Figure #9.
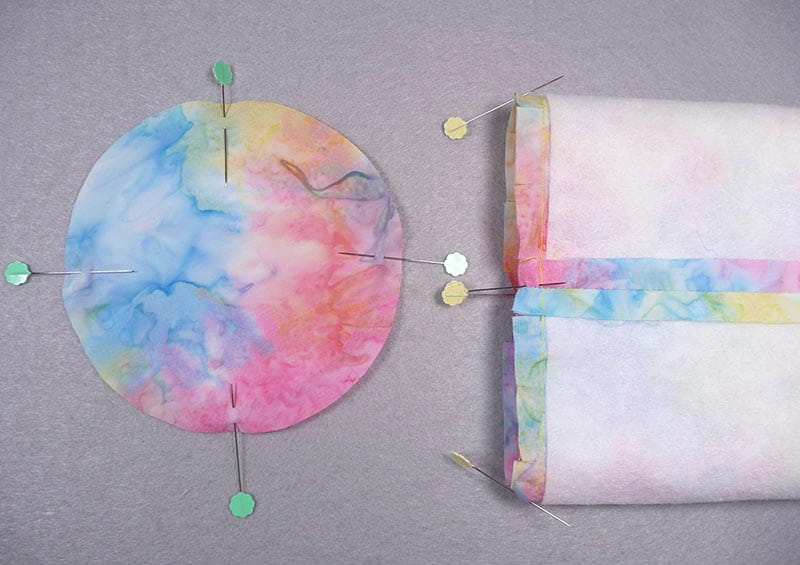 Figure #9
Next, pin one circle to one of the tubular pieces, matching quarter marks and keeping raw edges even. Ease the layers so they match from the beginning to the end. See Figure #10.
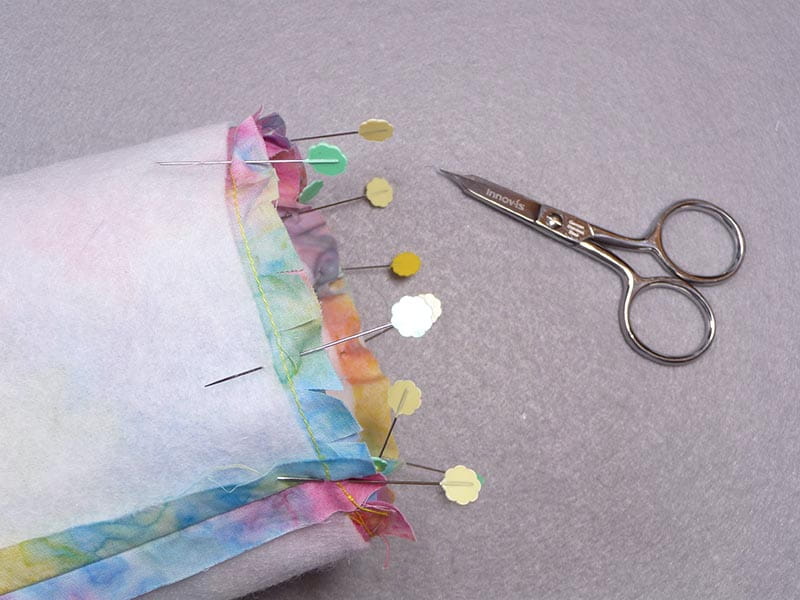 Figure #10
Sew pieces together using a 1/2-inch seam allowance, keeping raw edges even as you stitch. Sewing tip: Sewing a straight edge to a circular edge takes some maneuvering. Sew slowly, turning the fabric as needed. I like to stitch with the clipped edge facing up. Be sure your stitches form beyond the clippings for a secure seam. Repeat the process for the second set of pieces. See the example of finished bottom seam. See Figure #11.
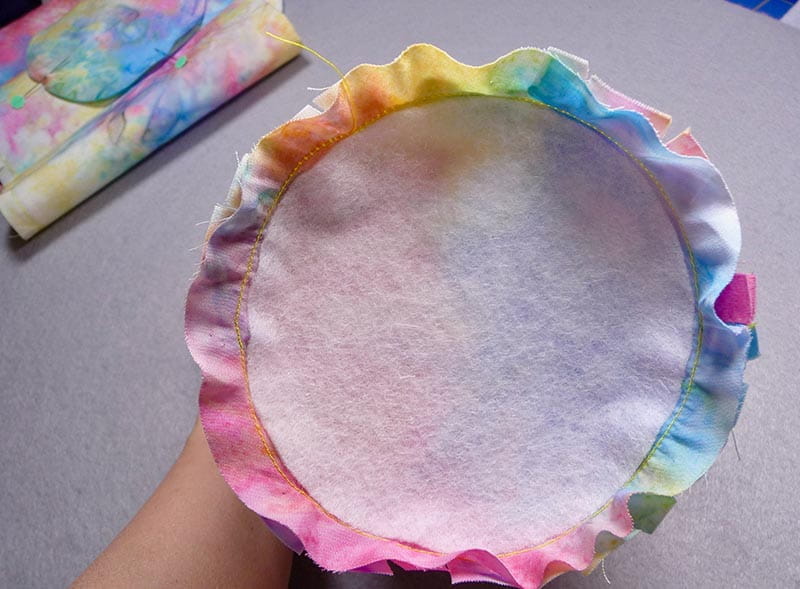 Figure #11
4. Assemble and add the decorative touches
Turn one container piece right side out. Turn and press under ½-inch on the unsewn end of each piece. See Figure #12.
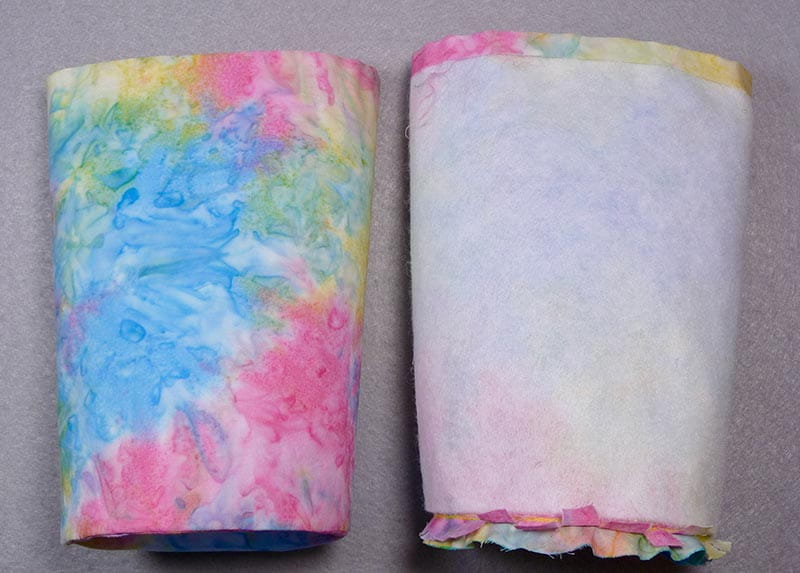 Figure #12
Place one container piece inside the other with wrong sides facing. Pin pieces together with center back seams matching. See Figure #13a.
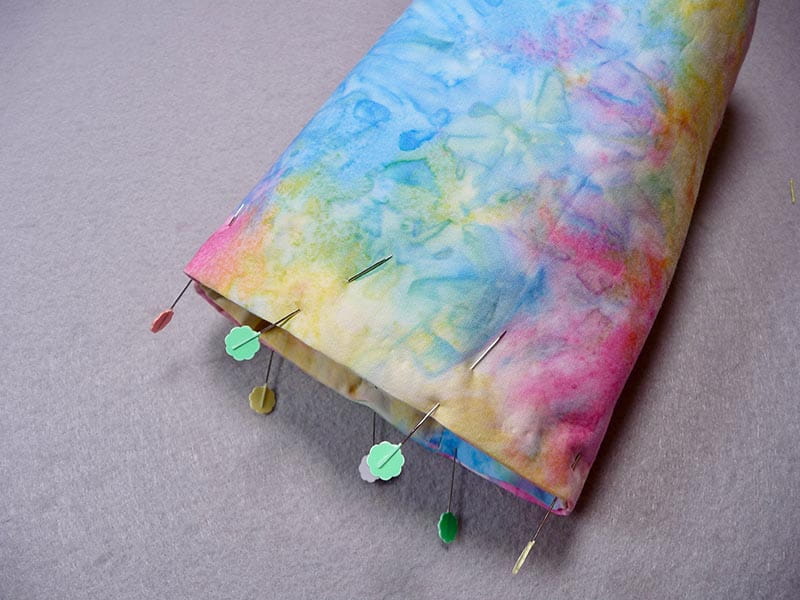 Figure #13a
Set the machine for free-arm sewing. Topstitch close to the top edge to secure the pieces together. See Figure #13b.
 Figure #13b
Press the container piece by rolling up a towel, pushing it inside, and carefully running the iron over the top of it. See Figure #14a.
 Figure #14a
You’re almost finished! Place the jar inside the cover and fold down the top edge to make a small cuff. See Figure #14b.
 Figure #14b
5. Add the final touch with flowers and greeting
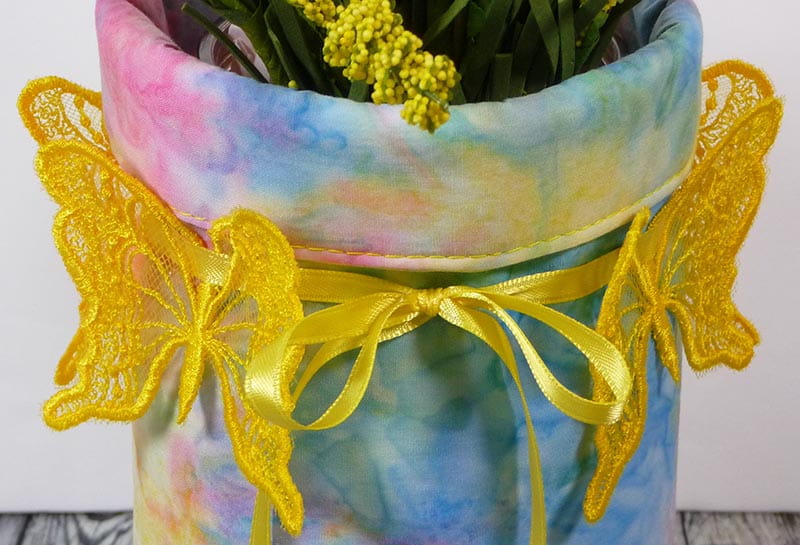
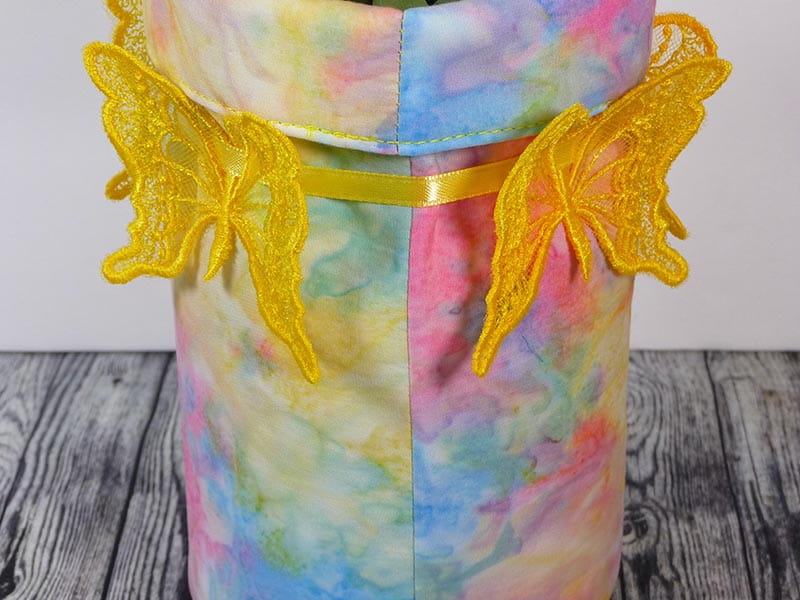
Cut small slits in the open area of each butterfly to make an opening for the ribbon to slip through. The red arrows below show the area to cut. See Figure #15.
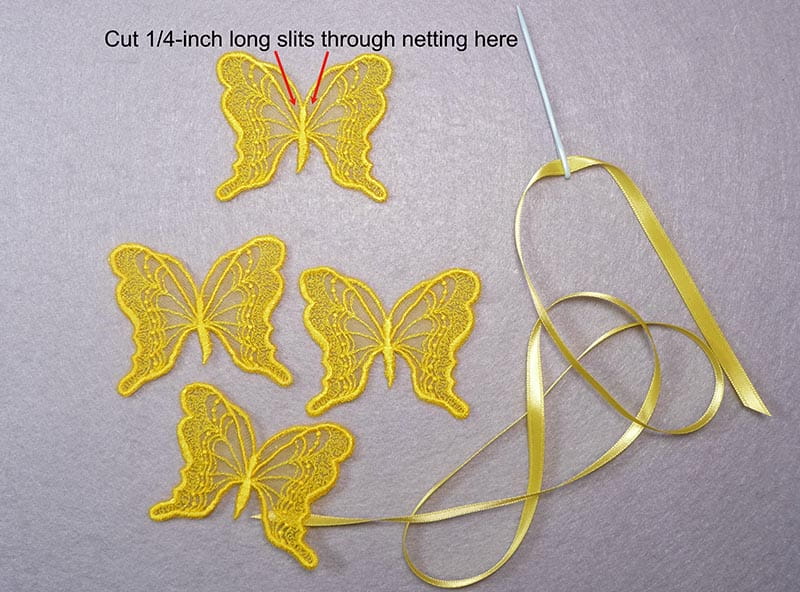 Figure #15
Use large eyed dull needle or safety pin to feed ribbon through the slits. See Figure #16.
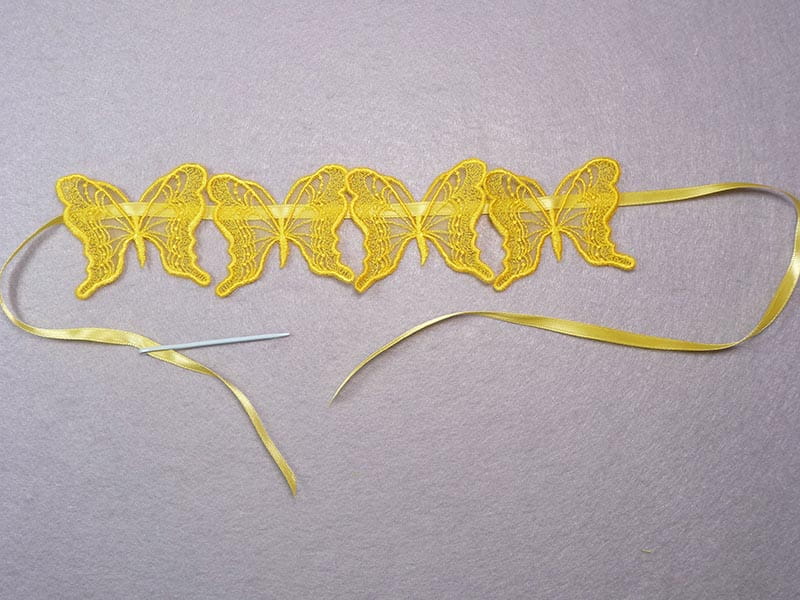 Figure #16
Wrap ribbon with butterflies around the top of the jar and tie it shut. Adjust so butterflies are evenly spaced along the top.
This butterfly embroidery project creates the perfect Mother’s Day gift
You are finished! You've just created a truly one-of-a-kind Mother's Day gift that’s beautiful, functional, and straight from the heart.Whether you're gifting it to your mom, grandmother, or another special person in your life, this custom bouquet is sure to brighten their day. Love projects that combine creativity and sewing? Discover more Mother’s Day gift ideas like custom flower pots or a stylish embroidered clutch.
Want personalized help or design tips for your next sewing project? Follow us at @BrotherSews to join our community of sewists who share ideas, advice, and inspiration.
FAQs
Q: What size embroidery machine hoop is required?
A: A 4-inch or larger embroidery hoop is ideal for this project. Make sure your hoop accommodates the butterfly design. Check out this embroidered bridal denim jacket or this DIY apron to get more familiar with using your embroidery hoop.
Q: Can I substitute materials?
A: Yes, feel free to use similar fabrics or ribbons you have on hand.
Q: What type of jar works best?
A: Wide-mouth quart-sized canning jars are ideal for this project, offering plenty of room for flowers while being easy to decorate.
Q: Are the butterflies washable?
A: Yes, they can be lightly spot-cleaned. However, avoid overhandling them to maintain their delicate design.
Q: Can I use this for other occasions?
A: Absolutely! Switch up the fabric or ribbon colors to make it suitable for birthdays, anniversaries, or any occasion where you want to brighten someone’s day.
Tags
Shop this Project
No sewing or embroidery machine? No problem! Any products mentioned in this project are available to buy here so you can stay stitching.

Brother Sewing and Embroidery Machines
Related Projects
Stay Connected
* Required fields