Ultimate New Year's Eve Sew A Long: Stylish Embroidered Knit Top
 I can hardly let a garment go without adding embroidery, especially when I am trying to dress it up for the holidays; and what better opportunity to do this than the Brother Sews Ultimate New Year’s Eve Project! This is a simple knit top to sew and I added the tulle sleeves for a little extra glam. This is a simple top to sew or use the techniques on a top you already own.

Supplies:
- Thread: Silver Metallic, 2 or 3 Shades of Grey Embroidery Thread, Navy Embroidery Thread
- Scissors
- Pins
- Steam Iron
- Tailor’s Clapper
- Pacesetter
lightweight water-soluble embroidery stabilizer - #1802
The Julia Top Sewing Pattern (available in December) You can use any pattern or refashion a shirt you already own. - Rayon or ITY knit fabric (use pattern yardage for your size)
- 1 yard tulle fabric for the sleeve

Machines I am using:
- Brother Double Coverstitch Machine CV3550
- Brother 5234PRW Serger
- Brother Luminaire Innov-ís XP1

Note: I am using my Julia Top #1802,
but you can also refashion a top for the same style. This episode of It’s Sew Easy tv
will show you how to alter a pattern or add a ruffle.
1. Wash and dry your fabric before cutting the pattern out.
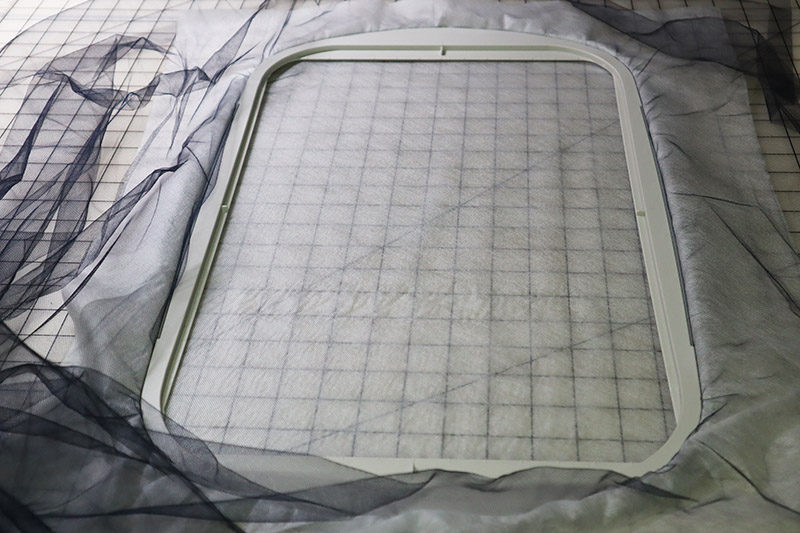
2. Cut the embroidery stabilizer and tulle longer than needed. For example, if you are embroidering a sleeve, cut the tulle and stabilizer at least 4” longer in order to rehoop.
3. Hoop the Washaway Embroidery Stabilizer and tulle fabric. Pull the Pacesetter lightweight water-soluble embroidery stabilizer tight and make sure the tulle is even in the hoop. Tighten the embroidery hoop.
but you can also refashion a top for the same style. This episode of It’s Sew Easy tv
will show you how to alter a pattern or add a ruffle.

 4. Choose an embroidery design in the machine or check out www.iBroidery.com for additional options.

 5. This is the design I chose, but the colors won’t work for my navy and gray theme.
 6. With this many colors, I find COLOR SHUFFLE the easiest to see the changes.

 7. Here you have the option to choose how many colors you want to use and then click on the colors.
 8. I decided to stick with 4 colors, one of them being Brother Metallic Thread – feel free to use as many as you want! The machine will shuffle the colors you chose into various options.
 9. If you don’t find a colored design you like, choose additional colors or change the colors all together. It’s very easy to go back and forth until you are satisfied with one of the designs. Also, if you click on one of the designs, the image will appear larger and then you can scroll through the different designs.


 10. Use the editing options to duplicate the designs or add additional designs, rotate, change the size, and layout the sleeve or front decor.


 11. When happy with the design layout, it’s a good idea to save it to the MEMORY, especially if you are embroidering 2 sleeves or additional designs.
 12. Here is a look at my final layout.
 13. Embroider. Next, rehoop the stabilizer and tulle. Rehoop as needed for as long of a piece of fabric needed.
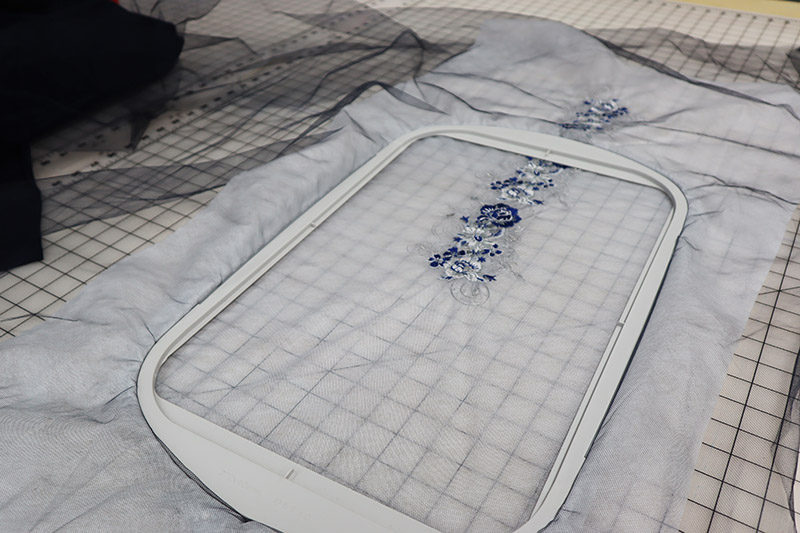 14. Use the center markings on the hoop to line up the fabric in the hoop. When finished embroidering, wash away the embroidery stabilizer and press the fabric.

 15. If embroidering fabric for a sleeve, layout the pattern underneath the fabric as shown. I am using french seams on my tulle fabric, so I will add ¼” to each sleeves seam.
 16. I embroidered a second piece of tulle for a neckline decoration.
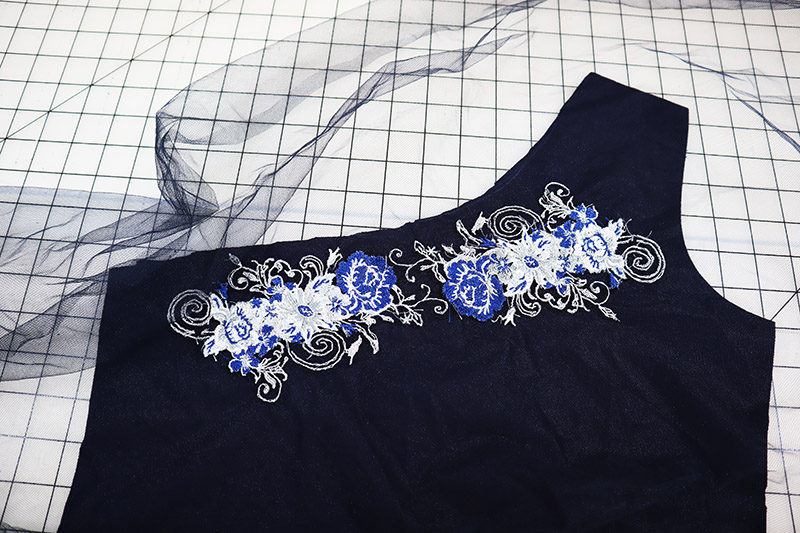 17. Because the fabric on the top is a knit and the top is fitted, I decided to attach the embroidered tulle to the fabric instead of embroidering direction onto the fabric.
 18. Decide where to place the embroidery.


 19. I am going with an asymmetrical look. I will attach the tulle onto the knit fabric at the shoulder and armhole area. This will give a stable base for the appliqué.
 20. Follow pattern instructions to sew the pattern.

 21. Press up the hem using steam and the tailor’s clapper. This will create a crisp crease to run through the coverstitch machine for hemming.

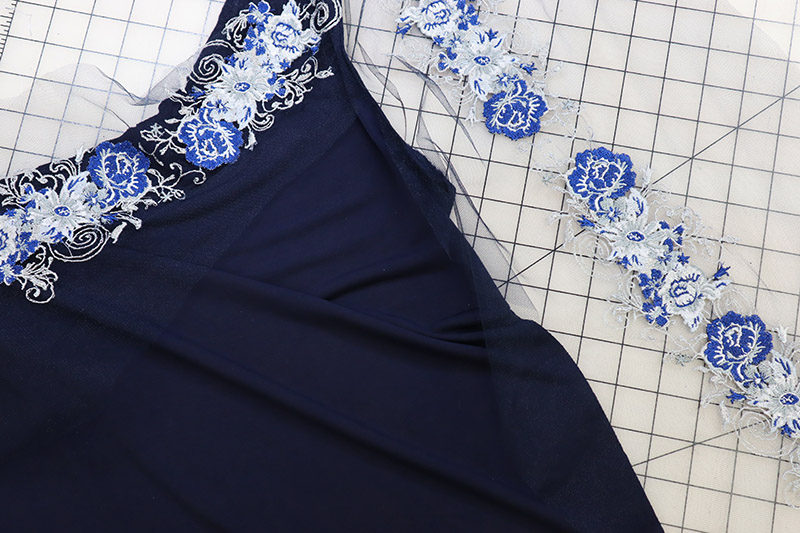
 22. The last step is to attach the remaining appliqué. Try the top on or use a dress form and pin the embroidered tulle in place.
 23. Set the sewing machine up for free motion quilting. Attach the embroidery foot and lower the feed dogs.

 24. Slide the top onto the machine and free motion around the edge of the embroidery. I am using navy thread to match the top.
 25. Trim off the excess tulle.


 That’s it! Again, you might want to add 2 sleeves or refashion a garment with the same technique. Simply use the embroidered tulle as an appliqué. I can’t wait to see what you create using this technique. Be sure to share photos on social using #angelawolf and #brothersews.
Happy Holidays ♥
Angela
That’s it! Again, you might want to add 2 sleeves or refashion a garment with the same technique. Simply use the embroidered tulle as an appliqué. I can’t wait to see what you create using this technique. Be sure to share photos on social using #angelawolf and #brothersews.
Happy Holidays ♥
Angela

Related Projects
Stay Connected
* Required fields