Creating an Embroidered Steampunk Parasol
When your fabric choices are limited, use the quilting designs available with Dream Motion Pro to embellish fabric yardage. The result is a custom-embroidered fabric perfect for creating a Victorian-inspired parasol or lots of other projects. Finished Parasol size: 48" diameter
Machines and Products Used
- THE Dream Motion™ PRO software
- THE Dream Fabric Frame
- THE Dream Quilter™ 15 DQLT15
- Brother Sewing and Embroidery Machine
(both designs used will fit in a 4x4 hoop) - iBroidery
designs: 200810234
and 200810235
Materials
- 2 yards of 58"-wide satin
- 1 yard of 45"-wide tulle
- Water-soluble embroidery stabilizer
- Embroidery, sewing, and bobbin threads
- 48" umbrella pattern and hardware from My Little World (www.UmbrellaJoan.com
, item #1020 ) - Rotary cutter with pinking blade
Tip: I chose a fancy tulle with woven dots to give the ruffle extra visual texture.
Creating the Fabric
Treat the fabric the same way you would a quilt design, but with smaller designs than the usual quilt.- In Pantograph, select the EZ mode. Choose your design; I chose the design "sally pattern 1" from the Continuous Line folder. Set the Total Height and Total Width to 52" and the Row Height to 3". Type in 17 Rows and 15 Patterns. THE Dream Motion™ PRO
will automatically set the Pattern Width near 3 1/2" and the Pattern Height near 3". - In the Odd Rows section, click Stagger once and Flip Vertically once. Your display will change to reflect the staggered and flipped motifs in every other row. If you like, play with these settings to create a variety of overall embroidery designs. Remember that flipping some motifs vertically produces a two-way pattern; that means you can alternate the pattern placement for efficient cutting without having some parasol panels appear upside down.
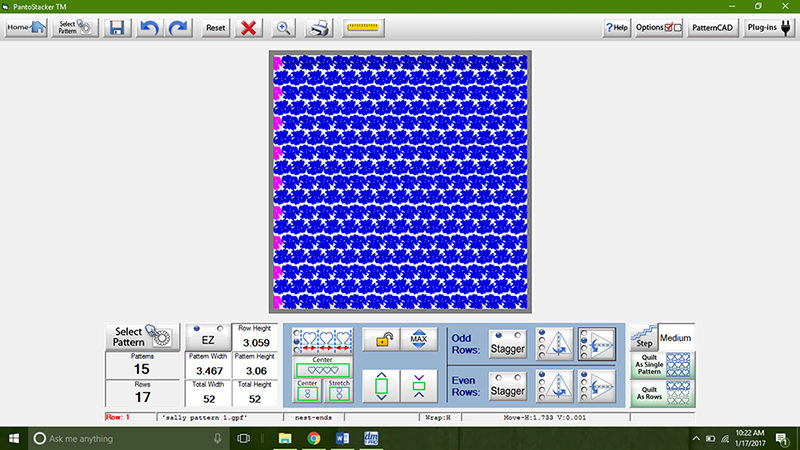
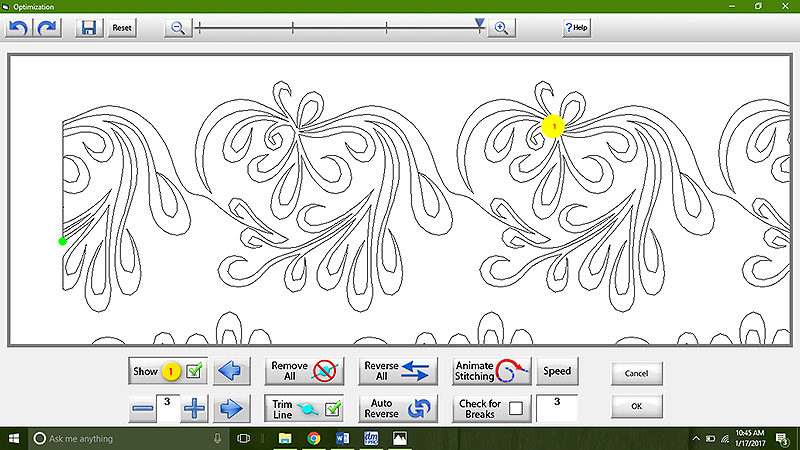
- Select Quilt As Rows to move to the next step. Click Optimize before stitching to control the way your machine treats the ends of the continuous rows. The Optimize screen lets us convert some of the trims to lines of stitches, which will speed the stitching process as the machine stops to travel less often.
Tip: You're creating a large file with lots of stitches, so it may take longer than usual to process the design, depending on the speed of your computer's processor.
- On the Optimize screen, click on the middle row of motifs to reverse its stitching direction; notice that the red and green dots at the ends of that row change places and the two long trims (blue lines) are replaced by shorter trim lines at the sides of the zone.
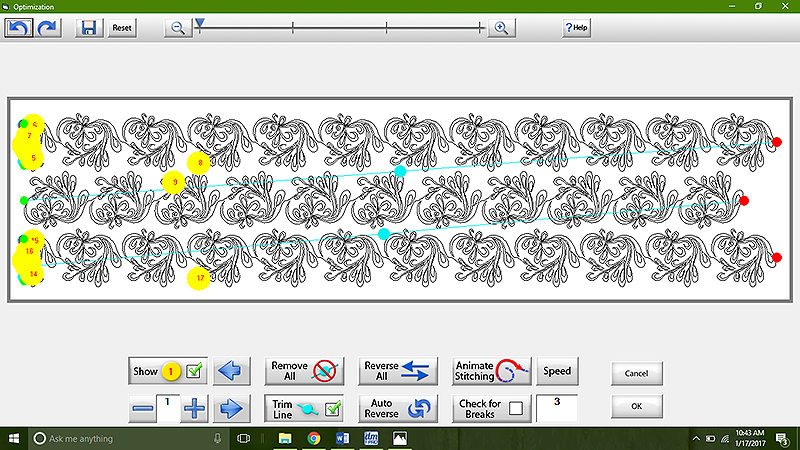
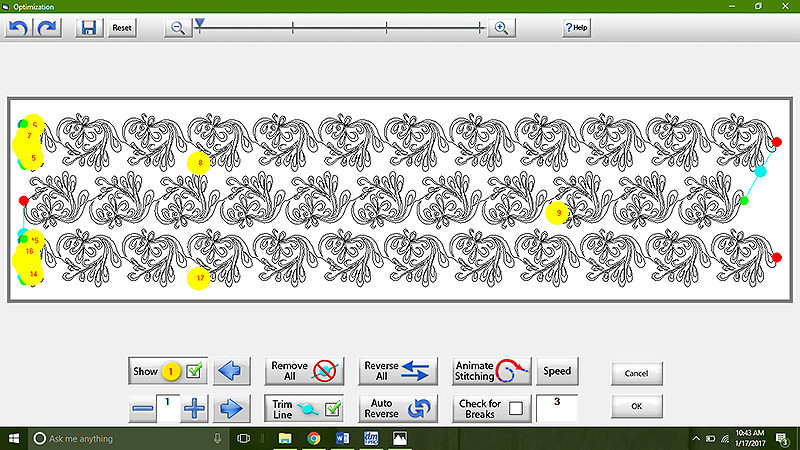
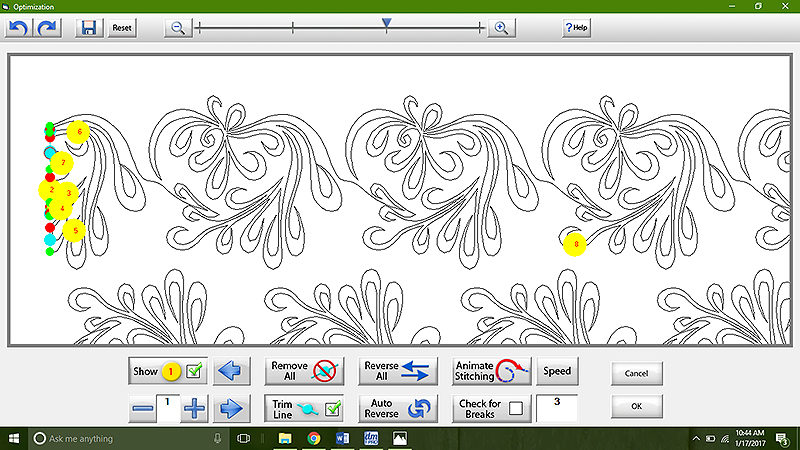
- Click the slider at the top of the Optimize screen to zoom in on the pattern and drag the view so that you can see the trims (blue lines with dots) at the left edge of the pattern. Click on each blue dot in turn to remove those trims by turning them into lines of stitching. Drag the view as necessary to remove all of the trims at the left edge of the first and third rows, then click OK. Don't remove the trims at the right edge of the zone, as this area will be in the middle of your embroidered fabric.
- Fill a couple of bobbins with embroidery thread and thread the machine with the same thread. Set the tension for this thread combination; the thinner surface (satin fabric versus quilt layers) may also necessitate tension adjustments. Place the fabric on THE Dream Fabric Frame
so that the first zone is within the safe area and stitch your design. - Move from zone to zone to stitch the entire fabric area. Extra fabric is provided for hooping, but you may still need to use a header as you approach the fabric edges.
Tip: Remember to go to the Optimize screen before you stitch each zone. If you forget, the pattern will still be correctly positioned on the fabric, but stitching will take longer and you'll have many trims to clip. The patterns within the zones will differ, so approach the optimization individually for each zone.
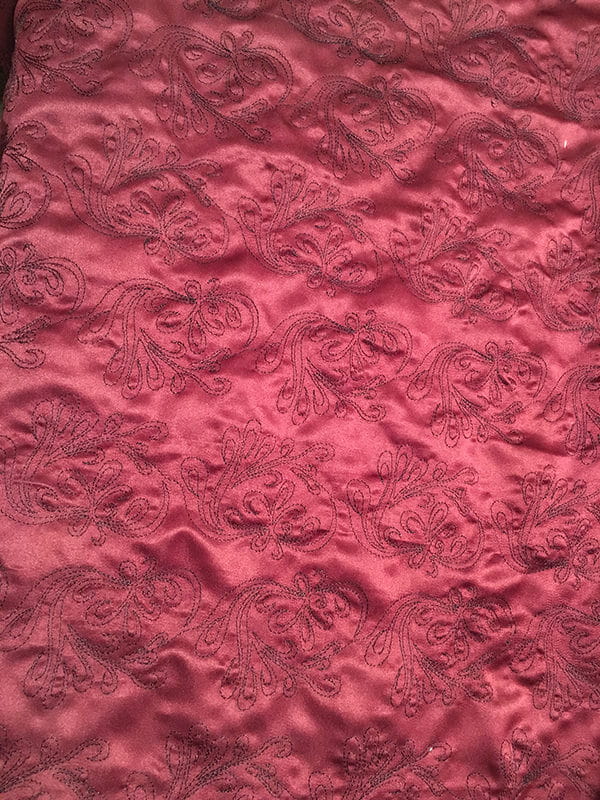
- When the embroidery is complete, remove the fabric from the frame and press it from the wrong side.
Sewing the Parasol Panels
- Following the parasol pattern instructions, cut eight parasol sections from the embellished fabric. Cut them one at a time, matching the rows of motifs and the direction of the motifs across all of the sections, as if you were matching a striped fabric. I like to use the first section I cut as a guide for positioning each other section.
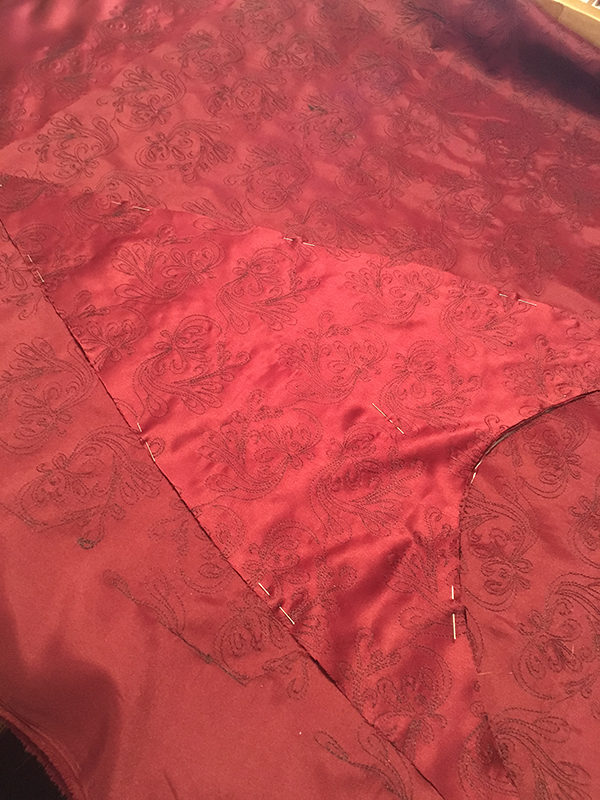
- Sew the eight panels together as instructed in the pattern and hem the lower edge. At this point you can slip the parasol fabric over the frame to gauge the fit and adjust the hem placement if necessary.
Making the Ruffle and Embellishments
- Using a pinking blade on a rotary cutter, cut 2 1/2" strips across the width of the tulle fabric. You'll need enough strips to equal twice the length of your parasol hem, plus a little for seam allowances; I used four tulle strips. For a modern steampunk look, the ruffle's long edges are not hemmed, so the pinking blade gives them a nice finish.
- Join the ruffle strips end to end with a narrow French seam or serger rolled hem/seam.
- Set your sewing machine for a straight stitch 3.0 mm long and pull both needle and bobbin thread tails to the back of the machine. Holding the thread tails, stitch 5/8" from the top edge of the long ruffle strip. At the end of the ruffle, trim the thread tails, leaving 3" of thread at the end and at the beginning of the next row of stitches. Stitch 1/2" from the same edge, again leaving long thread tails.
Tip: The shorter stitch length gives you more control over the gathers in this fine fabric.
- Divide the ruffle into eight sections by folding and inserting pins at the folds. Position the ruffle on the lower edge of the parasol fabric, with the parasol's hem just below the rows of stitches on the tulle, matching the pins to the parasol seams. Pull up the gathering stitches to fit, pinning the ruffle to the parasol as you go. It's easiest to pull the bobbin threads. Remember to allow extra fabric at the points of the parasol so that the ruffle eases around the point without cupping.
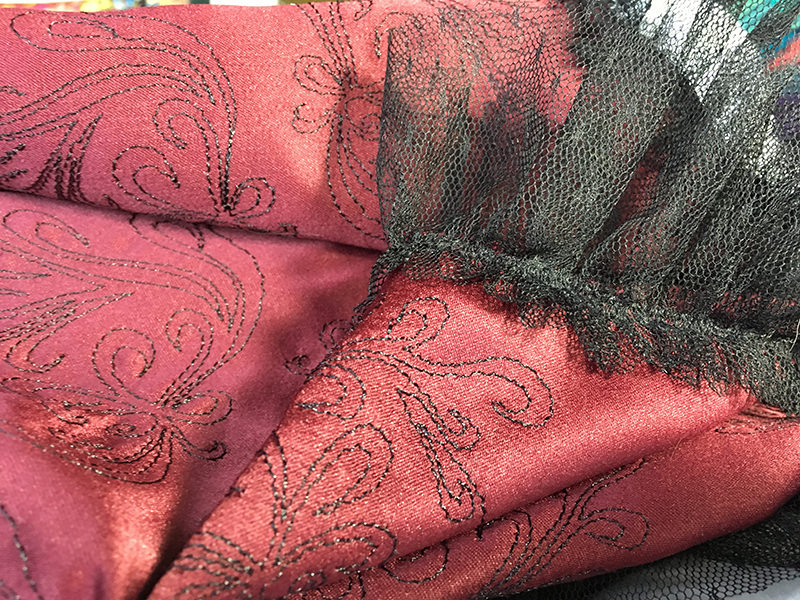
Tip: I pick up the bobbin threads of the gathering stitches at every other pin and work in both directions. In this way I don't have to pull and arrange the gathers along the entire ruffle length; instead, I work with one parasol panel at a time.
- Set the machine for a zigzag stitch. Use thread that matches the tulle in the needle and thread to match the parasol fabric in the bobbin. Sew the ruffle to the parasol, placing the zigzag stitches over the gathering threads. When you're finished, trim any visible gathering threads to tidy up the work.
- Sandwich the remaining tulle between two layers of water-soluble stabilizer larger enough to fill your hoop. Embroider eight lacy motifs, using matching thread colors in the needle and bobbin. Soak the motifs thoroughly to remove the stabilizer, lay flat to dry, and then press the tulle from the wrong side. Cut out each motif close to the outer stitches.

- Position a motif on each umbrella panel. In the sample, the oval motifs are centered 4" below the top of the parasol and the diamonds are centered 5" below the top. Pin the motifs in place.
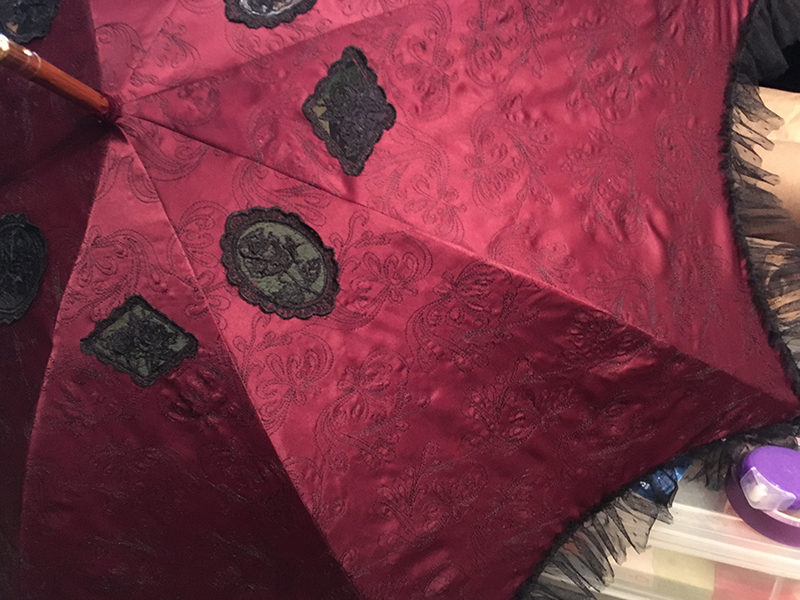
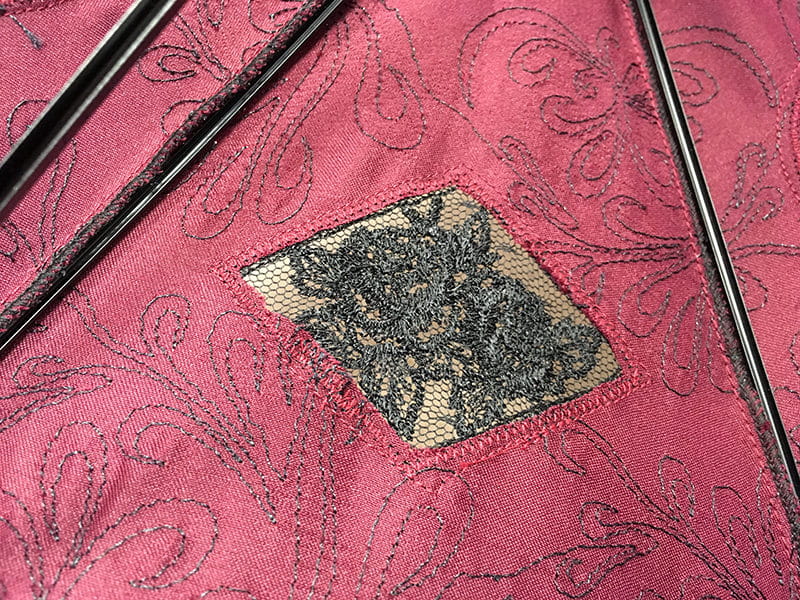
- Zigzag each motif to the parasol with matching thread; I used burgundy bobbin thread once again to help hide the stitches on the wrong side. Position the stitches along an interior line of the embroidered motif, leaving the motif's edge free. Change to a straight stitch and sew just outside the zigzag stitches for reinforcement.
- Working from the inside, trim away the parasol fabric inside the lines of zigzag stitches. Be careful not to cut the lace appliqués.
Finishing the Parasol
Follow the instructions in the pattern to complete the parasol. For the sample, which is not intended for use in rainy weather, I omitted the waterproofing. I also chose not to add a strap for holding the parasol closed. You can choose what works best for your project. We'd love to see what you do with your embellished fabric! Please post photos on Facebookand Instagram
and be sure to tag #StitchingSewcial and @BrotherSews so we can all be further inspired!

