September Free Design: Embroidered Headband
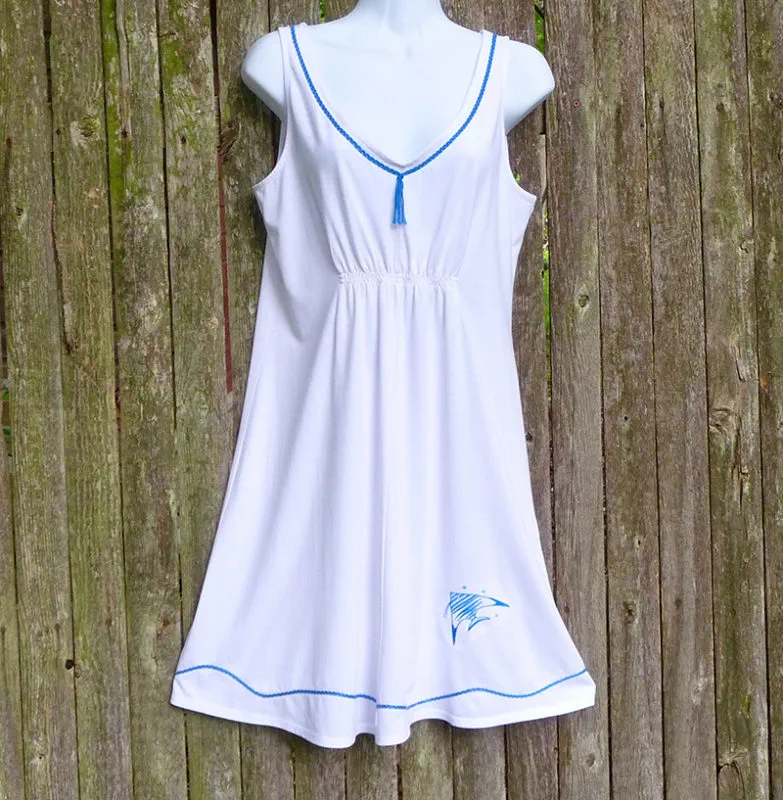
Want to look stylish on the beach or at the pool? Take a plain and ordinary white knit swimsuit cover-up and add some spice with embroidery and corded embellishment. The SA157 Brother Five-Hole Cording Foot
makes this type of embellishment easy to accomplish. Add a lightweight embroidery design to the bottom hem area to top off this stylish look and enjoy the compliments you’re sure to get! Are you ready? Let’s go sew!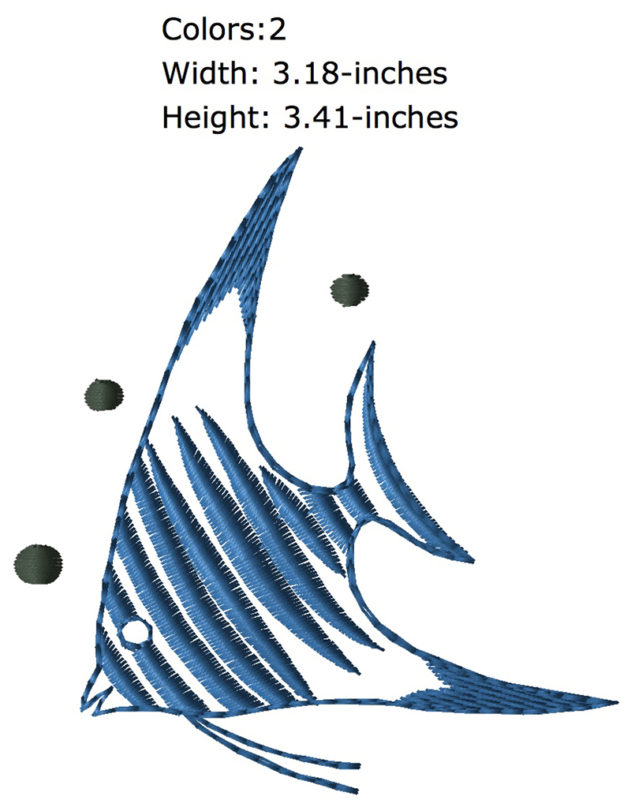
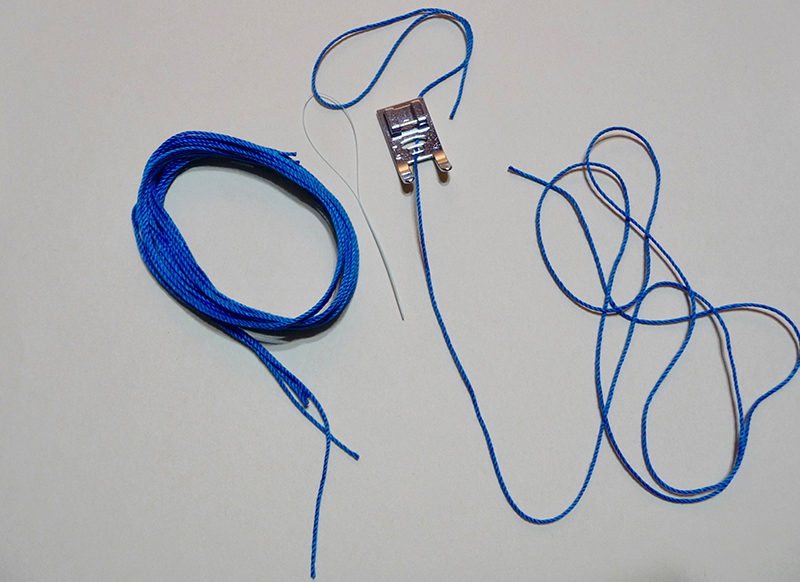 Figure #1[/caption]
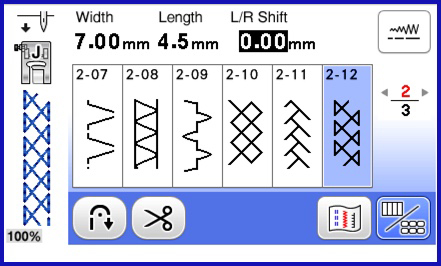 Figure #2[/caption]
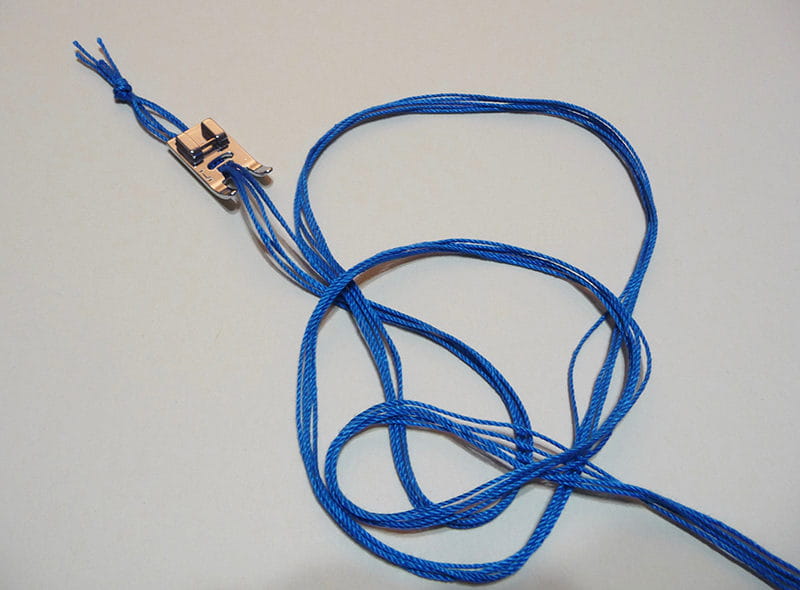 Figure #3[/caption]
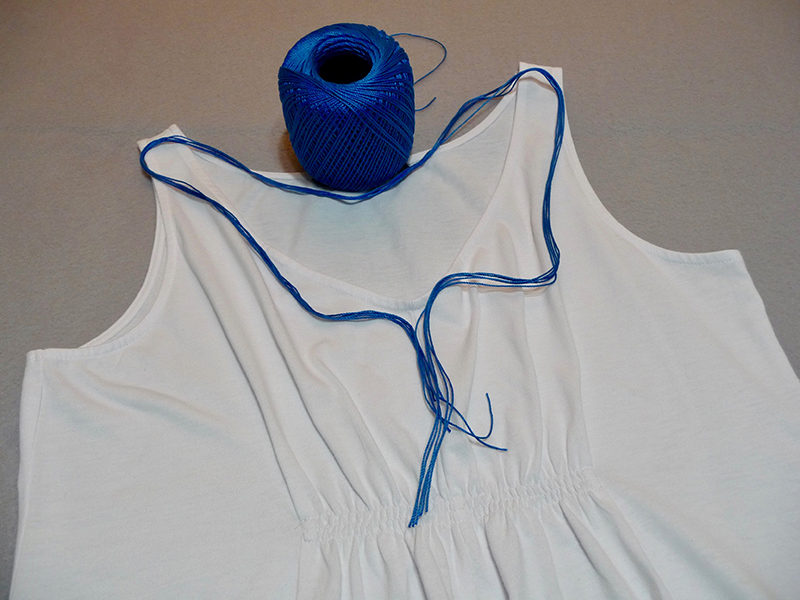 Figure #4[/caption]
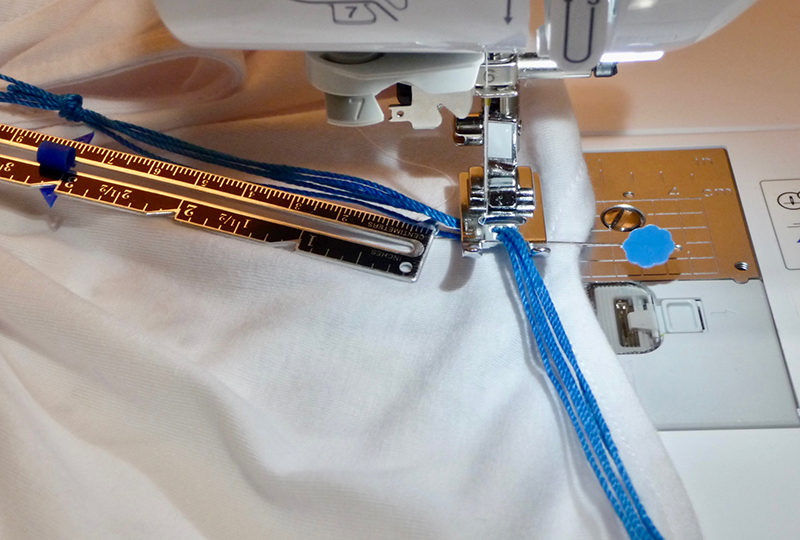 Figure #5[/caption]
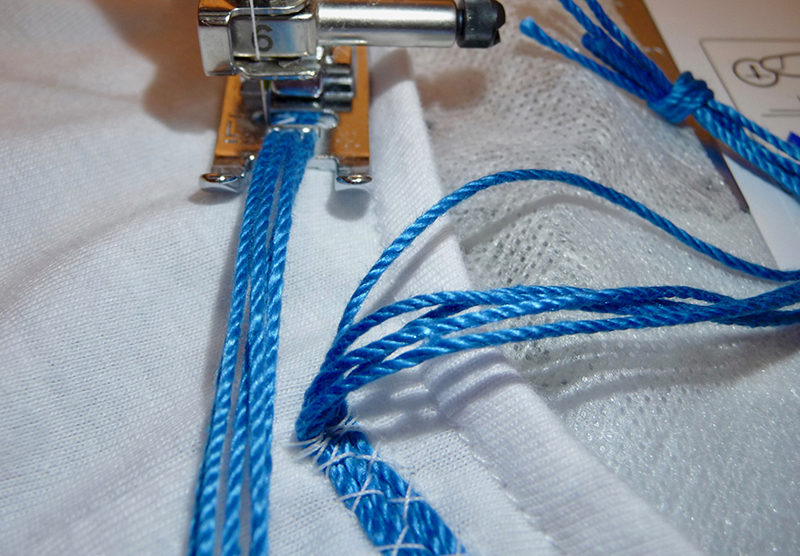 Figure #6[/caption]
 Figure #7a[/caption]
[caption id="attachment_16661" align="aligncenter" width="800"]
Figure #7a[/caption]
[caption id="attachment_16661" align="aligncenter" width="800"]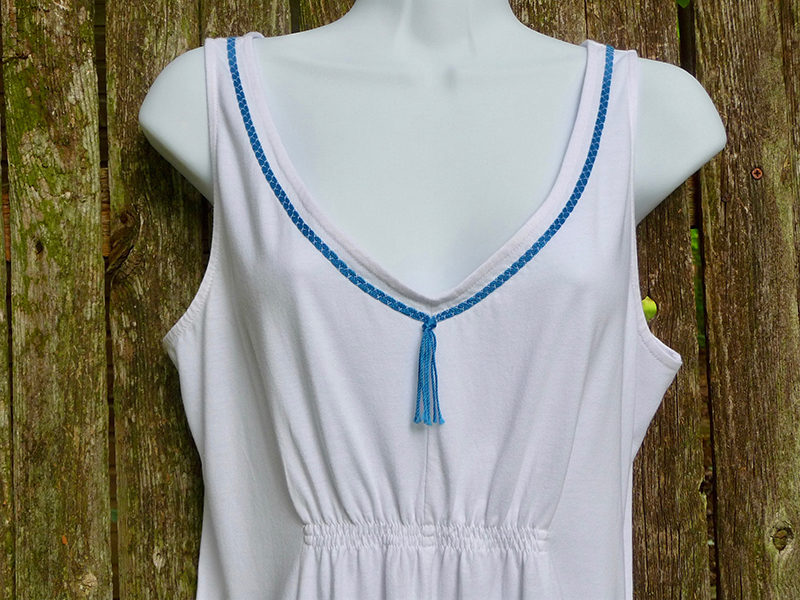 Figure #7b[/caption]
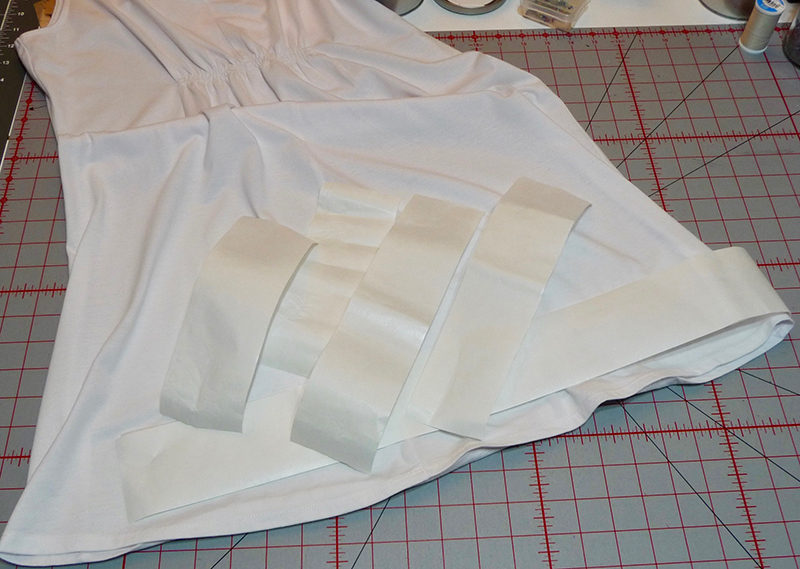 Figure #8a[/caption]
[caption id="attachment_16663" align="aligncenter" width="800"]
Figure #8a[/caption]
[caption id="attachment_16663" align="aligncenter" width="800"]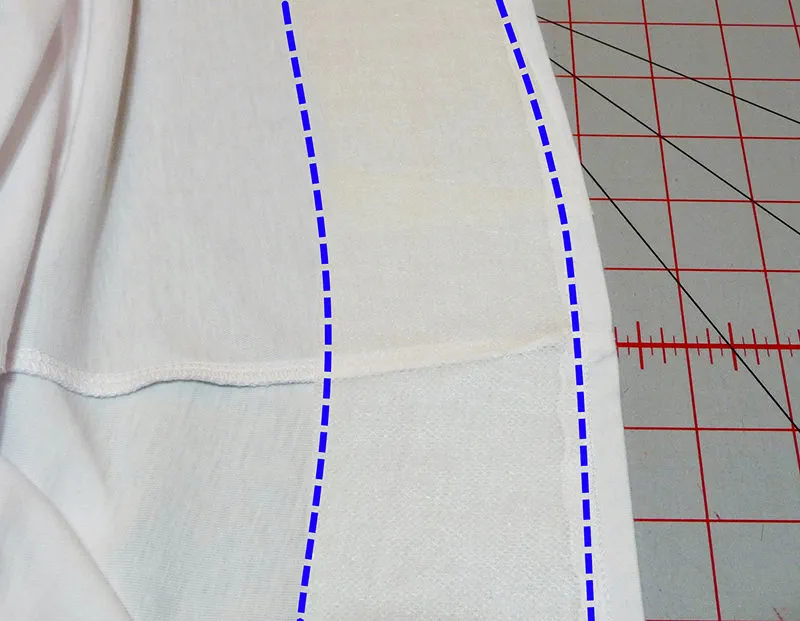 Figure #8b (Note: Blue lines indicate edge of stabilizer).[/caption]
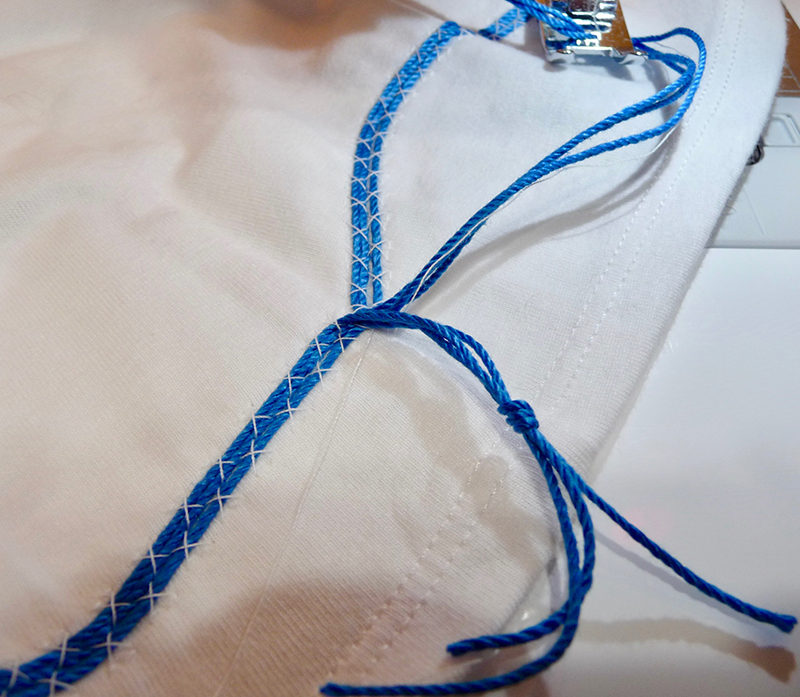 Figure #9[/caption]
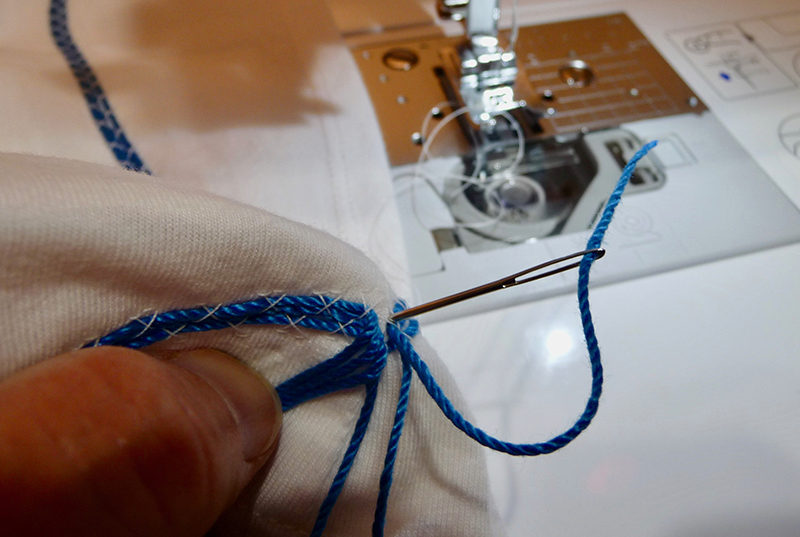 Figure #10a[/caption]
[caption id="attachment_16666" align="aligncenter" width="800"]
Figure #10a[/caption]
[caption id="attachment_16666" align="aligncenter" width="800"]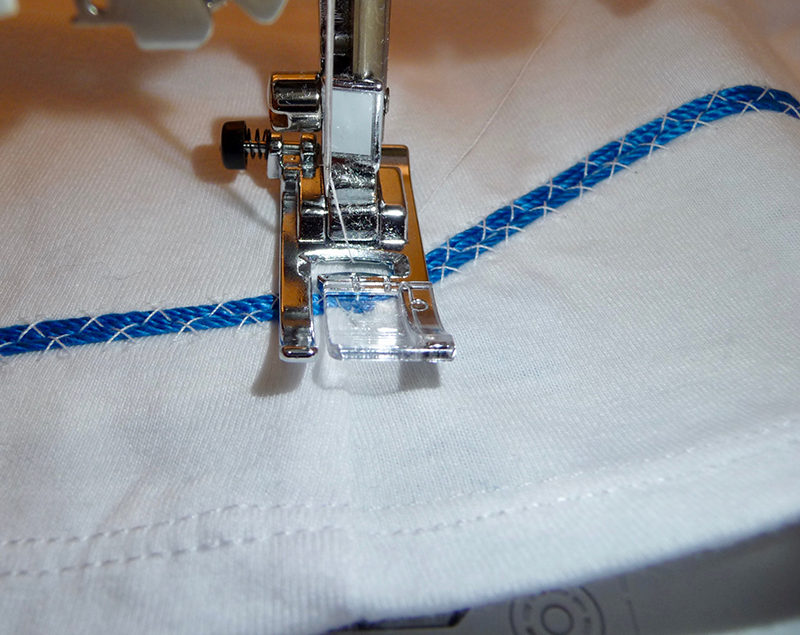 Figure #10b[/caption]
[caption id="attachment_16667" align="aligncenter" width="800"]
Figure #10b[/caption]
[caption id="attachment_16667" align="aligncenter" width="800"]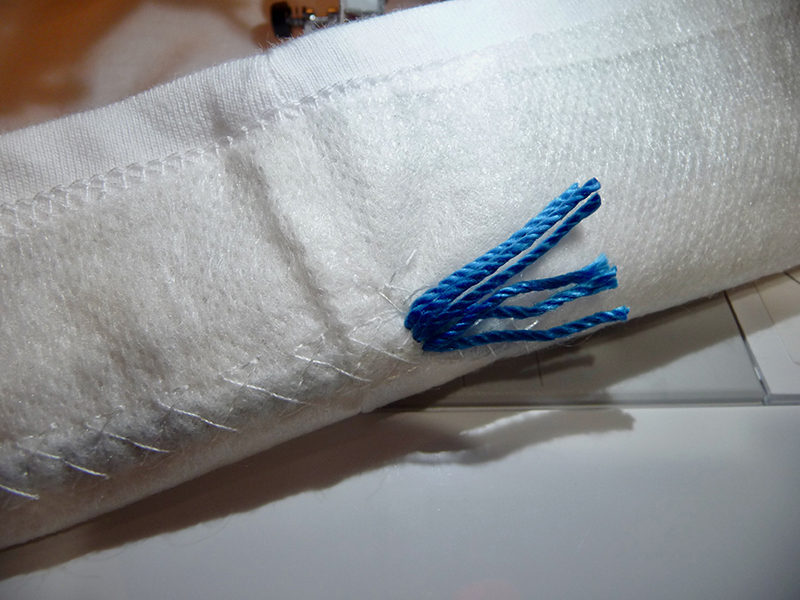 Figure #10c[/caption]
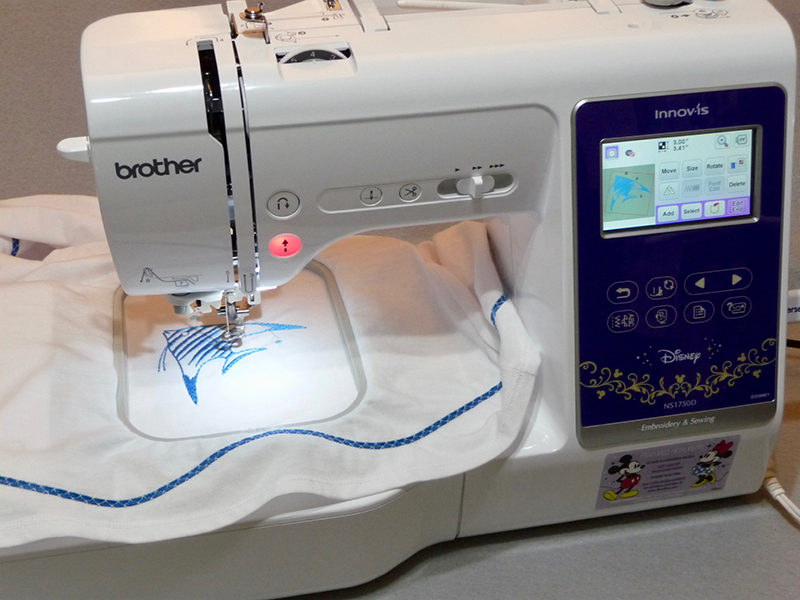 Figure #10[/caption]
makes this type of embellishment easy to accomplish. Add a lightweight embroidery design to the bottom hem area to top off this stylish look and enjoy the compliments you’re sure to get! Are you ready? Let’s go sew!
Materials and Supplies:
- Brother Sewing and Embroidery Machine with 4-inch by 4-inch hoop.
- Brother Polyester Embroidery Threads
in desired colors for embroidery design. - Brother Bobbin Thread for Embroidery
- SA157 5-Groove cording foot for 7mm machines
- SA540 Brother Pacesetter Light Weight Wash-Away Stabilizer
for stitching neckline and embroidering motif. - SA5906 Brother Pacesetter Light Weight Adhesive Backed Wash-Away Stabilizer
for stitching hemline. - SA5931 Brother Pacesetter Fusible Cut-Away Stabilizer
or SA5929 Brother Pacesetter Heavy Cut-Away
combined with temporary embroidery adhesive spray for embroidering motif. - Size 11 Embroidery needle for embroidering.
- Sewing thread for sewing cording.
- Stretch needle size 11 for sewing on the knit fabric.
- Large-eyed tapestry needle for weaving thread tails to back side.
- Threading tool such as a dental floss threader to insert cords into foot.
- Super fine, crochet cotton or similar thread to use for cording.
Note: Most any smooth, flexible cord will work as long as it flows easily through the holes in the foot. Be sure your cording is colorfast and washable.
- Plain white swimsuit cover-up simi
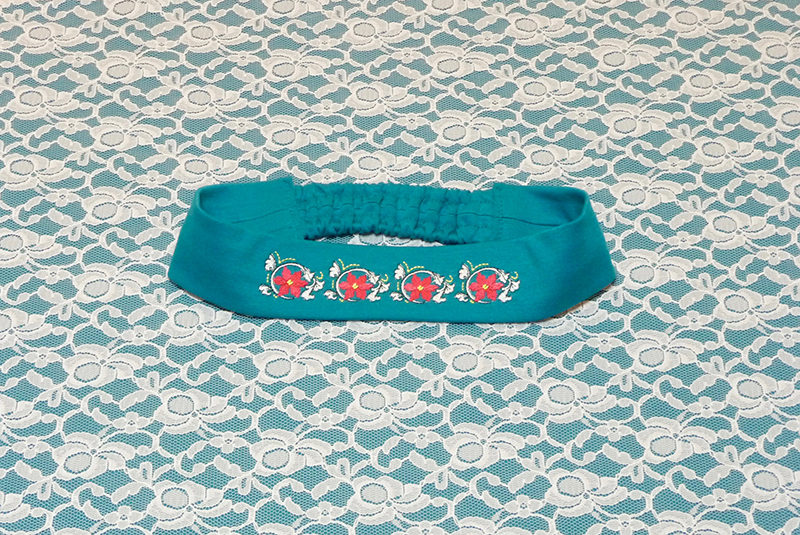
This one size fits all, adult size headband, is bright, colorful, and comfortable to wear. Our Brother Free Design of the Month is just the right size to accent the top of the headband. Made from small pieces of knit fabric, you can whip this up quickly for yourself, or as a gift for family and friends. This is yet another project that prompts you to save your scraps and turn them into something pretty and practical!Materials and Supplies
Note: This project features a 5-inch X 7-inch hoop with the design stitched as a border. The design itself fits within a 4-inch hoop. Re-hoop fabric to add designs and create a similar border design with a 4-inch hoop.- Brother Embroidery Thread and bobbin thread.
- SA5929 Brother Pacesetter heavy weight cut-away stabilizer.
- Brother Free Design of the Month.
- Embroidery needle for embroidering.
- Temporary adhesive spray made specifically for embroidering.
- Fabric for headband: One piece of interlock knit cut to measure 5-inches wide X 18-inches long, and one piece of interlock knit cut to measure 4-inches wide X 10-inches long.
- Three pieces of 3/8-inch lightweight clear elastic measuring 5 ½-inches long.
- Bodkin or small safety pin for inserting elastic.
- Basic sewing notions including sewing thread to match fabric, a straight edge ruler, and a wash out fabric marker.
Tips: Be sure to test your marker for easy removal. Most markings need to be thoroughly removed before pressing. Please read through instructions before beginning.Design size and original thread colors:- 1.49” High X 1.13” Wide
- (37.9 mm High X 28.7mm Wide)
 Free Design of the Month[/caption]
Steps to Create Embroidered Headband
- Transfer design to your machine. Select a rectangular frame shape with a triple straight stitch from the built-in menu. Re-size to equal approximately 6.97” X 4.98.” Add the accent design, repeating it four times to create a vertical border. See Figure #1.
 Figure #1[/caption]
Note: We used the repeat pattern function built in to various Brother model machines to create the perfectly spaced border design, adding designs at the top and bottom to create the vertical border. See Figure #2a and #2b.[caption id="attachment_16843" align="aligncenter" width="161"]
Figure #1[/caption]
Note: We used the repeat pattern function built in to various Brother model machines to create the perfectly spaced border design, adding designs at the top and bottom to create the vertical border. See Figure #2a and #2b.[caption id="attachment_16843" align="aligncenter" width="161"] Figure #2a[/caption]
[caption id="attachment_16844" align="aligncenter" width="190"]
Figure #2a[/caption]
[caption id="attachment_16844" align="aligncenter" width="190"] Figure #2b[/caption]
- Hoop cut-away stabilizer. Use any thread color to stitch frame. See Figure #3. Next, remove hoop from machine and spray stabilizer with adhesive, following manufacturer’s directions.
 Figure #3[/caption]
Tip: Using the circles on the template as a guide, trace the dimensions of the template grid to create a window on a piece of paper, cardstock, or cardboard. Cut out the window. Use as a guard for the spray by placing it over the hoop, protecting the surface of the inner and outer hoop and lightly spraying adhesive only through the window. See Figure #4a, #4b, and #4c.[caption id="attachment_16846" align="aligncenter" width="800"]
Figure #3[/caption]
Tip: Using the circles on the template as a guide, trace the dimensions of the template grid to create a window on a piece of paper, cardstock, or cardboard. Cut out the window. Use as a guard for the spray by placing it over the hoop, protecting the surface of the inner and outer hoop and lightly spraying adhesive only through the window. See Figure #4a, #4b, and #4c.[caption id="attachment_16846" align="aligncenter" width="800"] Figure #4a[/caption]
[caption id="attachment_16847" align="aligncenter" width="800"]
Figure #4a[/caption]
[caption id="attachment_16847" align="aligncenter" width="800"] Figure #4b[/caption]
[caption id="attachment_16848" align="aligncenter" width="800"]
Figure #4b[/caption]
[caption id="attachment_16848" align="aligncenter" width="800"] Figure #4c[/caption]
- Lightly mark the center of the 5-inch X 18-inch strip and center it over stitched frame. See Figure #5a.
 Figure #5a[/caption]
- Embroider design in center of strip. See Figure #5b. Trim away excess stabilizer.
 Figure #5b[/caption]
- Set up machine for sewing. Select the embroidered piece. In this next step you need to sew a basting stitch along the ½-inch seam line of each short edge, beginning and ending 5/8-inch from the edge and anchoring the stitch with a tie off at one end. You can mark each end with a pin to show the starting and stopping point for basting. See Figure #6.
 Figure #6[/caption]
Tip: Basting stitch allows for easing embroidered piece to fit the narrower elastic band.
Figure #6[/caption]
Tip: Basting stitch allows for easing embroidered piece to fit the narrower elastic band.- Select the triple stretch stitch. See below:
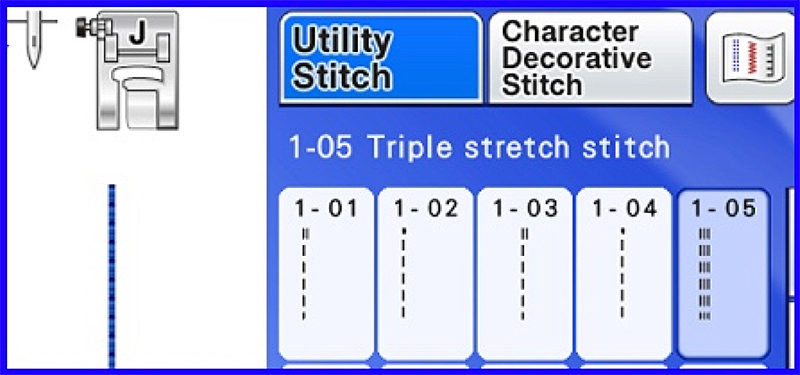
- Increase stitch length to 3.0. Fold embroidered piece in half lengthwise and sew a ½-inch seam along long edge. Turn right side out and press, having seam centered in the back.
- Place right sides together and sew long edge of second, smaller strip in the same manner. Turn right side out and press, having seam centered in the back. Next, sew channels for elastic by sewing a line of standard straight stitches ½-inch from each long, finished edge. See Figure #7.
 Figure #7[/caption]
- Insert elastic into each channel, pinning elastic and leaving a small amount extended at each short end.
- Sew close to the edges to anchor elastic in place. See Figure #8a and #8b.
 Figure #8a[/caption]
[caption id="attachment_16854" align="aligncenter" width="800"]
Figure #8a[/caption]
[caption id="attachment_16854" align="aligncenter" width="800"] Figure #8b[/caption]
- Insert ends of elastic piece into open ends of embroidered strip. Gather ends to fit elastic band, turn raw edges under, and then stitch across the folded end with a zigzag stitch, closing the seam and anchoring elastic in place. See Figure #9.
 Figure #9[/caption]
- Remove basting stitches if they show. You are finished! Enjoy! See photo of back of headband below:
 Options and ideas:
- If you are unsure of fit, baste strips together and try on before permanently sewing elastic in place. Shorten elastic or replace with longer lengths if needed. Adjust length of embroidered piece for a child sized headband. If desired, use a 1-inch wide piece of soft knitted elastic in place of the three individual elastic pieces, and eliminate stitching the channels.
 lar to the tank style dress shown here.
 - Featured embroidery design is available on the Brother iBroidery Design Download site.
See design below:
Steps to Create Swimsuit Cover-Up
- Gather your supplies to prepare for embellishing the neckline. See Figure #1.
Figure #1[/caption]
- Set up machine for sewing. It’s best to thread cording into foot before attaching it to the machine. We’ll do that next, but before you begin it’s a good idea to find some fabric remnants similar to your garment and give this technique a trial run. Select a stitch that will “jump” over the cords. You could use something as simple as a multi-step zig zag or opt for the stitch and stitch settings I used here. See Figure #2.
Figure #2[/caption]
- Feed cords into the foot leaving long tails at the back. See Figure #3.
Figure #3[/caption]
- For alternative stitches, be sure to test the settings, choosing a width that covers the cords from side to side, and a length that is not too dense.
Tip: Tie loose ends into a knot at the back to keep them from slipping out of the foot.
- For the actual neckline, begin by reeling off enough cording to go all around the neckline with approximately 10-inches extra. See Figure #4.
Figure #4[/caption]
- I used all five holes for the neckline, cutting five lengths of cording. Starting at the back of the foot, feed each cord into the holes, threading from the top of the foot to the bottom. Knot the ends and pull threads to the back of the foot. Place strips of wash-way stabilizer underneath the neckline. Start your stitching at the center front leaving 3-inches of cording behind the foot so you can tie and form a tassel at the end. See Figure #5.
Figure #5[/caption]
- Stitch evenly along the neckline, smoothing the fabric in front of, and behind the foot without stretching it. Take care that you don’t tug on the cords - let them flow loosely as you stitch. Sew until you reach the beginning point, then pull the cords out of the way and finish at the center front. See Figure #6.
Figure #6[/caption]
- Tie cords into a tight knot and trim evenly to form a tassel. See Figure #7a and #7b.
Figure #7a[/caption]
[caption id="attachment_16661" align="aligncenter" width="800"] Figure #7b[/caption]
- Cut pieces of adhesive stabilizer 3-inches wide to attach to the wrong side at the hemline. It’s likely your hemline will have a curve so it’s best to use short pieces. See Figure #8a and Figure 8b.
Figure #8a[/caption]
[caption id="attachment_16663" align="aligncenter" width="800"] Figure #8b (Note: Blue lines indicate edge of stabilizer).[/caption]
Note: In Figure #8b, the blue lines indicate edge of stabilizer.
- Insert just three cords into the back slots on the foot for a lighter finish at the hem. Begin stitching at one side seam and sew free-form waves stitching all along the hem. Stop at the point where you began. See Figure #9.
Figure #9[/caption]
- Use the tapestry needle to weave the thread tails to the wrong side. Attach the regular presser foot to the machine and anchor the cords by stitching over them with a straight stitch. Trim excess, leaving short tails of cording. See Figure #10a, #10b, and #10c.
Figure #10a[/caption]
[caption id="attachment_16666" align="aligncenter" width="800"] Figure #10b[/caption]
[caption id="attachment_16667" align="aligncenter" width="800"] Figure #10c[/caption]
- Set up machine for embroidery. Attach stabilizer to the wrong side, placing it near the hem area of the dress.
Tip: SA5931
is fusible and light beige. Often times this is preferred for light colored garments and it shows less from the right side when garment is worn against the skin. However, if your knit is thin and it appears that the beige stabilizer will show through you’ll want to switch to the white cut-away. Test each one by placing it against the wrong side to decide before you stitch. If you use the fusible you will want to lightly fuse it to the garment so you can peel away the excess and trim when finished. For non-fusible cut-away it’s important to attach it to the knit with temporary adhesive spray. A solid rule for embroidering on knits is to always make sure the knit has absolutely no stretch factor within the hoop.
is fusible and light beige. Often times this is preferred for light colored garments and it shows less from the right side when garment is worn against the skin. However, if your knit is thin and it appears that the beige stabilizer will show through you’ll want to switch to the white cut-away. Test each one by placing it against the wrong side to decide before you stitch. If you use the fusible you will want to lightly fuse it to the garment so you can peel away the excess and trim when finished. For non-fusible cut-away it’s important to attach it to the knit with temporary adhesive spray. A solid rule for embroidering on knits is to always make sure the knit has absolutely no stretch factor within the hoop.
- Hoop the dress to prepare for embroidery, adding a layer of wash-away stabilizer for additional support. Select the fish design. You can give it a fun spin by rotating it so it appears to be coming up out of the waves. See Figure #10.
Figure #10[/caption]
- When finished with embroidery, remove all excess wash-away stabilizer and then trim cut-away leaving a small margin around the design. You are finished and ready to head for some fun in the sun! Enjoy!
Related Projects
Stay Connected
* Required fields