Single Pattern Decorative Stitches
-Brother Sews Ambassador
I like to think of decorative sewing machine stitches as “mini” embroidery patterns. They can be delicate, whimsical, geometric, or bold. Many sewing machine stitches fit into a category of contemporary style or classical designs, and we often think of sewing them in rows. In this tip sheet I’d like to show you how to use your decorative stitches as single pattern elements. Let’s explore options you’ll find on different sewing machines, as well as settings that make single pattern decorative stitching easy and fun. For decorative stitching you’ll want to attach presser foot “N” and thread your machine with decorative thread in top and bobbin. Select your decorative stitch from the Character/Decorative Stitch menu. Change width and length as desired. Note: If you want to sew these decorative stitches in precise lines, you’ll find it easier with stitches that are not too large.
Let me start by showing you what the set up would look like on a variety of different machines. Pay attention to the icons and keys and then see if you find identical or similar icons on your own Brother machine model. The settings I like to use are as follows, shown in Figure #1: Figure #1[/caption]
Below are images showing how these settings look on a variety of machines. See Figure #2, Figure #3, and Figure #4.
[caption id="attachment_25794" align="aligncenter" width="800"]
Figure #1[/caption]
Below are images showing how these settings look on a variety of machines. See Figure #2, Figure #3, and Figure #4.
[caption id="attachment_25794" align="aligncenter" width="800"] Figure #2[/caption]
[caption id="attachment_25795" align="aligncenter" width="800"]
Figure #2[/caption]
[caption id="attachment_25795" align="aligncenter" width="800"] Figure #3[/caption]
[caption id="attachment_25796" align="aligncenter" width="800"]
Figure #3[/caption]
[caption id="attachment_25796" align="aligncenter" width="800"] Figure #4[/caption]
Let’s make a fun sample using the technique for sewing a single pattern. Follow the steps below:
Figure #4[/caption]
Let’s make a fun sample using the technique for sewing a single pattern. Follow the steps below:
 Figure #5[/caption]
 Figure #6[/caption]
 Figure #7a[/caption]
[caption id="attachment_25800" align="aligncenter" width="800"]
Figure #7a[/caption]
[caption id="attachment_25800" align="aligncenter" width="800"] Figure #7b[/caption]
 CLICK HERE FOR PDF!
I like to think of decorative sewing machine stitches as “mini” embroidery patterns. They can be delicate, whimsical, geometric, or bold. Many sewing machine stitches fit into a category of contemporary style or classical designs, and we often think of sewing them in rows. In this tip sheet I’d like to show you how to use your decorative stitches as single pattern elements. Let’s explore options you’ll find on different sewing machines, as well as settings that make single pattern decorative stitching easy and fun. For decorative stitching you’ll want to attach presser foot “N” and thread your machine with decorative thread in top and bobbin. Select your decorative stitch from the Character/Decorative Stitch menu. Change width and length as desired. Note: If you want to sew these decorative stitches in precise lines, you’ll find it easier with stitches that are not too large.
Let me start by showing you what the set up would look like on a variety of different machines. Pay attention to the icons and keys and then see if you find identical or similar icons on your own Brother machine model. The settings I like to use are as follows, shown in Figure #1:
- Press the Single/Repeating pattern key so the machine will sew just one single pattern and stop.
- Press the Automatic reinforcement key to tie off at the end of the pattern.
- Press the Automatic thread cutting key to automatically cut the threads at the end of the pattern.
- Press the Pivot function to automatically raise the presser foot when you finish a pattern, and automatically lower the presser foot when you begin a new pattern. This is especially helpful if you are stitching single patterns and then shifting the position of the fabric while leaving the needle down.
Figure #1[/caption]
Below are images showing how these settings look on a variety of machines. See Figure #2, Figure #3, and Figure #4.
[caption id="attachment_25794" align="aligncenter" width="800"] Figure #2[/caption]
[caption id="attachment_25795" align="aligncenter" width="800"] Figure #3[/caption]
[caption id="attachment_25796" align="aligncenter" width="800"] Figure #4[/caption]
Let’s make a fun sample using the technique for sewing a single pattern. Follow the steps below:
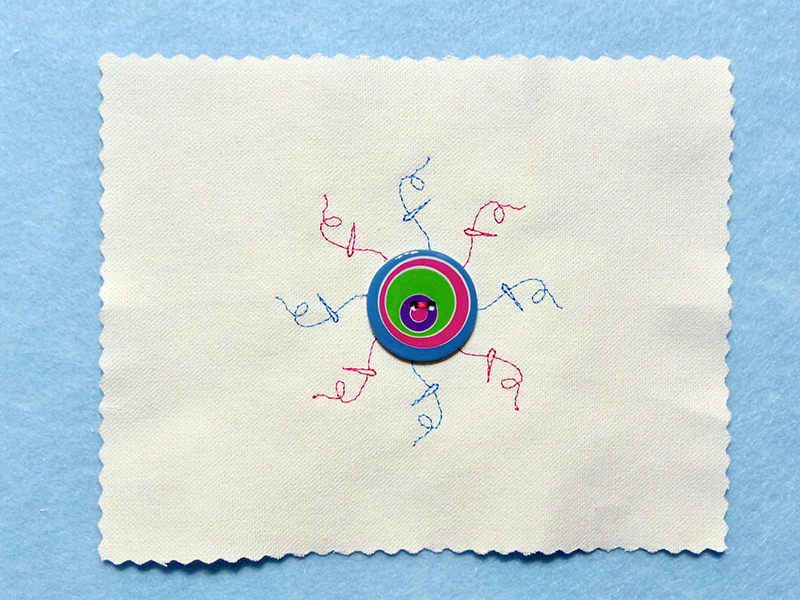
- Use a large decorative button to draw a circle with a removable marker. Draw lines outside the circle. See Figure #5.
Figure #5[/caption]
- Select a decorative pattern. I used motif No. 8-31 from the Brother Luminaire.
- Beginning at the edge of the circle sew one complete pattern on each line. See Figure #6.
Figure #6[/caption]
- Sew the button in the center of the circle. See Figure #7a and Figure #7b.
Figure #7a[/caption]
[caption id="attachment_25800" align="aligncenter" width="800"] Figure #7b[/caption]
- Wash out markings and you have a unique decoration to complement your button! You can use this decorative idea for garments, crafts, and home décor.
CLICK HERE FOR PDF!Tags
Shop this Project
Have you ever seen a project (like this one) and said, 'I want to try that?' Well, Brother has you covered! The products in this fun project are available for purchase, so you can click, shop, and get to embroidery!
Sewing Machines
Related Projects
Stay Connected
* Required fields