Accessory Spotlight: The Low Shank Adapter “S”
The Brother accessory labeled Adapter “S” is designed to add height to low shank screw on feet so these feet proper fit Brother machines with a high shank presser bar.
There are several Brother machines such as the XP1 Luminaire
that require this adapter to use accessories such as the screw-on Walking foot shown above. In fact, this adapter and the small screw needed for attaching it is included with the XP1 Luminaire
and a select number of additional Brother model machines. Check your owner’s manual to see if it is listed with your included accessories. If it is, you will need to use it for any included or optional accessories that screw on to the machine. The accessories listed below all require this adapter for use on a high shank machine. Note that this is a partial list.
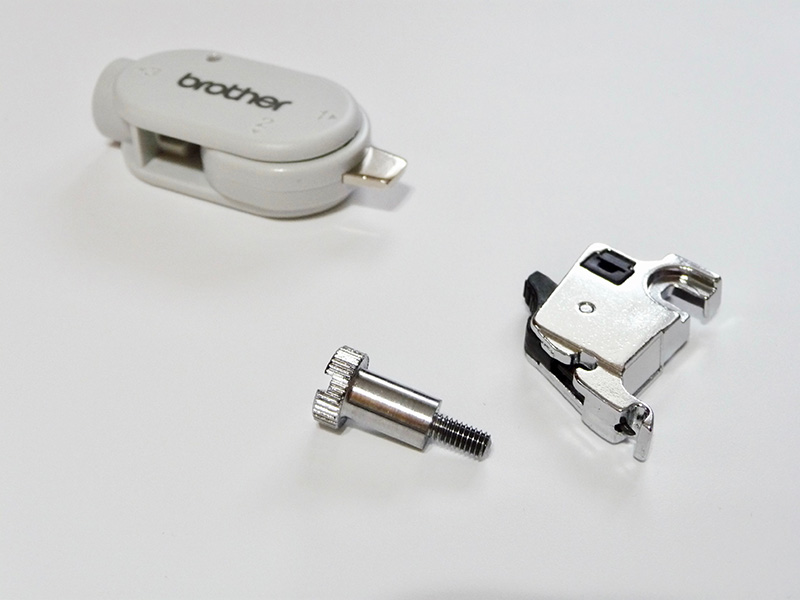
In this example we’ll show how to use the adapter with the low shank Walking foot. Start by making sure the needle is all the way up and then touch the Lock/Unlock at the top of the screen. This locks the screen and all button functions. See manual for details. Remove the standard presser foot holder designed for snap on feet. See Figure #1. [caption id="attachment_24030" align="aligncenter" width="800"] Figure #1[/caption]
You’ll see that the presser bar shows just one hole. The needle has been removed in the photos below for better visibility. See Figure #2.
[caption id="attachment_24031" align="aligncenter" width="800"]
 Figure #2[/caption]
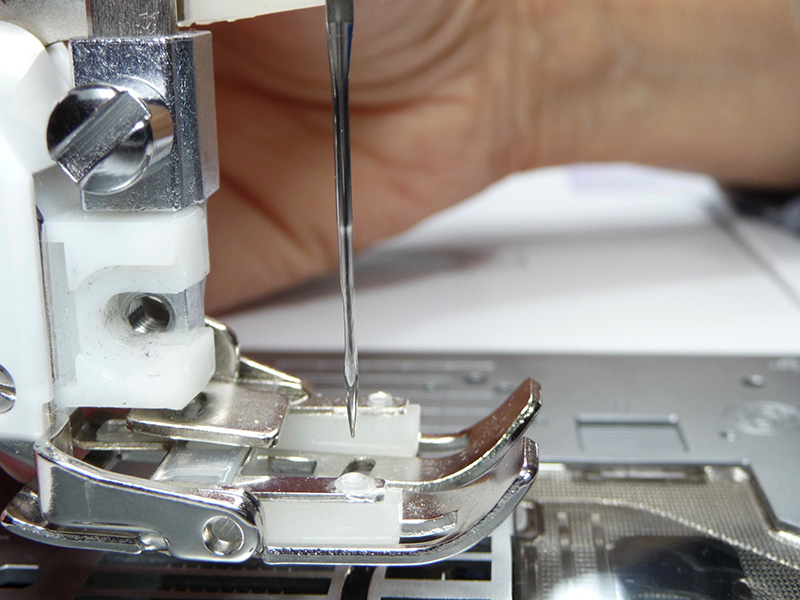
Slide the adapter onto the bar, matching the shape of the adapter to the bar, pushing it up as high as possible, and inserting the screw into the top hole. Be sure the screw is snug. See Figure #3.
[caption id="attachment_24032" align="aligncenter" width="800"]
 Figure #3[/caption]
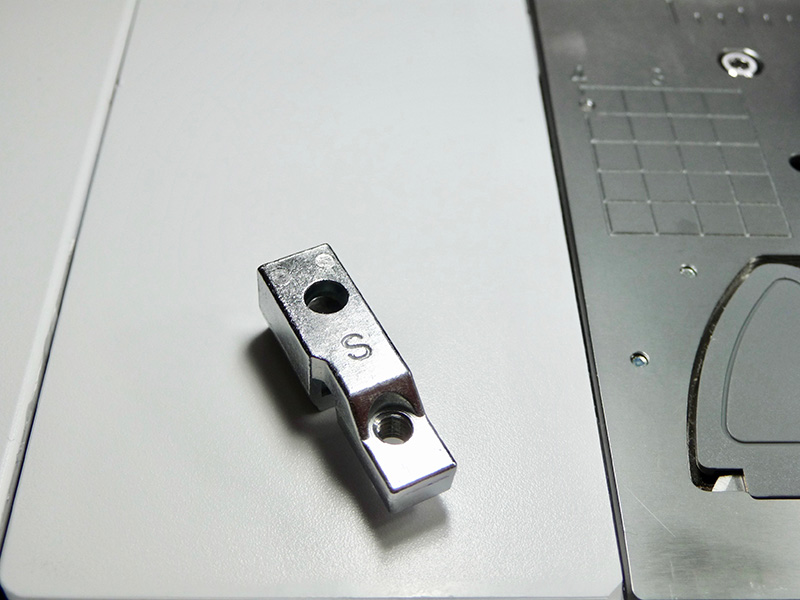
Below you see the “S” that’s engraved on the adapter. Note that this is on the right-hand side of the presser bar when the adapter is attached. See Figure #4.
[caption id="attachment_24033" align="aligncenter" width="800"]
 Figure #4[/caption]
Now, you’re ready to attach the screw-on foot, placing it on the bar and lining up the opening with the hole for the large screw. See Figure #5.
[caption id="attachment_24034" align="aligncenter" width="800"]
 Figure #5[/caption]
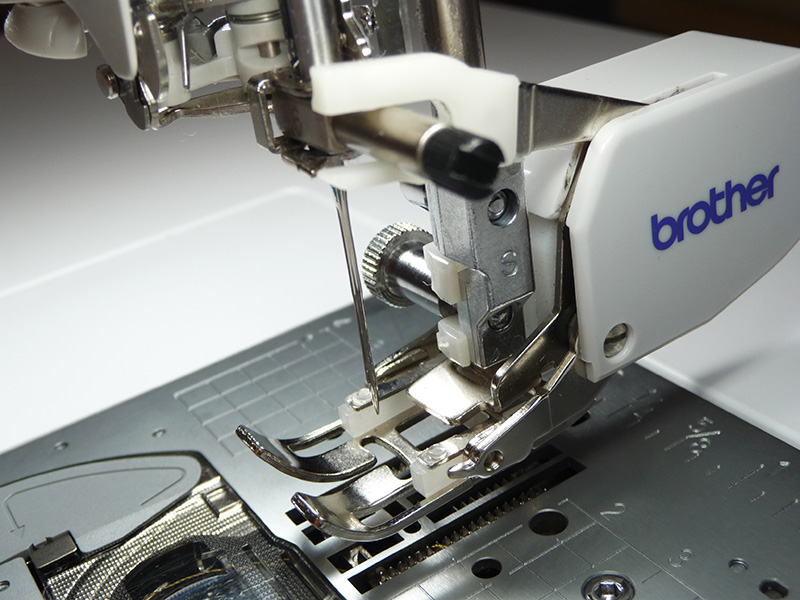
Insert the large screw to finish attaching the foot, tightening it firmly with the screwdriver. Turn the handwheel manually to check and make sure everything is positioned properly. When attaching the walking foot, make sure that the white plastic arm goes over the needle bar screw. Insert the large screw and tighten with the screwdriver so it is snug. See Figure #6.
[caption id="attachment_24035" align="aligncenter" width="800"]
 Figure #6[/caption]
When you’re finished you can unlock the screen and buttons by touching the icon. You’re ready to sew.
that require this adapter to use accessories such as the screw-on Walking foot shown above. In fact, this adapter and the small screw needed for attaching it is included with the XP1 Luminaire
and a select number of additional Brother model machines. Check your owner’s manual to see if it is listed with your included accessories. If it is, you will need to use it for any included or optional accessories that screw on to the machine. The accessories listed below all require this adapter for use on a high shank machine. Note that this is a partial list.
- SA140:
the 7mm Walking foot - SA188:
the 7mm Open Toe Walking foot - SA129:
the Clear Spring Action Darning/Free Motion foot - SA120:
the Gathering Foot - SA161:
the Adjustable Zipper & Piping foot
In this example we’ll show how to use the adapter with the low shank Walking foot. Start by making sure the needle is all the way up and then touch the Lock/Unlock at the top of the screen. This locks the screen and all button functions. See manual for details. Remove the standard presser foot holder designed for snap on feet. See Figure #1. [caption id="attachment_24030" align="aligncenter" width="800"]
 Figure #1[/caption]
You’ll see that the presser bar shows just one hole. The needle has been removed in the photos below for better visibility. See Figure #2.
[caption id="attachment_24031" align="aligncenter" width="800"]
 Figure #2[/caption]
Slide the adapter onto the bar, matching the shape of the adapter to the bar, pushing it up as high as possible, and inserting the screw into the top hole. Be sure the screw is snug. See Figure #3.
[caption id="attachment_24032" align="aligncenter" width="800"]
 Figure #3[/caption]
Below you see the “S” that’s engraved on the adapter. Note that this is on the right-hand side of the presser bar when the adapter is attached. See Figure #4.
[caption id="attachment_24033" align="aligncenter" width="800"]
 Figure #4[/caption]
Now, you’re ready to attach the screw-on foot, placing it on the bar and lining up the opening with the hole for the large screw. See Figure #5.
[caption id="attachment_24034" align="aligncenter" width="800"]
 Figure #5[/caption]
Insert the large screw to finish attaching the foot, tightening it firmly with the screwdriver. Turn the handwheel manually to check and make sure everything is positioned properly. When attaching the walking foot, make sure that the white plastic arm goes over the needle bar screw. Insert the large screw and tighten with the screwdriver so it is snug. See Figure #6.
[caption id="attachment_24035" align="aligncenter" width="800"]
 Figure #6[/caption]
When you’re finished you can unlock the screen and buttons by touching the icon. You’re ready to sew.

