Free Design of the Month: Monogrammed Slippers
There’s nothing quite like slipping into a pair of monogrammed slippers for comfort and a great feeling from head to toe. If you haven’t thought about making your own slippers now is the time to start. This project features instructions for creating an all-over quilt design using My Design Center to create quilted fabric for the slipper pieces. If this feature is not available to you, use one of the alternative options mentioned in the instructions. Download the Brother Free Design of the Month, pick a pattern, gather your supplies, and you’re well on your way to crafting a pair of comfy slippers. Embellish the toes with a personal monogram for yourself or make a pair to give as a gift. Are you ready? Let’s go sew!
Materials and Supplies
- Brother sewing and embroidery machine.
Note that these instructions show how to create quilted fabric using the Brother My Design Center option on the Luminaire XP1 machine,
prior to embroidering the design. Please be sure to read the Important Notes section for more information about creating these slippers. - Brother
Embroidery Thread, Bobbin Thread, and size 11 embroidery needle for embroidering. - Basic Sewing notions including sewing thread to match fabric and a removable marker or chalk.
- Slipper pattern with toe area large enough to accommodate embroidery design. Read the recommendations in the Important Notes section below and refer to your selected pattern for fabric and notions.
- Click here to download the Brother FREE Design of the Month. See image below:

Important Notes Before You Begin
Basic steps for making the slippers:- Create oversized pieces of quilted fabric.
- Outline the area for the main slipper pattern and embroider a monogram in the toe area.
- Cut out and construct a pair of slippers.
with the 10 5/8” X 16” hoop, used for making stipple quilted fabric. Complete instructions are shown below for using this method on the Luminaire.
Additional Brother models include the My Design Center option so you can follow the same general instructions for creating stipple quilted fabric. The Brother PE-Design 11
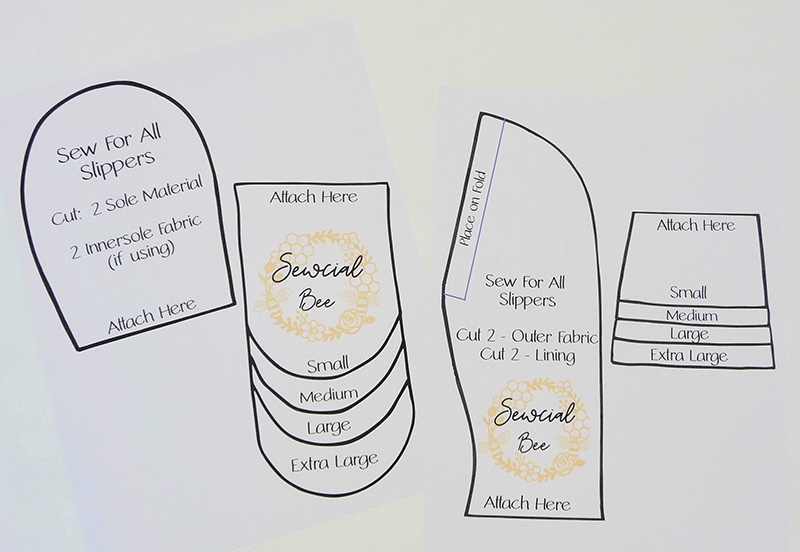
software program also includes options for creating stipple quilted fabric using decorative fill patterns. • Note: Depending on the size of your largest hoop, and your slipper pattern pieces, you may need to re-hoop to create larger sections of quilted fabric. • Purchase single faced pre-quilted fabric, pre-quilt your own fabric with free motion techniques, or pre-quilt fabric with straight stitches. • Skip the quilting and simply fuse thin craft fleece to the slipper pieces. Decide on materials for main slipper piece, insole, bottom sole, and filler for quilting: • The pattern I selected included many options and ideas for materials. Note that the thickness of your filler for quilting can slightly affect the size of the finished slippers. • I chose thin fusible craft fleece, fusing it to the fabric used for my main slipper piece and insole prior to quilting. I also fused a layer to my lining piece. • For the bottom sole I opted for anti-skid gripper fabric. Gather all your supplies and review these instructions as well as your pattern instructions before cutting pieces: • The monogram design is small, making it the perfect size for a monogram frame on the slippers. Once you have quilted your fabric you can opt to embroider the design using a 4-inch hoop. • Featured pattern is the Sew For All Slipper by Sewcial Bee. See Figure #1 below. [caption id="attachment_23837" align="aligncenter" width="800"]
 Figure #1[/caption]
Disclaimer: Pattern used with permission from SEWcialBee Designs. Brother International Corporation makes no representation or warranties regarding this product.
Steps to Create Monogrammed Slippers
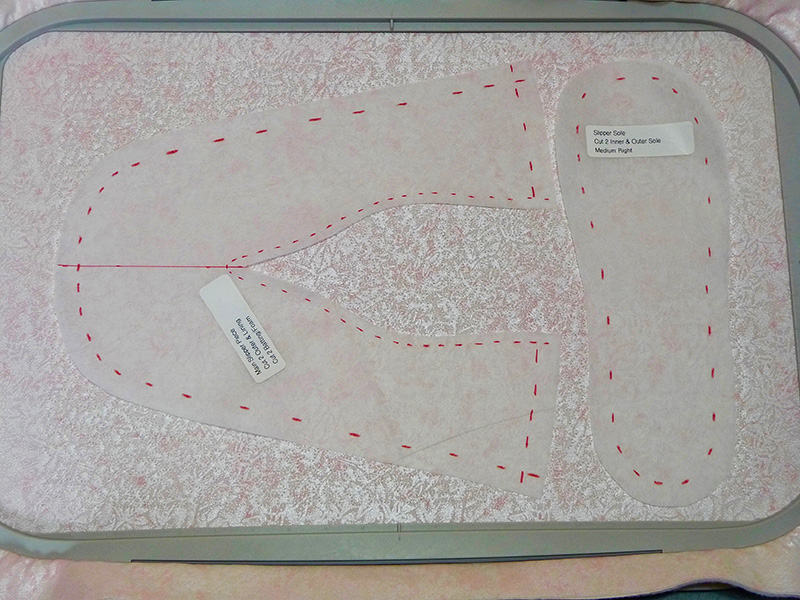
1. Prepare your pattern, deciding on size, and cutting pattern pieces as needed. I started by cutting the pattern and tracing it onto pattern tracing cloth, so I had a full pattern for the main slipper piece and a separate right and left sole. I used my trusty Brother P-touchlabel maker to identify my new pattern pieces. See Figure #2a and Figure #2b. [caption id="attachment_23838" align="aligncenter" width="800"]
 Figure #2a[/caption]
[caption id="attachment_23839" align="aligncenter" width="800"]
 Figure #2b[/caption]
2. Use your trimmed patterns to determine how much fabric you’ll need for creating a quilted version. Prepare your fabric by quilting sections large enough for your pattern pieces. With the Luminaire’s 10 5/8” X 16” hoop I was able to create two identical quilted fabric sections for cutting the main pieces and a right and left sole. See Figure #3.
[caption id="attachment_23840" align="aligncenter" width="800"]
 Figure #3[/caption]
3. Steps for creating stipple quilted fabric in My Design Center are shown below:
• Select My Design Center from the Home screen. See Figure #4.
[caption id="attachment_23841" align="aligncenter" width="800"]
 Figure #4[/caption]
• Touch the Stamp Key. See Figure #5.
[caption id="attachment_23842" align="aligncenter" width="800"]
 Figure #5[/caption]
• Touch the icon to choose the embroidery frame area. See Figure #6.
[caption id="attachment_23843" align="aligncenter" width="800"]
 Figure #6[/caption]
• Select the 10 5/8” X 16” hoop. See Figure #7.
[caption id="attachment_23844" align="aligncenter" width="800"]
 Figure #7[/caption]
• Touch the key to access the Region Property screen. See Figure #8.
[caption id="attachment_23845" align="aligncenter" width="800"]
 Figure #8[/caption]
• Select the option for stipple fill and choose a thread color. See Figure #9.
[caption id="attachment_23846" align="aligncenter" width="800"]
 Figure #9[/caption]
• Touch the bucket tool and then touch the screen to fill the entire area with stipple stitches. See Figure #10.
[caption id="attachment_23847" align="aligncenter" width="800"]
 Figure #10[/caption]
• Touch Next and leave everything at the default setting. Touch Set and then touch OK to proceed to the Embroidery Edit screen. See Figure #11.
[caption id="attachment_23848" align="aligncenter" width="800"]
 Figure #11[/caption]
• Finish by touching Embroidery. See Figure #12.
[caption id="attachment_23849" align="aligncenter" width="800"]
 Figure #12[/caption]
4. Hoop fabric for slipper and stitch the stipple pattern in a thread color that closely matches the fabric. Leave fabric undisturbed in the hoop. Transfer monogram frame design to machine. Create a combination design by adding a built-in letter from your font menu to fit the center of the floral frame. Change thread colors to coordinate with your fabric. See modified colors in Figure #13.
[caption id="attachment_23850" align="aligncenter" width="549"]
 Figure #13[/caption]
5. Place the slipper pattern over the stipple stitching. Using a removable marker trace the outline, along with the center marking for toe of slipper. See Figure #14.
[caption id="attachment_23851" align="aligncenter" width="800"]
 Figure #14[/caption]
6. Embroider design in the area, taking care to account for seam allowances. In the example shown below I used the StitchVision projection system to position my monogram design. See Figure #15a, Figure #15b, and Figure #15c.
[caption id="attachment_23852" align="aligncenter" width="800"]
 Figure #15a[/caption]
[caption id="attachment_23853" align="aligncenter" width="800"]
 Figure #15b[/caption]
[caption id="attachment_23854" align="aligncenter" width="800"]
 Figure #15c[/caption]
Repeat the steps to quilt fabric and embroider a matching monogram on the second slipper piece.
Note: If you’re using an alternative method for preparing the slipper fabric, you can mark the center of the monogram design on the fabric, and then use a 4-inch hoop with the positioning grid to position your design.
Tip: It’s easier to embroider the design on an oversized quilted section of fabric before cutting your piece to size. See Figure #16a and Figure #16b.
[caption id="attachment_23855" align="aligncenter" width="800"]
 Figure #16a[/caption]
[caption id="attachment_23856" align="aligncenter" width="800"]
 Figure #16b[/caption]
1. When you’re finished embroidering both right and left slipper pieces, construct slipper following pattern instructions. Enjoy your beautiful new creation! See additional finished views of slippers below:
[caption id="attachment_23857" align="aligncenter" width="800"]
 Figure #7b[/caption]
[caption id="attachment_23858" align="aligncenter" width="800"]
 Figure #7b[/caption]
Options and ideas:
- For a great gift set, consider making a color coordinating robe, adding a matching monogram on a robe pocket.
- Choose other embroidery designs to decorate the toe area of these slippers. Simply measure the area to be sure your design will fit.
- For additional comfort and support, consider making an insole without filler to use as a thin layer over a pre-purchased support style insole.

